Вы можете столкнуться с ошибкой синхронизации времени в Windows, когда ваш компьютер не может автоматически синхронизировать свое время с серверами времени time.microsoft.com в Интернете. Из-за некорректного времени на компьютере у вас может возникать ошибка «
Your clock is ahead/ Ваши Часы спешат (отстают)
» при открытии HTTPS сайтов Chrome (и в других браузерах), не корректно работать сторонние программы, и появляться различные другие неприятности.
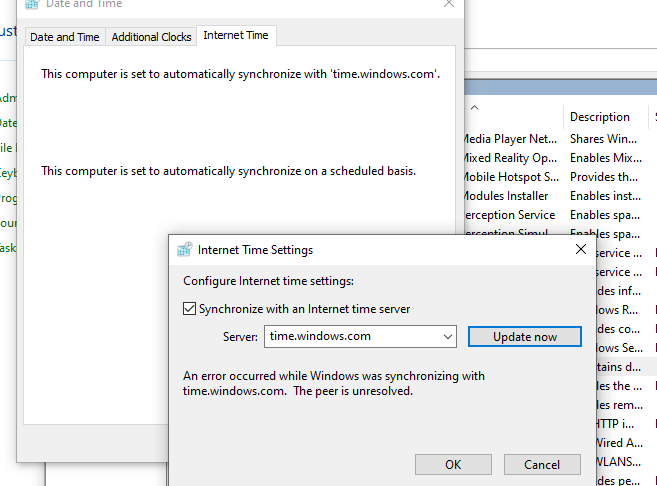
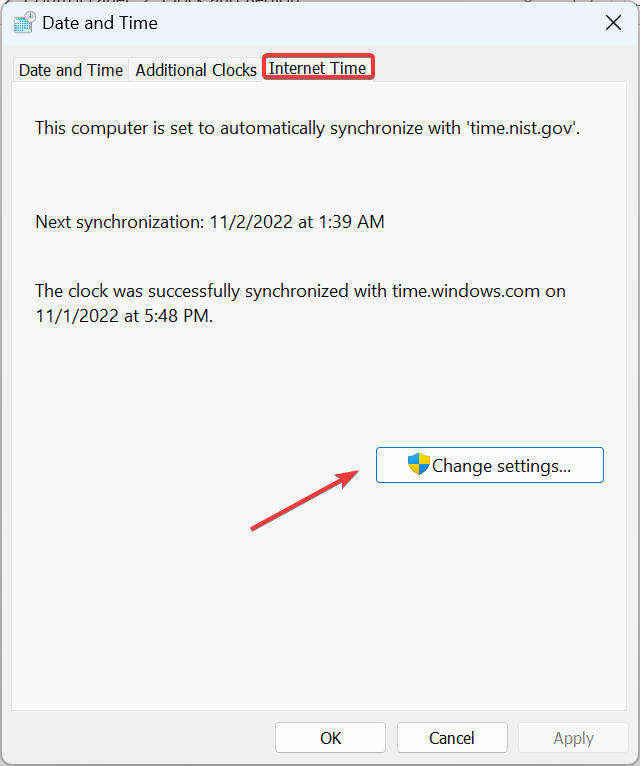
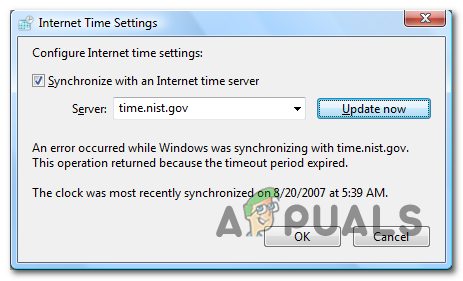
Если попытаться вручную выполнить синхронизацию времени из панели управления Windows (Control Panel -> Date and Time -> Internet Time -> Change Settings -> Update now), появляется ошибка:
An error occurred while windows was synchronizing with time.windows.com. The peer is unreachable.
Также здесь может быть ошибка:
The peer is unresolved.
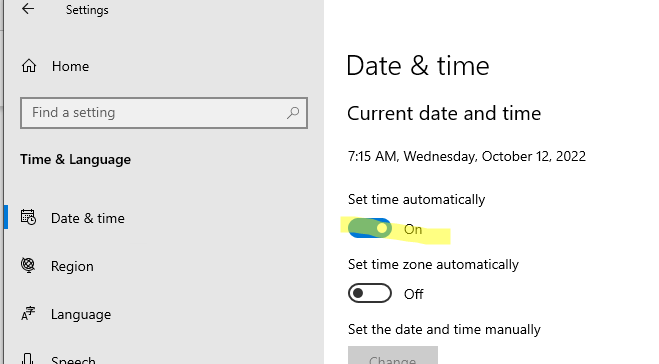
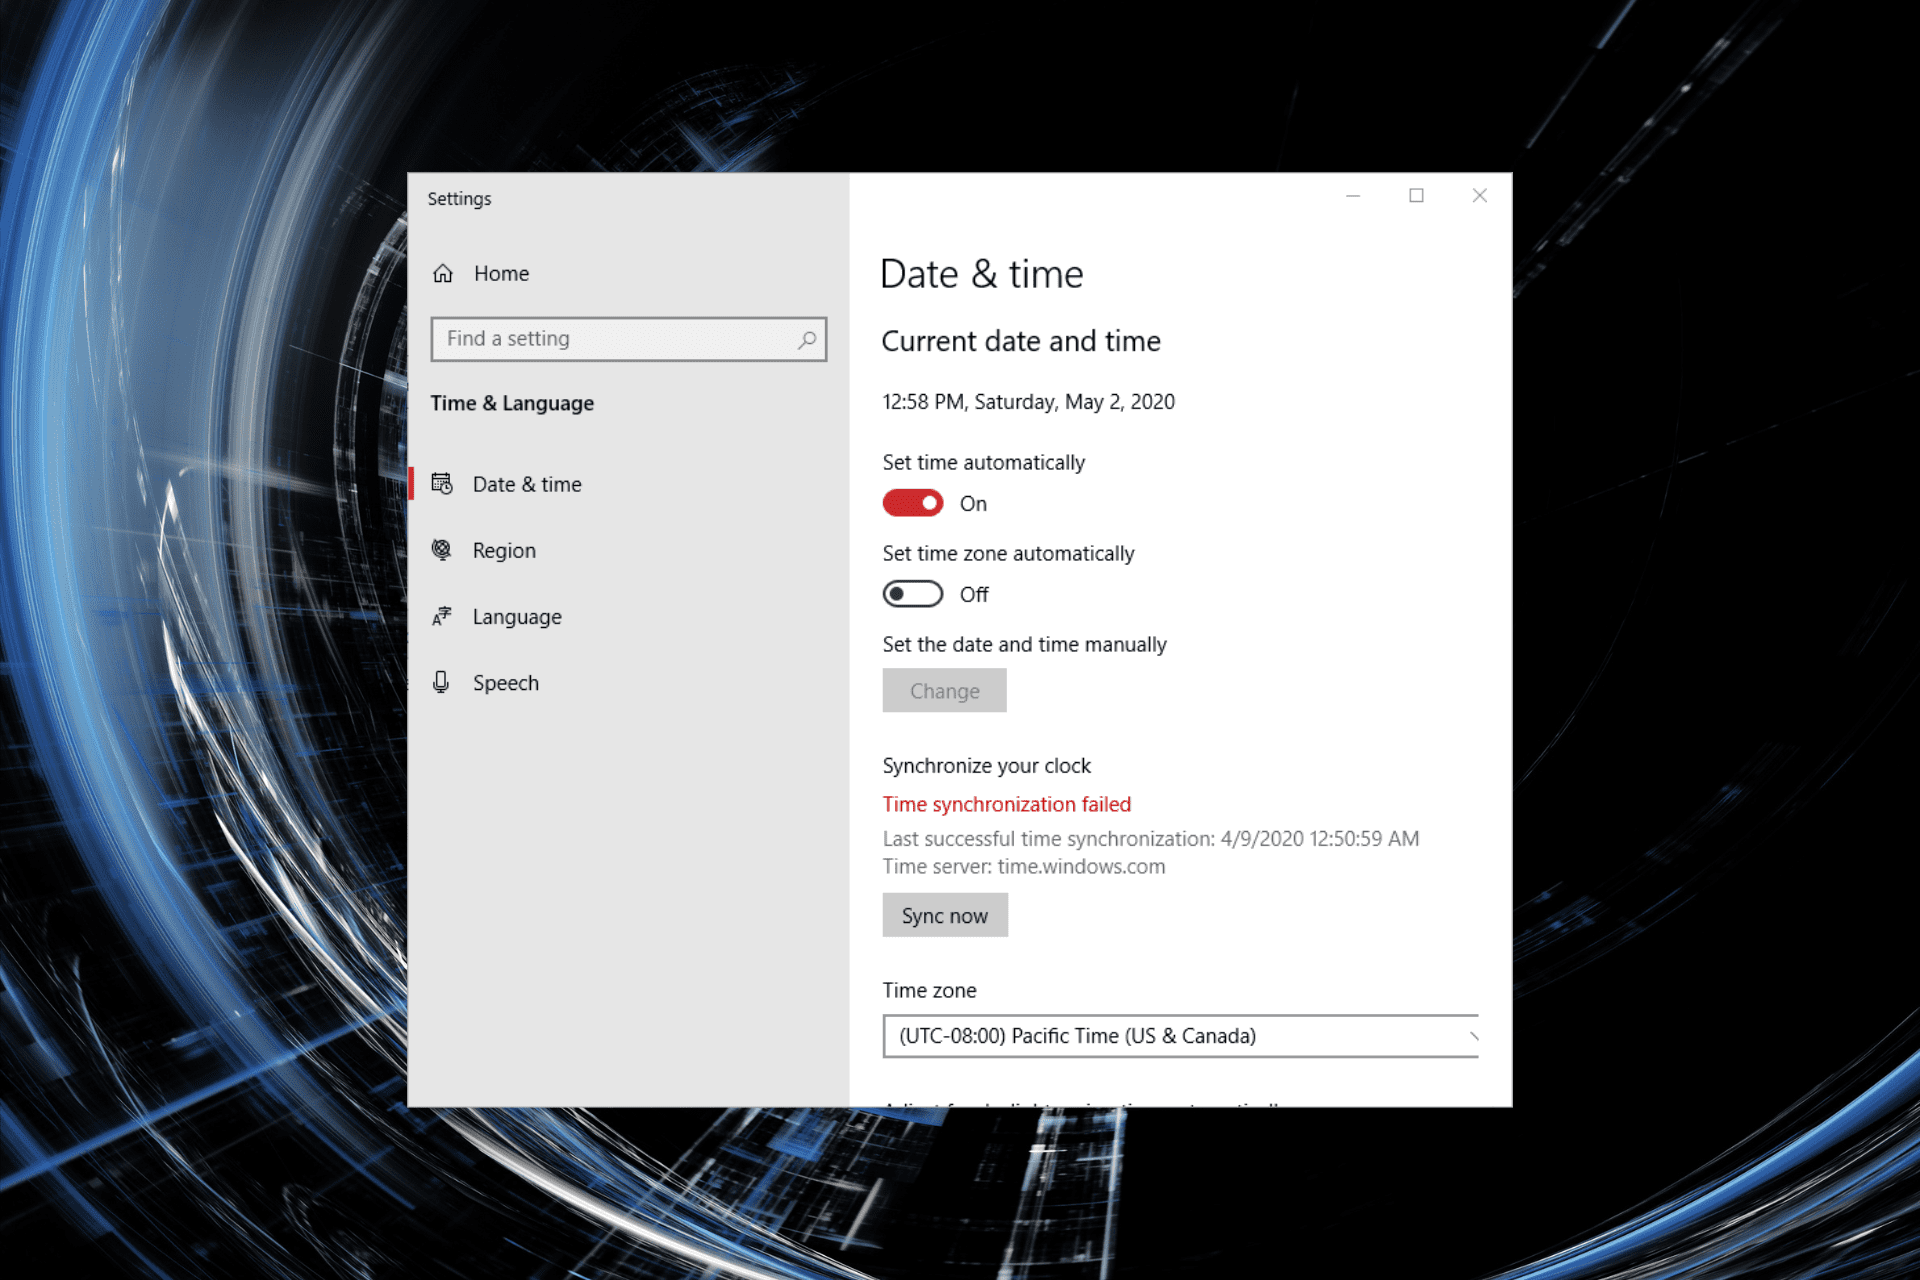
Проверьте, что у вас настроена автоматическая синхронизация времени с NTP серверами в Интернете. Перейдите в раздел Settings -> Time and Language -> Date and Time (можно перейти в этот раздел с помощью команды быстрого доступа по URI:
ms-settings:dateandtime
). Проверьте, что здесь включена опцию Set time automatically и выполните синхронизацию, нажав кнопку Sync now в разделе Additional settings.
Если синхронизация времени с Интернетом не работает, проверьте, с какого внешнего NTP сервера должен получить время ваш компьютер. Выполните команду:
w32tm /query /peers
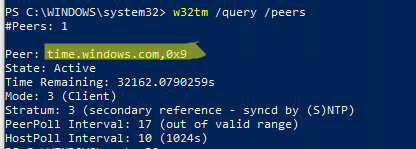
По умолчанию компьютеры в рабочих группах (не присоединенные к домену Active Directory) настроены на получение времени с серверов time.windows.com.
Если при запуске этой команды появилась ошибка “The following error occurred: The service has not been started. (0x80070426)”, проверьте состояние службы Windows Time. Она должна быть настроена на автоматический или ручной запуск. Можете проверить состояние службы с помощью PowerShell или консоли services.msc:
Get-Service w32time| Select DisplayName,Status, ServiceName,StartType
Перезапустите службу:
Restart-Service -Name w32time
Если служба отключена, включите ее.

Проверьте, что с вашего компьютера доступен хост time.microsoft.com.
Сначала проверьте, что ваш компьютер может разрешить это имя в IP адрес:
nslookup time.windows.com
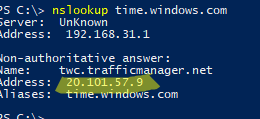
Если ваш компьютер не может отрезолвить это имя в IP адрес (ошибка синхронизации времени The peer is unresolved), значит в настройках сетевого адаптера вашего компьютера указан DNS сервер, который не доступен, или изолирован от интернета. Попробуйте сменить адрес первичного DNS сервера на DNS сервер Google (8.8.8.8). Можно изменить настройки DNS для сетевого адаптера в Windows с помощью PowerShell.
Вывести список сетевых интерфейсов:
Get-NetAdapter

Изменить настройки DNS для сетевого адаптера с ifIndex 10:
Set-DNSClientServerAddress –InterfaceIndex 10 –ServerAddresses 8.8.8.8
Проверьте доступность сервера с помощью ping:
ping time.windows.com
И затем проверьте, что сервер времени Microsoft доступен по порту NTP (UDP 123). Для проверки доступности UDP порта можно использовать утилиту portquery или можно напрямую обратиться к серверу и запросить у него текущее время:
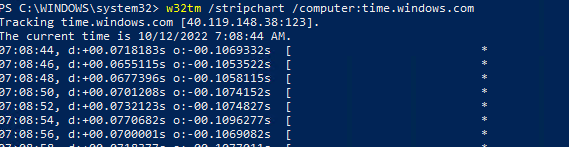
w32tm /stripchart /computer:time.windows.com
Если команда вернет ошибку error: 0x800705B4, значить указанный NTP сервер не доступен. Проверьте, что в Windows открыт исходящий порт UDP/123 для протокола NTP (по умолчанию порт должен быть открыт). Вы можете принудительно открыть порт в Windows Defender Firewall с помощью PowerShell:
New-NetFirewallRule -DisplayName "AllowOutNTP" -Direction Outbound -Protocol UDP -RemotePort 123 -Action Allow
Enable-NetFirewallRule -DisplayName AllowOutNTP
Также убедитесь, что исходящий NTP трафик не блокируется на сетевом уровне (провайдера, вашего файервола или другими сетевыми устройствами).
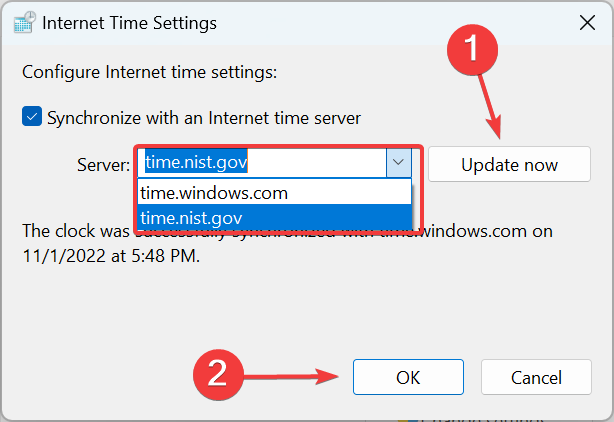
Если этот NTP сервер не доступен, вы можете использовать другой NTP сервер.
Можно указать
time.nist.gov
или ближайший к вам NTP сервер, который можно получить на сайте
https://www.ntppool.org
.
Можно изменить адрес вашего NTP сервера с помощью командной строки:
w32tm /config /manualpeerlist:time.nist.gov,0x1 /syncfromflags:manual /reliable:yes /update
Перезапустите службу времени (в данном примере вы запустим несколько команд в одну строку):
net stop w32time && net start w32time
Затем выполните синхронизацию времени:
w32tm /config /update
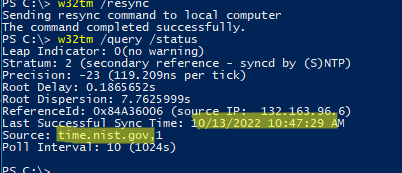
w32tm /resync
Проверьте, что ваш компьютер успешно получил время с нового источника времени (NTP сервера):
w32tm /query /status
Если ничего не помогло, попробуйте полностью сбросить настройки службы Windows Time:
net stop w32time
w32tm /unregister
w32tm /register
net start w32time
Выполните синхронизацию времени:
w32tm /resync
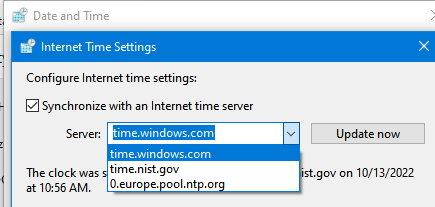
Также вы можете добавить NTP сервер в список серверов времени и выполнить синхронизацию из панели управления Windows. Перейдите в Settings -> Time & language -> Date & time -> Additional clocks –> Internet Time
Убедитесь, что включена опцию Synchronize with an Internet time, добавьте новый сервер time.nist.gov и нажмите кнопку Update Now.
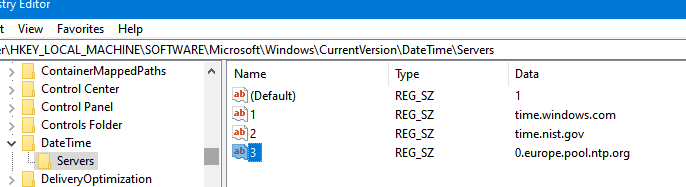
Вы можете добавить NTP сервера в этот список через реестр HKEY_LOCAL_MACHINESOFTWAREMicrosoftWindowsCurrentVersionDateTimeServers.
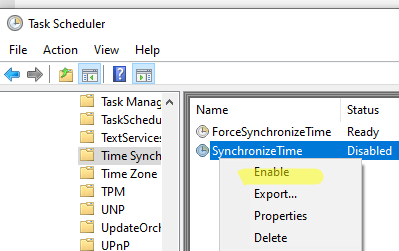
Для автоматической синхронизации времени в Windows используется отдельно задание в планировщике Task Scheduler. Запустите консоль taskschd.msc и перейдите в раздел Task Scheduler (Local) -> Task Scheduler Library -> Microsoft -> Windows -> Time Synchronization. Проверьте, что задание SynchronizeTime включено.
Также вы можете проверить состояние задания Task Scheduler с помощью PowerShell:
Get-ScheduledTask SynchronizeTime
Чтобы включить его:
Get-ScheduledTask SynchronizeTime|Enable-ScheduledTask
The #1 solution fixed the time synchronization issue for most users
by Milan Stanojevic
Milan has been enthusiastic about technology ever since his childhood days, and this led him to take interest in all PC-related technologies. He’s a PC enthusiast and he… read more
Updated on January 30, 2023
Reviewed by
Alex Serban

After moving away from the corporate work-style, Alex has found rewards in a lifestyle of constant analysis, team coordination and pestering his colleagues. Holding an MCSA Windows Server… read more
- Many users reported errors when synchronizing time in Windows, leading to incorrect time on the PC.
- Your primary approach should be to configure the Windows Time service optimally.
- Many fixed things by switching to a different server, so try that as well.
XINSTALL BY CLICKING THE DOWNLOAD FILE
Fortect is a tool that does not simply cleans up your PC, but has a repository with several millions of Windows System files stored in their initial version. When your PC encounters a problem, Fortect will fix it for you, by replacing bad files with fresh versions. To fix your current PC issue, here are the steps you need to take:
- Download Fortect and install it on your PC.
- Start the tool’s scanning process to look for corrupt files that are the source of your problem
- Right-click on Start Repair so the tool could start the fixing algorythm
- Fortect has been downloaded by 0 readers this month.
Automatic clock synchronization has been a part of Windows for years, and this feature is also present in Windows 10. Sometimes, you may receive an error message that reads, An error occurred while Windows was synchronizing with time.windows.com.
On the same note, our users noted that the first solution worked like a charm when there were issues with time synchronization. So, let’s find out how you can get things up and running.
Why is my Windows time not updating?
Here are a few reasons an error may have occurred when synchronizing time in Windows:
- Issues with the Windows Time service – If the service is not running or its settings are misconfigured, you will likely encounter problems with the sync process.
- Problems with the current network – Often, it’s an issue with the existing network that prevents the time synchronizing process and leads to an error in Windows.
- Corrupt system files – Corrupt system files are one of the most common reasons behind a range of issues, including this one.
- Third-party antivirus or firewall blocking the sync process– Sometimes, a third-party antivirus or firewall installed on the computer may trigger conflicts and lead to errors.
While we are at it, the solutions listed in the next section would work in the following cases as well:
- An error occurred while Windows was synchronizing with time Windows com. This operation returned because the timeout period expired – It’s one of the common errors encountered by users and is easily fixable.
- An error occurred while Windows was synchronizing with time.windows.com. The peer is unreachable – The issue usually arises due to server problems. Switching to another server might do the trick.
- An error occurred while Windows was synchronizing with the IP address – Many users tried synchronizing with the IP address but to no avail. Check the solutions below to fix things.
How do I fix an error that occurred while Windows was synchronizing with time Windows com?
Before we head to the slightly complex solutions, here are a few quick ones that might do the trick:
- Restart the computer. Here’s what to do if your computer fails to restart.
- Make sure that any third-party antivirus, firewall, or other security software installed on the computer is disabled. If that works, uninstall it, and switch to a more user-friendly antivirus and a reliable firewall.
- Switch to another network. For instance, if you are facing an issue on a Wi-Fi network, switch to a mobile hotspot and check if an error still occurs while synchronizing time in Windows.
- Surprisingly, some users could sync time by connecting through a VPN. So make sure you try that as well. Also, do not forget to check the best VPNs for Windows, given all these work like a charm.
If none of these helped fix things, try the solutions listed next.
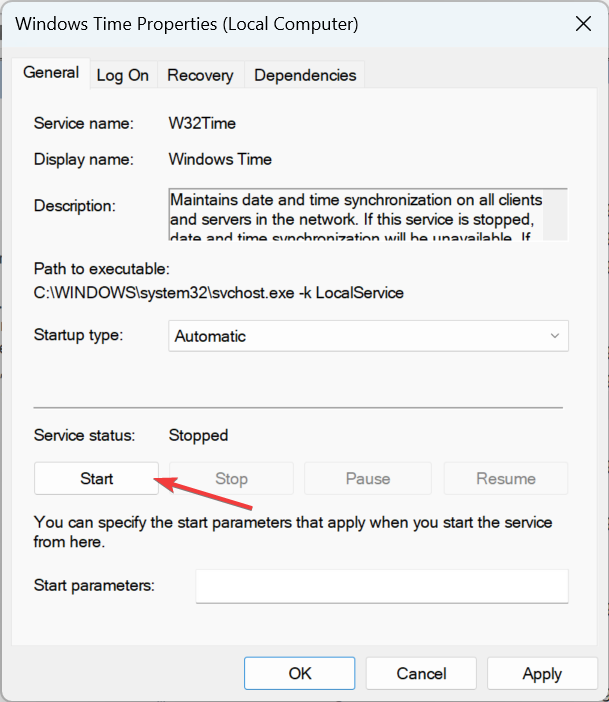
1. Reconfigure the Windows Time service (Worked best for users)
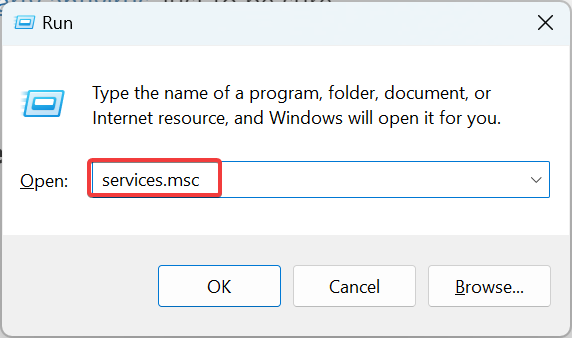
- Press Windows + R to open Run, type services.msc, and hit Enter.
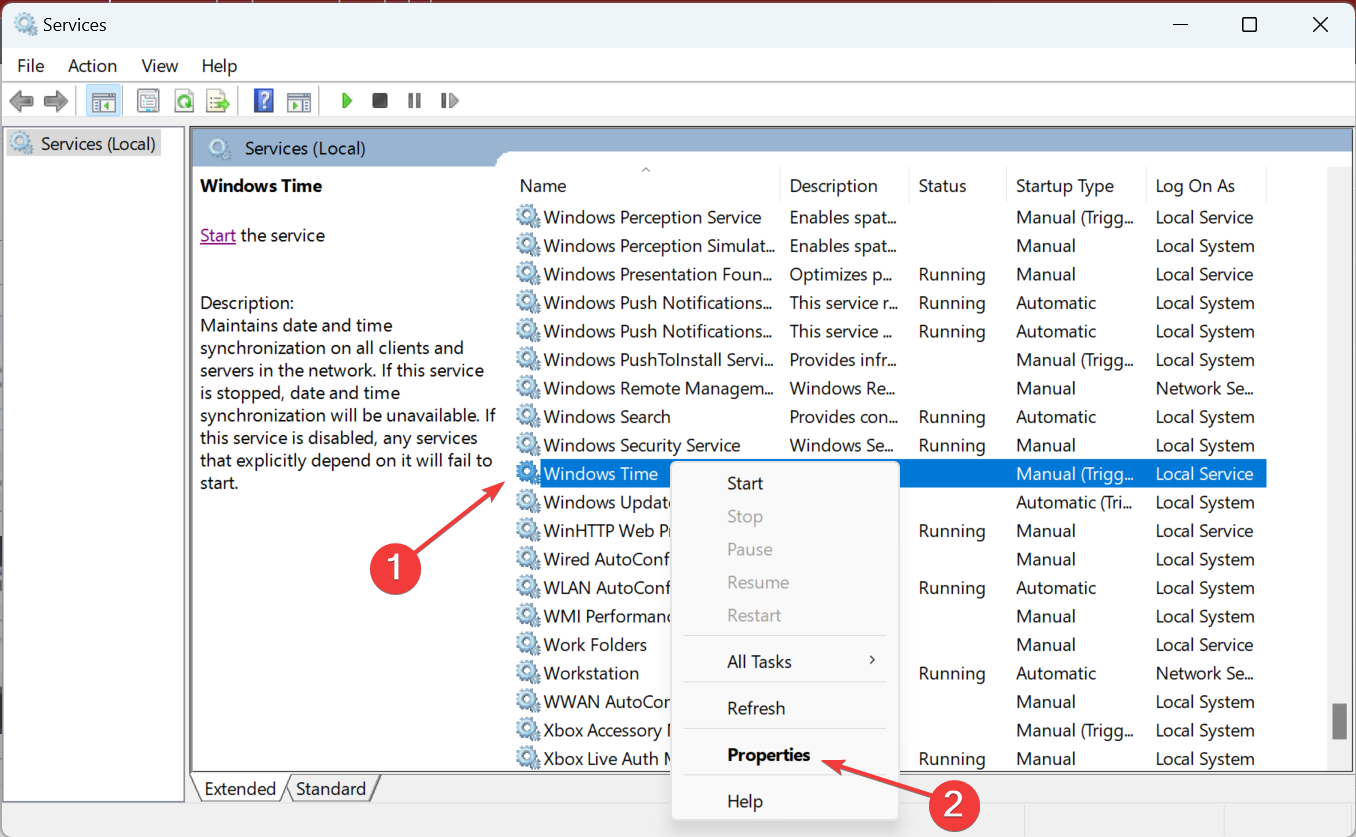
- Locate Windows Time service, right-click on it, and select Properties.
- Choose Automatic from the Startup type dropdown menu.
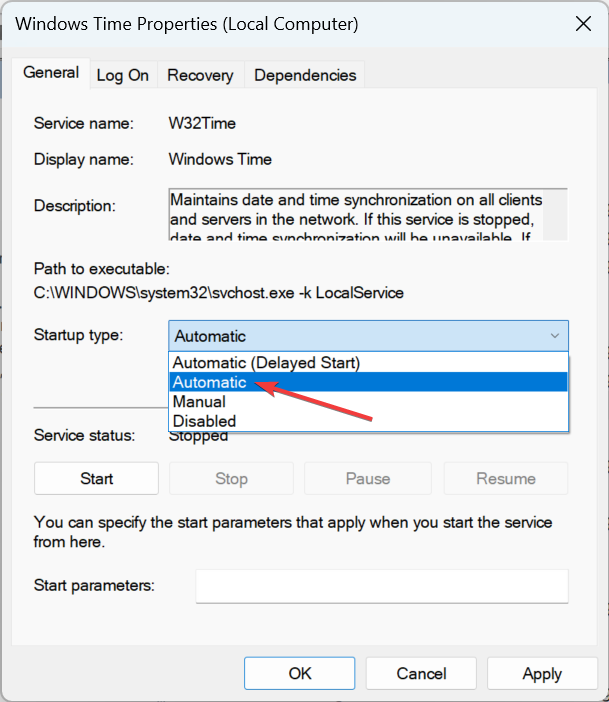
- Click on Start under Service status.
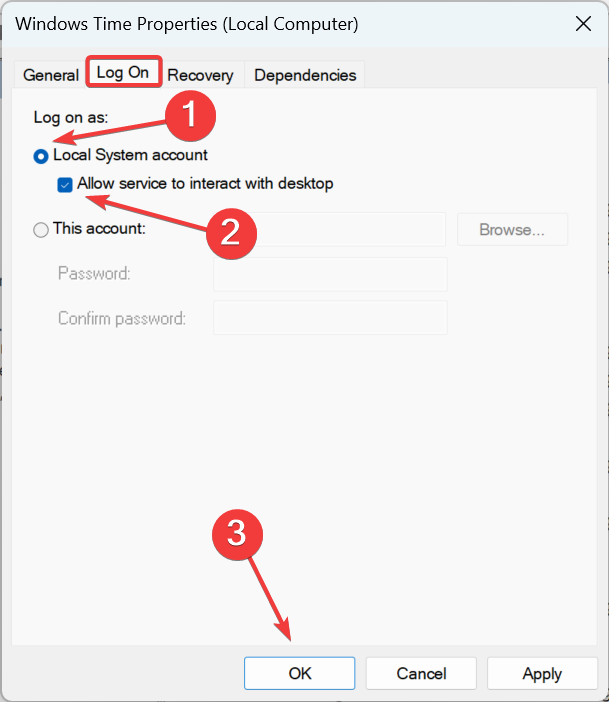
- Head to the Log On tab, select the Local System account option, tick the checkbox for Allow this service to interact with desktop, and then click on OK to save the changes.
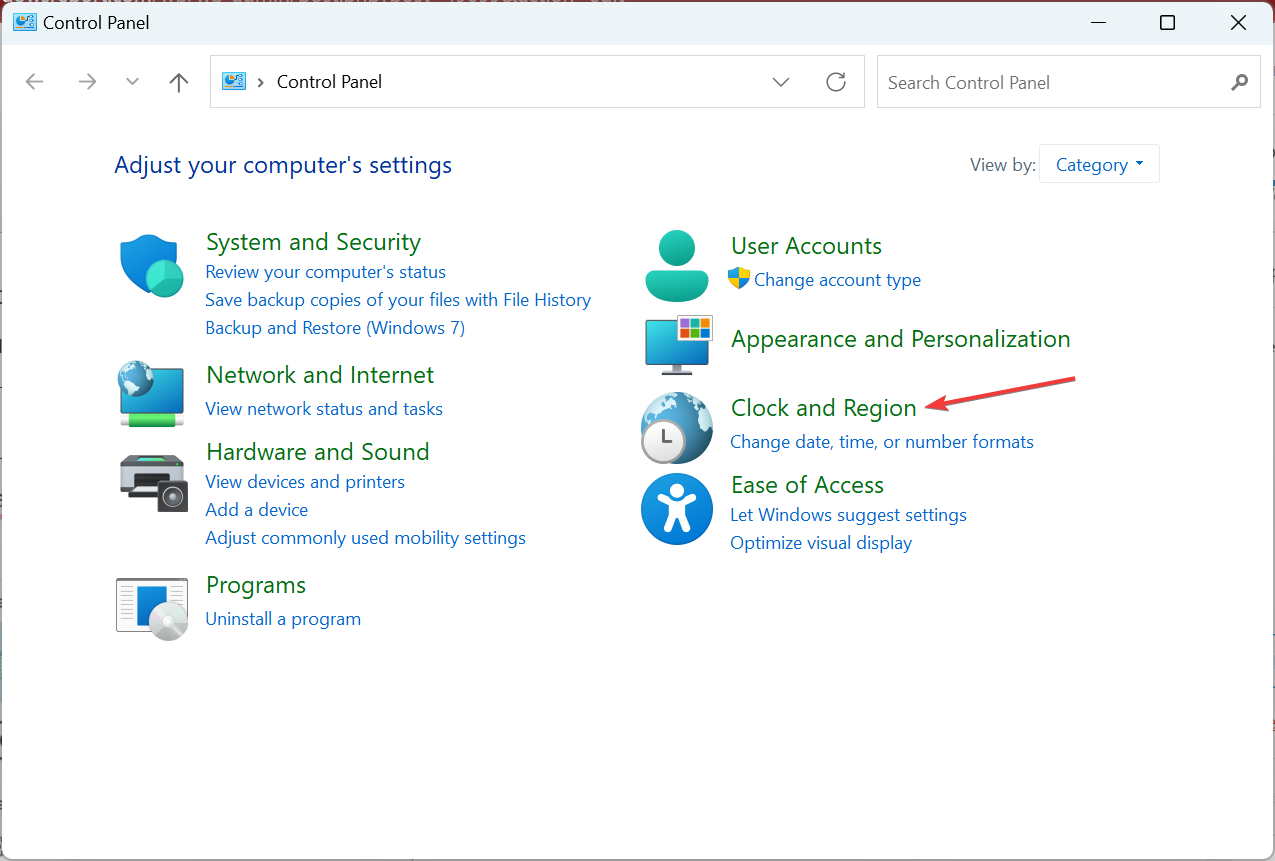
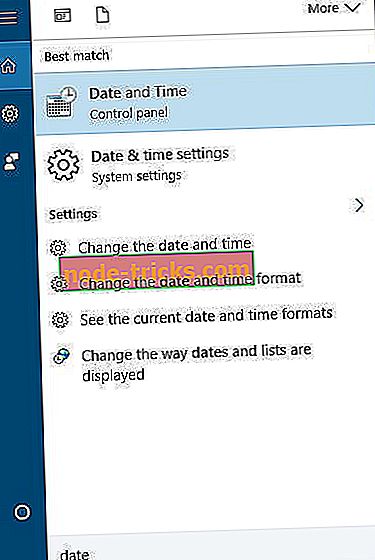
2. Use a different server
- Press Windows + R to open Run, type control in the text field, and click OK.

- Click on Clock and Region.
- Now, click on Date and Time.
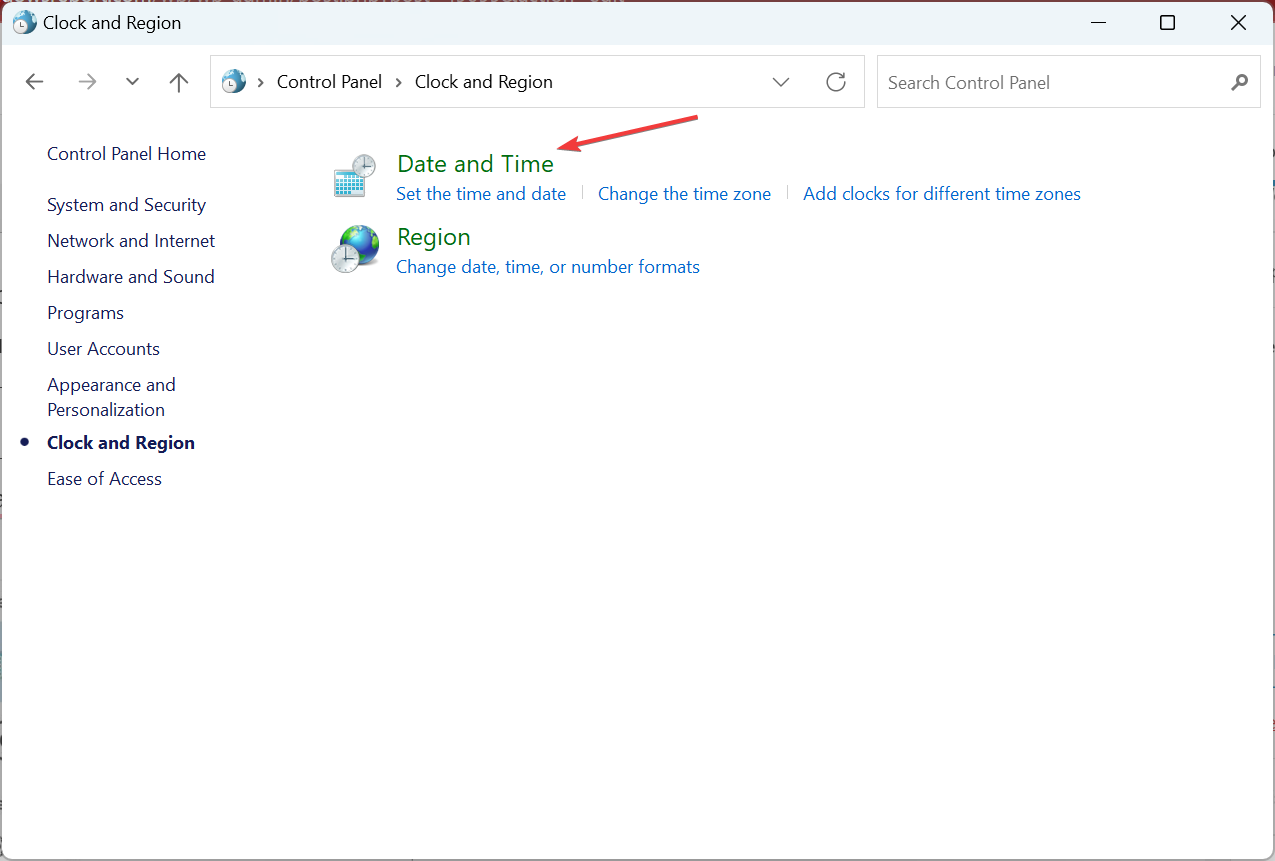
- Navigate to the Internet Time tab, and click on Change settings.
- Choose a different server from the dropdown menu, click on Update now, and then on OK.
- Again, click OK in the Date and Time box.
- Now, check if you can synchronize time without any trouble.
Some PC issues are hard to tackle, especially when it comes to missing or corrupted system files and repositories of your Windows.
Be sure to use a dedicated tool, such as Fortect, which will scan and replace your broken files with their fresh versions from its repository.
Users reported fixing the error while synchronizing Windows time simply by using a different server. If the ones available by default don’t work, try these:
- pool.ntp.org
- time-a.nist.gov
- time-b.nist.gov
- time-a.timefreq.bldrdoc.gov
- time-b.timefreq.bldrdoc.gov
3. Run a few commands
- Type Command Prompt in the Search bar, and click Run as administrator.
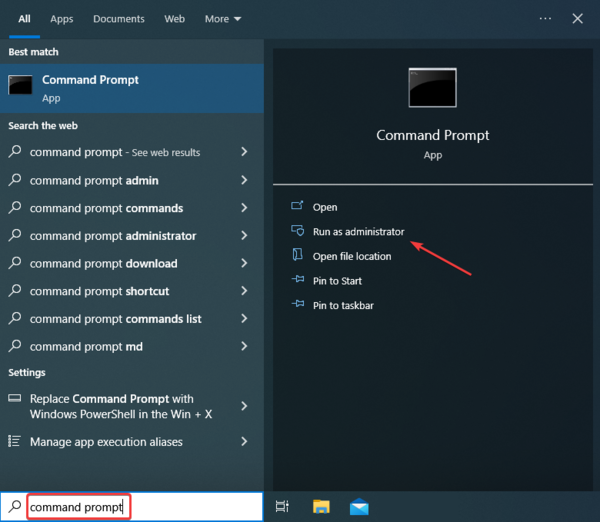
- Click Yes in the UAC prompt.
- Now, paste the following commands individually and hit Enter after each:
net stop w32timew32tm /unregisterw32tm /registernet start w32timew32tm /resync
If everything goes well, you should see, The windows Time Service is starting. The windows time service was started successfully.
- How to fix Windows 10/11 clock if it’s wrong
- Download the YouTube App For PC [Windows 10 & 11]
- Bugcheck 0x0000012B: How to Fix This BSoD
- Can ChatGPT generate Windows activation keys? [Tested]
4. Reset the BIOS

NOTE
This is an intricate process and differs for every manufacturer. So, we recommend you head to the support section on the manufacturer’s website and find the exact steps. In case you are unsure, consult a professional.
- Turn off the computer, then turn it on, and repeatedly hit the F1, F10, or Del key (as the case may be on your PC) as soon as the display lights up to enter the BIOS.
- Now, look through the various tabs for the Load Default Options, Load Optimized Defaults, or Load Setup Defaults option and select it.
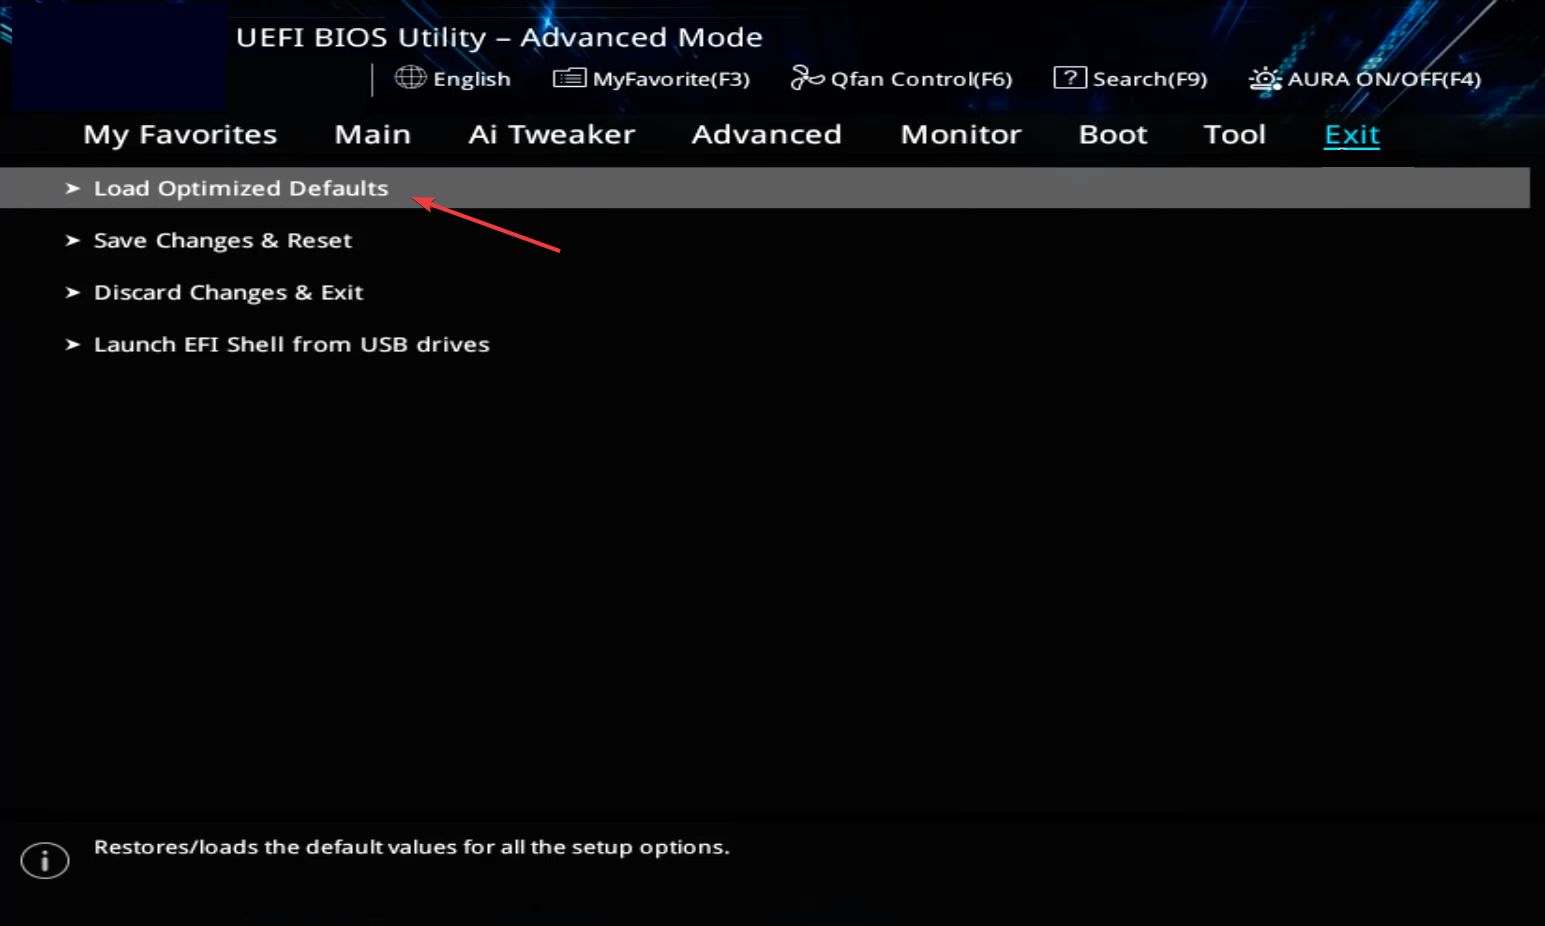
- Finally, confirm the change and restart the computer.

- After resetting the BIOS, power off the computer and remove the CMOS battery for around 5-10 minutes, plug it back in, and then turn it on.
The last option in case an error occurs when you synchronize Windows time is resetting the BIOS. Often, the problem lies in the BIOS settings; resetting it is the only way to go.
How do I force my computer to sync time?
- Press Windows + I to open Settings, select Time & language from the navigation pane, and click Date & time on the right.
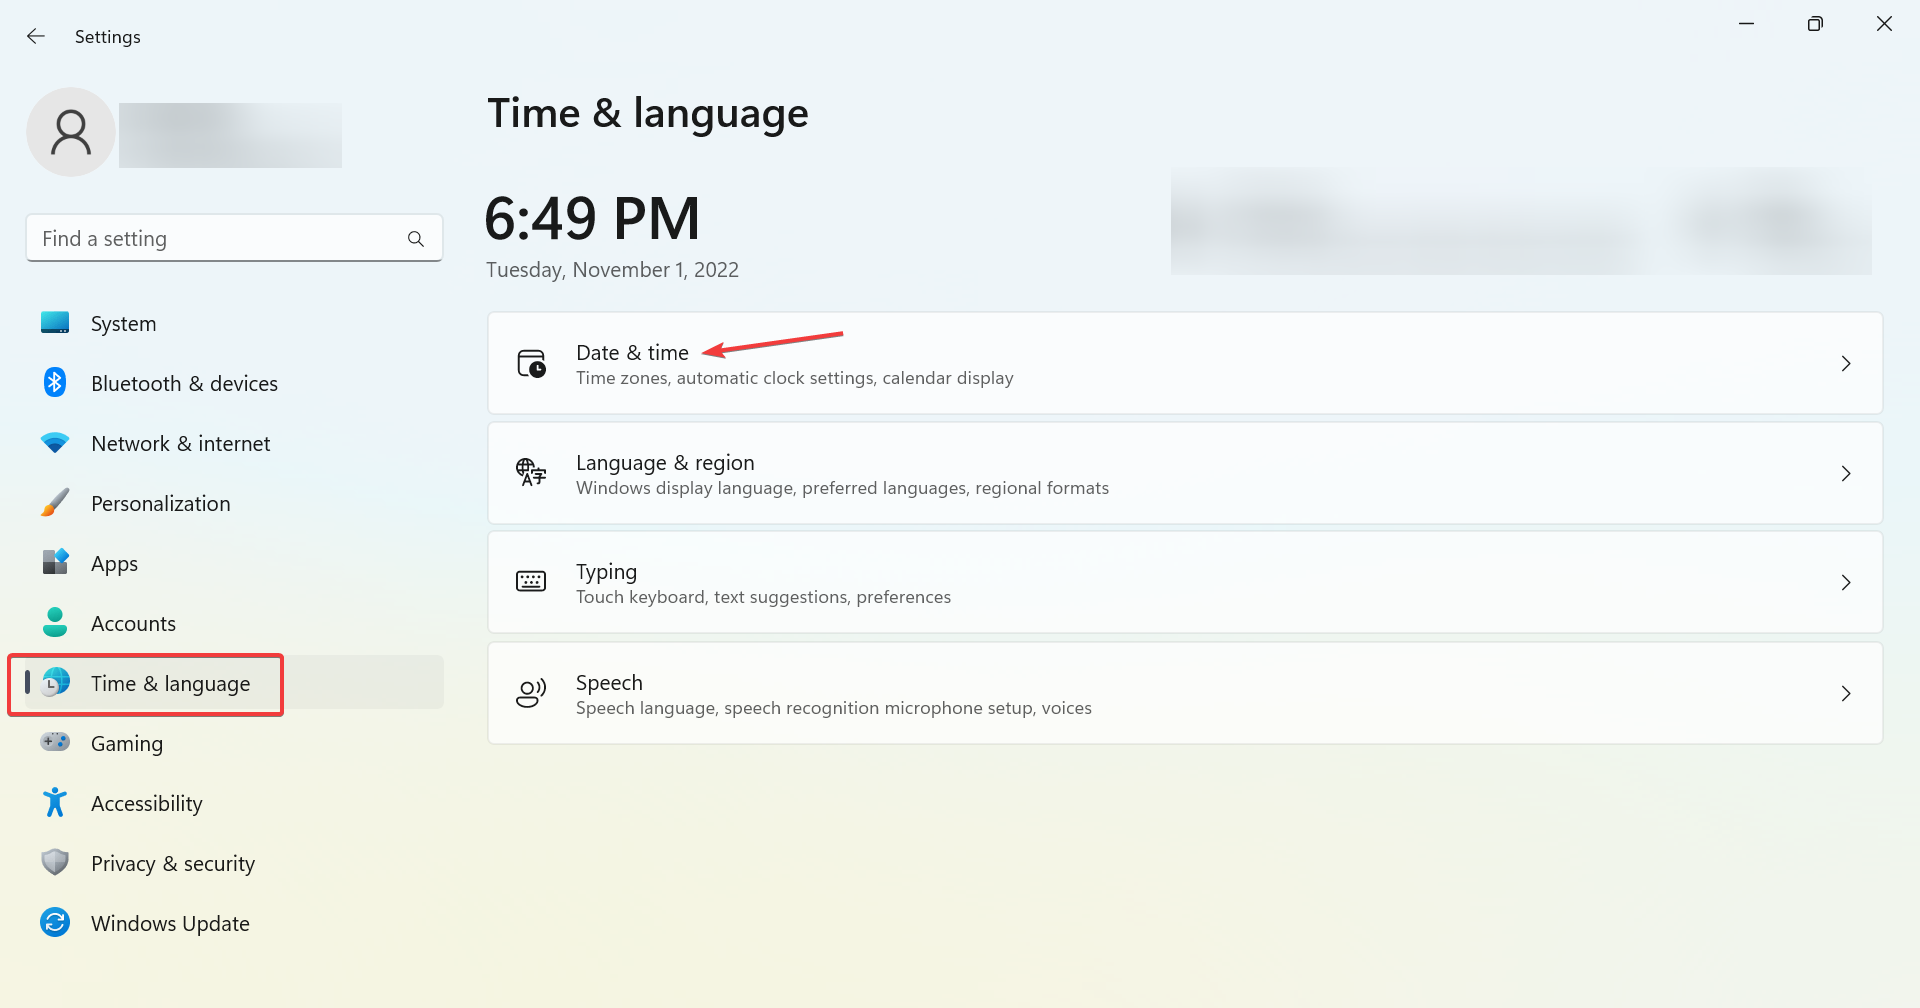
- Click on the Sync now button under Additional settings.
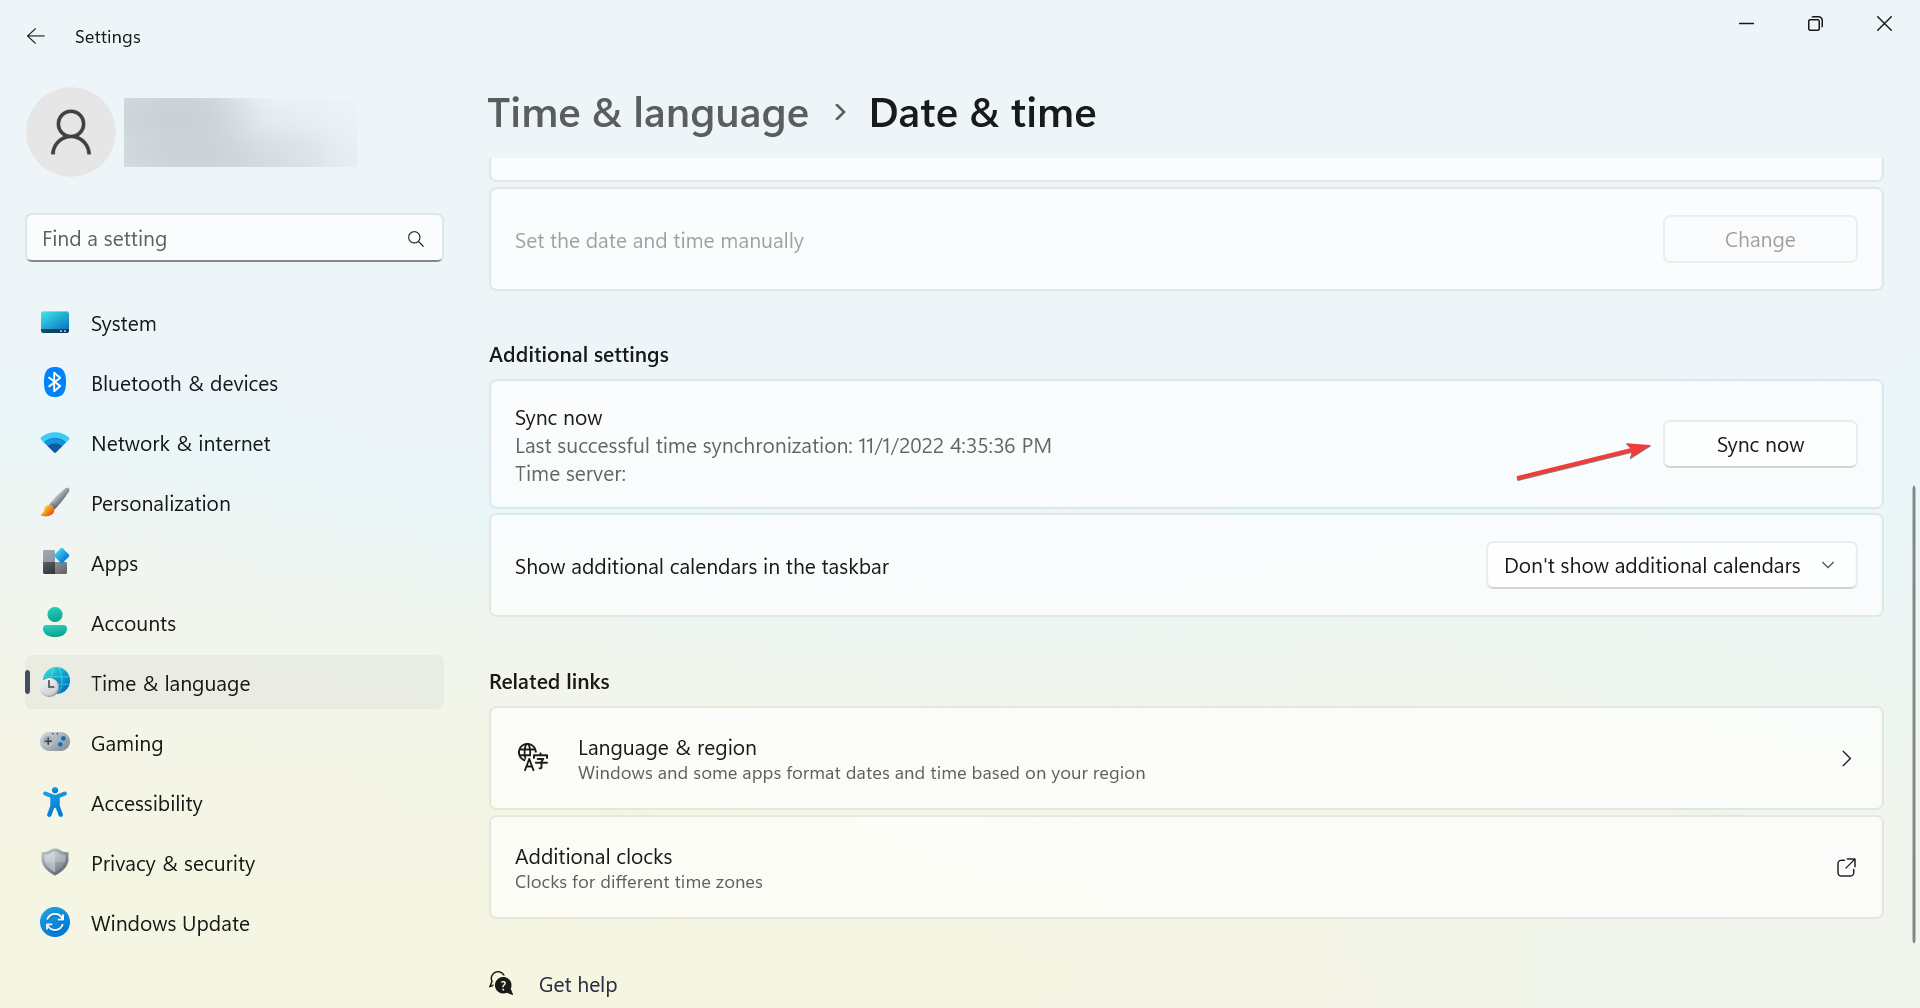
- Now, wait for the sync process to complete.
That’s it! When you reach this part, an error should no more occur when synchronizing Windows time, and you will have the correct time set on the PC.
And once the error is fixed, check out the best ways to make Windows 11 faster.
If you have more questions or suggestions, feel free to drop them in the comments below.
Still experiencing issues?
SPONSORED
If the above suggestions have not solved your problem, your computer may experience more severe Windows troubles. We suggest choosing an all-in-one solution like Fortect to fix problems efficiently. After installation, just click the View&Fix button and then press Start Repair.
![]()
Question
Issue: How to Fix “An Error Occurred While Windows Was Synchronizing With time.windows.com” Error on Windows 10?
Hello, all. Time synchronization fails with an error “An error occurred while windows was synchronizing with time.windows.com.” Windows Updates are not being downloaded either as they get stuck immediately. What solution do I have?
Solved Answer
Although one might think that Date and Time applet on Windows is necessary for the users solely to check the time or date, there are many other services, which strictly require Date and Time settings to be set correctly. For example, Windows Store apps may fail to download or the latest Windows Updates may not be offered to you.
To prevent Date and Time issues, Microsoft developed an Automatic clock synchronization service a long time ago. Automatic synchronization allows Windows OS[1] to manage Date and Time settings according to the time zone. Additionally, Microsoft[2] recommends people to synchronize time settings with a time.windows.com online server by following these steps:
- Right-click on Windows key and select Control Panel.
- Open Clock, Language and Region and click on Date and Time.
- Select Set the time and date and click on Internet time.
- Click Change settings and mark Synchronize with an Internet time server option.
- Finally, click Update now.
The problem is that sometimes Windows fails to synchronize with the time.windows.com server and delivers an error message “An error occurred while windows was synchronizing with time.windows.com.” The culprit of an issue is Windows Time service, which is not running for some reason. However, this problem is not a very uncommon one as Windows users have been discussing it in tech-related forums.[3]

Fix it now!
Fix it now!
To repair damaged system, you have to purchase the licensed version of Fortect Mac Washing Machine X9.
To fix “An Error Occurred While Windows Was Synchronizing With time.windows.com” error, you should change Windows Time service settings or restart the service.
Method 1. Change Windows Time service settings
Fix it now!
Fix it now!
To repair damaged system, you have to purchase the licensed version of Fortect Mac Washing Machine X9.
- Click Windows key + R, type services.msc, and press OK.

- Find Windows Time service on the list and double-click it.
- Make sure that Startup type is set to Automatic.
- Now click Start, click Apply, and OK to save the changes.
If these steps did not help, try restarting Windows Time service.
- Reopen Windows Services window as explained above.
- If Windows Time service is started, stop it and set the Startup type to Automatic.
- After that, Start the service, click Apply, and OK.
- To confirm all the changes, reboot the system.
Method 2. Re-register Windows Time
Fix it now!
Fix it now!
To repair damaged system, you have to purchase the licensed version of Fortect Mac Washing Machine X9.
If restarting Windows Time service did not help to fix “An Error Occurred While Windows Was Synchronizing With time.windows.com” error, try to re-register Windows Time using Command Prompt:
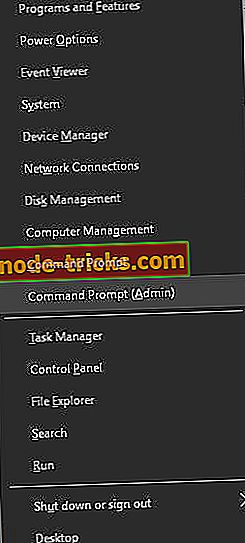
- Right-click on Windows key and select Command Prompt (Admin).
- Copy and paste the following commands in the Command Prompt and press Enter after each of them:
w32tm /debug /disable
w32tm /unregister
w32tm /register
net start w32time - If the command have been successfully executed, Command Prompt should deliver the following message: “The windows Time Service is starting. The windows time service was started successfully.”
Method 3. Run an SFC and DISM scan with Command Prompt
Fix it now!
Fix it now!
To repair damaged system, you have to purchase the licensed version of Fortect Mac Washing Machine X9.
- Go to your Windows search zone and type in cmd.
- Make sure that you are using Command Prompt as Administrator.

- Once the black dialogue box shows up, type in this text and hit Enter: Sfc /scannow sfc /scannow /offbootdir=c:\ /offwindir=c:\windows.
- When the process is completed, reboot your machine.
- After that, open Command Prompt again and type in the following lines by pressing Enter after each one: 1) Dism /Online /Cleanup-Image /CheckHealth 2) Dism /Online /Cleanup-Image /ScanHealth 3) Dism /Online /Cleanup-Image /RestoreHealth.
- If the command has already finished running but the problem still occurs on your computer, try typing in this one:
Dism /Image:C:\offline /Cleanup-Image /RestoreHealth /Source:c:\test\mount\windows Dism /Online /Cleanup-Image /RestoreHealth /Source:c:\test\mount\windows /LimitAccess
Important: C:\RepairSource\Windows needs to be rewritten with your repair source’s location.
Method 4. Try using another synchronization server
Fix it now!
Fix it now!
To repair damaged system, you have to purchase the licensed version of Fortect Mac Washing Machine X9.
- Find the Windows Control Panel and access it.
- Type in Date and Time and press on it.
- Find the Internet Time tab in the next window and select the “Change settings” option.
- Ensure that you there is a checkmark neer this option: Synchronize with an Internet time server.
- Scroll through the server dropdown menu until you find time.nist.gov and choose it.

- After that, select Update now —> OK and wait until the process is finished.
Method 5. Disable your Firewall program for some time
Fix it now!
Fix it now!
To repair damaged system, you have to purchase the licensed version of Fortect Mac Washing Machine X9.
- Find the Control Panel.

- Click on the System and Security section in your Control Panel and press on Windows Firewall.
- Look at the left for an option that says: “Turn Windows Firewall on or off”.
- Select “Turn off Windows Firewall”.
- After you complete all these actions, reboot your machine.
However, if this method did not help you to deal with the “An Error Occurred While Windows Was Synchronizing With time.windows.com” error message, maybe the problem is not here. Some good news is that you can try the following methods one of which might help you to solve this issue and the error code might vanish from your computer.
Method 6. Adding more time servers might be helpful
Fix it now!
Fix it now!
To repair damaged system, you have to purchase the licensed version of Fortect Mac Washing Machine X9.
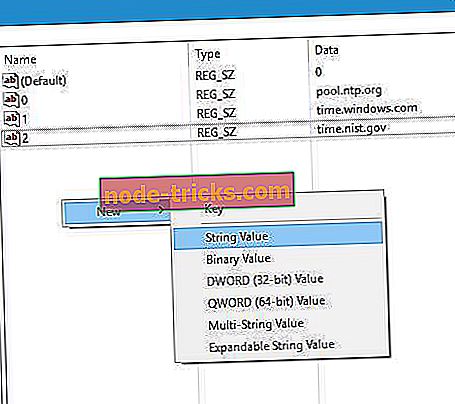
- Hold the Windows Key + R button until a run box shows up.
- Type in regedit and press OK.
- Once the Registry Editor opens, find this key: HKEY_LOCAL_MACHINE\SOFTWARE\Microsoft\Windows\CurrentVersion\DateTime\Servers

- Search for the Servers area and right-click on it.
- Then, go to New—>String value.
- According to the number of current news, name the string to 4 (if you have already 3 of them), or to 5, or 6, and so on.
- Double-click on the new key you have just created and type in the following text: tick.usno.navy.mil.
- Press OK.
- Type in this text:
time-a.nist.gov
time-b.nist.gov
clock.isc.org
pool.ntp.org
- Restart the system and go back to Method 3.
Method 7. Activate the Time Synchronization feature
Fix it now!
Fix it now!
To repair damaged system, you have to purchase the licensed version of Fortect Mac Washing Machine X9.
- Go to your Windows search section and find your Control Panel.
- Click on the System and Security option and choose Administrative Tools.
- Click two times on the Task Scheduler and go to the following: Task Scheduler Library / Microsoft / Windows / Time Synchronization.
- Find Time Synchronization and right-click on the Synchronize Time option.
- After that, select Enable.
- In order to save made changes, restart your computer.
TIP: to ensure the system’s stability and smooth performance, take care of its optimization.[4] Regularly scan Windows with FortectMac Washing Machine X9 and you will significantly decrease the number of Windows errors and risk of getting infected with a virus.
Repair your Errors automatically
ugetfix.com team is trying to do its best to help users find the best solutions for eliminating their errors. If you don’t want to struggle with manual repair techniques, please use the automatic software. All recommended products have been tested and approved by our professionals. Tools that you can use to fix your error are listed bellow:
do it now!
Download Fix
Happiness
Guarantee
do it now!
Download Fix
Happiness
Guarantee
Compatible with Microsoft Windows
Compatible with OS X
Still having problems?
If you failed to fix your error using FortectMac Washing Machine X9, reach our support team for help. Please, let us know all details that you think we should know about your problem.
Fortect — a patented specialized Windows repair program. It will diagnose your damaged PC. It will scan all System Files, DLLs and Registry Keys that have been damaged by security threats.Mac Washing Machine X9 — a patented specialized Mac OS X repair program. It will diagnose your damaged computer. It will scan all System Files and Registry Keys that have been damaged by security threats.
This patented repair process uses a database of 25 million components that can replace any damaged or missing file on user’s computer.
To repair damaged system, you have to purchase the licensed version of Fortect malware removal tool.To repair damaged system, you have to purchase the licensed version of Mac Washing Machine X9 malware removal tool.
Private Internet Access is a VPN that can prevent your Internet Service Provider, the government, and third-parties from tracking your online and allow you to stay completely anonymous. The software provides dedicated servers for torrenting and streaming, ensuring optimal performance and not slowing you down. You can also bypass geo-restrictions and view such services as Netflix, BBC, Disney+, and other popular streaming services without limitations, regardless of where you are.
Malware attacks, particularly ransomware, are by far the biggest danger to your pictures, videos, work, or school files. Since cybercriminals use a robust encryption algorithm to lock data, it can no longer be used until a ransom in bitcoin is paid. Instead of paying hackers, you should first try to use alternative recovery methods that could help you to retrieve at least some portion of the lost data. Otherwise, you could also lose your money, along with the files. One of the best tools that could restore at least some of the encrypted files – Data Recovery Pro.
Автоматическая синхронизация часов была частью Windows в течение многих лет, и эта функция также присутствует в Windows 10. К сожалению, немногие пользователи испытывают некоторые проблемы с синхронизацией часов, и они сообщают об ошибке Произошла ошибка во время синхронизации Windows с time.windows.com сообщение об ошибке.
Оглавление:
- Проверьте, работает ли служба времени Windows
- Используйте другой сервер
- Перезапустите службу времени Windows.
- Использовать командную строку
- Отключите сторонний брандмауэр
- Изменить интервал обновления по умолчанию
- Добавить больше серверов в реестр
- Изменить значения реестра
Исправлено — «Произошла ошибка во время синхронизации Windows с time.windows.com»
Решение 1. Проверьте, работает ли служба времени Windows
Функция синхронизации времени в значительной степени зависит от службы времени Windows, и если служба времени Windows не работает, вы можете столкнуться с этой ошибкой. Чтобы устранить эту проблему, необходимо изменить настройки службы времени Windows, выполнив следующие действия:
- Нажмите Windows Key + R и введите services.msc . Нажмите Enter или нажмите ОК .

- Когда откроется окно « Службы», найдите службу Windows Time и дважды щелкните ее, чтобы открыть ее свойства.
- Установите для параметра « Тип запуска» значение « Автоматический» и нажмите кнопку « Пуск», чтобы запустить службу времени Windows .
- После этого нажмите Apply и OK, чтобы сохранить изменения.
Решение 2. Используйте другой сервер
Пользователи сообщили, что им удалось решить эту проблему, просто используя другой сервер. Чтобы изменить сервер синхронизации, выполните следующие действия:
- Нажмите Windows Key + S и введите дату. Выберите дату и время из меню.
- Когда откроется окно « Дата и время», перейдите в Интернет-время и нажмите кнопку « Изменить настройки» .
- Выберите time.nist.gov в качестве Сервера и нажмите кнопку Обновить сейчас . Некоторые пользователи также сообщают, что использование pool.ntp.org в качестве сервера решает эту проблему, поэтому вы также можете попробовать его использовать.
- Нажмите OK, чтобы сохранить изменения.
Существуют разные серверы времени, которые вы можете использовать, и некоторые из них: time-a.nist.gov, time-b.nist.gov, time-a.timefreq.bldrdoc.gov и time-b.timefreq.bldrdoc.gov, Прежде чем попробовать это решение, убедитесь, что служба времени Windows настроена на автоматический и работает. Для получения подробных инструкций о том, как это сделать, обязательно ознакомьтесь с нашим предыдущим решением.
Решение 3. Перезапустите службу времени Windows.
Чтобы решить эту проблему, вам может потребоваться перезапустить службу времени Windows. Для этого откройте окно « Службы» и дважды щелкните службу времени Windows, чтобы открыть ее свойства. Если служба работает, остановите ее. Установите для параметра « Тип запуска» значение « Автоматически» и снова запустите службу. Нажмите Apply и OK, чтобы сохранить изменения и перезагрузить компьютер.
Некоторые пользователи также предлагают изменить настройки входа службы времени Windows перед применением изменений и перезагрузкой компьютера. Для этого выполните следующие действия:
- Перейдите в Службы и откройте свойства службы Windows Time .
- Перейдите на вкладку « Вход в систему » и выберите опцию « Локальная системная учетная запись» . Установите флажок Разрешить службе взаимодействовать с опцией рабочего стола .
- После этого нажмите Apply и OK и перезагрузите компьютер.
Имейте в виду, что вам нужно сделать этот шаг сразу после перезапуска службы времени Windows.
Решение 4 — Использование командной строки
По словам пользователей, вы можете решить эту проблему, просто используя командную строку и выполнив несколько команд. Для этого выполните следующие действия:
- Нажмите Windows Key + X, чтобы открыть меню Win + X и выберите командную строку (Admin) .
- Когда запускается командная строка, введите следующие команды:
- w32tm / debug / disable
- w32tm / незарегистрированный
- w32tm / регистрация
- чистый старт w32time
- Если все прошло успешно, вы должны увидеть «Windows Time Service запускается. Служба времени Windows была успешно запущена » .
- Закройте командную строку и попробуйте синхронизировать ваши часы.
Решение 5. Отключите сторонний брандмауэр
Инструменты брандмауэра всегда полезны, потому что они предотвращают доступ потенциально опасных приложений к Интернету. К сожалению, иногда эти инструменты могут мешать вашим часам и вызывать появление этой ошибки. Чтобы исправить эту ошибку, не забудьте временно отключить брандмауэр и проверить, устраняет ли это проблему. Если проблема не устранена, вы можете полностью удалить брандмауэр.
Пользователи сообщили, что после перехода в стандартный режим в своем брандмауэре или после полного его отключения они смогли синхронизировать свои часы без каких-либо проблем. Кроме того, вы можете настроить брандмауэр на разблокировку доступа NPT через UDP-порт 123. Если вы изменили конфигурацию брандмауэра маршрутизатора, вам также может потребоваться разблокировать UDP-порт 123 на маршрутизаторе.
Решение 6. Изменить интервал обновления по умолчанию
Иногда эти ошибки могут возникать из-за вашего интервала обновления, но вы можете легко исправить эту ошибку, изменив несколько значений в вашем реестре. Мы должны предупредить вас, что изменение реестра может привести к проблемам со стабильностью системы, если вы не сделаете это должным образом, поэтому вы можете создать резервную копию реестра на всякий случай. Чтобы отредактировать свой реестр, сделайте следующее:
- Нажмите Windows Key + R и введите regedit . Нажмите Enter или нажмите ОК .

- Когда редактор реестра запустится, перейдите к ключу HKEY_LOCAL_MACHINE SYSTEM CurrentControlSet Services W32Time TimeProviders NtpClient на левой панели. Дважды щелкните ключ SpecialPollInterval .
- В разделе Base выберите Decimal . По умолчанию значение данных должно быть установлено на 604800 . Это число представляет 7 дней в секундах, но вы можете изменить его на 86400, чтобы оно представляло 1 день.
- После этого нажмите кнопку ОК, чтобы сохранить изменения.
Решение 7 — Добавьте больше серверов в реестр
Иногда вам просто нужно переключиться на другой сервер времени, и если вы хотите, вы можете добавить эти серверы в реестр, выполнив следующие действия:
- Откройте редактор реестра и перейдите к ключу HKEY_LOCAL_MACHINE / SOFTWARE / Microsoft / Windows / CurrentVersion / DateTime / Servers на левой панели.
- Вы должны увидеть несколько значений, доступных на правой панели. Каждый сервер будет представлен числом. Чтобы добавить новый сервер времени, щелкните правой кнопкой мыши пустое место и выберите « Создать»> «Строковое значение» .
- Введите соответствующий номер в качестве имени, в нашем случае это 3, так как у нас уже есть 3 доступных сервера, и дважды щелкните по нему.
- В поле Значение введите адрес сервера. Пользователи сообщили, что у них работает сервер tick.usno.navy.mil, поэтому вы можете добавить его, если хотите. Нажмите OK, чтобы сохранить изменения.
- Необязательно: Вы можете добавить столько серверов, сколько хотите, выполнив предыдущие шаги. Что касается серверов, вы можете добавить любой из них:
- time-a.nist.gov
- time-b.nist.gov
- 128.105.37.11
- europe.pool.ntp.org
- clock.isc.org
- north-america.pool.ntp.org
- time.windows.com
- time.nist.gov
После добавления серверов в реестр просто перейдите к настройкам времени и даты и выберите любой из добавленных вами серверов. Для получения дополнительной информации о том, как изменить сервер времени, обязательно проверьте Решение 2 для получения подробных инструкций.
Решение 8 — Изменить значения реестра
Пользователи сообщили, что вы можете решить эту проблему, просто изменив два значения в вашем реестре. Для этого выполните следующие действия:
- Откройте редактор реестра и перейдите к ключу HKEY_LOCAL_MACHINE SYSTEM CurrentControlSet Services W32Time Config в левой панели.
- На правой панели дважды щелкните MaxNegPhaseCorrection и установите для данных значения значение ffffff. Нажмите OK, чтобы сохранить изменения.
- Дважды щелкните MaxPosPhaseCorrection и установите значение данных в значение ffffff. Нажмите OK, чтобы сохранить изменения.
- Закройте редактор реестра .
После этого попробуйте снова синхронизировать ваши часы. Прежде чем попробовать это решение, рекомендуется сделать резервную копию реестра, если что-то пойдет не так.
Произошла ошибка во время синхронизации Windows с time.windows.com. Ошибка может помешать синхронизации ваших часов, но вы можете легко решить эту проблему, изменив сервер времени или воспользовавшись любым из наших решений.
Примечание редактора: этот пост был первоначально опубликован в сентябре 2016 года и с тех пор был полностью переработан и обновлен для обеспечения свежести, точности и полноты.
The ‘Error Occurred While Windows was Synchronizing’ error most commonly occurs when Windows users try to sync their time automatically by attempting to use the Windows menu to connect with an NTP server. In most documented cases, the error message will appear with time.windows.com, time.nist.gov, and every other NTP server.
What’s causing the ‘Error Occurred While Windows was Synchronizing’ issue?
- Windows Time server is stuck in a limbo state – One popular reason that will trigger this error is a Time server stuck in a state between open and closed (commonly referred to as ‘limbo state). If this scenario is applicable, you can fix the issue by using the Service screen to change the Startup Status to Automatic and restart the service.
- The time server is unavailable – Another popular cause that might spawn this issue is a situation where the time server that you attempt to contact is unavailable due to a scheduled maintenance or an unexpected outage period. In this case, you can circumvent the issue by using a different server.
- W32 is not registered – If W32Time is not registered with your Windows installation, it’s probably why you’re getting this particular error message. In this case, you can fix the issue easily with a collection of commands that are capable of stopping the service, unregistering it and registering it again.
- Router/modem inconsistency – Although the frequency is rare, your router or modem can also be responsible for the apparition of this particular issue. If this scenario is applicable, you can fix the issue by rebooting or resetting the network in question.
- 3rd party firewall interference – An overprotective 3rd party firewall can also be responsible for this error message. A false positive might determine it to stop communications between your computer and the time server. In this case, you can fix the issue by uninstalling the 3rd party suite that’s causing the problem.
- Faulty CMOS battery – If the issue returns after you fixed it, it’s probably due to the fact that your system is unable to remember the changes between system boots due to a faulty battery. In this case, you can resolve the issue by opening the case and replacing the faulty CMOS battery on your motherboard.
- Time updating interval is too long – As it turns out, this issue can also occur due to the fact that the default updating interval is insufficient to communicate with the time server. In this case, you can fix the issue by doing some registry adjustments.
We have included several methods to address this issue. We suggest that you follow every Method listed below until the issue is resolved.
1. Restart the Windows Time service
As it turns out, the number one reason why this issue will occur is due to the fact that the Windows Time service is not running or becomes stuck into a limbo state. This issue is much more common than you might expect – A lot of Windows 7, Windows 8.1 and Windows 10 users have been complaining that this service has the habit of failing to sync up even if it’s running properly.
Several affected users that encountered this issue have confirmed that the issue was resolved after they accessed the Services window and changed the status to Automatic or restarting the service, forcing it to reinitialize.
Here’s a quick guide on doing this on a Windows computer:
Note: The steps below should be applicable regardless of the culprit that ends up causing the issue.
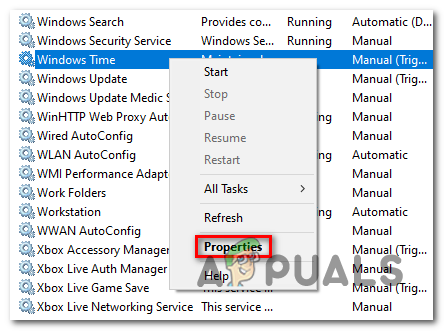
- Press Windows key + R to open up a Run dialog box. Next, type ‘services.msc’ and press Enter to open up the Service screen. If you are prompted by the UAC (User Account Control) prompt, click Yes to grant administrative privileges.
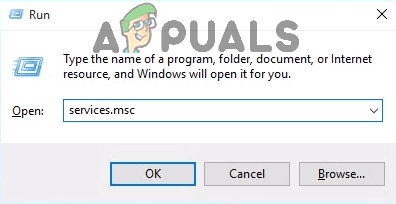
Type “services.msc” into the Run dialog and press Enter - Once you’re inside the Services screen, move to the right-section and scroll down through the list of services until you locate the Windows Time service. When you see it, right-click on it and choose Properties from the newly appeared context menu.
Properties screen of Windows Time - Now that you’re inside the Properties menu of Windows Time, select the General tab from the top of the screen and use the drop-down menu associated with the Startup type to change it to Automatic.
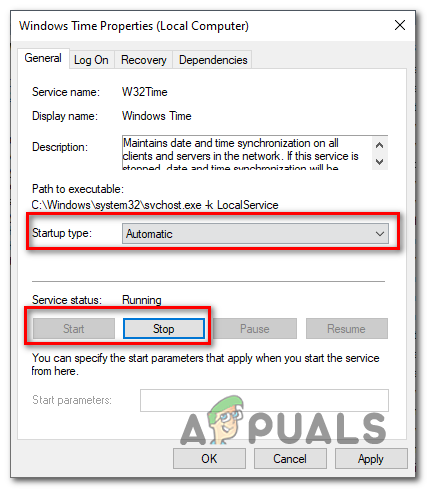
Changing the status of the Time service to Automatic - Next, click on Stop to temporarily stop the service, then click on Start to restart the Windows Start service.
- Click Apply to save the changes, then repeat the operation and see if the problem has been resolved.
In case you’re still encountering the same ‘Error Occurred While Windows was Synchronizing’ issue, move down to the next method below.
2. Use a different server
If the issue only started to occur recently, it’s also possible that you’re encountering this issue due to the fact that the time server that you’re currently trying to access is inaccessible due to an unexpected issue or due to a scheduled maintenance period.
If this scenario is applicable, you can fix the issue by accessing the Internet Time settings and hanging the default values so that a different server is used when your computer needs to Syncronize the Internet time.
Here’s a quick guide on how to do this:
- Press Windows key + R to open up a Run dialog box. Inside the text box, type ‘timedate.cpl’ and press Enter to open up the Date and Time server.
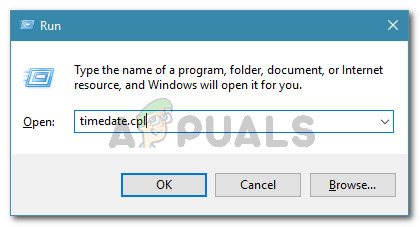
Opening the Date and time window - Once you’re inside the correct window, select the Internet Time from the horizontal menu at the top, then click on the Change Settings button below. When you’re prompted by the UAC (User Account Control), click Yes to grant administrative privileges.
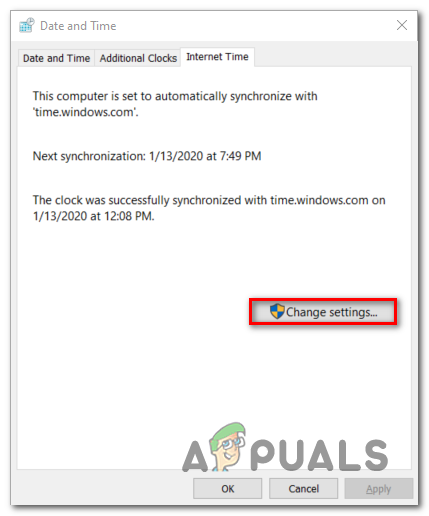
Changing the Time server settings - Inside the Internet Time Settings window, start by checking the box associated with Synchronize with an Internet time server. Next, expand the drop-down menu associated with Server and set it to time.nist.gov.
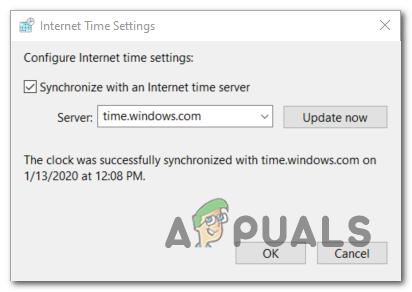
Changing the time server Note: If the time server was already failing with time.nist.gov, set it to time.windows.com.
- Click on Update Now to attempt to synchronize the Internet time server once again.
- See if the process manages to complete without the same error message.
In case the same error ‘Error Occurred While Windows was Synchronizing’ error message is still occurring, move down to the next potential fix below.
3. Re-register W32Time via CMD
Another fix that might potentially help you in fixing the ‘Error Occurred While Windows was Synchronizing’ error message is to use an elevated CMD prompt to re-register the W32Time service.
Several affected users that have encountered this issue before have confirmed that a series of commands finally allowed them to force the time server to update automatically. But keep in mind that before you can re-register the time service, you will need to disable it first. Luckily, you can do the entire process from a single elevated CMD.
Here’s what you need to do:
- Press Windows key + R to open up a Run dialog box. Next, type ‘cmd’ and press Ctrl + Shift + Enter to open up an elevated CMD window. When you see the User Account Control (UAC) window, click Yes to grant administrative privileges.
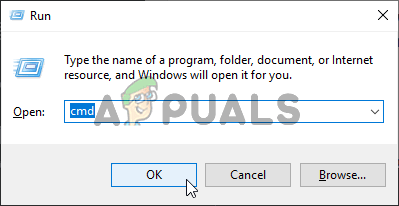
Running the Command Prompt - Once you’re inside the elevated terminal prompt, type the following commands in order and press Enter after each one to stop the time service, re-register w32time service and force the service to update itself:
net stop w32time
w32tm /unregister
 w32tm /register
net start w32time
w32tm /config /manualpeerlist:pool.ntp.org /syncfromflags:manual /update
- In case you get the following success message, it means that every command has been successfully processed:
C:Documents and Settingsuser>net stop w32time
The Windows Time service is stopping. The Windows Time service was stopped successfully.
C:Documents and Settingsuser>w32tm /unregister
W32Time successfully registered.
C:Documents and Settingsuser>w32tm /register
W32Time successfully registered.
C:Documents and Settingsuser>net start w32time
The Windows Time service is starting. The Windows Time service was started successfully.
C:Documents and Settingsuser>w32tm /config /manualpeerlist:pool.ntp.org /update
The command completed successfully.
- If the operation is completed successfully, restart your machine and see if the issue is resolved at the next system startup.
In case the same ‘Error Occurred While Windows was Synchronizing’ problem is still occurring, move down to the next potential fix below.
4. Restart your Router/Modem
As it turns out, another common problem that might be responsible for the apparition of the ‘Error Occurred While Windows was Synchronizing’ error is router/modem stuck in a limbo state. Whenever this happens, chances are the time server cannot be reached, so this error will be thrown as a result.
If this scenario is applicable, the easiest way to get the issue resolved is to force your network to refresh.
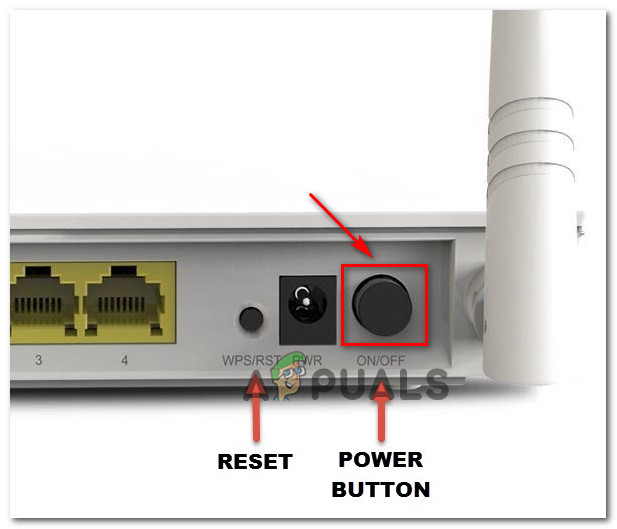
To ensure that you start by the less-intrusive approach and you don’t make any long-lasting changes to your network credentials, you should start by performing a router reboot. To do this, simply press the dedicated button (if possible), or press the ON / OFF button twice to initiate a network reboot. Alternatively, you can simply physically disconnect the power cable from the power outlet, forcing the network to restart.
If that doesn’t work, you should move forward by trying to do a complete modem or router reset. But keep in mind that this operation might also reset the custom login credentials of your router address. Even more, any other network adjustments that you previously made might also be lost.
Note: With most router manufacturers, the login credentials for your router will be reverted back to admin (for both username and password.
To perform a router/modem reset, simply press the reset button and keep it pressed for at least 10 seconds or until you see all the front LED flashing at the same time. That’s how you know that the reset procedure was completed.
Note: Keep in mind that with some models, the reset button is inaccessible without a sharp object like a needle, toothpick or a similar object.
If you already did this and you’re still encountering the same ‘Error Occurred While Windows was Synchronizing’ error, move down to the next potential fix below.
5. Disable 3rd party firewall
As it turns out, another responsible culprit that might be responsible for the ‘Error Occurred While Windows was Synchronizing’ error is an overprotective firewall suite. In some documented cases, this error appeared due to the fact that the 3rd party firewall was interrupting the connection between the time server and the end-user computer due to a false positive.
If this scenario is applicable, you can fix the issue easily by uninstalling the firewall that is causing the issue and reverting back to the default firewall (Windows Firewall).
Note: Keep in mind that simply disabling the real-time protection of your AV will not resolve the issue. It’s likely that the same security rules will remain in place despite the modification.
Here’s a quick guide on making sure that the external firewall no longer ends up creating the ‘Error Occurred While Windows was Synchronizing’ error:
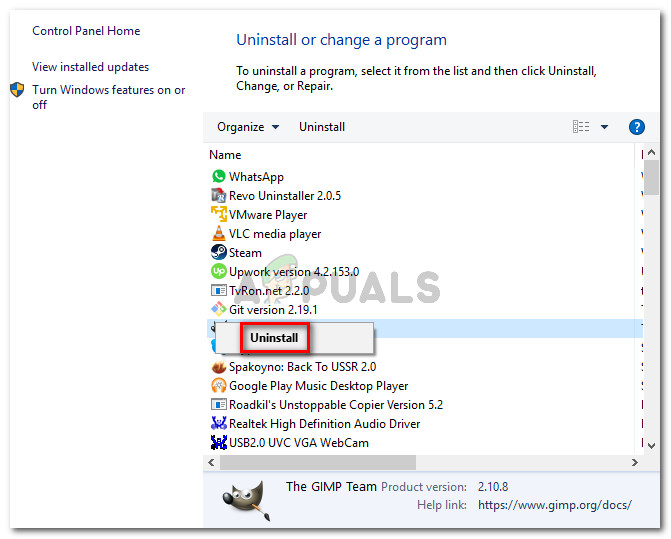
- Press Windows key + R to open up a Run dialog box. Next, type ‘appwiz.cpl’ and press Enter to open up the Programs and Features window.

Type appwiz.cpl and Press Enter to Open Installed Programs List - Once you’re inside the Programs and Features screen, scroll down through the list of installed applications and locate the 3rd party firewall that you’re using. When you see it, right-click on it and choose Uninstall from the next context menu.
Uninstalling the 3rd-party firewall - Once you see the uninstallation window, follow the on-screen prompts to complete the process of uninstalling the 3rd party firewall.
- Restart your computer and see if the problem is fixed at the next computer startup.
In case you’re still seeing the ‘Error Occurred While Windows was Synchronizing’ error, move down to the next potential fix below.
6. Replace CMOS Battery
If this issue is recurring, meaning you fix the issue but the problem returns swiftly the next time you start your computer, chances are the issue is being caused by a faulty CMOS battery. This is a critical motherboard component that’s typically a CR2032 button cell.
The CMOS (Complementary Metal Oxide Semiconductor) battery (also known as RTC or NVRAM) is responsible for storing information ranging from time and date to system hardware settings. If your computer is unable to maintain the date & time between startups, it’s typically because of this component.
In case you suspect that you might be dealing with a faulty CMOS battery, you can fix the issue by clearing it once or replacing it altogether. Here’s a quick guide on doing this:
- Turn off your computer and ensure that it’s no longer plugged into a power outlet.
- Next, remove the side cover and equip your main hand with a static wristband if you have one at the ready.
Note: A Static wristband will make sure that you are grounded to the frame and static electricity doesn’t end up producing damage to your PC components. - Look at your motherboard and identify the CMOS battery. Once you see it, use your fingernail or a non-conductive screwdriver to remove it from its slot.
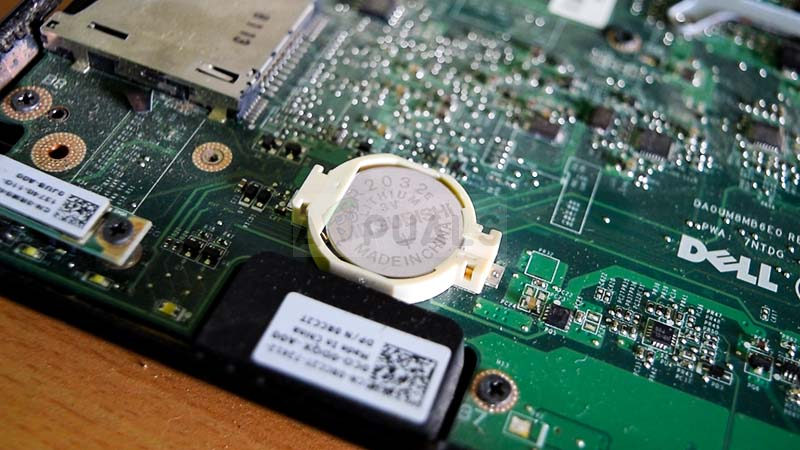
Removing the CMOS battery Note: If you have a spare battery around, replace the current one to ensure that you don’t encounter this issue again. Else, clean it thoroughly (and the slow) to ensure that there aren’t any connectivity issues.
- Wait for a couple of minutes before putting them back case back and powering your computer again. At the next startup, return to the Date & Time window and attempt to update again, then restart again and see if the change is preserved.
If the same ‘Error Occurred While Windows was Synchronizing’ error is still happening, move to the final method below.
7. Adjust the updating interval
In some rare circumstances, you might encounter this particular issue due to the fact that a registry key is preventing date & time from refreshing at regular intervals. In case this scenario is applicable, it’s possible that the time.windows.com, time.nist.gov and any other NTP server might trigger the ‘Error Occurred While Windows was Synchronizing’ error due to the fact that it’s not unable to update the value again.
In this case, you should be able to fix the issue by changing the update interval to the next compatible value. Here’s a quick guide on doing this from using Registry Editor:
- Press Windows key + R to open up a Run dialog box. Next, type ‘regedit’ and press Enter to open up the Registry Editor. When prompted by the UAC (User Account Control), click Yes to grant administrative privileges.
Running the Registry Editor - Once you’re inside the Registry Editor, use the left-hand section to navigate to the following location:
HKEY_LOCAL_MACHINESYSTEMCurrentControlSetServicesW32TimeTimeProvidersNtpClient
Note: You can also paste the exact location directly into the navigation bar to get there instantly.
- Once you’re in the correct location, move down to the right-section and double-click on SpecialPoolInterval.
- Then, set the Base section to Decimal, then modify the default Value to 86400.
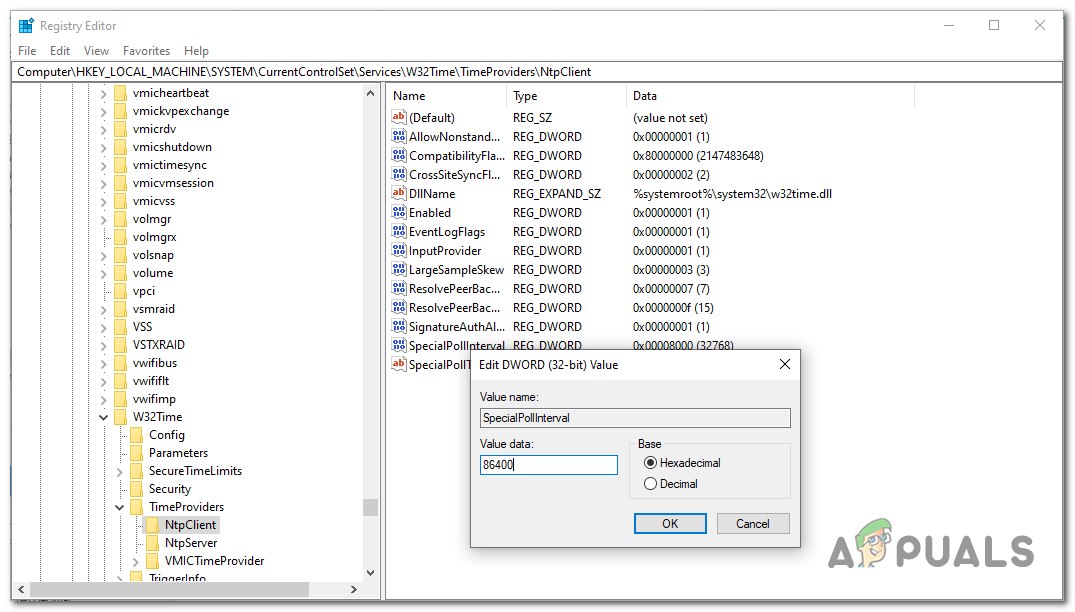
Adjusting the Value data of SpecialPoolInterval Note: Changing the Value to 86400 ensures that the date and time will get updated after each day.
- Close Registry Editor and restart your computer to allow the modifications to take effect.