Configuring IPv6 Unicast Routing
Information About Configuring IPv6 Unicast Routing
This chapter describes how to configure IPv6 unicast routing on the switch.
Understanding IPv6
IPv4 users can move to IPv6 and receive services such as end-to-end security, quality of service (QoS), and globally unique
addresses. The IPv6 address space reduces the need for private addresses and Network Address Translation (NAT) processing
by border routers at network edges.
For information about how Cisco Systems implements IPv6, go to:
http://www.cisco.com/en/US/products/ps6553/products_ios_technology_home.html
For information about IPv6 and other features in this chapter
-
See the Cisco IOS IPv6 Configuration Library.
-
Use the Search field on Cisco.com to locate the Cisco IOS software documentation. For example, if you want information about
static routes, you can enter Implementing Static Routes for IPv6 in the search field to learn about static routes.
Static Routes for IPv6
Static routes are manually configured and define an explicit route between two networking devices. Static routes are useful
for smaller networks with only one path to an outside network or to provide security for certain types of traffic in a larger
network.
Configuring Static Routing for IPv6 (CLI)
For configuring static routes for IPv6, see the Configuring Static Routing for IPv6 section.
For more information about static routes, see the “Implementing Static Routes for IPv6” chapter in the Cisco IOS IPv6 Configuration Library on Cisco.com.
Path MTU Discovery for IPv6 Unicast
The switch supports advertising the system maximum transmission unit (MTU) to IPv6 nodes and path MTU discovery. Path MTU
discovery allows a host to dynamically discover and adjust to differences in the MTU size of every link along a given data
path. In IPv6, if a link along the path is not large enough to accommodate the packet size, the source of the packet handles
the fragmentation.
ICMPv6
The Internet Control Message Protocol (ICMP) in IPv6 generates error messages, such as ICMP destination unreachable messages,
to report errors during processing and other diagnostic functions. In IPv6, ICMP packets are also used in the neighbor discovery
protocol and path MTU discovery.
Neighbor Discovery
The switch supports NDP for IPv6, a protocol running on top of ICMPv6, and static neighbor entries for IPv6 stations that
do not support NDP. The IPv6 neighbor discovery process uses ICMP messages and solicited-node multicast addresses to determine
the link-layer address of a neighbor on the same network (local link), to verify the reachability of the neighbor, and to
keep track of neighboring routers.
The switch supports ICMPv6 redirect for routes with mask lengths less than 64 bits. ICMP redirect is not supported for host
routes or for summarized routes with mask lengths greater than 64 bits.
Neighbor discovery throttling ensures that the switch CPU is not unnecessarily burdened while it is in the process of obtaining
the next hop forwarding information to route an IPv6 packet. The switch drops any additional IPv6 packets whose next hop is
the same neighbor that the switch is actively trying to resolve. This drop avoids further load on the CPU.
Default Router Preference
The switch supports IPv6 default router preference (DRP), an extension in router advertisement messages. DRP improves the
ability of a host to select an appropriate router, especially when the host is multihomed and the routers are on different
links. The switch does not support the Route Information Option in RFC 4191.
An IPv6 host maintains a default router list from which it selects a router for traffic to offlink destinations. The selected
router for a destination is then cached in the destination cache. NDP for IPv6 specifies that routers that are reachable or
probably reachable are preferred over routers whose reachability is unknown or suspect. For reachable or probably reachable
routers, NDP can either select the same router every time or cycle through the router list. By using DRP, you can configure
an IPv6 host to prefer one router over another, provided both are reachable or probably reachable.
For configuring DRP for IPv6, see the Configuring Default Router Preference section.
For more information about DRP for IPv6, see the Cisco IOS IPv6 Configuration Library on Cisco.com.
Policy-Based Routing for IPv6
Policy-based routing (PBR) gives you a flexible means of routing packets by allowing you to configure a defined policy for
traffic flows, which lessens reliance on routes derived from routing protocols. Therefore, PBR gives you more control over
routing by extending and complementing the existing mechanisms provided by routing protocols. PBR allows you to set the IPv6
precedence. For a simple policy, you can use any one of these tasks; for a complex policy, you can use all of them. It also
allows you to specify a path for certain traffic, such as priority traffic over a high-cost link.
PBR for IPv6 may be applied to both forwarded and originated IPv6 packets. For forwarded packets, PBR for IPv6 will be implemented
as an IPv6 input interface feature, supported in the following forwarding paths:
-
Process
-
Cisco Express Forwarding (formerly known as CEF)
-
Distributed Cisco Express Forwarding
Policies can be based on the IPv6 address, port numbers, protocols, or packet size.
PBR allows you to perform the following tasks:
-
Classify traffic based on extended access list criteria. Access lists, then, establish the match criteria.
-
Set IPv6 precedence bits, giving the network the ability to enable differentiated classes of service.
-
Route packets to specific traffic-engineered paths; you might need to route them to allow a specific quality of service (QoS)
through the network.
PBR allows you to classify and mark packets at the edge of the network. PBR marks a packet by setting precedence value. The
precedence value can be used directly by devices in the network core to apply the appropriate QoS to a packet, which keeps
packet classification at your network edge.
For enabling PBR for IPv6, see the Enabling Local PBR for IPv6 section.
For enabling IPv6 PBR for an interface, see the Enabling IPv6 PBR on an Interface section.
Unsupported IPv6 Unicast Routing Features
The switch does not support these IPv6 features:
-
IPv6 packets destined to site-local addresses
-
Tunneling protocols, such as IPv4-to-IPv6 or IPv6-to-IPv4
-
The switch as a tunnel endpoint supporting IPv4-to-IPv6 or IPv6-to-IPv4 tunneling protocols
-
IPv6 Web Cache Communication Protocol (WCCP)
IPv6 Feature Limitations
Because IPv6 is implemented in switch hardware, some limitations occure due to the IPv6 compressed addresses in the hardware
memory. This hardware limitation result in some loss of functionality and limits some features. For example, the switch cannot
apply QoS classification on source-routed IPv6 packets in hardware.
IPv6 and Switch Stacks
The switch supports IPv6 forwarding across the stack and IPv6 host functionality on the active switch. The active switch runs
the IPv6 unicast routing protocols and computes the routing tables. They receive the tables and create hardware IPv6 routes
for forwarding. The active switch also runs all IPv6 applications.
If a new switch becomes the active switch, it recomputes the IPv6 routing tables and distributes them to the member switches.
While the new active switch is being elected and is resetting, the switch stack does not forward IPv6 packets. The stack MAC
address changes, which also changes the IPv6 address. When you specify the stack IPv6 address with an extended unique identifier
(EUI) by using the ipv6 address
ipv6-prefix/prefix
length
eui-64 interface configuration command, the address is based on the interface MAC address. See the Configuring IPv6 Addressing and Enabling IPv6 Routing section.
If you configure the persistent MAC address feature on the stack and the active switch changes, the stack MAC address does
not change for approximately 4 minutes.
These are the functions of IPv6 active switch and members:
-
Active switch:
-
runs IPv6 routing protocols
-
generates routing tables
-
distributes routing tables to member switches that use distributed Cisco Express Forwarding for IPv6
-
runs IPv6 host functionality and IPv6 applications
-
-
Member switch:
-
receives Cisco Express Forwarding for IPv6 routing tables from the active switch
-
programs the routes into hardware

Note
IPv6 packets are routed in hardware across the stack if the packet does not have exceptions (IPv6 Options) and the switches
in the stack have not run out of hardware resources.
-
flushes the Cisco Express Forwarding for IPv6 tables on active switch re-election
-
Default IPv6 Configuration
|
Feature |
Default Setting |
||
|---|---|---|---|
|
IPv6 routing |
Disabled globally and on all interfaces |
||
|
Cisco Express Forwarding for IPv6 or distributed Cisco Express Forwarding for IPv6 |
Disabled (IPv4 Cisco Express Forwarding and distributed Cisco Express Forwarding are enabled by default)
|
||
|
IPv6 addresses |
None configured |
How to Configure IPv6 Unicast Routing
The following sections shows the various configuration options available for IPv6 Unicast Routing
Configuring IPv6 Addressing and Enabling IPv6 Routing
This section describes how to assign IPv6 addresses to individual Layer 3 interfaces and to globally forward IPv6 traffic
on the switch.
Note |
IPv6 routing is not enabled by default and needs to be enabled using the ipv6 |
Before configuring IPv6 on the switch, consider these guidelines:
-
Not all features discussed in this chapter are supported by the switch. See the Unsupported IPv6 Unicast Routing Features.
-
In the ipv6 address interface configuration command, you must enter the ipv6-address and ipv6-prefix variables with the address specified in hexadecimal using 16-bit values between colons. The prefix-length variable (preceded by a slash [/]) is a decimal value that shows how many of the high-order contiguous bits of the address
comprise the prefix (the network portion of the address).
To forward IPv6 traffic on an interface, you must configure a global IPv6 address on that interface. Configuring an IPv6 address
on an interface automatically configures a link-local address and activates IPv6 for the interface. The configured interface
automatically joins these required multicast groups for that link:
-
solicited-node multicast group FF02:0:0:0:0:1:ff00::/104 for each unicast address assigned to the interface (this address
is used in the neighbor discovery process.) -
all-nodes link-local multicast group FF02::1
-
all-routers link-local multicast group FF02::2
To remove an IPv6 address from an interface, use the no
ipv6 address
ipv6-prefix/prefix
length
eui-64 or no ipv6 address
ipv6-address
link-local interface configuration command. To remove all manually configured IPv6 addresses from an interface, use the no ipv6 address interface configuration command without arguments. To disable IPv6 processing on an interface that has not been explicitly
configured with an IPv6 address, use the no ipv6 enable interface configuration command. To globally disable IPv6 routing, use the no ipv6 unicast-routing global configuration command.
For more information about configuring IPv6 routing, see the “Implementing Addressing and Basic Connectivity for IPv6” chapter
in the Cisco IOS IPv6 Configuration Library on Cisco.com.
To assign an IPv6 address to a Layer 3 interface and enable IPv6 routing, perform this procedure:
Procedure
| Command or Action | Purpose | |
|---|---|---|
| Step 1 |
Example: |
Enables privileged EXEC mode. Enter your password if prompted. |
| Step 2 |
configure Example: |
Enters global configuration mode. |
| Step 3 |
sdm prefer {core Example: |
Selects an SDM template:
|
| Step 4 |
end Example: |
Returns to privileged EXEC mode. |
| Step 5 |
reload Example: |
Reloads the operating system. |
| Step 6 |
configure Example: |
Enters global configuration mode after the switch reloads. |
| Step 7 |
interface Example: |
Enters interface configuration mode, and specifies the Layer 3 interface to configure. The interface can be a physical interface, |
| Step 8 |
no Example: |
Removes the interface from Layer 2 configuration mode (if it is a physical interface). |
| Step 9 |
Use one of the following:
Example: |
|
| Step 10 |
exit Example: |
Returns to global configuration mode. |
| Step 11 |
ipv6 Example: |
Enables forwarding of IPv6 unicast data packets. |
| Step 12 |
end Example: |
Returns to privileged EXEC mode. |
| Step 13 |
show ipv6 interface Example: |
Verifies your entries. |
| Step 14 |
copy Example: |
(Optional) Saves your entries in the configuration file. |
Configuring IPv4 and IPv6 Protocol Stacks
Beginning in privileged EXEC mode, follow these steps to configure a Layer 3 interface to support both IPv4 and IPv6 and to
enable IPv6 routing.
Note |
To disable IPv6 processing on an interface that has not been configured with an IPv6 address, use the no ipv6 enable command in interface configuration mode. |
Procedure
| Command or Action | Purpose | |||
|---|---|---|---|---|
| Step 1 |
Example: |
Enables privileged EXEC mode. Enter your password if prompted. |
||
| Step 2 |
configure Example: |
Enters global configuration mode. |
||
| Step 3 |
ipv6 unicast-routing Example: |
Enables forwarding of IPv6 data packets on the switch. |
||
| Step 4 |
interface Example: |
Enters interface configuration mode, and specifies the Layer 3 interface to configure. |
||
| Step 5 |
no switchport Example: |
Removes the interface from Layer 2 configuration mode (if it is a physical interface). |
||
| Step 6 |
ip address Example: |
Specifies a primary or secondary IPv4 address for the interface. |
||
| Step 7 |
Use one of the following:
|
|
||
| Step 8 |
end Example: |
Returns to privileged EXEC mode. |
||
| Step 9 |
Use one of the following:
|
Verifies your entries. |
||
| Step 10 |
copy Example: |
(Optional) Saves your entries in the configuration file. |
Configuring Default Router Preference
Router advertisement messages are sent with the default router preference (DRP) configured by the ipv6 nd router-preference interface configuration command. If no DRP is configured, RAs are sent with a medium preference.
A DRP is useful when two routers on a link might provide equivalent, but not equal-cost routing, and policy might dictate
that hosts should prefer one of the routers.
For more information about configuring DRP for IPv6, see the “Implementing IPv6 Addresses and Basic Connectivity” chapter
in the Cisco IOS IPv6 Configuration Library on Cisco.com.
Beginning in privileged EXEC mode, follow these steps to configure a DRP for a router on an interface.
Procedure
| Command or Action | Purpose | |
|---|---|---|
| Step 1 |
Example: |
Enables privileged EXEC mode. Enter your password if prompted. |
| Step 2 |
configure terminal Example: |
Enters global configuration mode. |
| Step 3 |
interface Example: |
Enters interface configuration mode and identifies the Layer 3 interface on which you want to specify the DRP. |
| Step 4 |
ipv6 nd router-preference {high | medium | low} Example: |
Specifies a DRP for the router on the switch interface. |
| Step 5 |
end Example: |
Returns to privileged EXEC mode. |
| Step 6 |
show Example: |
Verifies the configuration. |
| Step 7 |
copy Example: |
(Optional) Saves your entries in the configuration file. |
Configuring IPv6 ICMP Rate Limiting
ICMP rate limiting is enabled by default with a default interval between error messages of 100 milliseconds and a bucket size
(maximum number of tokens to be stored in a bucket) of 10.
To change the ICMP rate-limiting parameters, perform this procedure:
Procedure
| Command or Action | Purpose | |
|---|---|---|
| Step 1 |
Example: |
Enables privileged EXEC mode. Enter your password if prompted. |
| Step 2 |
configure Example: |
Enters global configuration mode. |
| Step 3 |
ipv6 icmp error-interval Example: |
Configures the interval and bucket size for IPv6 ICMP error messages:
|
| Step 4 |
end Example: |
Returns to privileged EXEC mode. |
| Step 5 |
show ipv6 interface [interface-id] Example: |
Verifies your entries. |
| Step 6 |
copy Example: |
(Optional) Saves your entries in the configuration file. |
Configuring Cisco Express Forwarding and distributed Cisco Express Forwarding for IPv6
Cisco Express Forwarding is a Layer 3 IP switching technology to improve network performance. Cisco Express Forwarding implements
an advanced IP look-up and forwarding algorithm to deliver maximum Layer 3 switching performance. It is less CPU-intensive
than fast-switching route-caching, allowing more CPU processing power to be dedicated to packet forwarding. IPv4 Cisco Express
Forwarding and distributed Cisco Express Forwarding are enabled by default. IPv6 Cisco Express Forwarding and distributed
Cisco Express Forwarding are disabled by default, but automatically enabled when you configure IPv6 routing.
IPv6 Cisco Express Forwarding and distributed Cisco Express Forwarding are automatically disabled when IPv6 routing is unconfigured.
IPv6 Cisco Express Forwarding and distributed Cisco Express Forwarding cannot disabled through configuration. You can verify
the IPv6 state by entering the show ipv6 cef command in privileged EXEC mode.
To route IPv6 unicast packets, you must first globally configure forwarding of IPv6 unicast packets by using the ipv6 unicast-routing global configuration command, and you must configure an IPv6 address and IPv6 processing on an interface by using the ipv6 address command in interface configuration mode.
For more information about configuring Cisco Express Forwarding and distributed Cisco Express Forwarding, see Cisco IOS IPv6 Configuration Library on Cisco.com.
Configuring Static Routing for IPv6
For more information about configuring static IPv6 routing, see the “Implementing Static Routes for IPv6” chapter in the Cisco IOS IPv6 Configuration Library on Cisco.com.
To configure static IPv6 routing, perform this procedure:
Before you begin
You must enable the forwarding of IPv6 packets by using the ipv6 unicast-routing command in global configuration mode, and enable IPv6 on at least one Layer 3 interface by configuring an IPv6 address on
the interface.
Procedure
| Command or Action | Purpose | |||
|---|---|---|---|---|
| Step 1 |
Example: |
Enables privileged EXEC mode. Enter your password if prompted. |
||
| Step 2 |
configure Example: |
Enters global configuration mode. |
||
| Step 3 |
ipv6 route Example: |
Configures a static IPv6 route.
|
||
| Step 4 |
end Example: |
Returns to privileged EXEC mode. |
||
| Step 5 |
Use one of the following:
Example:or |
Verifies your entries by displaying the contents of the IPv6 routing table.
|
||
| Step 6 |
copy Example: |
(Optional) Saves your entries in the configuration file. |
Enabling IPv6 PBR on an Interface
To enable Policy-Based Routing (PBR) for IPv6, you must create a route map that specifies the packet match criteria and desired
policy-route action. Then you associate the route map on the required interface. All packets arriving on the specified interface
that match the match clauses will be subject to PBR.
In PBR, the set
vrf command decouples the virtual routing and forwarding (VRF) instance and interface association and allows the selection of
a VRF based on access control list (ACL)-based classification using existing PBR or route-map configurations. It provides
a single router with multiple routing tables and the ability to select routes based on ACL classification. The router classifies
packets based on ACL, selects a routing table, looks up the destination address, and then routes the packet.
To enable PBR for IPv6, perform this procedure:
Procedure
| Command or Action | Purpose | |
|---|---|---|
| Step 1 |
Example: |
Enables privileged EXEC mode. Enter your password if prompted. |
| Step 2 |
Example: |
Enters global configuration mode. |
| Step 3 |
Example: |
Defines the conditions for redistributing routes from one routing protocol into another, or enables policy routing, and enters |
| Step 4 |
Do one of the following:
Example:Example: |
Specifies the match criteria.
|
| Step 5 |
Do one of the following:
Example:Example: |
Specifies the action or actions to take on the packets that match the criteria.
|
| Step 6 |
Example: |
Exits route-map configuration mode and returns to global configuration mode. |
| Step 7 |
Example: |
Specifies an interface type and number, and places the router in interface configuration mode. |
| Step 8 |
Example: |
Identifies a route map to use for IPv6 PBR on an interface. |
| Step 9 |
Example: |
Exits interface configuration mode and returns to privileged EXEC mode. |
Enabling Local PBR for IPv6
Packets that are generated by the device are not normally policy routed. Perform this task to enable local IPv6 policy-based
routing (PBR) for such packets, indicating which route map the device should use.
To enable Local PBR for IPv6, perform this procedure:
Procedure
| Command or Action | Purpose | |
|---|---|---|
| Step 1 |
Example: |
Enables privileged EXEC mode. Enter your password if prompted. |
| Step 2 |
Example: |
Enters global configuration mode. |
| Step 3 |
Example: |
Configures IPv6 PBR for packets generated by the device. |
| Step 4 |
Example: |
Returns to privileged EXEC mode. |
Displaying IPv6
For complete syntax and usage information on these commands, see the Cisco IOS command reference publications.
|
Command |
Purpose |
|---|---|
|
show ipv6 access-list |
Displays a summary of access lists. |
|
show ipv6 cef |
Displays Cisco Express Forwarding for IPv6. |
|
show ipv6 interface |
Displays IPv6 interface status and configuration. |
|
show ipv6 mtu |
Displays IPv6 MTU per destination cache. |
|
show ipv6 neighbors |
Displays IPv6 neighbor cache entries. |
|
show ipv6 prefix-list |
Displays a list of IPv6 prefix lists. |
|
show ipv6 protocols |
Displays a list of IPv6 routing protocols on the switch. |
|
show ipv6 rip |
Displays IPv6 RIP routing protocol status. |
|
show ipv6 route |
Displays IPv6 route table entries. |
|
show ipv6 static |
Displays IPv6 static routes. |
|
show ipv6 traffic |
Displays IPv6 traffic statistics. |
Configuration Examples for IPv6 Unicast Routing
The following sections shows the various configuration examples available for IPv6 Unicast Routing
Example: Configuring IPv4 and IPv6 Protocol Stacks
This example shows how to enable IPv4 and IPv6 routing on an interface.
Device> enable
Device# configure terminal

Device(config)# ipv6 unicast-routing
Devoce(config)# interface fastethernet1/0/11
Device(config-if)# no switchport
Device(config-if)# ip address 192.168.99.1 255.255.255.0
Device(config-if)# ipv6 address 2001:0DB8:c18:1::/64 eui 64
Device(config-if)# end
Example: Configuring Default Router Preference
This example shows how to configure a DRP of high for the router on an interface.
Device> enable
Device# configure terminal
Device(config)# interface gigabitethernet1/0/1
Device(config-if)# ipv6 nd router-preference high
Device(config-if)# end
Example: Configuring IPv6 ICMP Rate Limiting
This example shows how to configure an IPv6 ICMP error message interval of 50 milliseconds and a bucket size of 20 tokens.
Device> enable
Device# configure terminal
Device(config)#ipv6 icmp error-interval 50 20
Example: Configuring Static Routing for IPv6
This example shows how to configure a floating static route to an interface with an administrative distance of 130:
Device> enable
Device# configure terminal
Device(config)# ipv6 route 2001:0DB8::/32 gigabitethernet 0/1 130
Example: Enabling PBR on an Interface
In the following example, a route map named pbr-dest-1 is created and configured, specifying packet match criteria and desired
policy-route action. PBR is then enabled on GigabitEthernet interface 0/0/1.
Device> enable
Device# configure terminal
Device(config)# ipv6 access-list match-dest-1
Device(config)# permit ipv6 any 2001:DB8:2001:1760::/32
Device(config)# route-map pbr-dest-1 permit 10
Device(config)# match ipv6 address match-dest-1
Device(config)# set interface GigabitEthernet 0/0/0
Device(config)# interface GigabitEthernet0/0/1
Device(config-if)# ipv6 policy-route-map interactive
Example: Enabling Local PBR for IPv6
In the following example, packets with a destination IPv6 address that match the IPv6 address range allowed by access list
pbr-src-90 are sent to the device at IPv6 address 2001:DB8:2003:1::95:
Device> enable
Device# configure terminal
Device(config)# ipv6 access-list src-90
Device(config)# permit ipv6 host 2001:DB8:2003::90 2001:DB8:2001:1000::/64
Device(config)# route-map pbr-src-90 permit 10
Device(config)# match ipv6 address src-90
Device(config)# set ipv6 next-hop 2001:DB8:2003:1::95
Device(config)# ipv6 local policy route-map pbr-src-90
Example: Displaying IPv6
This is an example of the output from the show ipv6 interface command:
Device> enable
Device# show ipv6 interface
Vlan1 is up, line protocol is up
  IPv6 is enabled, link-local address is FE80::20B:46FF:FE2F:D940
  Global unicast address(es):
    3FFE:C000:0:1:20B:46FF:FE2F:D940, subnet is 3FFE:C000:0:1::/64 [EUI]
  Joined group address(es):
    FF02::1
    FF02::2
    FF02::1:FF2F:D940
  MTU is 1500 bytes
  ICMP error messages limited to one every 100 milliseconds
  ICMP redirects are enabled
  ND DAD is enabled, number of DAD attempts: 1
  ND reachable time is 30000 milliseconds
  ND advertised reachable time is 0 milliseconds
  ND advertised retransmit interval is 0 milliseconds
  ND router advertisements are sent every 200 seconds
  ND router advertisements live for 1800 seconds
<output truncated>
Additional References
Standards and RFCs
| Standard/RFC | Title |
|---|---|
| RFC 5453 |
Reserved IPv6 Interface Identifiers |
Feature History for IPv6 Unicast Routing
This table provides release and related information for the features explained in
this module.
These features are available in all the releases subsequent to the one they were
introduced in, unless noted otherwise.
|
Release |
Feature |
Feature Information |
|---|---|---|
| Cisco IOS XE Gibraltar 16.11.1 |
IPv6 Unicast Routing |
IPv4 users can move to IPv6 and receive services such as end-to-end security, quality of service (QoS), and globally unique |
|
Cisco IOS XE Gibraltar 16.11.1 |
RFC 5453 |
Support for RFC 5453 was introduced. |
Use the Cisco Feature Navigator to find information about platform and software image
support. To access Cisco Feature Navigator, go to http://www.cisco.com/go/cfn.
OSPF has seen quite some changes since it was introduced somewhere in the 1980s.
The first time it was documented was in 1989 in RFC 1131. Some improvements were made in OSPF version 2, first announced in RFC 1247, updated by RFC 1583, 2178 and 2328.
Later it was updated so it could support IPv6, this resulted in OSPFv3 which was described in RFC 2740, updated by RFC 5340.
Long story short…we used OSPF version 2 of IPv4 and OSPF version 3 for IPv6.
The IETF kept updating OSPF version 3 and since RFC 5838 it supports address families (just like BGP). This means we don’t have to run OSPFv2 and OSPFv3 next to each other, one routing instance supports IPv4 and IPv6 at the same time.
In this lesson, I’ll explain how to configure OSPFv3 for IPv4.
OSPFv3 with address family support has been added since IOS 15.1(3)S and 15.2(1)T. To demonstrate this I’ll use two routers:
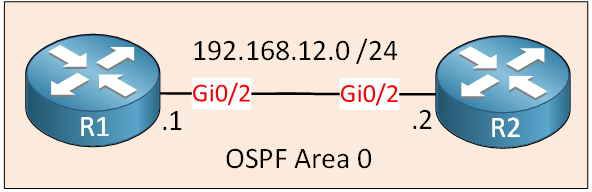
Let’s enable OSPFv3 on our routers:
R1(config)#router ospfv3 1
%OSPFv3: IPv6 routing not enabled
Even though I only want to configure routing for IPv4, OSPFv3 still uses IPv6 link-local addresses so we have to to enable IPv6:
R1 & R2
(config)#ipv6 unicast-routing
Now we’ll try to enable OSPFv3 on the interface:
R1 & R2
(config)#interface GigabitEthernet 3
(config-if)#ospfv3 1 ipv4 area 0

% OSPFv3: IPV6 is not enabled on this interface
If you don’t have IPv6 enable on your interfaces, you get the above error message. Let’s enable it:
R1 & R2
(config)#interface GigabitEthernet 3
(config-if)#ipv6 enable
(config-if)#ospfv3 1 ipv4 area 0
Once you enable IPv6 on the interface, a link-local address is created. The routers can now establish a neighbor adjacency. Let’s see if we can advertise something in OSPFv3:
R2(config)#interface loopback 0
R2(config)#ip address 2.2.2.2 255.255.255.0
R2(config-if)#ospfv3 1 ipv4 area 0

% OSPFv3: IPV6 is not enabled on this interface

R2(config-if)#ipv6 enable
R2(config-if)#ospfv3 1 ipv4 area 0
Above you can see I created a new loopback interface with an IP address, once I try to advertise it I still get en error that it requires an IPv6 address. This is a bit awkward since I won’t be using this interface to establish neighbor adjacencies, it’s only an IPv4 network that I want to advertise. Anyway, we enable IPv6 and then we can advertise it. Let’s verify our work:
Verification
First let’s check if we have neighbors:
R1#show ospfv3 neighbor

          OSPFv3 1 address-family ipv4 (router-id 192.168.12.1)

Neighbor ID     Pri   State           Dead Time   Interface ID    Interface
192.168.12.2      1   FULL/DR         00:00:35    8               GigabitEthernet3
The output is the same as “show ip ospf neighbor” but now we use another command. Same thing applies to looking at the OSPF LSDB:
R1#show ospfv3 database

          OSPFv3 1 address-family ipv4 (router-id 192.168.12.1)

		Router Link States (Area 0)

ADV Router       Age         Seq#        Fragment ID  Link count  Bits
 192.168.12.1    154         0x80000002  0            1           None
 192.168.12.2    155         0x80000002  0            1           None

		Net Link States (Area 0)

ADV Router       Age         Seq#        Link ID    Rtr count
 192.168.12.2    155         0x80000001  8          2

		Link (Type-8) Link States (Area 0)

ADV Router       Age         Seq#        Link ID    Interface
 192.168.12.1    198         0x80000001  8          Gi3
 192.168.12.2    195         0x80000001  8          Gi3

		Intra Area Prefix Link States (Area 0)

ADV Router       Age         Seq#        Link ID    Ref-lstype  Ref-LSID
 192.168.12.2    105         0x80000001  0          0x2001      0
 192.168.12.2    155         0x80000001  8192       0x2002      8
If you want to look at the OSPF entries in the routing table then the “old” command doesn’t work:
|
0 / 0 / 0 Регистрация: 16.02.2015 Сообщений: 37 |
|
|
1 |
|
|
23.04.2015, 02:17. Показов 2390. Ответов 15
Собственно дело очень интересное, прописываю на 5 роутере, допустим, ipv6 route ::/0 fde4:1:1:4::1 затем пытаюсь кинуть трейсроут на любой айпи6, ответ не приходит даже от первого хопа, хоп этот пингуется без проблем, т.е. сеть между роутерами есть. В чем беда? Может есть какая-то особенность в ипв6? на ипв4 проблем не возникало в таком плане. проект прикрепил.. Пробовал так же делать прямые роуты на сеть из R5 в fde4:1:1:3::/64 и из R1 в fde4:1:1:4::/64 через R3. та же ситуация…
0 |

|
0 / 0 / 0 Регистрация: 16.02.2015 Сообщений: 37 |
|
|
23.04.2015, 02:26 [ТС] |
2 |
|
Так же вероятно там не будет этих роутов в проекте, т.к. пишу сохранить конфиг (write) ребутаю роутер а роутов как и не было. Хотя если до ребута смореть через show ipv6 route они присутствуют..
0 |
|
460 / 441 / 75 Регистрация: 26.12.2012 Сообщений: 2,883 |
|
|
23.04.2015, 09:04 |
3 |
|
вам принципиально Unique Local Addresses использовать ? если нет попробуйте с Global Unicast адресами, т.е используйте не fde4:1:1:3::/64 а 2a01:BF0:: например
0 |
|
0 / 0 / 0 Регистрация: 16.02.2015 Сообщений: 37 |
|
|
23.04.2015, 13:01 [ТС] |
4 |
|
с этим разобрался, добавил ipv6 unicast-routing вроде первый роутер проходить стало, но вот беда не хочет через тунели трафик идти..роут ведь прописывается как обычно для тунеля? т.е. просто на ип6 соседнего роутера кидаем трафик? Прикрепил проект с прописанными всеми роутами..
0 |
|
460 / 441 / 75 Регистрация: 26.12.2012 Сообщений: 2,883 |
|
|
23.04.2015, 13:03 |
5 |
|
добавил ipv6 unicast-routing без этой команды конечно не будет ipv6 работать
0 |

|
0 / 0 / 0 Регистрация: 16.02.2015 Сообщений: 37 |
|
|
23.04.2015, 13:07 [ТС] |
6 |
|
а видимо еще нужен образ к проекту исоса, вот он.
0 |
|
460 / 441 / 75 Регистрация: 26.12.2012 Сообщений: 2,883 |
|
|
23.04.2015, 13:10 |
7 |
|
напишите с какого на какой пробуете ?
0 |
|
0 / 0 / 0 Регистрация: 16.02.2015 Сообщений: 37 |
|
|
23.04.2015, 13:12 [ТС] |
8 |
|
Это с 8 роутера: Код Router#traceroute fde4:1:1:3::2 Type escape sequence to abort. Tracing the route to FDE4:1:1:3::2 1 FDE4:1:1:1::2 !U !U !U Router# fde4:1:1:3::2 - интерфейс 3 роутера вот файл иоса
0 |
|
460 / 441 / 75 Регистрация: 26.12.2012 Сообщений: 2,883 |
|
|
23.04.2015, 14:08 |
9 |
|
первое что увидел это то что у вас на R4 нет маршрута до fde4:1:1:3::2
0 |
|
0 / 0 / 0 Регистрация: 16.02.2015 Сообщений: 37 |
|
|
23.04.2015, 14:11 [ТС] |
10 |
|
обнаружил что роутер4 не пингует роутер2 через ипв6 адресс, и та же история роутер7 не пингует роутер2 по ипв6 адресу которые прописаны для туннелей Добавлено через 52 секунды
0 |
|
460 / 441 / 75 Регистрация: 26.12.2012 Сообщений: 2,883 |
|
|
23.04.2015, 14:16 |
11 |
|
на R2 на интерфейсе e0/0 нет ip адреса как он будет общаться ?
0 |
|
0 / 0 / 0 Регистрация: 16.02.2015 Сообщений: 37 |
|
|
23.04.2015, 14:43 [ТС] |
12 |
|
Код interface Ethernet0/0 ip address 55.128.0.2 255.128.0.0 half-duplex ! я добавил на R2 ipv6 route 3ffe::/16 Tunnel1 Код Router#traceroute 3ffe:b00:c18:1::1 Type escape sequence to abort. Tracing the route to 3FFE:B00:C18:1::1 1 2A02:BF0::2 32 msec 16 msec 20 msec 2 * * * Добавлено через 14 минут Router#traceroute 2002:b1:d0:3::81 Type escape sequence to abort. 1 2A04:BF0::2 32 msec 16 msec 20 msec Добавлено через 2 минуты С 5 роутера до 1-го (прописал маршрут через 3) Код Router#traceroute fde4:1:1:3::1 Type escape sequence to abort. Tracing the route to FDE4:1:1:3::1 1 FDE4:1:1:4::1 36 msec 16 msec 20 msec 2 FDE4:1:1:3::1 40 msec 36 msec 40 msec
0 |
|
460 / 441 / 75 Регистрация: 26.12.2012 Сообщений: 2,883 |
|
|
23.04.2015, 14:46 |
13 |
|
почему он ответил с глобального айпи а не локального? ну уберите тогда глобальные адреса с интерфесов
0 |
|
0 / 0 / 0 Регистрация: 16.02.2015 Сообщений: 37 |
|
|
23.04.2015, 14:58 [ТС] |
14 |
|
глобальные это пол беды, почему роутер7 не пингует свой же адрес интерфейса тунеля и соседнего роутера.. Router>ping 2002:b1:d0:3::81 Type escape sequence to abort. Type escape sequence to abort. Добавлено через 3 минуты
0 |
|
0 / 0 / 0 Регистрация: 16.02.2015 Сообщений: 37 |
|
|
23.04.2015, 15:01 [ТС] |
15 |
|
Вот последняя версия
0 |
|
0 / 0 / 0 Регистрация: 16.02.2015 Сообщений: 37 |
|
|
24.04.2015, 01:13 [ТС] |
16 |
|
нижний туннель заработал, который между р4 и р2, а вот верхний, который между р2 и р7 не работает, все так же не видят роутеры друг друга.. Добавлено через 11 минут Код interface Tunnel1 no ip address no ip redirects ipv6 address 2002:B1:D0:3::82/16 tunnel source 177.208.3.130 tunnel mode ipv6ip 6to4 ! ipv6 route 2002:B1:D0:3::/16 Tunnel1 Роутер2: interface Tunnel2 no ip address no ip redirects ipv6 address 2002:B1:D0:3::81/16 tunnel source 177.208.3.129 tunnel mode ipv6ip 6to4 ! ipv6 route 2002:B1:D0:3::/16 Tunnel2 Что я упускаю? Добавлено через 9 часов 55 минут 2002:B1:D0:3::82 -> 2002:B1D0:0382::/48
0 |
|
IT_Exp Эксперт 87844 / 49110 / 22898 Регистрация: 17.06.2006 Сообщений: 92,604 |
24.04.2015, 01:13 |
|
Помогаю со студенческими работами здесь GNS3 GNS3 Маршруты public class AccountModel … gns3 маршрутизация Gns3 маршрутизация
Искать еще темы с ответами Или воспользуйтесь поиском по форуму: 16 |
") Mikrotik на GNS3
Mikrotik на GNS3Cisco routers do not have Internet Protocol version 6 (IPv6) routing enabled by default. So how do we enable IPv6 on a router?
- First, enable IPv6 routing on a Cisco router using the ‘ipv6 unicast-routing’ global configuration command. This command globally enables IPv6 and must be the first command executed on the router.
- Configure the IPv6 global unicast address on an interface using the ‘ipv6 address address/prefix-length [eui-64]’ command. After you enter this command, the link local address will be automatically derived. If you omit the ‘eui-64’ parameter, you will need to configure the entire address manually.
IPv6 Configuration and Verification
Here is an IPv6 configuration example:
R1(config)#ipv6 unicast-routing
R1(config)#int Gi0/0
R1(config-if)#ipv6 address 2001:0BB9:AABB:1234::/64 eui-64
We can verify the IP configuration and IP settings using the ‘show ipv6 interface Gi0/0’ command:
R1#show ipv6 interface Gi0/0
GigabitEthernet0/0 is up, line protocol is up
  IPv6 is enabled, link-local address is FE80::201:42FF:FE65:3E01
  No Virtual link-local address(es):
  Global unicast address(es):
    2001:BB9:AABB:1234:201:42FF:FE65:3E01, subnet is 2001:BB9:AABB:1234::/64 [EUI]
  Joined group address(es):
    FF02::1
    FF02::2
    FF02::1:FF65:3E01
  MTU is 1500 bytes
  ....
From the output above, we can verify the following:
- The link local IPv6 address has been automatically configured. Link local addresses begin with FE80::/10, and the interface ID is used for the rest of the address. Because the interface’s MAC address is 00:01:42:65:3E01, the calculated address is FE80::201:42FF:FE65:3E01.IPv6 hosts check that their link local IP addresses are unique and not in use by reaching out to the local network using Neighbor Discovery Process (NDP).
- The global IPv6 address has been created using the modified EUI-64 method. Remember that IPv6 global addresses begin with 2000::/3. So in our case, the IPv6 global address is 2001:BB9:AABB:1234:201:42FF:FE65:3E01.
We will also create an IPv6 address on another router. This time, we will enter the whole address:
R2(config-if)#ipv6 address 2001:0BB9:AABB:1234:1111:2222:3333:4444/64
Notice that the IPv6 address is in the same subnet configured on R1 (2001:0BB9:AABB:1234/64). We can test the connectivity between the devices using the ‘ping’ command for IPv6:
R1#ping ipv6 2001:0BB9:AABB:1234:1111:2222:3333:4444

Type escape sequence to abort.
Sending 5, 100-byte ICMP Echos to 2001:0BB9:AABB:1234:1111:2222:3333:4444, timeout is 2 seconds:
!!!!!
Success rate is 100 percent (5/5), round-trip min/avg/max = 0/0/0 ms
As you can see from the output above, the devices can communicate with each other. So that’s how to enable IPv6 on router. IPv6 addresses and the default gateway can also be configured on hosts automatically using SLAAC and DHCPv6. DNS servers are still required to be able to reach the Internet.
Download our Free CCNA Study Guide PDF for complete notes on all the CCNA 200-301 exam topics in one book.
We recommend the Cisco CCNA Gold Bootcamp as your main CCNA training course. It’s the highest rated Cisco course online with an average rating of 4.8 from over 30,000 public reviews and is the gold standard in CCNA training:

![]()
The premiere source of truth powering network automation. Open and extensible, trusted by thousands.
![]()
NetBox is now available as a managed cloud solution! Stop worrying about your tooling and get back to building networks.
By stretch | Friday, April 9, 2010 at 1:11 a.m. UTC
I managed to frustrate myself recently (sadly, not an uncommon occurrence) while working on an IPv6 lab. One of the routers simply refused to pass traffic, and at first I could not figure out why. The solution was simple — and in hindsight, painfully obvious — but I decided to record it here for posterity.
Here we have a simple scenario, three routers connected in series:

R1 and R3 both have a static default IPv6 route installed, pointing toward R2 as the next hop. All interfaces are up, and you would assume they could ping one another.
R1# show ipv6 route
IPv6 Routing Table - 4 entries
Codes: C - Connected, L - Local, S - Static, R - RIP, B - BGP
       U - Per-user Static route, M - MIPv6
       I1 - ISIS L1, I2 - ISIS L2, IA - ISIS interarea, IS - ISIS summary
       O - OSPF intra, OI - OSPF inter, OE1 - OSPF ext 1, OE2 - OSPF ext 2
       ON1 - OSPF NSSA ext 1, ON2 - OSPF NSSA ext 2
       D - EIGRP, EX - EIGRP external
S   ::/0 [1/0]
     via 2001:DB8:0:12::2
C   2001:DB8:0:12::/64 [0/0]
     via ::, FastEthernet0/0
L   2001:DB8:0:12::1/128 [0/0]
     via ::, FastEthernet0/0
L   FF00::/8 [0/0]
     via ::, Null0
R1# ping 2001:db8:0:12::2
Type escape sequence to abort.
Sending 5, 100-byte ICMP Echos to 2001:DB8:0:12::2, timeout is 2 seconds:
!!!!!
Success rate is 100 percent (5/5), round-trip min/avg/max = 4/6/8 ms
R1# ping 2001:db8:0:23::3
Type escape sequence to abort.
Sending 5, 100-byte ICMP Echos to 2001:DB8:0:23::3, timeout is 2 seconds:
.....
Success rate is 0 percent (0/5)
No luck. What gives? Let’s start an IPv6 packet debug on R2 to hopefully shed some light on the issue.
R2# debug ipv6 packet
IPv6 unicast packet debugging is on
Attempting our ping again from R1 elicits the following output from the debug on R2:
*Mar  1 00:14:14.575: IPV6: source 2001:DB8:0:12::1 (FastEthernet0/0)
*Mar  1 00:14:14.575:       dest 2001:DB8:0:23::3 (FastEthernet0/1)
*Mar  1 00:14:14.579:       traffic class 0, flow 0x0, len 100+14, prot 58, hops 64, not a router?
*Mar  1 00:14:16.591: IPV6: source 2001:DB8:0:12::1 (FastEthernet0/0)
*Mar  1 00:14:16.591:       dest 2001:DB8:0:23::3 (FastEthernet0/1)
*Mar  1 00:14:16.591:       traffic class 0, flow 0x0, len 100+14, prot 58, hops 64, not a router?
...
«Not a router»? I don’t want to get into a philosophical debate, I just want to ping, damnit. After a moment, though, the message clicks: R2 is indeed not an IPv6 router. Unlike its well-established predecessor, IPv6 routing does not yet come enabled out of the box. The administrator must enable it, which I forgot to do.
R2(config)# ipv6 unicast-routing
R1# ping 2001:db8:0:23::3

Type escape sequence to abort.
Sending 5, 100-byte ICMP Echos to 2001:DB8:0:23::3, timeout is 2 seconds:
!!!!!
Success rate is 100 percent (5/5), round-trip min/avg/max = 4/9/16 ms
Back on R2, our debug confirms R2 is indeed a router now:
*Mar  1 00:19:26.107: IPV6: source 2001:DB8:0:23::3 (FastEthernet0/1)
*Mar  1 00:19:26.107:       dest 2001:DB8:0:12::1 (FastEthernet0/0)
*Mar  1 00:19:26.107:       traffic class 0, flow 0x0, len 100+14, prot 58, hops 63, forwarding
As a footnote, IPv4 can also be toggled on and off with no ip routing; great for pranking your coworkers, especially considering that debug ip packet (the IPv4 packet debug) won’t offer any clues.

Support PacketLife by buying stuff you don’t need!
Comments
Didzis Ozolins
April 9, 2010 at 5:55 a.m. UTC
happened to me as well, but with ipv4. In these cases there will be no routing table, so i usually execute the «show ip route» to see whether «ip routing» is enabled or not.
shivlu
April 9, 2010 at 6:04 a.m. UTC
RaSta
April 9, 2010 at 6:41 a.m. UTC
Great footnote, this will keep my coworker happy and sharp :p
Murali
April 9, 2010 at 9:49 a.m. UTC
Nice. I have actually seen ‘no ip routing’ used deliberately in devices which are intended to behave as pure layer-2 switches, or as hosts (e.g. voice gateways). It’s useful because it makes the output of ‘show ip route’ very different, making it clear that you’re working on a layer-2 device.
Marco Rizzi
April 9, 2010 at 9:59 a.m. UTC
Nice one,
that’s the kind of troubleshooting you will remember forever…
I just recalled my first L3 switch installation at CCNA times years ago… I missed the ip routing command for about 1 hour…. (not funny with static routes, no way to find a solution…)

Marco
gradgrind
April 9, 2010 at 11:03 a.m. UTC
I’ve gotten stuck on the same thing. I’m not sure how good the practice is, but I will use the ipv6 unicast routing command on the router pointed to the IPv6 internet in my lab to «turn IPv6 on and off».
Evan
April 9, 2010 at 11:55 a.m. UTC
Stretch, if that is the case then how did you configure the R2 interfaces with IPv6 addresses without turning on IPv6 first? From what I remember the router does not allow you to do this without implementing the «ipv6 unicast-routing» first.
Evan
April 9, 2010 at 12:04 p.m. UTC
My mistake, it does allow you to address it, how stupid is that?!
pompeychimes
April 9, 2010 at 9:23 p.m. UTC
Back in the day not having ip routing enabled was a frequent gotcha.
stretch
April 9, 2010 at 10:30 p.m. UTC
@Evan: Remember, just because it may not be an IPv6 router doesn’t mean it can’t be an IPv6 host (e.g. for administrative access).
UnderratedKing
April 10, 2010 at 3:14 a.m. UTC
Nice write up Stretch. I actually just completed a lab earlier today on your lab involving the command ipv6 unicast-routing. I’m getting ready to take the BSCI.
pradeep
April 10, 2010 at 12:00 p.m. UTC
Hi Stretch,
Nice troubleshooting.
Jim
April 12, 2010 at 5:25 p.m. UTC
hp_sky
April 18, 2010 at 5:30 a.m. UTC
Very good,thanks for share it!:-)
bob
April 21, 2010 at 1:37 p.m. UTC
This must rank up there with forgetting to «no shut» an interface…
Philip
April 21, 2010 at 1:41 p.m. UTC
Additional IPv6 fun fact: if you’re planning to enable IPv6 CEF, IPv4 CEF must be enabled first.
OH BOY
August 28, 2010 at 4:00 a.m. UTC
Thanks Strech
i was doing my uni assignment and stuck for hours to figure out how to troubleshoot that bloody «not a router?» debug message…
Funny thing is there is no info available on Google search. luckily i bumped into your life saving post here..lol
It was really worth posting it here, even though its a simple silly error (especially for n00b like me).
Thanks mate.
ciscom
January 20, 2012 at 11:59 p.m. UTC
You just saved my day!!!!! My goodness…And there shall be light!!
gnarly_packet
July 23, 2012 at 2:35 a.m. UTC
Great post, i was hitting this too!!
Alex
October 12, 2012 at 8:29 a.m. UTC
Just got the same problem, thanks for this post!!
Daro
October 22, 2013 at 8:36 p.m. UTC
Thanx! This helped me a lot while I got stucked in NAT-PT lab
Ashutosh
November 26, 2013 at 5:51 a.m. UTC
Thanks for the post! It’s straight forward and very helpful.
A guest
December 22, 2014 at 7:06 a.m. UTC
you saved my time
Comments have closed for this article due to its age.