Sergey is correct, but if you need to get a response from your home-spun dialog(s) for evaluation in the same block of code that invoked it, you should use .showAndWait(), not .show(). Here’s my rendition of a couple of the dialog types that are provided in Swing’s OptionPane:
public class FXOptionPane {

public enum Response { NO, YES, CANCEL };

private static Response buttonSelected = Response.CANCEL;

private static ImageView icon = new ImageView();

static class Dialog extends Stage {
    public Dialog( String title, Stage owner, Scene scene, String iconFile ) {
        setTitle( title );
        initStyle( StageStyle.UTILITY );
        initModality( Modality.APPLICATION_MODAL );
        initOwner( owner );
        setResizable( false );
        setScene( scene );
        icon.setImage( new Image( getClass().getResourceAsStream( iconFile ) ) );
    }
    public void showDialog() {
        sizeToScene();
        centerOnScreen();
        showAndWait();
    }
}

static class Message extends Text {
    public Message( String msg ) {
        super( msg );
        setWrappingWidth( 250 );
    }
}

public static Response showConfirmDialog( Stage owner, String message, String title ) {
    VBox vb = new VBox();
    Scene scene = new Scene( vb );
    final Dialog dial = new Dialog( title, owner, scene, "res/Confirm.png" );
    vb.setPadding( new Inset(10,10,10,10) );
    vb.setSpacing( 10 );
    Button yesButton = new Button( "Yes" );
    yesButton.setOnAction( new EventHandler<ActionEvent>() {
        @Override public void handle( ActionEvent e ) {
            dial.close();
            buttonSelected = Response.YES;
        }
    } );
    Button noButton = new Button( "No" );
    noButton.setOnAction( new EventHandler<ActionEvent>() {
        @Override public void handle( ActionEvent e ) {
            dial.close();
            buttonSelected = Response.NO;
        }
    } );
    BorderPane bp = new BorderPane();
    HBox buttons = new HBox();
    buttons.setAlignment( Pos.CENTER );
    buttons.setSpacing( 10 );
    buttons.getChildren().addAll( yesButton, noButton );
    bp.setCenter( buttons );
    HBox msg = new HBox();
    msg.setSpacing( 5 );
    msg.getChildren().addAll( icon, new Message( message ) );
    vb.getChildren().addAll( msg, bp );
    dial.showDialog();
    return buttonSelected;
}

public static void showMessageDialog( Stage owner, String message, String title ) {
    showMessageDialog( owner, new Message( message ), title );
}
public static void showMessageDialog( Stage owner, Node message, String title ) {
    VBox vb = new VBox();
    Scene scene = new Scene( vb );
    final Dialog dial = new Dialog( title, owner, scene, "res/Info.png" );
    vb.setPadding( new Inset(10,10,10,10) );
    vb.setSpacing( 10 );
    Button okButton = new Button( "OK" );
    okButton.setAlignment( Pos.CENTER );
    okButton.setOnAction( new EventHandler<ActionEvent>() {
        @Override public void handle( ActionEvent e ) {
            dial.close();
        }
    } );
    BorderPane bp = new BorderPane();
    bp.setCenter( okButton );
    HBox msg = new HBox();
    msg.setSpacing( 5 );
    msg.getChildren().addAll( icon, message );
    vb.getChildren().addAll( msg, bp );
    dial.showDialog();
}
}

Today’s tutorial demonstrates creating a JavaFX message box in our Java application. The message box can be a confirmation, warning, information, or error alert.
Create JavaFX Message Box
To accomplish the following example code, we use Java version 18, JavaFX version 13 and Netbeans IDE version 13.
Example Code:
//write your package name
package com.mycompany.javafx_messagebox;
//import required libraries
import javafx.application.Application;
import javafx.event.ActionEvent;
import javafx.geometry.Insets;
import javafx.scene.Scene;
import javafx.scene.control.Alert;
import javafx.scene.control.Alert.AlertType;
import javafx.scene.control.Button;
import javafx.scene.layout.TilePane;
import javafx.stage.Stage;
/**
* JavaFX App
*/
public class App extends Application {
@Override
public void start(Stage stage) {
// create a tile pane
TilePane r = new TilePane();
//add padding
r.setPadding(new Insets(10, 10, 10, 10));
// an array of button names
String[] buttonNames = {"Confirmation MessageBox",
"Error MessageBox",
"Information MessageBox",
"Warning MessageBox"};
//Show no alert at the startup of the program
Alert alert = new Alert(AlertType.NONE);
/*
a loop to create buttons, define actions when
they are pressed and add them to the tile pane
*/
for (String s : buttonNames) {
Button button = new Button(s);
button.setOnAction((ActionEvent event) -> {
if (null != button.getText()) {
switch (button.getText()) {
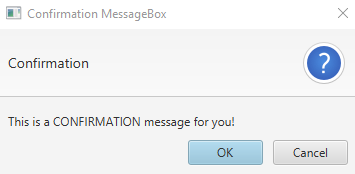
case "Confirmation MessageBox":
// set alert type, title, content text and then show it
alert.setAlertType(AlertType.CONFIRMATION);
alert.setTitle("Confirmation MessageBox");
alert.setContentText("This is a CONFIRMATION "+
"message for you!");
alert.show();
break;
case "Error MessageBox":
// set alert type, title, content text and then show it
alert.setAlertType(AlertType.ERROR);
alert.setTitle("Error MessageBox");
alert.setContentText("This is an ERROR message for you!");
alert.show();
break;
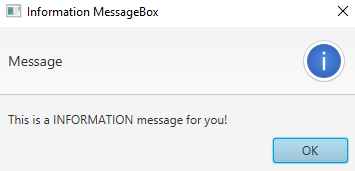
case "Information MessageBox":
// set alert type, title, content text and then show it
alert.setAlertType(AlertType.INFORMATION);
alert.setTitle("Information MessageBox");
alert.setContentText("This is a INFORMATION "+
"message for you!");
alert.show();
break;
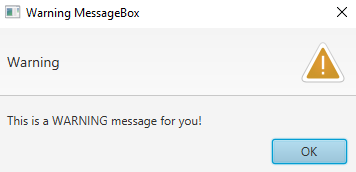
case "Warning MessageBox":
// set alert type, title, content text and then show it
alert.setAlertType(AlertType.WARNING);
alert.setTitle("Warning MessageBox");
alert.setContentText("This is a WARNING message for you!");
alert.show();
break;
default:
break;
}
}
});
//add button
r.getChildren().add(button);
}
// create a scene
Scene sc = new Scene(r, 640, 50);
// set the scene
stage.setScene(sc);
//show the stage
stage.show();
}//end start method
//main method
public static void main(String[] args) {
launch(args);
}//end main
}//end App class
Output (main window):

Output (confirmation message box, displayed when we click on Confirmation MessageBox button):
Output (error message box, displayed when we click on Error MessageBox button):

Output (information message box, displayed when we click on Information MessageBox button):
OUTPUT (warning message box, displayed when we click on the Warning MessageBox button):
For this tutorial, we don’t need to make any changes to the module-info.java and pom.xml files. Create a JavaFX project and practice the code given above.
We have a main class named App that extends the Application class (which is standard in Java). You can name the primary launch class (App).
Next, we override the start() method because the App is the child class of the Application class. Remember that the child class needs to implement all abstract functions/methods of the parent class.
After that, we have a start() method that takes one parameter of the Stage type. We are using the Stage type parameter because this is where all visual components JavaFX application will be displayed.
We do not need to create the Stage type object because the JavaFX runtime creates it. The following is the step-by-step explanation of what’s inside the start() method.
-
Create an object of JavaFX
TilePane, which is a layout component and lays out all its child components in the grid of same-sized cells. -
Add margins around the whole grid (
top/right/bottom/left). -
Create an array with the names of all buttons we need for this application.
-
Create an alert message box of type
NONEbecause we do not want to display any message box at the program’s startup. -
Next, we have a
forloop, which iterates over all the button names.- Inside the loop, we create a button of the current name.
- Set an action for that specific button based on the condition. We get the button text and display a message box based on the button name using the
switchstatement.
-
Add the button to the
TilePane. -
Create a scene using the
Sceneclass. -
Set the scene.
-
Finally, show the stage.
Now, it is the main method’s turn. We can launch the JavaFX application without having the main method, but it is useful when we are required to use parameters that are passed to the application using the command line.
JavaFX 8u40 finally includes simple Dialogs and Alerts! I’ve been waiting for this since 2012! In the meantime I wrote about how to use Dialogs in JavaFX 2 and later in JavaFX 8 with ControlsFX.
Now that they are available in the official JDK, let’s learn how to use them.
Prerequisites
To use the official JavaFX Dialogs you need JDK 8u40 or later.
→ Download JDK 8u40 or newer.
Standard Dialogs
Information Dialog
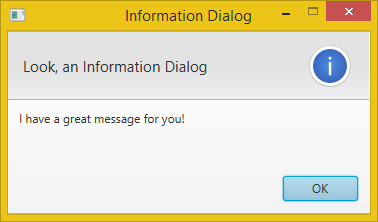
Alert alert = new Alert(AlertType.INFORMATION);
alert.setTitle("Information Dialog");
alert.setHeaderText("Look, an Information Dialog");
alert.setContentText("I have a great message for you!");

alert.showAndWait();
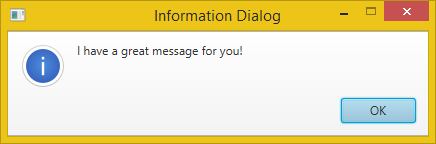
Alert alert = new Alert(AlertType.INFORMATION);
alert.setTitle("Information Dialog");
alert.setHeaderText(null);
alert.setContentText("I have a great message for you!");

alert.showAndWait();
Warning Dialog

Alert alert = new Alert(AlertType.WARNING);
alert.setTitle("Warning Dialog");
alert.setHeaderText("Look, a Warning Dialog");
alert.setContentText("Careful with the next step!");

alert.showAndWait();
Error Dialog
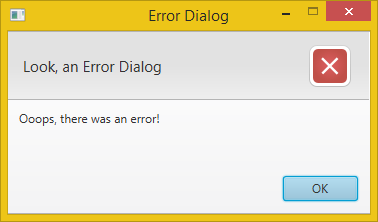
Alert alert = new Alert(AlertType.ERROR);
alert.setTitle("Error Dialog");
alert.setHeaderText("Look, an Error Dialog");
alert.setContentText("Ooops, there was an error!");

alert.showAndWait();
Exception Dialog
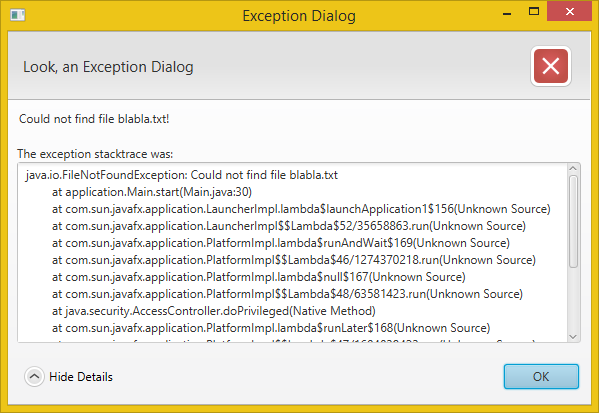
There is not a complete Exception Dialog out of the box. But we can easily provide TextArea as expandable content.
Alert alert = new Alert(AlertType.ERROR);
alert.setTitle("Exception Dialog");
alert.setHeaderText("Look, an Exception Dialog");
alert.setContentText("Could not find file blabla.txt!");

Exception ex = new FileNotFoundException("Could not find file blabla.txt");

// Create expandable Exception.
StringWriter sw = new StringWriter();
PrintWriter pw = new PrintWriter(sw);
ex.printStackTrace(pw);
String exceptionText = sw.toString();

Label label = new Label("The exception stacktrace was:");

TextArea textArea = new TextArea(exceptionText);
textArea.setEditable(false);
textArea.setWrapText(true);

textArea.setMaxWidth(Double.MAX_VALUE);
textArea.setMaxHeight(Double.MAX_VALUE);
GridPane.setVgrow(textArea, Priority.ALWAYS);
GridPane.setHgrow(textArea, Priority.ALWAYS);

GridPane expContent = new GridPane();
expContent.setMaxWidth(Double.MAX_VALUE);
expContent.add(label, 0, 0);
expContent.add(textArea, 0, 1);

// Set expandable Exception into the dialog pane.
alert.getDialogPane().setExpandableContent(expContent);

alert.showAndWait();
Confirmation Dialog
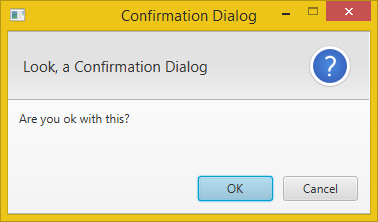
Alert alert = new Alert(AlertType.CONFIRMATION);
alert.setTitle("Confirmation Dialog");
alert.setHeaderText("Look, a Confirmation Dialog");
alert.setContentText("Are you ok with this?");

Optional<ButtonType> result = alert.showAndWait();
if (result.get() == ButtonType.OK){
    // ... user chose OK
} else {
    // ... user chose CANCEL or closed the dialog
}
Confirmation Dialog with Custom Actions
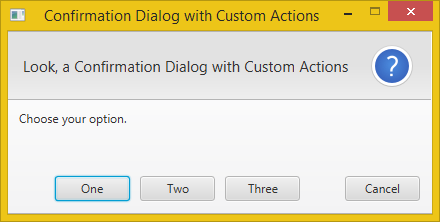
Alert alert = new Alert(AlertType.CONFIRMATION);
alert.setTitle("Confirmation Dialog with Custom Actions");
alert.setHeaderText("Look, a Confirmation Dialog with Custom Actions");
alert.setContentText("Choose your option.");

ButtonType buttonTypeOne = new ButtonType("One");
ButtonType buttonTypeTwo = new ButtonType("Two");
ButtonType buttonTypeThree = new ButtonType("Three");
ButtonType buttonTypeCancel = new ButtonType("Cancel", ButtonData.CANCEL_CLOSE);

alert.getButtonTypes().setAll(buttonTypeOne, buttonTypeTwo, buttonTypeThree, buttonTypeCancel);

Optional<ButtonType> result = alert.showAndWait();
if (result.get() == buttonTypeOne){
    // ... user chose "One"
} else if (result.get() == buttonTypeTwo) {
    // ... user chose "Two"
} else if (result.get() == buttonTypeThree) {
    // ... user chose "Three"
} else {
    // ... user chose CANCEL or closed the dialog
}
Text Input Dialog

TextInputDialog dialog = new TextInputDialog("walter");
dialog.setTitle("Text Input Dialog");
dialog.setHeaderText("Look, a Text Input Dialog");
dialog.setContentText("Please enter your name:");

// Traditional way to get the response value.
Optional<String> result = dialog.showAndWait();
if (result.isPresent()){
    System.out.println("Your name: " + result.get());
}

// The Java 8 way to get the response value (with lambda expression).
result.ifPresent(name -> System.out.println("Your name: " + name));
Note: The result.isPresent() will return false if the user cancelled the dialog.
Choice Dialog
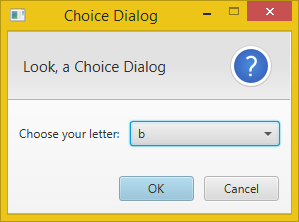
List<String> choices = new ArrayList<>();
choices.add("a");
choices.add("b");
choices.add("c");

ChoiceDialog<String> dialog = new ChoiceDialog<>("b", choices);
dialog.setTitle("Choice Dialog");
dialog.setHeaderText("Look, a Choice Dialog");
dialog.setContentText("Choose your letter:");

// Traditional way to get the response value.
Optional<String> result = dialog.showAndWait();
if (result.isPresent()){
    System.out.println("Your choice: " + result.get());
}

// The Java 8 way to get the response value (with lambda expression).
result.ifPresent(letter -> System.out.println("Your choice: " + letter));
Note: The result.isPresent() will return false if the user didn’t choose anything or cancelled the dialog.
Custom Login Dialog
Here is an example of how to create a custom dialog with a login form:
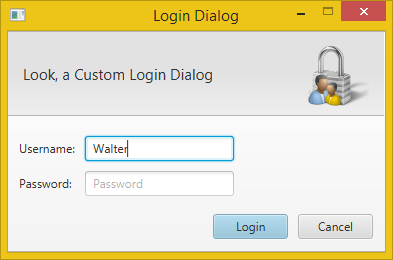
// Create the custom dialog.
Dialog<Pair<String, String>> dialog = new Dialog<>();
dialog.setTitle("Login Dialog");
dialog.setHeaderText("Look, a Custom Login Dialog");

// Set the icon (must be included in the project).
dialog.setGraphic(new ImageView(this.getClass().getResource("login.png").toString()));

// Set the button types.
ButtonType loginButtonType = new ButtonType("Login", ButtonData.OK_DONE);
dialog.getDialogPane().getButtonTypes().addAll(loginButtonType, ButtonType.CANCEL);

// Create the username and password labels and fields.
GridPane grid = new GridPane();
grid.setHgap(10);
grid.setVgap(10);
grid.setPadding(new Insets(20, 150, 10, 10));

TextField username = new TextField();
username.setPromptText("Username");
PasswordField password = new PasswordField();
password.setPromptText("Password");

grid.add(new Label("Username:"), 0, 0);
grid.add(username, 1, 0);
grid.add(new Label("Password:"), 0, 1);
grid.add(password, 1, 1);

// Enable/Disable login button depending on whether a username was entered.
Node loginButton = dialog.getDialogPane().lookupButton(loginButtonType);
loginButton.setDisable(true);

// Do some validation (using the Java 8 lambda syntax).
username.textProperty().addListener((observable, oldValue, newValue) -> {
    loginButton.setDisable(newValue.trim().isEmpty());
});

dialog.getDialogPane().setContent(grid);

// Request focus on the username field by default.
Platform.runLater(() -> username.requestFocus());

// Convert the result to a username-password-pair when the login button is clicked.
dialog.setResultConverter(dialogButton -> {
    if (dialogButton == loginButtonType) {
        return new Pair<>(username.getText(), password.getText());
    }
    return null;
});

Optional<Pair<String, String>> result = dialog.showAndWait();

result.ifPresent(usernamePassword -> {
    System.out.println("Username=" + usernamePassword.getKey() + ", Password=" + usernamePassword.getValue());
});
Styling the Dialogs
Custom Icon
![]()
In the current version it’s a bit cumbersome to get to the Dialog’s Stage to be able to set its icon. Here is how:
// Get the Stage.
Stage stage = (Stage) dialog.getDialogPane().getScene().getWindow();

// Add a custom icon.
stage.getIcons().add(new Image(this.getClass().getResource("login.png").toString()));
According to this bug report the final version of the JavaFX 8u40 Dialogs should use the same icon as the application that it is running from. In that case you would need to set its owner and the Dialog would get the owner’s icon:
dialog.initOwner(otherStage);
Minimal Decorations
Another option is to remove the icon and use only minimal window decorations.
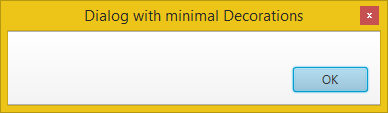
dialog.initStyle(StageStyle.UTILITY);
Other Options
Setting the Owner
You can specify the owner Window for a dialog. If no owner or null is specified for the owner, it is a top-level, unowned dialog.
dialog.initOwner(parentWindow);
Setting the Modality
You can specify the modality for a dialog. The modality must be one of Modality.NONE, Modality.WINDOW_MODAL, or Modality.APPLICATION_MODAL.
dialog.initModality(Modality.NONE);
API Documentation
For more information on the Dialogs have a look at the JavaFX API docs:
- Alert
- Dialog
- TextInputDialog
- ChoiceDialog
- DialogPane
import javafx.application.Application;
import javafx.scene.Scene;
import javafx.scene.control.Button;
import javafx.scene.layout.*;
import javafx.event.ActionEvent;
import javafx.event.EventHandler;
import javafx.scene.control.*;
import javafx.stage.Stage;
import javafx.scene.control.Alert.AlertType;
public class Alert_2 extends Application {
public void start(Stage s)
{
s.setTitle("creating alerts");
Button b = new Button("Confirmation alert");
Button b1 = new Button("error alert");
Button b2 = new Button("Information alert");
Button b3 = new Button("Warning alert");
Button b4 = new Button("none alert");
TilePane r = new TilePane();
Alert a = new Alert(AlertType.NONE);
EventHandler<ActionEvent> event = new
EventHandler<ActionEvent>() {
public void handle(ActionEvent e)
{
a.setAlertType(AlertType.CONFIRMATION);
a.setContentText("ConfirmationDialog");
a.show();
}
};
EventHandler<ActionEvent> event1 = new
EventHandler<ActionEvent>() {
public void handle(ActionEvent e)
{
a.setAlertType(AlertType.ERROR);
a.setContentText("error Dialog");
a.show();
}
};
EventHandler<ActionEvent> event2 = new
EventHandler<ActionEvent>() {
public void handle(ActionEvent e)
{
a.setAlertType(AlertType.INFORMATION);
a.setContentText("Information Dialog");
a.show();
}
};
EventHandler<ActionEvent> event3 = new
EventHandler<ActionEvent>() {
public void handle(ActionEvent e)
{
a.setAlertType(AlertType.WARNING);
a.setContentText("Warning Dialog");
a.show();
}
};
EventHandler<ActionEvent> event4 = new
EventHandler<ActionEvent>() {
public void handle(ActionEvent e)
{
Alert a1 = new Alert(AlertType.NONE,
"default Dialog",ButtonType.APPLY);
a1.show();
}
};
b.setOnAction(event);
b1.setOnAction(event1);
b2.setOnAction(event2);
b3.setOnAction(event3);
b4.setOnAction(event4);
r.getChildren().add(b);
r.getChildren().add(b1);
r.getChildren().add(b2);
r.getChildren().add(b3);
r.getChildren().add(b4);
Scene sc = new Scene(r, 200, 200);
s.setScene(sc);
s.show();
}
public static void main(String args[])
{
launch(args);
}
}
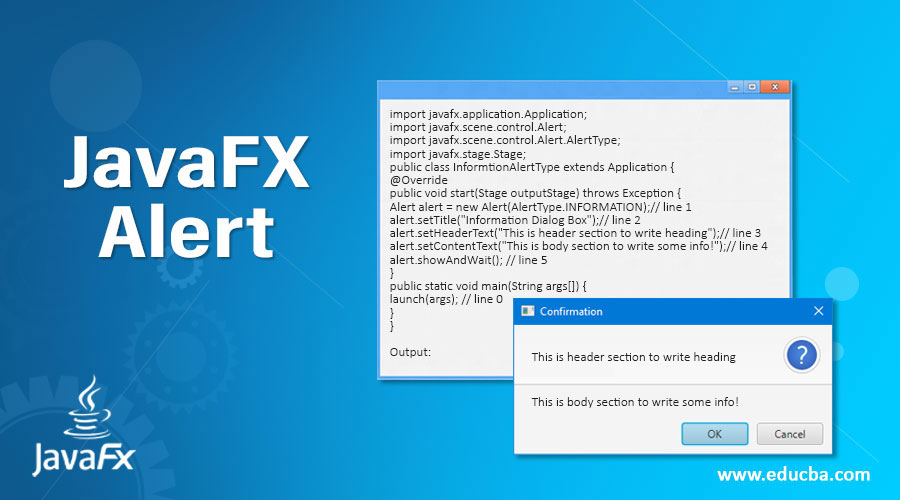
Introduction to JavaFX Alert
In JavaFX, an Alert box is used to alert the user about further process. JavaFX Alert class is a subclass of Dialog class. Alert box in javafx alert the user about information, error messages, confirmation messages and warning messages to let know them the user about what exact dialog popup is about.
There are different ways to alert the user about what happening next. In that, there are 5 Alert types to alert the user.
Types of Alert Box in JavaFX
Below are the points which explain the types of alert box in javaFX:
- None Alert: The None alert types do not set to any default properties.
- Information Alert: The Information alert type informs the user about content information or suggests the user about what is going on in the next process.
- Error Alert: The Error alert type is showing the user about where things went wrong or what is the error with the functionality.
- Confirmation Alert: The Confirmation alert type is asking the user about permission to move further. We have two options available, Yes or If we click Yes means we have granted them permission to move next step of If we click No, then do not move to the next step.
- Warning Alert: The Warning alert type warns the user about some fact or action. The warning does not disturb the further process as like Error.
Methods and Constructors in Alert Box
Below we can see the methods and constructor of alert box:
Methods
- getAlertType(): Gives alert type.
- setAlertType(Alert.AlertType): Setting the alert type.
- getButtonTypes(): Get button type from the Observable list.
- setContentText(String s): Setting the content or text to alert the user about what is the dialog box.
- getContentText(): Gives the content text which we have set.
Constructors
- Alert(Alert.AlertType alertType): Create a new Alert object with an alert type parameter.
- Alert(Alert.AlertType alertType, String string, ButtonType… buttonType): Create new Alert object with alert type, String and Button type parameters.
How does Alert Box work in JavaFX?
Alert box in JavaFX mainly works on the value of alert type which is provided by Alert(AlertType.VALUE) constructor. Accessing JavaFX features user-defined class must extend Application
1.NONE Alert
Alert alertType=new Alert(AlertType.NONE);2. INFORMATION Alert
Alert alertType=new Alert(AlertType.INFORMATION);3. ERROR Alert
Alert alertType=new Alert(AlertType.ERROR);4. CONFIRMATION Alert
Alert alertType=new Alert(AlertType.INFORMATION);5. WARNING Alert
Alert alertType=new Alert(AlertType.WARNING);How to Create Alert Box in Java FX?
Steps to Create Alert Boxes:
Step 1: Create an Alert type
Alert alertType=new Alert(AlertType.TYPE);Step 2: Create a Pane or any other component.
TilePane tilePane=new TilePane ();Step 3: Creating a scene means screen to display output.
Scene screen = new Scene(tilePane, length, width);Step 4: Adding Scene reference screen to the Stage:
stage.setScene(screen);Step 5: showing stage reference with the show () method.
stage.show();Note: 2,3,4 and 5 steps are optional if we want any action classes with alert boxes then use 2,3,4 and 5 steps.
Examples of JavaFX Alert
Below are the examples of JavaFX Alert:
1. Information Alert
Code:
import javafx.application.Application;
import javafx.scene.control.Alert;
import javafx.scene.control.Alert.AlertType;
import javafx.stage.Stage;
public class InformtionAlertType extends Application {
@Override
public void start(Stage outputStage) throws Exception {
Alert alert = new Alert(AlertType.INFORMATION);// line 1
alert.setTitle("Information Dialog Box");// line 2
alert.setHeaderText("This is header section to write heading");// line 3
alert.setContentText("This is body section to write some info!");// line 4
alert.showAndWait(); // line 5
}
public static void main(String args[]) {
launch(args); // line 0
}
}
Output:
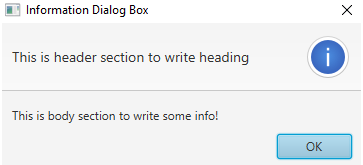
Explanation to the above program: In the above code line 0 calls start method from internal JVM. Line 1 creates an information alert type. Line 2 sets the title to a dialog box. Line 3 sets the header text. Line 4 sets the body text of the dialog box. Line 5 shows the dialog box output. As you can see in the output information dialog box has a predefined image on the right end.
2. Error Alert
Code:
import javafx.application.Application;
import javafx.scene.control.Alert;
import javafx.scene.control.Alert.AlertType;
import javafx.stage.Stage;
public class ErrorAlertType extends Application {
@Override
public void start(Stage outputStage) throws Exception {
Alert alert = new Alert(AlertType.ERROR);// line 1
alert.setTitle("Error Dialog Box");// line 2
alert.setHeaderText("ERROR HEADING");// line 3
alert.setContentText("I am proving what is the error exactly!");// line 4
alert.showAndWait(); // line 5
}
public static void main(String args[]) {
launch(args); // line 0
}
}
Output:
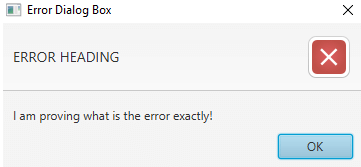
Explanation to the above program: In the above code line 0 calls start method from internal JVM. Line 1 creates an error alert type. Line 2 sets the title to the dialog box. Line 3 sets the header text. Line 4 sets the body text of the dialog box. Line 5 shows the dialog box output. As you can see in the output information dialog box has a predefined image on the right end.
3. Confirmation Alert
Code:
import javafx.application.Application;
import javafx.scene.control.Alert;
import javafx.scene.control.Alert.AlertType;
import javafx.stage.Stage;
public class ConfirmationAlertType extends Application {
@Override
public void start(Stage outputStage) throws Exception {
Alert alert = new Alert(AlertType.CONFIRMATION);// line 1
alert.setTitle("Confirmation Dialog Box");// line 2
alert.setHeaderText("Please Confirm!");// line 3
alert.setContentText("Are you sure want to move further?!");// line 4
alert.showAndWait(); // line 5
}
public static void main(String args[]) {
launch(args); // line 0
}
}
Output:
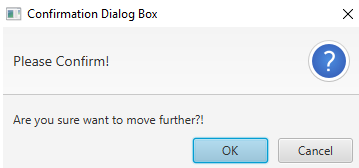
Explanation to the above program: In the above code line 0 calls start method from internal JVM. Line 1 creates a confirmation alert type. Line 2 sets the title to the dialog box. Line 3 sets the header text. Line 4 sets the body text of the dialog box. Line 5 shows the dialog box output. As you can see in the output information dialog box has a predefined image on the right end.
4. Warning Alert
Code:
import javafx.application.Application;
import javafx.scene.control.Alert;
import javafx.scene.control.Alert.AlertType;
import javafx.stage.Stage;
public class WarningAlertType extends Application {
@Override
public void start(Stage outputStage) throws Exception {
Alert alert = new Alert(AlertType.WARNING);// line 1
alert.setTitle("Warning Dialog Box");// line 2
alert.setHeaderText("Warning!");// line 3
alert.setContentText("Some packages may be installed additionally!");// line 4
alert.showAndWait(); // line 5
}
public static void main(String args[]) {
launch(args); // line 0
}
}
Output:
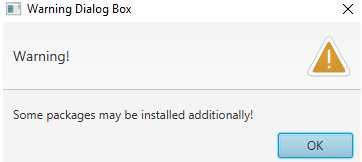
Explanation to the above program: In the above code line 0 calls start method from internal JVM. Line 1 creates a warning alert type. Line 2 sets the title to the dialog box. Line 3 sets the header text. Line 4 sets the body text of the dialog box. Line 5 shows the dialog box output. As you can see in the output information dialog box has a predefined image on the right end.
Recommended Articles
This is a guide to JavaFX Alert. Here we discuss Syntax, methods, and constructors, with how to create and different examples of JavaFX Alert. You can also go through our other related articles to learn more –
- JavaFX Libraries
- JavaFX VBox
- JavaFX FileChooser
- JavaFX TextField