Everytime I launch TF2, I get the following message: Setup file ‘gameinfo.txt’ doesn’t exist in subdirectory ‘hl2’. Check your -game parameter or VCONFIG setting.
Things I’ve tried
-Fresh reinstall (twice)
-Fresh OS reinstall
-Update drivers etc.
-Find ‘gameinfo.txt’ in my tf folder, delete it, verify game cache, and launch again
-verify game cache
-restart PC
-wait for a while
-run as admin
Help would be appreciated!
Have you tried replacing the gameinfo.txt with a new one? Here’s a link. Just place that in your tf folder and see if it works.
Have you tried replacing the gameinfo.txt with a new one? [url=https://www.dropbox.com/s/heyy925duvgapql/gameinfo.txt?dl=0]Here’s a link[/url]. Just place that in your tf folder and see if it works.
I’ve had this issue a few times in the last couple days. It was being caused by a bad desktop shortcut for tf2. Not sure if that’s the issue here. I fixed it by creating a new shortcut for tf2.
I’ve had this issue a few times in the last couple days. It was being caused by a bad desktop shortcut for tf2. Not sure if that’s the issue here. I fixed it by creating a new shortcut for tf2.
Just tried it, no dice, thanks though
CarnHave you tried replacing the gameinfo.txt with a new one? Here’s a link. Just place that in your tf folder and see if it works.
Just tried it, no dice, thanks though
[quote=Carn]Have you tried replacing the gameinfo.txt with a new one? [url=https://www.dropbox.com/s/heyy925duvgapql/gameinfo.txt?dl=0]Here’s a link[/url]. Just place that in your tf folder and see if it works.[/quote]
check the file itself? I remember a while back i had a fucky problem with it and for some reason the gameinfo was completely wrong, it was pointing the filesystem to some appid that wasn’t 440 (tf2’s). You can probably use the one you dl’d to crosscheck.
check the file itself? I remember a while back i had a fucky problem with it and for some reason the gameinfo was completely wrong, it was pointing the filesystem to some appid that wasn’t 440 (tf2’s). You can probably use the one you dl’d to crosscheck.
Crosschecked and looked it over. Issue still persists. Appreciate the help though
BuildBruhcheck the file itself? I remember a while back i had a fucky problem with it and for some reason the gameinfo was completely wrong, it was pointing the filesystem to some appid that wasn’t 440 (tf2’s). You can probably use the one you dl’d to crosscheck.
Crosschecked and looked it over. Issue still persists. Appreciate the help though
[quote=BuildBruh]check the file itself? I remember a while back i had a fucky problem with it and for some reason the gameinfo was completely wrong, it was pointing the filesystem to some appid that wasn’t 440 (tf2’s). You can probably use the one you dl’d to crosscheck.[/quote]
Did you ever find a solution?
I have replaced the gameinfo.txt from here, verified it at least it has 440 in the right place
I also replaced my desktop icon from within steam.
Any help please
Did you ever find a solution?
I have replaced the gameinfo.txt from here, verified it at least it has 440 in the right place
I also replaced my desktop icon from within steam.
Any help please
I have the same problem. Please help
I have the same problem. Please help
I have something similar to this. when i launch it through steam, it crashes on the startup loading screen. If i try to launch it through the tf2 folder, the error message opens. Send Help.
I have something similar to this. when i launch it through steam, it crashes on the startup loading screen. If i try to launch it through the tf2 folder, the error message opens. Send Help.
sorry for necroing
i’ve been battling this for the past week, nothing worked, did everything b0wl did, added him to see if he fixed it and said he just got a new pc
i got a match tomorrow and i can’t play anywhere else, please help
this is the error i get when i launch it normally
View post on imgur.com
this is the error i get when i launch it through hl2.exe (as administrator awell)
View post on imgur.com
edit
fixed it, thanks wiethoofd and prsn for helping out!
sorry for necroing
i’ve been battling this for the past week, nothing worked, did everything b0wl did, added him to see if he fixed it and said he just got a new pc
i got a match tomorrow and i can’t play anywhere else, please help
this is the error i get when i launch it normally
[img]https://i.imgur.com/Jhr5ezO.png[/img]
this is the error i get when i launch it through hl2.exe (as administrator awell)
[img]https://i.imgur.com/HGvUw63.png[/img]
edit
fixed it, thanks wiethoofd and prsn for helping out!
So, does anyone know an actual solution for this? Checking the app id (which is 440) and replacing gameinfo.txt didn’t work.
So, does anyone know an actual solution for this? Checking the app id (which is 440) and replacing gameinfo.txt didn’t work.
JackyLegssorry for necroing
i’ve been battling this for the past week, nothing worked, did everything b0wl did, added him to see if he fixed it and said he just got a new pc
i got a match tomorrow and i can’t play anywhere else, please help
this is the error i get when i launch it normally
https://i.imgur.com/Jhr5ezO.png
this is the error i get when i launch it through hl2.exe (as administrator awell)
https://i.imgur.com/HGvUw63.png
edit
fixed it, thanks wiethoofd and prsn for helping out!
how did you fix it? i’m literally trying anything but still no results.
Thank you
[quote=JackyLegs]sorry for necroing
i’ve been battling this for the past week, nothing worked, did everything b0wl did, added him to see if he fixed it and said he just got a new pc
i got a match tomorrow and i can’t play anywhere else, please help
this is the error i get when i launch it normally
[img]https://i.imgur.com/Jhr5ezO.png[/img]
this is the error i get when i launch it through hl2.exe (as administrator awell)
[img]https://i.imgur.com/HGvUw63.png[/img]
edit
fixed it, thanks wiethoofd and prsn for helping out![/quote]
how did you fix it? i’m literally trying anything but still no results.
Thank you
I’ve tried a couple of methods with wiethoofd and prsn which fixed it temporarily, I’ve taken all my launch options out and put -autoconfig in my launch options after restarting my pc, after a few tries it worked (try launching as administrator if it doesn’t work).
after a while it happened again, eventually, my pc died, my motherboard and graphics card were toast, had to replace them, after that it never happened again.
try puting the gameinfo.txt into the team fortress 2 folder then put in into the hl2 folder and run it???
try puting the gameinfo.txt into the team fortress 2 folder then put in into the hl2 folder and run it???
Please
sign in through STEAM
to post a comment.
The following is a list of errors and problems that can occur while using Vtex.
When listing a new error here, please follow the established format.
Contents
- 1 Local Steam Service is not running
- 2 Problem figuring out outputdir
- 3 «Unable to find gameinfo.txt»
- 4 Setup file gameinfo.txt doesn’t exist
- 5 TGA is bogus
- 6 «Warning: falling back to auto detection of vconfig» (Windows Vista)
- 7 See also
Local Steam Service is not running
Vtex will give the following error:
SteamStartup() failed: SteamStartup(0xf,0x0012F0E4) failed with error 108: The local Steam Service is not running
Steam must run while Vtex is run. Start Steam to fix this.
Problem figuring out outputdir
Vtex will give the following error:
Problem figuring out outputdir for <path>
As a first step, check that the texture to convert is really in the sourcesdk_contentgamedirmaterialsrc folder, where gamedir is the game folder (cstrike/dod/hl2/hl2mp).
If the texture is in the correct folder, the error might instead be caused by a complication with the environment variables. Primarily, this should be able to be eliminated by using VConfig and ensuring the selected mod has been run at least once. However, there are cases where this doesn’t solve the problem.
One solution is to remove the instance of the VProject Environment variable. In Windows XP this can be accomplished by the following:
- Right-click on My computer and click on Properties.
- Select the Advanced tab.
- Click on Environment Variables near the bottom of the window.
- In the System variables section scroll down and highlight the line VProject.
- Click the Delete button.
- Click OK twice to exit.
However, this solution will create the Unable to find gameinfo.txt error instead. To do: Delete this non-functioning solution alternative?
Alternative Solution
vtex.exe cannot understand spaces in the input file. One solution is to create a folder directly on the C:/ drive with the same name as the original one the vtex shortcut was pointing at. For example, create C:/tf instead of C:Program FilesSteamsteamapps<account_name>team fortress 2tf. Update the vtex.exe shortcut to point to this new folder. In this folder, put the gameinfo.txt from the original folder, as well as an empty materialsrc and materials folder. Place your file to be converted in the new materialsrc folder. Now drag-and-drop the file onto the vtex shortcut, and the output will be in the new materials folder.
«Unable to find gameinfo.txt»
Vtex will give the following error and instructions:
Unable to find gameinfo.txt. Solutions:

1. Read http://www.valve-erc.com/srcsdk/faq.html#NoGameDir
2. Run vconfig to specify which game you're working on.
3. Add -game <path> on the command line where <path> is the directory that gameinfo.txt is in.
This error will occur after VProject has been removed using the steps above.
Open Source SDK and change the Current Game.
![]() Note: The link at step 1 won’t provide a solution. (The page is really old.)
Note: The link at step 1 won’t provide a solution. (The page is really old.)
Setup file gameinfo.txt doesn’t exist
The Nov 7th, 2007 SDK release includes Orange Box with TF2 and trying to use vtex in this new SDK update to create a vtf file for Team Fortress 2 results in the following error message:
"Setup file 'gameinfo.txt' doesn't exist in subdirectory 'C:Program FilesSteamsteamappsplayer namesourcesdkbinorangeboxbinvconfig'. check your -game parameter or VCONFIG setting.".
Assuming that this is the same error as «Unable to find gameinfo.txt» above, then trying to run vconfig.exe results in this error:
"This application has failed to start because Steam.dll was not found. Re-installing the application may fix this problem."
Solution:
- Create a shortcut to vtex.exe which is located in «C:Program FilesSteamsteamappsplayer_namesourcesdkbinorangeboxbinvtex.exe» and select Properties.
- At the end of the Target text add -game «C:Program FilesSteamsteamappsplayer_nameteam fortress 2tf» -nop4
Valve intends to fix the problem with requirement of a -nop4 argument to be added to the target.
TGA is bogus
Vtex will give the following error:
TGA <path> is bogus!
The texture image you are trying to convert is not recognized as a valid targa (.tga) file. Make sure that it is, and that it is either 24 bit/pixel or 32 bit/pixel. (16 bit/pixel is not recognized.)
«Warning: falling back to auto detection of vconfig» (Windows Vista)
Vtex will give the following error:
To do: Please provide an exact quote of the error.
Make a shortcut for vtex.exe and add -game [path to game directory]
- Example: -game c:/steam/steamapps/sourcemods/Awakening
If there are spaces in any of the folders in your path use »
- Example: -game «c:/program files/steam/steamapps/sourcemods/insurgency»
See also
- Vtex
Эта страница попытка документировать общие проблемы с TF2 Classic и их решения.
Убедитесь, что вы полностью выполнили инструкции, приведенные на странице Установка, прежде чем искать решение проблему здесь.
Проблемы, связанные с TF2CDownloader
(Windows) SmartScreen заблокировал TF2CDownloader!
Он делает это для каждого неподписанного приложения. Подписать его будет стоить нам около $800 в год, поэтому мы этого не делаем. Во всплывающем окне SmartScreen нажмите «Подробнее», затем «Выполнить в любом случае».
(Windows) Пишет, что TF2CDownloader нахватает памяти!
Это происходит на Windows 7. Мы не поддерживаем и не можем поддерживать Windows 7, вы должны установить игру вручную.
(Linux) TF2CDownloader выдает «Error loading Python lib»!
Это происходит, когда приложение было собрано с версией glibc, более новой, чем та, которую поддерживает ваш дистрибутив. В настоящее время мы поддерживаем Ubuntu 20.04 и любой другой дистрибутив с glibc 2.31 или новее.
Почему при запуске TF2CDownloader возникает так много ошибок?
Это нормально. Выводимые данные чрезвычайно подробный. Первое, что делает TF2CDownloader, это проверяет, существует ли уже файл игры для проверки. Обычно он не существует, что заставляет его выдать «Checksum error». Затем, если какие-либо зеркала не работают, выходят из строя, отсутствуют или имеют другие проблемы, он также выдаст ошибку при попытке связаться с ними. Это not фатальные ошибки, и они ожидаются в процессе работы.
Я не могу найти папку, которую извлек TF2CDownloader!
Если вы не извлекаете файлы в исходные файлы (sourcemods), ваш каталог для извлечения — большая и загроможденная папка, «и» вы сортируете папки по дате изменения, вы, скорее всего, не сможете легко найти папку, которую он извлек. Вместо этого следует отсортировать папку в алфавитном порядке, а затем прокрутить ее, пока не найдете папку «tf2classic», чтобы переместить ее в папку sourcemods. Также может быть полезно нажать F5, чтобы обновить содержимое папки.
Проблемы с ручной установкой
Я получаю ошибку при попытке извлечь ZIP!
В Windows
Известно, что эта ошибка возникает при использовании встроенного ZIP-архиватор Проводника Windows. Для извлечения файлов игры необходимо использовать сторонние архиваторы (см. ниже).
Проверенные и поддерживаемые варианты включают 7-Zip, PeaZip, и WinZip (не бесплатный). WinRAR вероятно, также подойдет, однако его не рекомендуется использовать, поскольку в прошлом он был известен случайными ошибками при извлечении, а также тем, что является проприетарным.
В Linux
Эта проблема связана с тем, что старые версии libzip не поддерживают ZIP файлы, сжатые с помощью LZMA, что влияет на множество менеджеров архивов. Команда unzip не будет работать.
В дистрибутивах на базе KDE Plasma необходимо открыть Ark, нажать на «Settings» на панели инструментов, нажать «Configure Ark…», и в разделе «Plugins» окна конфигурации снять галочку с «Libzip plugin». Примените изменения и повторите попытку извлечения. Он должен вернуться к использованию бэкенда P7Zip, который будет работает нормально.
Как правило, следует установить 7-Zip и распаковать через CLI. На Ubuntu 22.04+ или Debian 12+ установите пакет «7zip». В Arch Linux или Manjaro установите «7-zip» из AUR. Затем выполните:
7zz x tf2classic-2.0.3.zip
И переместите извлеченную папку «tf2classic» в папку sourcemods.
Различные вопросы
Я не могу подключиться ни к одному серверу, и весь текст начинается с #TF!
Убедитесь в правильности структуры папок. Внутри вашей папки sourcemods, должна быть папка tf2classic, которая должна содержать файл gameinfo.txt. Если это не так, значит, вы извлекли файл неправильно. Если ваш путь выглядит как sourcemods/tf2classic-2.0.3/tf2classic или если все ваши файлы свободно сбрасываются в sourcemods, это приведет к такой проблеме.
Программа запуска сообщает мне, что SDK2013 не установлен, но он установлен!
Это может произойти, если Source SDK Base 2013 Multiplayer установлен на отдельный диск от клиента Steam. Правильный диск почти всегда будет C:. Любые другие диски кроме дисков C: приведут к проблемам. Вы можете переместить его, как показано ниже:

Для опытных пользователей есть возможность создать символическая ссылку из предполагаемого местоположения в общей папке на диске C: в реальное местоположение на другом диске. Смотрите инструкцию здесь о том, как создать такую ссылку.
Программа запуска говорит, что SDK2013 необходимо обновить, но это так!
Вам следует попробовать запустить SDK2013 из Steam. Даже если Steam утверждает, что он полностью установлен, он может требовать проверки или другой работы, которую Steam выполнит только при попытке его запуска. После запуска и повторного закрытия перезапустите программу запуска.
Лаунчер не работает!
Если у вас возникли какие-либо проблемы с лаунчером, вы можете полностью игнорировать её. Игра должна появиться в вашей библиотеке Steam, если она была установлена правильно, и вы можете запустить ее через неё.
Моя игра не отображается в моей библиотеке Steam!
Сначала полностью перезапустите Steam, если вы этого не сделали после установки игры. Щелкните правой кнопкой мыши по Steam в системном трее (стрелка вверх рядом с уведомлениями и панелью задач), затем нажмите «Выход» в появившемся меню. Или нажмите на кнопку Steam в левом верхнем углу окна и выберите «Выход» из выпадающего меню. Затем снова запустите Steam и посмотрите, появится ли он.
Если это не сработало, убедитесь, что структура папок правильная. Внутри вашей папки sourcemods, должна быть папка tf2classic, которая должна содержать файл gameinfo.txt. Если все это не так, значит, вы извлекли файл неправильно. Если ваш путь выглядит как sourcemods/tf2classic-2.0.3/tf2classic или если все ваши файлы свободно сбрасываются в sourcemods, это приведет к тому, что файл не будет обнаружен.
Эта проблема также может возникнуть, если Steam и TF2 Classic установлены на разных дисках (например, Steam на диске C:, а TF2 Classic на диске E:). Решение заключается в создании «символичной ссылки» — в папки с Steam, которая перенаправляет на папку во внешнем диске. Этапы для этого зависят от вашей системы.
Создание символичной ссылки в Windows
- Найдите свою папку
sourcemods. Если вы не можете найти его, вы можете выполнитьreg query HKCUSoftwareValveSteam /v SourceModInstallPathв Command Prompt, чтобы увидеть путь. - Удалите папку
sourcemods, иначе Символическая ссылка не сможет быть создана. Если какие-либо моды все еще находятся там, перенесите их в новое место. - Откройте Командную строку от имени администратора.
- Введите эту команду:
mklink /d /j "path to steam sourcemods" "path to your sourcemods"
Замените "path to steam sourcemods" на путь Steam sourcemods, например: "C:Program Files (x86)Steamsteamappssourcemods"
Замените "path to your sourcemods" на любой путь, который вам нужен, например: "D:Gamessourcemods"
Создание символичной ссылки в Linux
- Удалите папку Steam
sourcemods, которая обычно находится по пути~/.steam/steam/steamapps/sourcemods - Откройте терминал и запустите
ln -s /path/to/your/sourcemods ~/.steam/steam/steamapps/sourcemods
Как и в Windows, замените /path/to/your/sourcemods на полный путь к папке, которую вы хотите использовать на внешнем диске.
Обратите внимание, что любой внешний диск, используемый для запуска игр, «должен быть доступен для чтения и записи вашим пользователем, и у вас должны быть права на выполнение действий». Если это диск NTFS, следуйте руководству Valve по его подготовке: https://github.com/ValveSoftware/Proton/wiki/Using-a-NTFS-disk-with-Linux-and-Windows.
(Linux) Моя игра не может подключиться к серверам!/Мой внутриигровой оверлей не работает!
В Linux для правильной работы TF2C требуется специальный параметр запуска. Щелкните правой кнопкой мыши по игре в библиотеке Steam, нажмите «Свойства», затем вставьте это в поле «Параметры запуска»:
LD_PRELOAD="$HOME/.steam/steam/ubuntu12_32/gameoverlayrenderer.so" %command% -steam -steam
Это исправит оверлей и позволит вам подключаться к игровым серверам.
«На сервере, к которому вы пытаетесь подключиться, установлена старая версия игры».
Эта ошибка частично ложная. Чаще всего старая версия игры установлена не на сервере, а у вас. Если вы сами скачали старую версию игры, то при подключении к официальным серверам вы получите эту ошибку. Следовательно, вам необходимо переустановить игру из архива, используя последнюю версию игры.
Игроки невидимы в моей игре!
Обычно это происходит, если сеть ненадежна или игра тормозит. Можно выполнить команду, чтобы исправить это, хотя вам придется выполнять эту команду каждый раз, когда это будет происходить.
- Включите консоль разработчиков в настройках игры.
- Нажмите клавишу ~ (тильда, или Ё на русской раскладке) на клавиатуре, чтобы открыть консоль.
- Запустите
record demo;stop
Игра застряла на «Получение информации о сервере», но я слышу внутриигровые звуки!
Эта проблема возникает, если вы запускаете игру с Intel Graphics вместо использования выделенного GPU.
Решением является снижение графических настроек до тех пор, пока проблема не исчезнет.
Смотрите также
- Установка
- Discord server (напишите в наш англоязычный дискорд сервер, в канал #technical-issues если ваш вопрос не удалось решить здесь)
When startup my TF2 server, I’m hit immediately with an error that says KEYVALUES Error: LoadingFromBuffer: missing <in file tf2/gameinfo.txt
![[Image: 10f6z4m.jpg]](http://i32.tinypic.com/10f6z4m.jpg)
This error started to occur after I checked for updates with the HLDS updater. The shortcut was
Code:
C:SRCDSUpdaterHldsUpdateTool.exe -command update -game tf -verify_all -dir c:SRCDS
I then removed the -verify_all and tried to re-update, but it still gave me the same error.
The gameinfo.txt file I’m using now. I edited a line so that it would boot with MetaMod:Source. I used that to install Mani Admin mod for map voting.
Code:
"GameInfo"
 {
     game    "Team Fortress 2"
     gamelogo 1
     type multiplayer_only
     nomodels 1
     nohimodel 1
     nocrosshair 0
     hidden_maps
     {
         "test_speakers"        1
         "test_hardware"        1
     }
     nodegraph 0
FileSystem
{
SteamAppId 440 // This will mount all the GCFs we need (240=CS:S, 220=HL2).
ToolsAppId 211 // Tools will load this (ie: source SDK caches) to get things like materialsdebug, materialseditor, etc.
//
// The code that loads this file automatically does a few things here:
//
// 1. For each "Game" search path, it adds a "GameBin" path, in <dir>bin
// 2. For each "Game" search path, it adds another "Game" path in front of it with _<langage> at the end.
// For example: c:hl2cstrike on a french machine would get a c:hl2cstrike_french path added to it.
// 3. For the first "Game" search path, it adds a search path called "MOD".
// 4. For the first "Game" search path, it adds a search path called "DEFAULT_WRITE_PATH".
//
//
// Search paths are relative to the base directory, which is where hl2.exe is found.
//
// |gameinfo_path| points at the directory where gameinfo.txt is.
// We always want to mount that directory relative to gameinfo.txt, so
// people can mount stuff in c:mymod, and the main game resources are in
// someplace like c:program filesvalvesteamsteamapps<username>half-life 2.
//
SearchPaths
{
GameBin |gameinfo_path|addons/metamod/bin
Game |gameinfo_path|.
Game tf
Game |all_source_engine_paths|hl2
}
}
}
tf
Game |all_source_engine_paths|hl2
}
}
}
My server.cfg file in case it helps.
Code:
// this is your server name as shown in the server list
 hostname "<server name>"
 sv_password <password>
 // your server password. a pair of double quotes means it is not set and anyone can join
// start rcon settings
rcon_password SPARTAN120
// your rcon password to log into the dev rcon console or HLSW rcon console
sv_rcon_banpenalty 5
// Number of minutes to ban users who fail rcon authentication
sv_rcon_maxfailures 10
// Max number of times a user can fail rcon authentication before being banned
// end rcon settings
// start cvars for balancing un-even teams
mp_autoteambalance 1
// 0 is off and 1 is on. if 1 then should be used in conjunction with the following 3 commands
mp_autoteambalance_delay 60
// Time (in seconds) after the teams become unbalanced to attempt to switch players
mp_autoteambalance_warning_delay 30
// Time (in seconds) after the teams become unbalanced to print a balance warning
mp_teams_unbalance_limit 1
// Teams are unbalanced when one team has this many more players than the other (0 disables)
// end cvars for balancing un-even teams
// start cvars for round and game times
mp_enableroundwaittime 1
// Enable or disable timers to wait between rounds. 0 is off 1 is on
mp_bonusroundtime 20
// Time after round win until round restarts (in seconds)
mp_restartround 20
// Time the current round will restart (in seconds)
mp_stalemate_timelimit 240
// Timelimit (in seconds) of the stalemate round
mp_timelimit 40
// game time per map in minutes
mp_stalemate_enable 1
// enables sudden death at the end of rounds
// end cvars for round and game times
// start cvars for win conditions
//FIXED
mp_maxrounds 6
// Max number of rounds to play before server changes maps
mp_winlimit 0
// Max number of rounds one team can win before a server changes maps
// end cvars for win conditions
// start client specific cvars
mp_forcecamera 1
// force dead clients to first person mode disabling freelook. 0 is off 1 is on
mp_allowspectators 1
// enable or disable spectators on the server. 0 is off 1 is on
mp_forcerespawn 1
// People auto-respawn after the cooldown time
mp_footsteps 1
// footsteps on or off. 0 is off and 1 is on
sv_cheats 0
// allow cheats to be used by the client. 0 is off 1 is on
sv_timeout 300
// the amount of time in seconds that a client is booted for no input
sv_consistency 1
// Force clients to pass a consistency check for critical files before joining server. 0 is off 1 is on
decalfrequency 30
// the pause in seconds between a decal being sprayed
// end client specific cvars
// start cvars for communication
sv_voiceenable 1
// allow players to use a microphone. 0 is off 1 is on
sv_alltalk 0
// toggles whether both teams can hear each others voice comms or not. 0 is off 1 is on. recommend it being off
mp_chattime 10
// players can chat for this amount of time (in seconds) after a game is over
// Set to 15 to fix BM map changes
// end cvars for communication
// start download cvars
sv_allowupload 0
// allow custom decals to be uploaded. 0 is off 1 is on
sv_allowdownload 1
// allow files to be downloaded from the server. 0 is off 1 is on
net_maxfilesize 75
// Max download file size. Default is 15
// This is set to 75 because custom maps are HUGE!
sv_downloadurl ""
//redirect download location
// end download cvars
// start bandwidth rates/settings
sv_minrate 5000
// Min bandwidth rate allowed on server, 0 = unlimited. Default: 0
sv_maxrate 72000
// Max bandwidth rate allowed on server, 0 = unlimited. Default: 0
sv_minupdaterate 10
// Minimum updates per second that the server will allow. Default: 10
sv_maxupdaterate 100
// Maximum updates per second that the server will allow. Default: 60
sv_mincmdrate 66
sv_maxcmdrate 100
// end bandwidth rates/settings
// start server logging
log on
// enable or disable server logging. on is on / off is off
sv_logbans 1
// Log server bans in the server logs
sv_logecho 1
// Echo log information to the console. 0 is off 1 is on
sv_logfile 1
// Log server information in the log file. 0 is off 1 is on
sv_log_onefile 1
// log everything in one file
logaddress_add 140.192.244.120:27500
// For stats
// end server logging
// start cvars for general operation
sv_lan 0
// is this an internet or LAN server. 0 is internet 1 is LAN
sv_region 1
// server location. -1 is the world, 0 is USA east coast, 1 is USA west coast, 2 south america, 3 europe, 4 asia, 5 australia, 6 middle east, 7 africa
sv_contact podtf2@gmail.com
// contact email for sysop
sv_pausable 0
// enables or disables whether the server can be paused. 0 is off 1 is on
sv_pure 0
// forces all clients on the server to use content that matches what is on the server. 0 is off 1 is on
sv_pure_kick_clients 0
// kicks clients that do not have content that matches what is on the server
// end cvars for general operation
// start execute ban files
exec banned_user.cfg
exec banned_ip.cfg
// end execute ban files
//respawn timers
mp_disable_respawn_times 1
mp_respawnwavetime 5
//end respawn timers
The following is a list of errors and problems that can occur while using Vtex.
When listing a new error here, please follow the established format.
Contents
- 1 Local Steam Service is not running
- 2 Problem figuring out outputdir
- 3 «Unable to find gameinfo.txt»
- 4 Setup file gameinfo.txt doesn’t exist
- 5 TGA is bogus
- 6 «Warning: falling back to auto detection of vconfig» (Windows Vista)
- 7 See also
Local Steam Service is not running
Vtex will give the following error:
SteamStartup() failed: SteamStartup(0xf,0x0012F0E4) failed with error 108: The local Steam Service is not running
Steam must run while Vtex is run. Start Steam to fix this.
Problem figuring out outputdir
Vtex will give the following error:
Problem figuring out outputdir for <path>
As a first step, check that the texture to convert is really in the sourcesdk_contentgamedirmaterialsrc folder, where gamedir is the game folder (cstrike/dod/hl2/hl2mp).
If the texture is in the correct folder, the error might instead be caused by a complication with the environment variables. Primarily, this should be able to be eliminated by using VConfig and ensuring the selected mod has been run at least once. However, there are cases where this doesn’t solve the problem.
One solution is to remove the instance of the VProject Environment variable. In Windows XP this can be accomplished by the following:
- Right-click on My computer and click on Properties.
- Select the Advanced tab.
- Click on Environment Variables near the bottom of the window.
- In the System variables section scroll down and highlight the line VProject.
- Click the Delete button.
- Click OK twice to exit.
However, this solution will create the Unable to find gameinfo.txt error instead. To do: Delete this non-functioning solution alternative?
Alternative Solution
vtex.exe cannot understand spaces in the input file. One solution is to create a folder directly on the C:/ drive with the same name as the original one the vtex shortcut was pointing at. For example, create C:/tf instead of C:Program FilesSteamsteamapps<account_name>team fortress 2tf. Update the vtex.exe shortcut to point to this new folder. In this folder, put the gameinfo.txt from the original folder, as well as an empty materialsrc and materials folder. Place your file to be converted in the new materialsrc folder. Now drag-and-drop the file onto the vtex shortcut, and the output will be in the new materials folder.
Vtex will give the following error and instructions:
Unable to find gameinfo.txt. Solutions:

1. Read http://www.valve-erc.com/srcsdk/faq.html#NoGameDir
2. Run vconfig to specify which game you're working on.
3. Add -game <path> on the command line where <path> is the directory that gameinfo.txt is in.
This error will occur after VProject has been removed using the steps above.
Open Source SDK and change the Current Game.
![]() Note: The link at step 1 won’t provide a solution. (The page is really old.)
Note: The link at step 1 won’t provide a solution. (The page is really old.)
Setup file gameinfo.txt doesn’t exist
The Nov 7th, 2007 SDK release includes Orange Box with TF2 and trying to use vtex in this new SDK update to create a vtf file for Team Fortress 2 results in the following error message:
"Setup file 'gameinfo.txt' doesn't exist in subdirectory 'C:Program FilesSteamsteamappsplayer namesourcesdkbinorangeboxbinvconfig'. check your -game parameter or VCONFIG setting.".
Assuming that this is the same error as «Unable to find gameinfo.txt» above, then trying to run vconfig.exe results in this error:
"This application has failed to start because Steam.dll was not found. Re-installing the application may fix this problem."
Solution:
- Create a shortcut to vtex.exe which is located in «C:Program FilesSteamsteamappsplayer_namesourcesdkbinorangeboxbinvtex.exe» and select Properties.
- At the end of the Target text add -game «C:Program FilesSteamsteamappsplayer_nameteam fortress 2tf» -nop4
Valve intends to fix the problem with requirement of a -nop4 argument to be added to the target.
TGA is bogus
Vtex will give the following error:
TGA <path> is bogus!
The texture image you are trying to convert is not recognized as a valid targa (.tga) file. Make sure that it is, and that it is either 24 bit/pixel or 32 bit/pixel. (16 bit/pixel is not recognized.)
«Warning: falling back to auto detection of vconfig» (Windows Vista)
Vtex will give the following error:
To do: Please provide an exact quote of the error.
Make a shortcut for vtex.exe and add -game [path to game directory]
- Example: -game c:/steam/steamapps/sourcemods/Awakening
If there are spaces in any of the folders in your path use »
- Example: -game «c:/program files/steam/steamapps/sourcemods/insurgency»
See also
- Vtex
Содержание
- Vtex troubleshooting
- Contents
- Local Steam Service is not running
- Problem figuring out outputdir
- «Unable to find gameinfo.txt»
- Setup file gameinfo.txt doesn’t exist
- TGA is bogus
- «Warning: falling back to auto detection of vconfig» (Windows Vista)
- Missing GameInfo.txt
- Gameinfo txt hl2 error
- Gameinfo txt hl2 error
- Half-Life Deathmatch: Source
- Gameinfo txt hl2 error
- Team Fortress 2
Vtex troubleshooting
The following is a list of errors and problems that can occur while using Vtex.
When listing a new error here, please follow the established format.
Contents
Local Steam Service is not running
Vtex will give the following error:
Steam must run while Vtex is run. Start Steam to fix this.
Problem figuring out outputdir
Vtex will give the following error:
As a first step, check that the texture to convert is really in the sourcesdk_contentgamedirmaterialsrc folder, where gamedir is the game folder ( cstrike / dod / hl2 / hl2mp ).
If the texture is in the correct folder, the error might instead be caused by a complication with the environment variables. Primarily, this should be able to be eliminated by using VConfig and ensuring the selected mod has been run at least once. However, there are cases where this doesn’t solve the problem.
One solution is to remove the instance of the VProject Environment variable. In Windows XP this can be accomplished by the following:
- Right-click on My computer and click on Properties.
- Select the Advanced tab.
- Click on Environment Variables near the bottom of the window.
- In the System variables section scroll down and highlight the line VProject.
- Click the Delete button.
- Click OK twice to exit.
However, this solution will create the Unable to find gameinfo.txt error instead. To do: Delete this non-functioning solution alternative?
«Unable to find gameinfo.txt»
Vtex will give the following error and instructions:
This error will occur after VProject has been removed using the steps above.
Open Source SDK and change the Current Game.
Setup file gameinfo.txt doesn’t exist
The Nov 7th, 2007 SDK release includes Orange Box with TF2 and trying to use vtex in this new SDK update to create a vtf file for Team Fortress 2 results in the following error message:
Assuming that this is the same error as «Unable to find gameinfo.txt» above, then trying to run vconfig.exe results in this error:
- Create a shortcut to vtex.exe which is located in «C:Program FilesSteamsteamappsplayer_namesourcesdkbinorangeboxbinvtex.exe» and select Properties.
- At the end of the Target text add -game «C:Program FilesSteamsteamappsplayer_nameteam fortress 2tf» -nop4
Valve intends to fix the problem with requirement of a -nop4 argument to be added to the target.
TGA is bogus
Vtex will give the following error:
The texture image you are trying to convert is not recognized as a valid targa (.tga) file. Make sure that it is, and that it is either 24 bit/pixel or 32 bit/pixel. (16 bit/pixel is not recognized.)
«Warning: falling back to auto detection of vconfig» (Windows Vista)
Vtex will give the following error:
To do: Please provide an exact quote of the error.
Make a shortcut for vtex.exe and add -game [path to game directory]
Example: -game c:/steam/steamapps/sourcemods/Awakening
If there are spaces in any of the folders in your path use «
Example: -game «c:/program files/steam/steamapps/sourcemods/insurgency»
Источник
Missing GameInfo.txt


This occurs when the Current Game is incorrectly configured.
This can happen when:
- The Game Directory is set incorrectly so the tools cannot find the gameinfo.txt file.
- A gameinfo.txt file for the game is missing or incorrect.
- Installing/Restoring HL2 games from a backup that was created via the «Backup Games. » menu, but not having actually played the games after the install (HL2, EP1, etc).
How to fix this problem:
- First and foremost run the game (HL2, EP1, etc) at least once before running the SDK tools like Hammer. Running the games for the first time will create the gameinfo.txt and related files that are used by the SDK tools.
- If this is a custom MOD, make sure the Game Directory is set correctly, and that a valid gameinfo.txt is present.
- Try running the game you’re editing for once from the Play Games window.
- Try to Reset the Source SDK Game Configuration.
- If that does not work, Reinstall the Source SDK installation.
- If none of the previously stated work, check and see if you have recently changed your drive’s letter to something different.
- To fix the config go to X:Program Files (x86)SteamsteamappscommonCounter-Strike Global Offensivebin, then open «GameConfig»
- Open «GameConfig» and change all of the letters of the old drives to the current letter.
Источник
Gameinfo txt hl2 error
В папке с игрой (твой диск:steamSteamAppscommonTeam Fortress 2tf )пропал или попортился файл gameinfo.txt или его не видит стим
вот содержание файла:
«GameInfo»
<
game «Team Fortress 2»
type multiplayer_only
nomodels 1
nohimodel 1
nocrosshair 0
hidden_maps
<
«test_speakers» 1
«test_hardware» 1
>
nodegraph 0
GameData «tf.fgd»
InstancePath «maps/instances/»
advcrosshair 1
supportsvr 1
FileSystem
<
SteamAppId 440
//
// Setup engine search paths.
//
// If a search path contains «_english», and the current language is not english, then
// another search path will be inserted above the english one by replacing «_english» with
// the appropriate language.
//
// To debug how the engine has parsed this file, type «path» at the console.
//
// Search paths are relative to the base directory, which is where hl2.exe is found.
//
// |gameinfo_path| points at the directory where gameinfo.txt is.
// |all_source_engine_paths| points at the directory cintaining HL2 shared content.
//
SearchPaths
<
// First, mount all user customizations. This will search for VPKs and subfolders
// and mount them in alphabetical order. The easiest way to distribute a mod is to
// pack up the custom content into a VPK. To «install» a mod, just drop it in this
// folder.
//
// Note that this folder is scanned only when the game is booted.
game+mod tf/custom/*
// We search VPK files before ordinary folders, because most files will be found in
// VPK and we can avoid making thousands of file system calls to attempt to open files
// in folders where they don’t exist. (Searching a VPK is much faster than making an operating
// system call.)
game_lv tf/tf2_lv.vpk
game+mod tf/tf2_textures.vpk
game+mod tf/tf2_sound_vo_english.vpk
game+mod tf/tf2_sound_misc.vpk
game+mod tf/tf2_misc.vpk
game |all_source_engine_paths|hl2/hl2_textures.vpk
game |all_source_engine_paths|hl2/hl2_sound_vo_english.vpk
game |all_source_engine_paths|hl2/hl2_sound_misc.vpk
game |all_source_engine_paths|hl2/hl2_misc.vpk
platform |all_source_engine_paths|platform/platform_misc.vpk
// Now search loose files. We’ll set the directory containing the gameinfo.txt file
// as the first «mod» search path (after any user customizations). This is also the one
// that’s used when writing to the «mod» path.
mod+mod_write+default_write_path |gameinfo_path|.
// Add the TF directory as a game search path. This is also where where writes
// to the «game» path go.
game+game_write tf
// Where the game’s binaries are
gamebin tf/bin
// Last, mount in shared HL2 loose files
game |all_source_engine_paths|hl2
platform |all_source_engine_paths|platform
// Random files downloaded from gameservers go into a seperate directory, so
// that it’s easy to keep those files segregated from the official game files
// or customizations intentially installed by the user.
//
// This directory is searched LAST. If you visit a server and download
// a custom model, etc, we don’t want that file to override the default
// game file indefinitely (after you have left the server). Servers CAN have
// custom content that overrides the default game files, it just needs to be
// packed up in the .bsp file so that it will be mounted as a map search pack.
// The map search pack is mounted at the top of the search path list,
// but only while you are connected that server and on that map.
game+download tf/download
>
>
ToolsEnvironment
<
«Engine» «Source»
«UseVPLATFORM» «1»
«PythonVersion» «2.7»
«PythonHomeDisable» «1»
>
>
Источник
Gameinfo txt hl2 error


Half-Life Deathmatch: Source


Do you have the FGD file?
Here is the rest of the info:
*This is for setting up Hammer world editor (2013_MP) for Hldms.
Valve did not ship the FGD file with the new SDK, add FGD to
C:Program FilesSteamsteamappscommonhalf-life 1 source deathmatchbin (put in bin folder).
Hldms also needs the gameinfo.txt file, located at C:Program FilesSteamsteamappsCOMMONhalf-life 1 source deathamtchhl1mp make a copy
and paste at C:Program FilesSteamsteamappsCOMMONhalf-life 1 source deathamtchhl2 (paste in hl2 folder)
The new SDK does not have a launcher so make desktop shortcuts for Hammer.exe,studiomdl.exe,hlfaceposer.exe,hlmv.exe these
can be found at C:Program FilesSteamsteamappscommonhalf-life 1 source deathmatchbin
If you have mapped before may be a good idea to get your mapsrc files moved over from the old Hammer, find them at «C:Program FilesSteamsteamappsYOUR_ACCT_NUMBERsourcesdk_contenthl2mpmapsrc» and move to
C:Program FilesSteamsteamappscommonhalf-life 1 source deathmatchhl1mp delete your old shortcut to mapsrc and make a
new one for the folder you just moved.
Now open up hammer with the hammer.exe icon.
Select the «restore down icon» (To make hammer smaller so you can read this and see hammer).
Select (upper left on hammer) tools then options.
Click on «Edit» select «add» and enter Half-life Deathmatch click ok then close.
From the drop down (arrow down) (under configuration) select Half-life Deathmatch.
Now under Game date files we need to load our FGD file so click on add and the «bin» folder should load up
select hl1mp.fgd click on it then select open (it will load the info).
Texture format and Map type leave as they are.
Under default pointentity class select info_player_deathmatch.
Under default Solidentity class select Func_detail.
Default texture scale and Default lightmap scale leave alone
Cordon texture browse for tools/toolsskybox and set that as the texture.
Game executable Directory browse to C:Program FilesSteamsteamappscommonhalf-life 1 source deathmatch (click on the + sign to
keep expanding,) when you get to «half-life 1 source deathmatch» click on the text for «half-life 1 source deathmatch» then click ok.
we only need to tell hammer «where» the hl2.exe is,you wont see it in the folder with the «browse for folder window».
Game directory click down (using the + sign to C:Program FilesSteamsteamappscommonhalf-life 1 source deathmatchhl1mp
Once again when you see «hl1mp» dont expand click on the text «hl1mp».
For the Hammer .VMF Directory (your mapsrc folder) click down to C:Program FilesSteamsteamappscommonhalf-life 1 source deathmatchhl1mp
expand hl1mp this time you will see the folder named mapsrc click on the text «mapsrc» then ok.* note if this is a fresh install or you did not move your old mapsrc folder you need to make one here.
Now click on «build programs» tab (upper right on configure Hammer)
On top line selct «half-life deathmatch» with the down arrow.
Under the next one «Game executable» click on the folders(you may need to go up to arrow to get to C: program files as it starts in «bin» double click on the folder’s to move along) to get to C:Program FilesSteamsteamappscommonhalf-life 1 source deathmatchhl2.exe (click on hl2.exe)then open tab.
BSP executable at C:Program FilesSteamsteamappscommonhalf-life 1 source deathmatchbin (VBSP.EXE)
click on it then open tab. same for vvis executable and vrad executable.
Last one «place compiled maps in this directory» at C:Program FilesSteamsteamappscommonhalf-life 1 source deathmatchhl1mpcustomANY_NAME_YOU_WANTmaps click on the text for maps. (there is a map folder at hl1mp keep that for valve core maps, custom new ones at the new folder location, if you dont have a customANY_NAME_YOU_WANTmaps folder you need to create them first. somthing like this customreddogmaps * note reddog name does not matter you can use any name, hammer searches with a «*» for wild card so any name will work
You are done., click apply then ok and restart Hammer. another note when you first compile a map,
make sure before you compile that the box is checked «dont run the game after compiling» it will
crash if you dont have it checked.
we want to all custom stuff in the «custom» folder to keep valve’s hands off of it, custom/reddog/maps
materials
models
sounds
cfg
(everybody above gets a folder)
Think of the «custom» folder as the new hl1mp folder, the reason is, if we leave our stuff in hl1mp, and they do a update, it will affect
our stuff to as well, the less they can get ahold of the better.
Источник
Gameinfo txt hl2 error

Team Fortress 2


Is it a bad shortcut file
Is it a bad shortcut file
Try running the tf2 launcher file directly from the tf2 folder
Try running the tf2 launcher file directly from the tf2 folder
i have tried that already.

add «-game tf» to launch options
add «-game tf» to launch options
add «-game tf» to launch options
launch the game
it seems the program is trying to run as hl2
launch the game
it seems the program is trying to run as hl2
it just changes my resolution and thats it.
it just changes my resolution and thats it.
Your computer is on some serious drugs
Источник
In this Tutorial I will explain to the best of my knowledge how the Half-Life Model Viewer can be used to view and inspect Models, I take an indepth look at all the features this toolset provides. Feel free to download the accompanying PDF that goes into further detail on HLMV.
Introduction to the Half-Life Model Viewer (Source)
You can find the accompanying PDF here.
Download The project files here.
The Original Tutorial can be read here.
This is an introduction to the Half-life model Viewer (HLMV herein) for the Source Engine. This program is a crucial part of the Source SDK and can be quite useful for tinkering, debugging model errors, hit-boxes, texture alignment and general viewing.
To launch HLMV navigate to your Steam installation and locate the game or game series you wish to use the model viewer for. It may look like the following:
C:Program FilesSteamSteamAppscommonhalf-life 2binhlmv.exeIt is important though that you run hlmv.bat rather than the executable as it sets an environment variable for VPROJECT based on your current location so that HLMV can find gameinfo.txt. See the troubleshooting section below when debugging why HLMV may fail to launch.
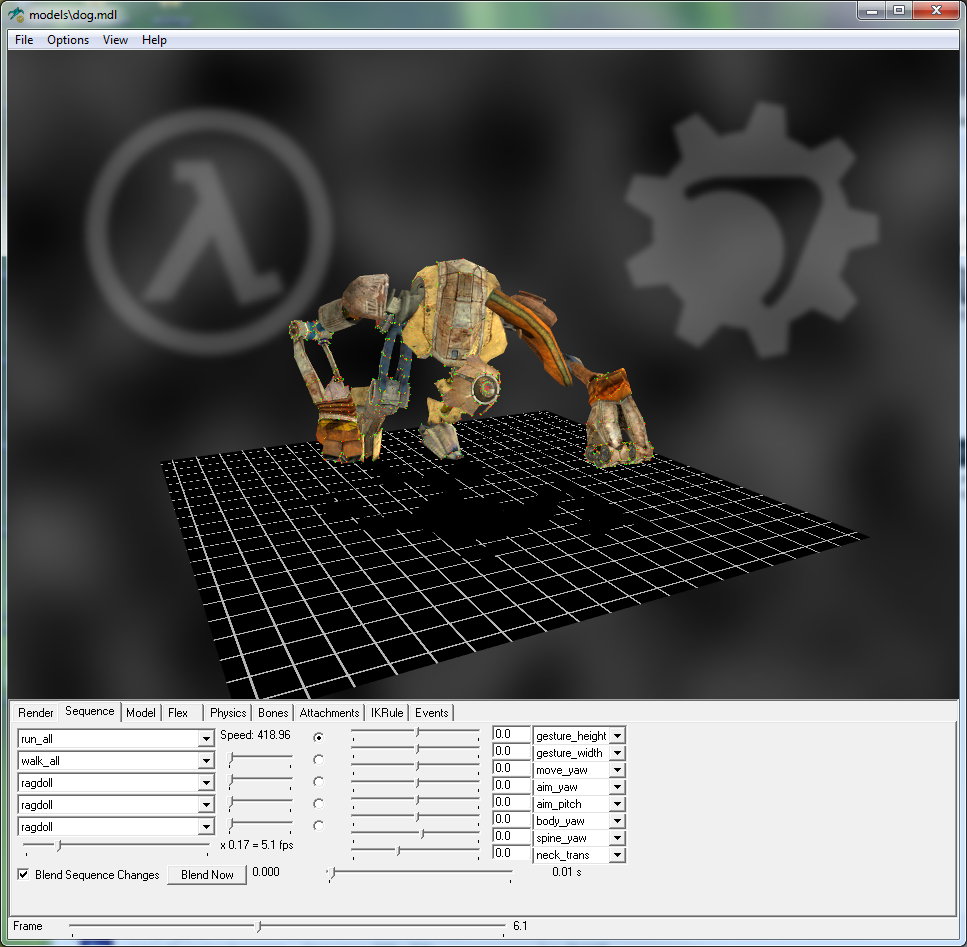
This is what you get when you launch HLMV. It can be quite daunting to newcomers but it’s a simple program for the most part and more than likely you won’t need to employ its full tool set.
Note: The viewer says in its title bar that it is version v1.22 but it is in fact version 2 which can be found in Help > About
Note: The model viewer changes frequently and you may see some settings that I explain or touch on in this document that does not resemble what you have in your HLMV. The viewer tends to have features in one version that don’t exist in another. I will highlight where these differences occur.
Controls
Mouse
 Drag in the center of the viewport. This will orbit the object.
Drag on the edge of the viewport. This will roll the camera.
+ Ctrl: Drag and this will orbit the light source.
 Drag and this will dolly the Camera Forwards and Backwards.
+ Shift: Drag and this will Pan the camera Up/Down/Left/Right.
Keyboard Shortcuts
Note: These may not be available in all versions.
F5: Refresh the currently loaded model.
F9: Static Cloth
R: Reload Cloth
C: Simulate Cloth
Ctrl + A: Toogle Attachments
Ctrl + O: Toggle Bones
Ctrl + N: Toggle Normals
Ctrl + T: Toggle Tangents
Ctrl + W: Toggle Wireframe on shaded
Ctrl + G: Toogle Ground
Ctrl + M: Toggle Movement
Ctrl + B: Toggle Background
Ctrl + H: Toggle Hitboxes
Ctrl + S: Toggle Shadow
Ctrl + D: Toggle Displacement
Menu Bar
File
- Load Model: This will allow you to load a valid Source model. It requires the .mdl extension and you can freely navigate to the folder yourself.
- Recompile: Recompile the model you are viewing with studiocompiler. Note: Not available in all versions.
- (Steam) Load Model: This will load a model based on the currently selected game you are accessing HLMV from. If for instance you had executed HLMV from TF2 you will be presented with a dialog containing only the TF2 models. Note: Not available in all versions.
- Refresh: This will reload the model and update it if there has been any texture, modelling or rigging changes. (F5).
- Load Weapon: You can use this to inspect how a weapon looks in the hands of a character.
- (Steam) Load Weapon: Load a weapon for inspection based on the currently loaded games object root. Note: Not available in all versions.
- Economy:
- Load stock hero items: For Dota 2 load a characters associated items/weapons. Note: Not available in all versions.
- Load stock hero items Combined: For Dota 2 load a characters associated items/weapons all combined. Note: Not available in all versions.
- Unload Weapon: Unload any opened weapons from the viewer. Note: Depending on which game you are using HLMV with, this option can provide a list for removing up to 12 selected models.
- Unload Specific Weapon: Unload any loaded weapons from a list. Note: Not available in all versions.
- Unload All Weapons: Unloads all loaded weapons from the viewer. Note: Not available in all versions.
- Run .mvscript: Load a model viewer script. Note: Not available in all versions.
- Save session as .mvscript: Save your current workspace as a .mvscript later use. Note: Not available in all versions.
- Load Background Texture: Greyed out.
- Load Ground Texture: Greyed out.
- Unload Ground Texture: Greyed out.
- Recent Models: This provides a list of the last 8 models viewed.
- Exit: Sends an automated email to GabeN asking for HL3.
Options
- Background Color: Provides a color picker that changes the background into a solid color. Useful for green screening.
- Ground Color: Doesn’t seem to function.
- Light Color: You can change the color tint on HLMV’s light source.
- Ambient Color: You can change the ambient color to provide a further lighting tint.
- Secondary Lights: Toggle the secondary lights system. Note: Not available in all versions.
- Center View: Center the Model in front of the camera.
- Center Verts: Centers the view and frames in close to mesh. Note: Not available in all versions.
- Viewmodel Mode: This mode is used to inspect weapons or items the player holds in their hands from the first person perspective.
- Reload Cloth: Reload the loth physics system. Note: Not available in all versions.
- Simulate Cloth: Some characters have cloth vertex animation associated with them, this enables it. Note: Not available in all versions.
- Static Cloth: Display cloth as a static object. Note: Not available in all versions.
- Make screenshot: Save a screenshot as a targa. Does not seem to function well.
View
- File Associations: Greyed out.
- Show Activities: This will affect the sequences tab to show an activity (a group of sequences/animations combined to form a set of movements) rather than a single animation.
- Show Hidden: This will show a models hidden sequences/animations (if any exist).
- Show Sequence numbers: Prefixes each sequence with its number. Note: Not available in all versions.
- Sort Sequences: Sort the sequences alphabetically. Note: Not available in all versions.
- Show Orbit Circle: Toggles the broken circular line that guides orbiting the model. Note: Not available in all versions.
- Enable Orbit Yaw: Toggle the ability to affect Yaw when clicking outside the orbit circle. Note: Not available in all versions.
- DotA Viewmode: change the camera perspective to a third person style. Note: Not available in all versions.
- Texture Viewer: Preview the loaded models texture with options between Off, Diffuse, Normal, Mask 1, Mask 2. Note: Not available in all versions.
Render Tab
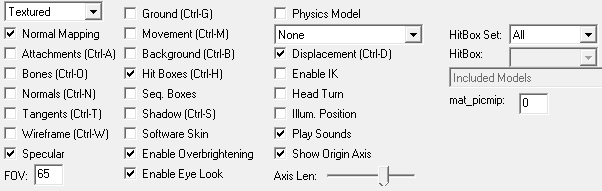
- Drop Down Box:
- Wireframe: Preview a model in wireframe mode.
- Smoothshaded: Doesn’t appear to function as one would expect. Same as textured.
- Textured: This gives a fairly accurate account of what the model will look like in the engine.
- Bone Weights: Doesn’t appear to function in any useful way compared to a similar mode found in 3D modelling packages.
- Bad Vertex Data: This will show a red area of issue in your mesh where the engine has an issue with the mesh or UV’s
- UV Chart: Displays the UV Map associated with the loaded model. If more than one model is used switch the material used under the Model tab to view its UV Data. Note: Not available in all versions.
- Co-LocatedVerts: Preview Vertices that overlap or live in the same (or close to) point in space. Note: Not available in all versions.
- Normal Map: Display the Normal Map of the loaded model. Note: Not available in all versions.
- NormalMap++: Display the Normal Map with what seems to be a gradient mask. Note: Not available in all versions.
- Value: Seems to display a specular channel. Note: Not available in all versions.
- Silhouette: Display the model as a silhouette. Note: Not available in all versions.
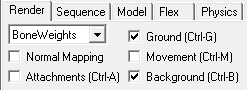
- Normal Mapping: This will display the normal/bump mapping on top of your textured model, providing the illusion of more detail and depth in your model.
- Attachments: This displays a small XYZ handle at each location on a model where an attachment can be located.
- Bones: This will highlight the models skeletal rig (if one exists).
- Normals: This will show the vertex normals of the mesh and the direction they point in.
- Tangents: This will preview the tangent data/positions within the mesh.
- Wireframe: Provides a wireframe on shaded view granted that you have textured or smoothshaded rendering selected.
- Specular: This will show a models specular map added to the model (if one exists).
- FOV: Defaulting to 65 the field of view controls the angle of width that you can view models from a first person perspective.
- Ground: Shows a textured plane (that scrolls when the model walks).
- Movement: This will provide a box encapsulating the model. Once a model begins to move or walk a lighter colored box will trail behind depicting the path of the character.
- Background: This will render a background image in the distance much like a skybox.
- Hitboxes: Hitboxes are individual boxes which encapsulate important sections of a model. They are used to register being shot or damaged in some way. Hitboxes values vary depending on what part of a model they represent.
- Sequence Box: A sequence box is a bounding area covering the whole area an animation will affect.
- Shadows: This will project a top down shadow onto the ground if it’s enabled.
- Software skin: Checking this disables any flex operations you may want to view on a model.
- Enable Overbrightening: This will increase the brightness of a model in the viewport.
- Enable Eye Look: Forces Character eyes to follow camera. Note: Not available in all versions.
- Physics Model and Dropdown box: Enable this to preview your mesh physics proxy. You can select an individual portion of the proxy in order to inspect it.
- Enable IK: This will render on the ground small boxes to show inverse kinematics in action. You must have a sequence running in order to see these boxes.
- Head Turn: Will force a character models head to face the camera.
- Illum. Position: Shows an axis handle to mark the illumination root of the model. When illuminating an animated or moving model in the engine, the lighting calculations are only done for the two brightest light sources. All the other lights, as well as bounced light from the environment, go into a simple single cubemap. This is the position the model uses for that cubemap.
- Play Sounds: This will play sounds if any are associated with an animation.
- Show Origin Axis: Display the Axis handles in the viewer. Note: Not available in all versions.
- Axis Len: This allows you to adjust the length of the axis handles. Note: Not available in all versions.
- HitBox Set: Select a Hitbox set associated with the loaded model. Note: Not available in all versions.
- HitBox: Select a Hitbox from a Hitbox set. Note: Not available in all versions.
- Dropdown Box: Lists all models the .QC references. Note: Not available in all versions.
- Matpic_mip: Set the mipmap level of an image, this directly affects the quality of an image. Note: Not available in all versions.
Sequence Tab
 This is what the Sequence tab looks like. The sections are color coded to aid in their description
- Red — This is the sequence tab that stacks animations on top of each other starting with the top and moving down. It is very useful when viewing or debugging how a set of animations will blend in the engine.
- Blue — These sliders are used to activate a blend from the previous animation to the next animation in the list.
- Teal — Their purpose is unclear (If you are aware of their purpose please let me know so I can update this document)
- Green — This slider allows you to control the speed at which the sequence plays.
- Yellow — Blend Sequence Changes when checked will create a motion blend between each sequence selected in the list. If unchecked you can observe a hard switch. The blend now button starts the blending operation once activated.
- Pink — This slider is in relation to the blending of animations also. When fully to the left (0 sec) and when blending 2 animations it will blend automatically whereas if the slider was full to the right (1 sec) or in-between it will add milliseconds to the time spent blending the animation. This can give for a more natural and organic Look depending on the animations in question.
- Orange — This lets you modify a bones orientation based on a sequence you have loaded. This means you can modify the direction or rotation the body faces or moves while it’s playing a base sequence.
- Brown — Filter sequences using strings. Note: Not available in all versions.
- Grey — Activity modifiers lets you switch out an activity if the model supports it. A checkbox for animate weapons allows you to animate weapons attached to your currently loaded model. Note: Not available in all versions.
Model Tab
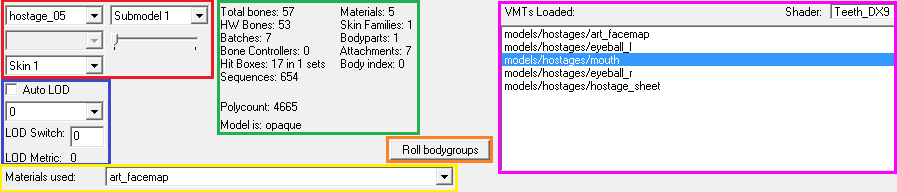
- Red — You can see that Hostage_05 is the selected model here. If it had any submodels they could be selected through a drop down. If the model had further skins you could select and view it.
- Blue — The Auto LOD allows the engine to control when to switch the mesh into a lower polygon version based on distance from the camera. From the drop down you can select and view a specific LOD. The LOD Switch is the value used to compute how far from the camera the model must be before an LOD is swapped in.
- Green — This section provides some general yet useful information on the loaded model.
- Pink — This section shows all the materials associated with the model as well as the shader used to render them.
- Orange — Roll Bodygroups lets you randomize the model bodygroup selections. Note: Not available in all versions.
- Yellow — Select a material to view, if UV Chart is select in the Render tab you can cycle through the Materials and UV’s. Note: Not available in all versions.
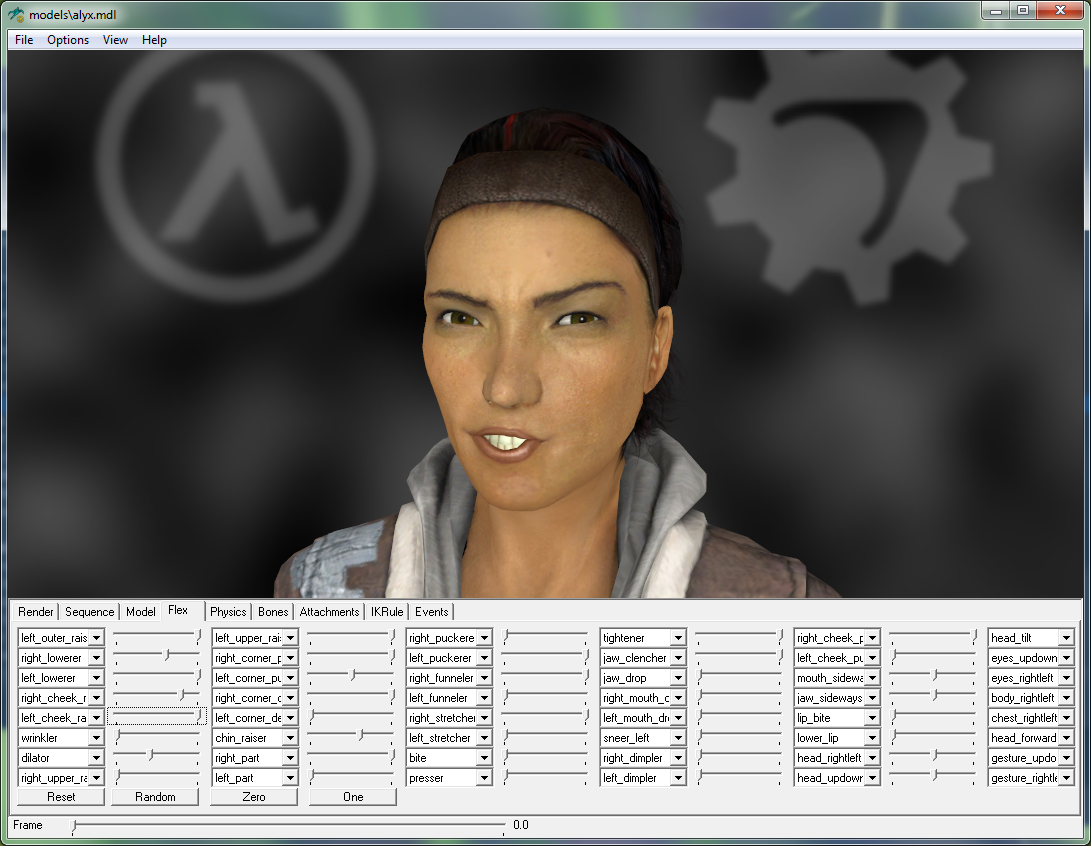
Flex Tab
This tab for the most part is self-explanatory and replicates a set of tools available to you in Faceposer. These sliders will not function if software skin in the render tab is checked. You can manipulate the individual controls used to create facial expressions in a character.
Physics Tab
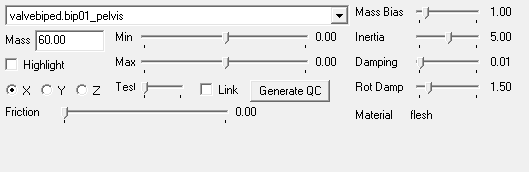
- Dropdown Box: This lets you select a specific section of the collision/physics mesh.
- Mass: You can set the mass of the object/selection and use this to generate a .QC.
- Highlight: Highlights the selected part of the physics mesh.
- X Y Z: Select an axis to rotate the physics mesh around.
- Friction: Set a friction value from 0 – 1000.
- Min/Max: Define a range from -99 to 99.
- Test Slider: This will rotate the mesh on a given axis between the values determined by min/max.
- Link: Constrains Min and Max to move in equal amounts in the opposite directions.
- Generate QC: This will create QC code on your clipboard based on the settings you manipulated with the sliders.
- Mass Bias: Affect the mesh’s mass.
- Inertia: Affect the mesh’s inertia.
- Damping: Affect the models damping.
- Rot Damping: Affect the models rotational damping.
- Material: Depending on what bone you have selected from the Dropdown Box the Material can vary from many predefined materials such as flesh, wood, concrete etc.
Bones Tab
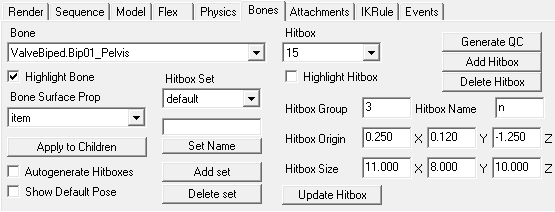
- Bone Dropdown: This allows you to select a bone and view the hitbox associated with it.
- Highlight Bone: This will highlight the select bone when checked.
- Bone Surface Prop: Here you can change the surface type.
- Apply to Children: Selecting this will propagate any changes you make to a bone onto its children if any exist.
- Autogenerate Hitboxes: Greys out the majority of the right side. This adds nothing to the QC so this will auto generate hitboxes on compilation.
- Show Default Pose: Show the default Ragdoll pose.
- Hitbox Set: This lets you select between hitboxes which comes in very helpful when modifying existing hitboxes.
- Set Name: Name the selected hitbox Set.
- Add set: Create a new hitbox set with this (naming it is a good idea)
- Delete set: Delete a selected set.
- Hitbox: Provides the value of the hitbox group the currently selected bone belongs to.
- Highlight Hitbox: Highlight the currently selected bones hitbox.
- Hitbox Group: Change the group a hitbox belongs to.
- Hitbox Name: Name your hitboxes here.
- Hitbox Origin: Move a hitbox on the 3 axis. Note: Not available in all versions.
- Hitbox Size: Scale a hitbox. Note: Not available in all versions.
- Update Hitbox: Refresh the hitbox in the previewer.
- Generate QC: This generates all your manually added hitboxes or tweaks as text to the clipboard for you to add to a .qc file in order for you to compile the tweaked model. Note: all changes you make in the viewer won’t be visible until you recompile your model and reload it.
- Add Hitbox: This lets you generate your very own hitboxes to cover parts like wings or extra limbs on your custom models.
- Delete Hitbox: will delete the currently selected hitbox.
- Edit Hitbox: Select which hitbox to edit. Note: Not available in all versions.
- Load .HBX: Load in a saved hitbox. Note: Not available in all versions.
- Save .HBX: Save the current hitbox for use in other models. Note: Not available in all versions.
Attachments Tab
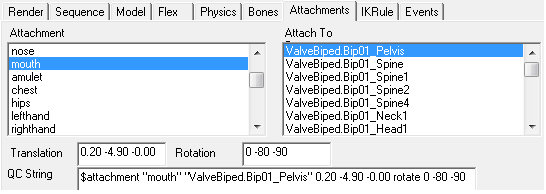
- Attachment: This lets you select from a collection of attachments currently attached to the loaded model.
- Attach To: This will highlight the bone that the currently selected attachment belongs to.
- Translation: This lets you move the selected attachment into a more suitable position if needed.
- Rotation: Modify the attachments orientation.
- QC String: This text will update once you make changes to the attachments. Paste this text into the correct section of the .qc file used to compile the model and recompile to bake in the settings you need.
IKRule Tab
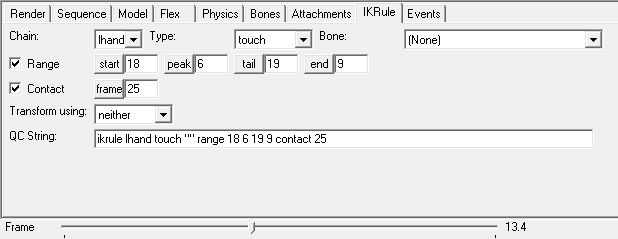
This section is used to inspect and modify the ikchain setup of your model by creating ikrules for scenarios such as walking or interacting with attachments.
- Chain: Select which ikChain to affect.
- Type: Select the type of ikrule you would like to work with.
- Range: Adds the values you put in the start, peak, tail and end fields to the QC String field.
- Contact: Adds the frame number you want the model to contact with something.
- Transform using: switch between source, sequence and neither.
Events Tab
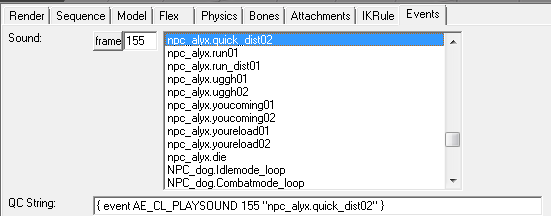
The events tab is used to create a QC string to play a sound at a specific frame in an animation.
- Frame: select this to generate the QC string based on your selection in the sound list.
- QC String: Use this text in your compilation for the model if you have a specific event the character must react to with sound.
- Activity List: Select from a group of activities. Note: Not available in all versions.
Materials Tab
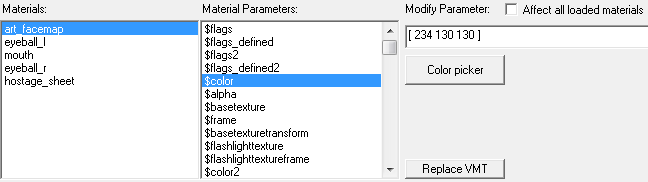
Tweak Model materials in this tab and save to .VMT. Note: The Materials Tab is not available in all versions of HLMV.
- Materials: Select the Material to edit
- Material Parameters: Select a Parameter to Edit.
- Modify Parameter: Change the value of the selected parameter. Depending on the type of value you could be give a float slider, textbox, color picker or transform matrix.
- Affect all loaded materials: self-explanatory.
- Replace VMT: save your changes to a material file.
Customize HLMV
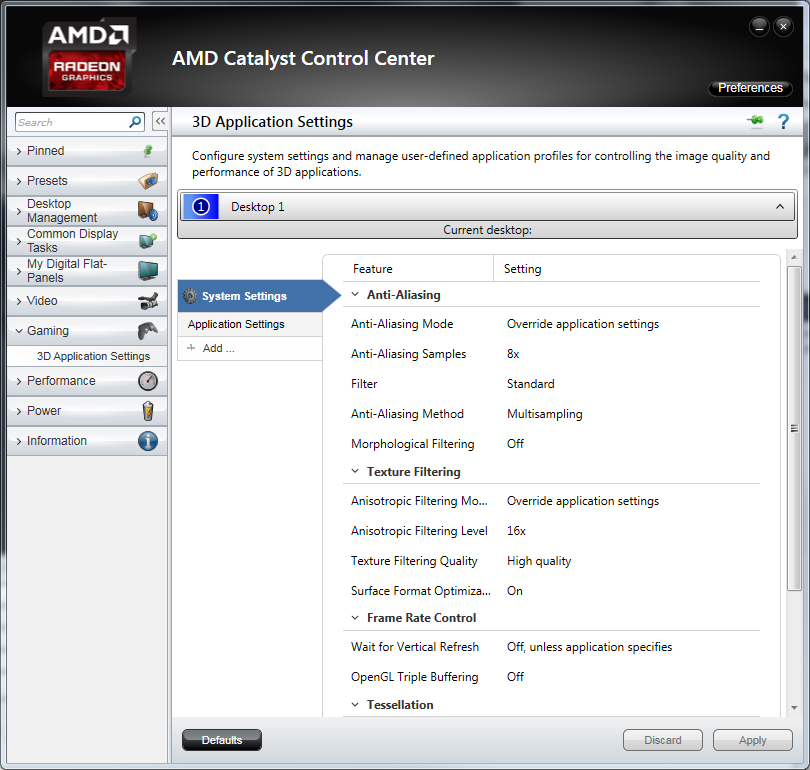
Tweaking the Anti-Aliasing of HLMV:
For AMD/ATi cards you can get optimal anti-alias performance from your GPU by entering the Catalyst Control Center and under Gaming > 3D Application Settings set Anti-Aliasing Mode to [Override application settings] as well as setting [Anti-Aliasing Samples] to 8x. You can also bump to max all the Texture Filtering Settings by overriding the application settings and setting each following value. Of course it makes more sense to only add these settings to HLMV so create a profile using the Add button and make the necessary changes.
You can further increase the image quality on Radeon cards if you own a HD5*** or above by setting the Anti-Aliasing method to Super sampling. (It would be best to do this in an application profile.)
For Nvidia Card owners it’s much the same procedure. Open the Nvidia Control Panel and navigate to the section labelled [Manage 3D settings]. You can make the changes globally or to HLMV only. Either way the values you must add are [Antialiasing — Mode]: Application-controlled and then set each anti-aliasing and Texture Filtering related setting to the highest possible for your GPU.

Dxsupport.cfg
HLMV reads values in from a text file called dxsupport.cfg which you can find in the same location as HLMV. Open this up with your text editor of choice and you will be greeted with hundreds of lines of Cvars setting values to variables that HLMV can understand. There is a profile for almost all GPU’s on the planet bar maybe some of the newer ones.
Follow these steps to further maximise the performance of HLMV with your GPU:
1. Find your graphics card listed within dxsupport.cfg
2. Add or modify the following and be sure to keep them within the code block (within the curly braces {} )
"setting.dxlevel" "99"
"ConVar.mat_antialias" "8"
"ConVar.mat_forceaniso" "8"
"ConVar.mat_picmip" "-10"
3. Don’t despair though if your card isn’t listed you can add it through a series of simple steps. Go to the control panel, open device manager; locate your graphics card under display adapters (if you have more than one use the primary). Right click on this adapter and open its properties, then selecting Hardware ID’s, These ID’s are 4 character Hexadecimal figures. Vendor ID is the value following the prefix VEN_ and Device ID comes after DEV_.
4. Next you must go to the bottom of dxsupport.cfg, locate the unknown section and depending on your adapter provider be it ATi/AMD, Nvidia or Intel you will see a section referring to this.
5. After finding this section you can edit it or simply create one based on this template: If the Vendor ID = 9999 and Device ID = 0000 place yours accordingly
"VendorID" "0x9999"
"MinDeviceID" "0x0000"
"MaxDeviceID" "0x0000"
"setting.dxlevel" "99"
"ConVar.mat_antialias" "8"
"ConVar.mat_forceaniso" "8"
"ConVar.mat_picmip" "-10"
"ConVar.mat_motion_blur_enabled" "1"
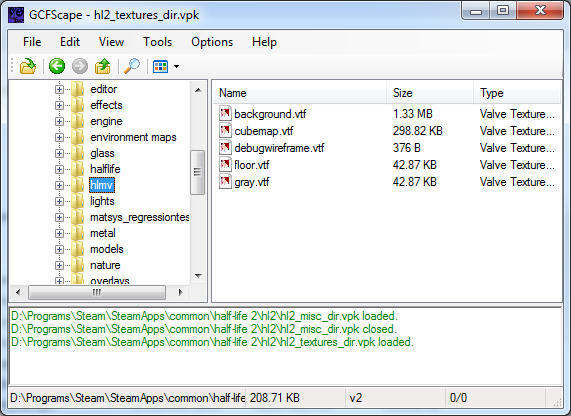
How to add custom Background and Ground materials
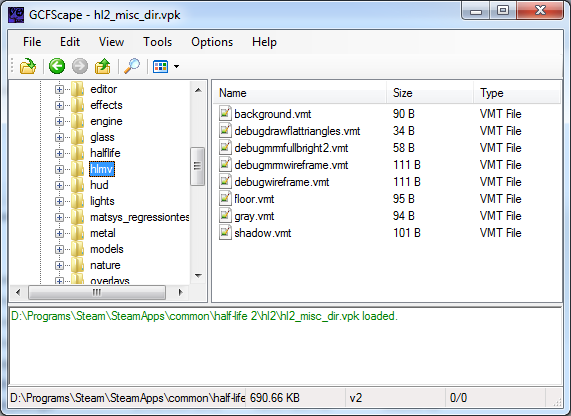
You can load custom materials into HLMV to replace the Background and Ground ( You can modify others also, simply search for what is available to change in GCFScape, depending on what game you wish to use the viewer for open the corresponding VPK i.e. hl2_textures_dir.vpk > materials > hlmv)
To add your own custom images you would first need to create them in an image editor of your choice and convert them to the VTF format. [A set is included with the accompanying project files]
Note: The stock background.vtf image is 512 * 512 and the ground.vtf is tiled @ 256 * 256
You will also need to locate or create VMT files for each texture. These can be found in the misc_dir VPK, i.e hl2_misc_dir.vpk
Place your custom files in the correct location to view the changes. For example:
Steam/Steamapps/common/half-life 2/hl2/custom/my custom files/materials/hlmvThen you simply need to press F5 and refresh HLMV you view your custom background and ground texture.
Note: Be sure to check Ground and Background on the render Tab.
Registry Hacks
In regedit.exe navigate to:
HKEY_CURRENT_USERSoftwareValvehlmvYou will see the following values for each model you have previously opened in HLMV. You can modify each in regedit but note that if you are modifying the values of the currently opened model HLMV will overwrite your changes, only modify if you have a separate model open and press F5 then re-open the model you modified in the registry and observe your changes. Otherwise simply close HLMV, make your changes and they will be set on opening HLMV next time.
Note: All values are relative to each model and not global settings for HLMV. Some of the values below depend on which HLMV you are using.
TroubleShooting
Run the game first
It’s always a good idea to run the game you wish to view the models of first. The reason for this is that the engine will extract some files from the VPK’s that the viewer uses to load models correctly.
Running HLMV from the Source SDK Fails
Fatal Error: Unable to load manifest file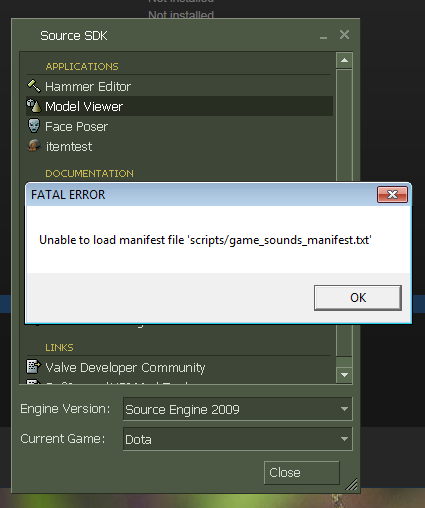
This does not seem to be an error that can be fixed; it arose ever since the SDK was ported to the steam pipe distribution system. The Source SDK is still important though, If you have trouble loading models through File > Load Model (Steam) and your positive your VPROJECT environment variable is set correctly you can Set the Engine version and Current game you wish view models for (you can create a game configuration if it doesn’t exist) Then restart the SDK, load HLMV from the games Bin Directory. For example:
C:Program FilesSteamSteamAppscommonhalf-life 2binhlmv.exe(Steam) Load model Error
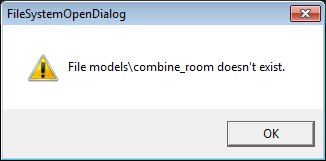
This might be the most infuriating problem with HLMV and is caused when you try to open a model from a VPK which doesn’t have an empty folder created in the models folder on your hard disk. Simply create the folder structure of the model you are trying to view. For the error above I would need to create this folder to be able to view its contents.
C:ProgramsSteamSteamAppscommonhalf-life 2hl2modelscombine_roomUnable to find gameinfo.txt
This error occurs when you attempt to load a HLMV when the correct environment has not yet been setup.
The variable is VPROJECT and it should point to the content folder of the game you wish to view models for. In the case of Half-Life 2 it would be something like this:
VPROJECT=C:ProgramsSteamSteamAppscommonhalf-life 2hl2You can check what VPROJECT is currently set to by typing the following in Command Prompt
This will return its current value.
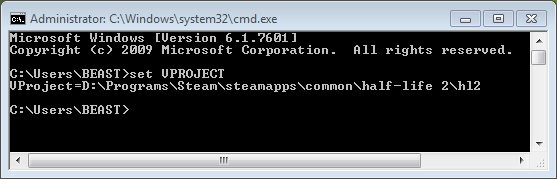
You can also set the variable using the same command and it would look something like this:
set VPROJECT=C:ProgramsSteamSteamAppscommonhalf-life 2hl2Note: This may not work for some people for reasons I am not quite sure of yet.
Occasionally the VCPROJECT path you set above does not update in the Environment Variables section.
Type Environment Variables into start and select «Edit environment variables for your account». In the screen you are presented with you should see in the User Variable Section an Entry for VCPROJECT.
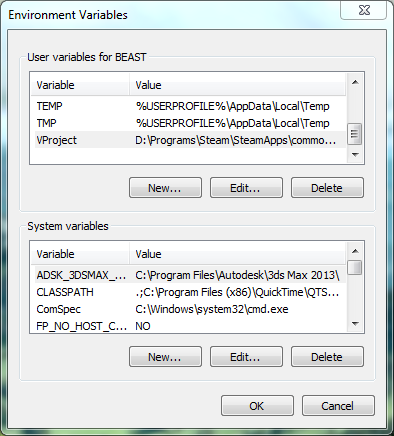
Open it to edit it. If it doesnt exist create it. This will set the Environment Variable.

Desktop Shortcut
Another useful method of avoiding the «Unable to find gameinfo.txt» issue is to create a shortcut to HLMV in the following manner.
Thanks to ZeqMacaw for providing this.
- Create a shortcut to «hlmv.exe» found (by default) in «C:Program FilesSteamsteamappscommonleft 4 dead 2bin».
- Right-click on the shortcut.
- Select Properties.
- Select the Shortcut tab (if not already shown).
- Delete all text in the Target field.
- Copy-paste into the Target field: «C:Program Files (x86)Steamsteamappscommonleft 4 dead 2binhlmv.exe» -game «C:Program Files (x86)Steamsteamappscommonleft 4 dead 2left4dead2» (If not using the default folder for Steam, then edit the Target field as needed. It should be similar to the Start in field.)
- Move the shortcut to a easily-accessible folder, such as a taskbar toolbar; it should be placed somewhere for convenient opening.
References
Thanks
I hope you find this page useful when you venture into the convoluted and often time awkward world of Source Modding. I will keep this page and accompanying documents up to date to the best of my abilities.
The support thread for this tutorial can be found over in the forums.
I have tried my best to keep this document as close to the facts as possible but when trying to describe a tool that doesn’t have a great official documentation (hence the need for this document) details can slip through the cracks. If you find any issues or if you know of anything this document should include please feel free to send a mail onto me concerning it.
![]()
Everytime I launch TF2, I get the following message: Setup file ‘gameinfo.txt’ doesn’t exist in subdirectory ‘hl2’. Check your -game parameter or VCONFIG setting.
Things I’ve tried
-Fresh reinstall (twice)
-Fresh OS reinstall
-Update drivers etc.
-Find ‘gameinfo.txt’ in my tf folder, delete it, verify game cache, and launch again
-verify game cache
-restart PC
-wait for a while
-run as admin
Help would be appreciated!
Have you tried replacing the gameinfo.txt with a new one? Here’s a link. Just place that in your tf folder and see if it works.
Have you tried replacing the gameinfo.txt with a new one? [url=https://www.dropbox.com/s/heyy925duvgapql/gameinfo.txt?dl=0]Here’s a link[/url]. Just place that in your tf folder and see if it works.
I’ve had this issue a few times in the last couple days. It was being caused by a bad desktop shortcut for tf2. Not sure if that’s the issue here. I fixed it by creating a new shortcut for tf2.
I’ve had this issue a few times in the last couple days. It was being caused by a bad desktop shortcut for tf2. Not sure if that’s the issue here. I fixed it by creating a new shortcut for tf2.
Just tried it, no dice, thanks though
CarnHave you tried replacing the gameinfo.txt with a new one? Here’s a link. Just place that in your tf folder and see if it works.
Just tried it, no dice, thanks though
[quote=Carn]Have you tried replacing the gameinfo.txt with a new one? [url=https://www.dropbox.com/s/heyy925duvgapql/gameinfo.txt?dl=0]Here’s a link[/url]. Just place that in your tf folder and see if it works.[/quote]
check the file itself? I remember a while back i had a fucky problem with it and for some reason the gameinfo was completely wrong, it was pointing the filesystem to some appid that wasn’t 440 (tf2’s). You can probably use the one you dl’d to crosscheck.
check the file itself? I remember a while back i had a fucky problem with it and for some reason the gameinfo was completely wrong, it was pointing the filesystem to some appid that wasn’t 440 (tf2’s). You can probably use the one you dl’d to crosscheck.
Crosschecked and looked it over. Issue still persists. Appreciate the help though
BuildBruhcheck the file itself? I remember a while back i had a fucky problem with it and for some reason the gameinfo was completely wrong, it was pointing the filesystem to some appid that wasn’t 440 (tf2’s). You can probably use the one you dl’d to crosscheck.
Crosschecked and looked it over. Issue still persists. Appreciate the help though
[quote=BuildBruh]check the file itself? I remember a while back i had a fucky problem with it and for some reason the gameinfo was completely wrong, it was pointing the filesystem to some appid that wasn’t 440 (tf2’s). You can probably use the one you dl’d to crosscheck.[/quote]
Did you ever find a solution?
I have replaced the gameinfo.txt from here, verified it at least it has 440 in the right place
I also replaced my desktop icon from within steam.
Any help please
Did you ever find a solution?
I have replaced the gameinfo.txt from here, verified it at least it has 440 in the right place
I also replaced my desktop icon from within steam.
Any help please
I have the same problem. Please help 
I have the same problem. Please help
I have something similar to this. when i launch it through steam, it crashes on the startup loading screen. If i try to launch it through the tf2 folder, the error message opens. Send Help.
I have something similar to this. when i launch it through steam, it crashes on the startup loading screen. If i try to launch it through the tf2 folder, the error message opens. Send Help.
sorry for necroing
i’ve been battling this for the past week, nothing worked, did everything b0wl did, added him to see if he fixed it and said he just got a new pc
i got a match tomorrow and i can’t play anywhere else, please help
this is the error i get when i launch it normally
this is the error i get when i launch it through hl2.exe (as administrator awell)
edit
fixed it, thanks wiethoofd and prsn for helping out!
sorry for necroing
i’ve been battling this for the past week, nothing worked, did everything b0wl did, added him to see if he fixed it and said he just got a new pc
i got a match tomorrow and i can’t play anywhere else, please help
this is the error i get when i launch it normally
[img]https://i.imgur.com/Jhr5ezO.png[/img]
this is the error i get when i launch it through hl2.exe (as administrator awell)
[img]https://i.imgur.com/HGvUw63.png[/img]
edit
fixed it, thanks wiethoofd and prsn for helping out!
So, does anyone know an actual solution for this? Checking the app id (which is 440) and replacing gameinfo.txt didn’t work.
So, does anyone know an actual solution for this? Checking the app id (which is 440) and replacing gameinfo.txt didn’t work.
JackyLegssorry for necroing
i’ve been battling this for the past week, nothing worked, did everything b0wl did, added him to see if he fixed it and said he just got a new pc
i got a match tomorrow and i can’t play anywhere else, please help
this is the error i get when i launch it normally
https://i.imgur.com/Jhr5ezO.png
this is the error i get when i launch it through hl2.exe (as administrator awell)
https://i.imgur.com/HGvUw63.png
edit
fixed it, thanks wiethoofd and prsn for helping out!
how did you fix it? i’m literally trying anything but still no results.
Thank you
[quote=JackyLegs]sorry for necroing
i’ve been battling this for the past week, nothing worked, did everything b0wl did, added him to see if he fixed it and said he just got a new pc
i got a match tomorrow and i can’t play anywhere else, please help
this is the error i get when i launch it normally
[img]https://i.imgur.com/Jhr5ezO.png[/img]
this is the error i get when i launch it through hl2.exe (as administrator awell)
[img]https://i.imgur.com/HGvUw63.png[/img]
edit
fixed it, thanks wiethoofd and prsn for helping out![/quote]
how did you fix it? i’m literally trying anything but still no results.
Thank you
I’ve tried a couple of methods with wiethoofd and prsn which fixed it temporarily, I’ve taken all my launch options out and put -autoconfig in my launch options after restarting my pc, after a few tries it worked (try launching as administrator if it doesn’t work).
after a while it happened again, eventually, my pc died, my motherboard and graphics card were toast, had to replace them, after that it never happened again.
I’ve tried a couple of methods with wiethoofd and prsn which fixed it temporarily, I’ve taken all my launch options out and put -autoconfig in my launch options after restarting my pc, after a few tries it worked (try launching as administrator if it doesn’t work).
after a while it happened again, eventually, my pc died, my motherboard and graphics card were toast, had to replace them, after that it never happened again.
try puting the gameinfo.txt into the team fortress 2 folder then put in into the hl2 folder and run it???
try puting the gameinfo.txt into the team fortress 2 folder then put in into the hl2 folder and run it???
Please
sign in through STEAM
to post a comment.
Go to tf2
Just installed TF2 on my new computer, gameinfo.txt is missing. Need help!
EVERYTHING IS FIXED! MOVE ON WITH YOUR DAY!
Hey everyone!
Recently I built myself a new computer. I installed Seam and then started to install TF2. After it installed, I tried to run it and it said this:
    Setup file "gameinfo.txt" doesn't exist in subdirectory "hl2".
Check  your -game parameter or VCONFIG setting.
I tried to verify my game cache, and it did not work. I also tried creating a gameinfo text file myself, but it said this:
hl2gameinfo.txt is not a valid format.
So then I uninstalled TF2 and reinstalled it again, thinking it would work. It’s turns out it didn’t work, and now I’m stuck.
I was wondering if any of you guys could help me with this problem of mine. Your help will be greatly appreciated!
Also, if the mods have a problem with this post being over here, I’ll remove it. Please tell me where I can post this. Thanks!
EDIT: Cleared up some confusion.
EDIT 2: Okay, so it turns out I can’t run any games. When I try to launch a game, it says it’s running, but then it switches to «syncing», and closes it. I have no idea what to do now. :C
EDIT 3: Everything is fixed! Thanks again to everyone who helped me! <3
Эта страница — попытка документировать общие проблемы с TF2 Classic и их решения.
Убедитесь, что вы полностью выполнили инструкции, приведенные на странице Установка, прежде чем искать решение проблему здесь.
Проблемы, связанные с TF2CDownloader
(Windows) SmartScreen заблокировал TF2CDownloader!
Он делает это для каждого неподписанного приложения. Подписать его будет стоить нам около $800 в год, поэтому мы этого не делаем. Во всплывающем окне SmartScreen нажмите «Подробнее», затем «Выполнить в любом случае».
(Windows) Пишет, что TF2CDownloader нахватает памяти!
Это происходит на Windows 7. Мы не поддерживаем и не можем поддерживать Windows 7, вы должны установить игру вручную.
(Linux) TF2CDownloader выдает «Error loading Python lib»!
Это происходит, когда приложение было собрано с версией glibc, более новой, чем та, которую поддерживает ваш дистрибутив. В настоящее время мы поддерживаем Ubuntu 20.04 и любой другой дистрибутив с glibc 2.31 или новее.
Почему при запуске TF2CDownloader возникает так много ошибок?
Это нормально. Выводимые данные чрезвычайно подробны. Первое, что делает TF2CDownloader, это проверяет, существует ли уже файл игры для проверки. Обычно он не существует, что заставляет его выдать «Checksum error». Затем, если какие-либо зеркала не работают, выходят из строя, отсутствуют или имеют другие проблемы, он также выдаст ошибку при попытке связаться с ними. Это не фатальные ошибки, и они ожидаются в процессе работы.
Я не могу найти папку, которую извлек TF2CDownloader!
Если вы не извлекаете файлы в исходные файлы (sourcemods), ваш каталог для извлечения — большая и загроможденная папка, «и» вы сортируете папки по дате изменения, вы, скорее всего, не сможете легко найти папку, которую он извлек. Вместо этого следует отсортировать папку в алфавитном порядке, а затем прокрутить ее, пока не найдете папку «tf2classic», чтобы переместить ее в папку sourcemods. Также может быть полезно нажать F5, чтобы обновить содержимое папки.
Проблемы с ручной установкой
Я получаю ошибку при попытке извлечь ZIP!
В Windows
Известно, что эта ошибка возникает при использовании встроенного ZIP-архиватора Проводника Windows. Для извлечения файлов игры необходимо использовать сторонние архиваторы (см. ниже).
Проверенные и поддерживаемые варианты включают 7-Zip, PeaZip, и WinZip (не бесплатный). WinRAR вероятно, также подойдет, однако его не рекомендуется использовать, поскольку в прошлом он был известен случайными ошибками при извлечении, а также тем, что является проприетарным.
В Linux
Эта проблема связана с тем, что старые версии libzip не поддерживают ZIP файлы, сжатые с помощью LZMA, что влияет на множество менеджеров архивов. Команда unzip не будет работать.
В дистрибутивах на базе KDE Plasma необходимо открыть Ark, нажать на «Settings» на панели инструментов, нажать «Configure Ark…», и в разделе «Plugins» окна конфигурации снять галочку с «Libzip plugin». Примените изменения и повторите попытку извлечения. Он должен вернуться к использованию бэкенда P7Zip, который будет работает нормально.
Как правило, следует установить 7-Zip и распаковать через CLI. На Ubuntu 22.04+ или Debian 12+ установите пакет «7zip». В Arch Linux или Manjaro установите «7-zip» из AUR. Затем выполните:
7zz x tf2classic-2.0.3.zip
И переместите извлеченную папку «tf2classic» в папку sourcemods.
Различные вопросы
Я не могу подключиться ни к одному серверу, и весь текст начинается с #TF!
Убедитесь в правильности структуры папок. Внутри вашей папки sourcemods, должна быть папка tf2classic, которая должна содержать файл gameinfo.txt. Если это не так, значит, вы извлекли файл неправильно. Если ваш путь выглядит как sourcemods/tf2classic-2.0.4/tf2classic или если все ваши файлы свободно сбрасываются в sourcemods, это приведет к такой проблеме.
Программа запуска сообщает мне, что SDK2013 не установлен, но он установлен!
Это может произойти, если Source SDK Base 2013 Multiplayer установлен на отдельный диск от клиента Steam. Правильный диск почти всегда будет C:. Любые другие диски кроме дисков C: приведут к проблемам. Вы можете переместить его, как показано ниже:
Для опытных пользователей есть возможность создать символическая ссылку из предполагаемого местоположения в общей папке на диске C: в реальное местоположение на другом диске. Смотрите инструкцию здесь о том, как создать такую ссылку.
Программа запуска говорит, что SDK2013 необходимо обновить, но это так!
Вам следует попробовать запустить SDK2013 из Steam. Даже если Steam утверждает, что он полностью установлен, он может требовать проверки или другой работы, которую Steam выполнит только при попытке его запуска. После запуска и повторного закрытия перезапустите программу запуска.
Лаунчер не работает!
Если у вас возникли какие-либо проблемы с лаунчером, вы можете полностью игнорировать её. Игра должна появиться в вашей библиотеке Steam, если она была установлена правильно, и вы можете запустить ее через неё.
Моя игра не отображается в моей библиотеке Steam!
Сначала полностью перезапустите Steam, если вы этого не сделали после установки игры. Щелкните правой кнопкой мыши по Steam в системном трее (стрелка вверх рядом с уведомлениями и панелью задач), затем нажмите «Выход» в появившемся меню. Или нажмите на кнопку Steam в левом верхнем углу окна и выберите «Выход» из выпадающего меню. Затем снова запустите Steam и посмотрите, появится ли он.
Если это не сработало, убедитесь, что структура папок правильная. Внутри вашей папки sourcemods, должна быть папка tf2classic, которая должна содержать файл gameinfo.txt. Если все это не так, значит, вы извлекли файл неправильно. Если ваш путь выглядит как sourcemods/tf2classic-2.0.4/tf2classic или если все ваши файлы свободно сбрасываются в sourcemods, это приведет к тому, что файл не будет обнаружен.
Эта проблема также может возникнуть, если Steam и TF2 Classic установлены на разных дисках (например, Steam на диске C:, а TF2 Classic на диске E:). Решение заключается в создании «символичной ссылки» — в папке с Steam, которая перенаправляет на папку во внешнем диске. Этапы для этого зависят от вашей системы.
Создание символичной ссылки в Windows
- Найдите свою папку
sourcemods. Если вы не можете найти его, вы можете выполнитьreg query HKCUSoftwareValveSteam /v SourceModInstallPathв Командной строке, чтобы увидеть путь. - Удалите папку
sourcemods, иначе Символическая ссылка не сможет быть создана. Если какие-либо моды все еще находятся там, перенесите их в новое место. - Откройте Командную строку от имени администратора.
- Введите эту команду:
mklink /d /j "path to steam sourcemods" "path to your sourcemods"
Замените "path to steam sourcemods" на путь Steam sourcemods, например: "C:Program Files (x86)Steamsteamappssourcemods"
Замените "path to your sourcemods" на любой путь, который вам нужен, например: "D:Gamessourcemods"
Создание символичной ссылки в Linux
- Удалите папку Steam
sourcemods, которая обычно находится по пути~/.steam/steam/steamapps/sourcemods - Откройте терминал и запустите
ln -s /path/to/your/sourcemods ~/.steam/steam/steamapps/sourcemods
Как и в Windows, замените /path/to/your/sourcemods на полный путь к папке, которую вы хотите использовать на внешнем диске.
Обратите внимание, что любой внешний диск, используемый для запуска игр, «должен быть доступен для чтения и записи вашим пользователем, и у вас должны быть права на выполнение действий». Если это диск NTFS, следуйте руководству Valve по его подготовке: https://github.com/ValveSoftware/Proton/wiki/Using-a-NTFS-disk-with-Linux-and-Windows.
(Linux) Моя игра не может подключиться к серверам!/Мой внутриигровой оверлей не работает!
В Linux для правильной работы TF2C требуется специальный параметр запуска. Щелкните правой кнопкой мыши по игре в библиотеке Steam, нажмите «Свойства», затем вставьте это в поле «Параметры запуска»:
LD_PRELOAD="$HOME/.steam/steam/ubuntu12_32/gameoverlayrenderer.so" %command% -steam -steam
Это исправит оверлей и позволит вам подключаться к игровым серверам.
«На сервере, к которому вы пытаетесь подключиться, установлена старая версия игры».
Эта ошибка частично ложная. Чаще всего старая версия игры установлена не на сервере, а у вас. Если вы сами скачали старую версию игры, то при подключении к официальным серверам вы получите эту ошибку. Следовательно, вам необходимо переустановить игру из архива, используя последнюю версию игры.
Игроки невидимы в моей игре!
Обычно это происходит, если сеть ненадежна или игра тормозит. Можно выполнить команду, чтобы исправить это, хотя вам придется выполнять эту команду каждый раз, когда это будет происходить.
- Включите консоль разработчиков в настройках игры.
- Нажмите клавишу ~ (тильда, или Ё на русской раскладке) на клавиатуре, чтобы открыть консоль.
- Запустите
record demo;stop
Игра застряла на «Получение информации о сервере», но я слышу внутриигровые звуки!
Эта проблема возникает, если вы запускаете игру с Intel Graphics вместо использования выделенного GPU.
Решением является снижение графических настроек до тех пор, пока проблема не исчезнет.
Смотрите также
- Установка
- Discord сервер (напишите в наш англоязычный дискорд сервер, в канал #technical-issues если ваш вопрос не удалось решить здесь)