Contents
- Effective Ways to Fix the “A Breakpoint Has Been Reached” Error
- 1. Turn Off Automatic Startup Programs
- 2. Run the DISM Tools and the SFC Scan
- 3. Run Disk Checker
- 4. Switch Off Any GPU Overclocking
- 5. Update Your Device Drivers
- 6. Perform a Full Malware Scan
- 7. Update Your System
- 8. Set the Page File to Automatic
- 9. Reinstall the Affected Application
- 10. Perform a System Restore
- 11. Remove Windows Updates
- 12. Repair Game Files
- 13. Prevent Your Antivirus Program from Blocking the File
- 14. Run the Windows Memory Diagnostic tool
- 15. Create Another Administrator Account
- 16. Perform a Clean Boot
- A Breakpoint Has Been Reached Error: Conclusion
- A Breakpoint Has Been Reached Error: FAQs
- What Is the Best Driver Updater to Update My PC Drivers?
- How Do I Fix My Ghost Recon Breakpoint Not Launching Problem?
- How Do I Fix My Hard Drive Not Showing Up?
![[FIXED] A Breakpoint Has Been Reached (Error 0x80000003)](https://www.auslogics.com/en/articles/wp-content/uploads/2023/05/shutterstock_2050685672.jpg)
Windows has an almost infinite supply of errors. You’d think you’ve seen it all until another bizarre error message takes you by surprise. One such problem is the error “a breakpoint has been reached.
The exception breakpoint error 0x80000003 is mainly the result of a Windows registry mix-up that leftover keys of uninstalled applications could trigger. Other possible causes include the following:
- Malware attacks
- Problematic Windows updates
- Outdated device drivers
- Malfunctioning hard disk sectors
- Missing or corrupted system files
- Corrupt or missing game files
You can experience the error when you run a program or boot your PC. This guide will help you fix the “a breakpoint has been reached” error on Windows 10 and 11.
Let’s begin.
Effective Ways to Fix the “A Breakpoint Has Been Reached” Error
To fix the error “a breakpoint has been reached”, follow the steps below. If the first solution doesn’t work, go through until you find the one that fixes the error on your PC.
1. Turn Off Automatic Startup Programs
The exception breakpoint error can sometimes occur when third-party apps launch during startup. To ensure that this may be causing the problem, restart your computer with no startup programs running in the background.
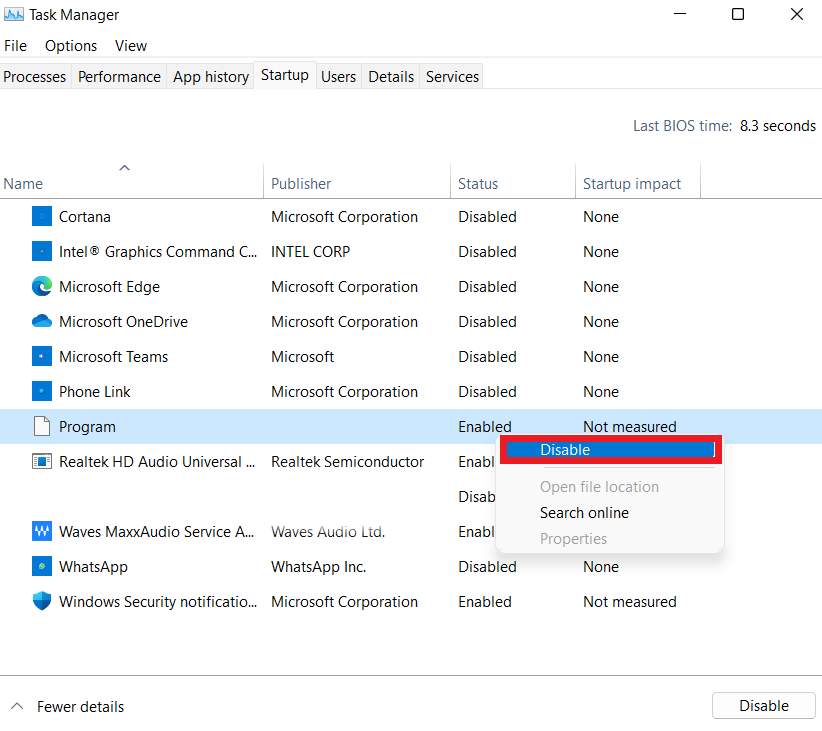
Follow the steps below to disable startup apps on Windows. Remember to turn off only third-party apps unless you don’t need a specific Window service:
- Click on “Win + X” to access the WinX menu.
- Next, click on “Task Manager” to launch the program.
- Launch Startup apps from the Task Manager.
- If you click the “Status” column header, the table will sort so that the active apps appear first.
- Next, click the “Disable” button next to each program.
After that, try restarting your computer to see if the exception breakpoint error still appears. If that’s not the case, try turning on the apps again, one by one, until you identify the app causing the problem.
2. Run the DISM Tools and the SFC Scan
The Deployment Image Service Management (DISM) tool is command-line software that can diagnose and repair problems with your Windows image. For example, you can use the tool to repair a damaged system image, which may be likely the cause of your issue.
Also, the System File Checker (SFC), like DISM, is a command-line tool integrated into Windows systems that scans for and replaces corrupted or missing system files. We’ll show you how to use these tools to check for potential errors.
Here’s how to use DISM and System File Checker:
- Then, click on the search bar and type “Command Prompt.”
- Launch the “Command Prompt” as an administrator. You can do that by right-clicking the command prompt and choosing “run as administrator.”
- Enter the following command in the Command Prompt window: “Dism /Online /Cleanup-Image /CheckHealth.”

- After that, type “Dism /Online /Cleanup-Image /ScanHealth” and enter to check your computer health.
- Next, type “Dism /Online /Cleanup-Image /RestoreHealth” to repair the system image. Remember that the process usually takes minutes to complete. So be patient until the test reaches 100%.

- After that, run the System File Checker by typing the following command: “sfc /scannow.” The process takes several minutes to complete. After the scan, it’ll show the results and any actions it took.
3. Run Disk Checker
Sometimes, the Windows exception breakpoint error could be due to a malfunctioning or corrupted hard drive. Bad sectors can also cause the “a breakpoint has been reached” error. You can eliminate the problem by scanning and fixing your disk for problems.
Here’s how to do it:
- First, launch the “Command prompt” as an administrator.
- Type Press “CHKDSK /f /r D:” and press enter. (Note: Check your disk letter and replace it accordingly.)
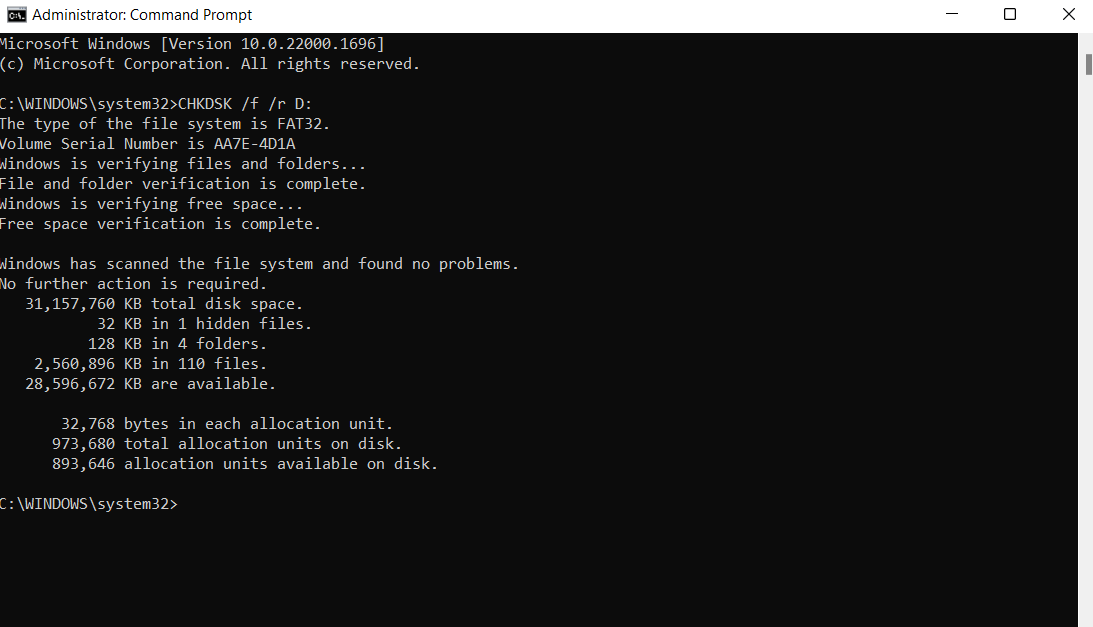
Wait for the process to complete. After completion, restart your computer to see if the problem is solved. If not, proceed with the other steps in this guide.
Related: Why Does a Windows 10 and Windows 11 PC Run Chkdsk at Startup?
4. Switch Off Any GPU Overclocking
If you get the exception breakpoint error during a graphics-intensive activity like playing games, an overclocked GPU may be the cause.
A properly overclocked GPU improves performance, but improper overclocking might crash your system and generate errors.
Revert any recent GPU overclocking you may have performed, whether with a third-party tool or a manufacturer-specific program, to see whether that resolves the issue.
You can check out top-tier GPU overclocking tools to help you solve the problem.
Removing the program entirely may be the only option if applying the latest update does not resolve the issue. To do so, just follow these steps:
5. Update Your Device Drivers
Device drivers control the communication between your hardware components and the operating system. Third-party applications also use drivers to interact with devices.
If a driver is corrupt or obsolete, the operating system will display an error when there’s a communication breakdown. This especially happens when a third-party program tries to make contact.
You can use Device Manager to find drivers and install their latest versions. However, they don’t show outdated drivers or notify you when an update becomes available for driver software. You can use Windows Update, but it’s only for Microsoft updates.
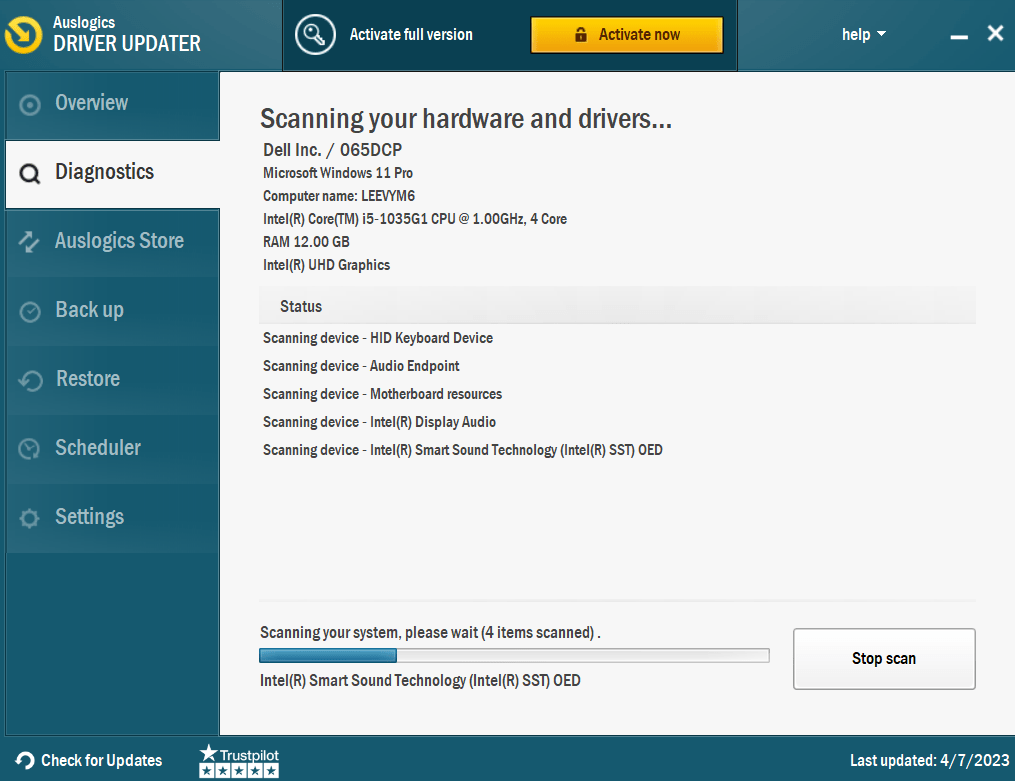
Use Auslogics Driver Updater
Auslogics Driver Updater can help you check for outdated and problematic drivers and install their updates automatically. If you go for the program’s full version, you can update multiple drivers simultaneously with just one click!
The tool fetches driver software from trusted sources and keeps backups just in case.
Downloading the program only takes three steps:
- Download the Auslogics Driver Updater.
- Click on “Click to install and check drivers.”
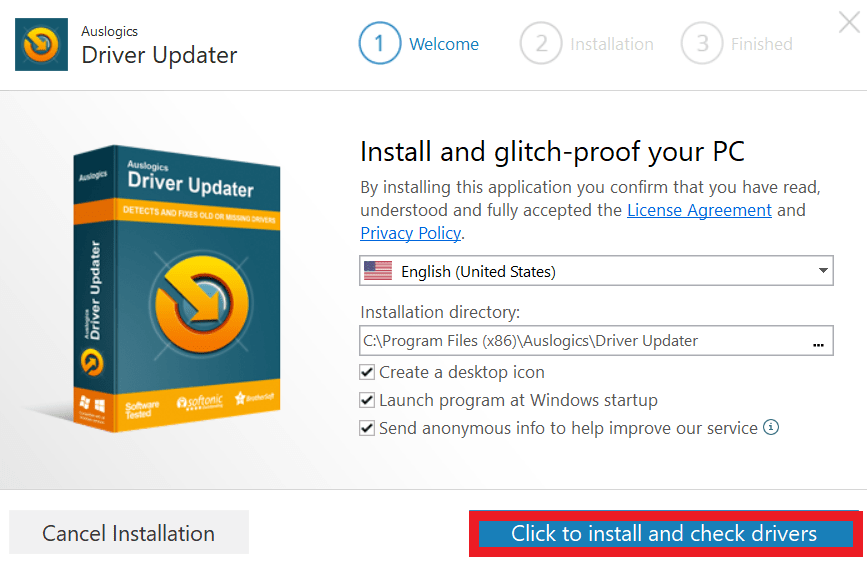
- After clicking “Finish,” the program will automatically scan your PC for drivers needing updating.
6. Perform a Full Malware Scan
The problem could be appearing due to the operations of a malicious file or program. You can get rid of the malware file or application by using Auslogics Anti-Malware to run a deep scan.
A full scan is more thorough than your antivirus program’s regular scan as it will assess protected areas on your computer for viruses.
So, choose the Full Scan option in your antivirus scan and allow it to complete the process.
Note that this may take up more time than the usually scheduled scan.
7. Update Your System
“A breakpoint has been reached” error could be popping up because your operating system is outdated. Executable files interact with device drivers, system files, and other system components. If one or more system components are outdated, issues will occur.
“A breakpoint has been reached” error is one of the problems that erupt in such a case. Some underlying operating system bugs, which may have been fixed in an update, could also be responsible for the problem.
So, if you haven’t updated your system in a while, do that and check for the problem. If you don’t know how to, follow these steps:
- Press the “Windows key + S” to open the search box.
- Type “Windows update” and click on “Check for Updates.”
- Click on “Check for updates” under Windows Update.
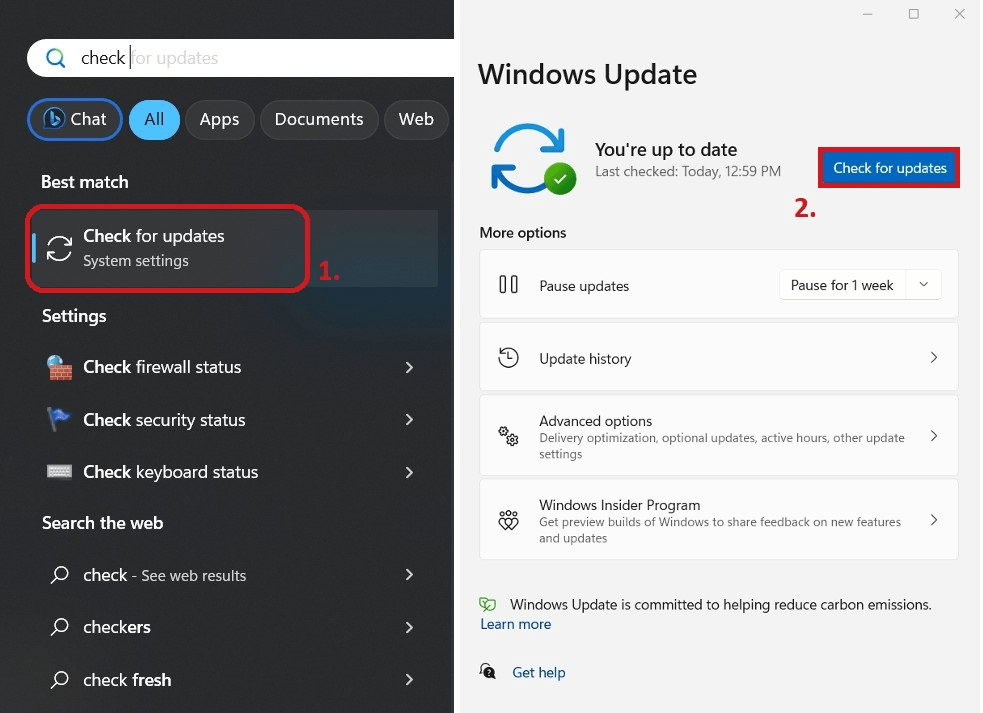
- Download and install available updates.
- Click on “Restart now” to install the updates.
8. Set the Page File to Automatic
The page file is Windows’ way of expanding your system memory to accommodate more programs and processes. It’s a portion of your hard drive that your operating system uses as a make-shift memory when your main memory is full.
Windows typically manages the file, but you may have changed the setting and applied a manual, static size for the page file.
There are two options here, and the one you choose depends on your current setting.
First, if Windows manages the page file automatically, you can switch it to manual and see if that solves the problem.
If you have a manual configuration, then switch the setting to automatic. Follow the steps below to change your virtual memory settings on Windows 10 and Windows 11:
- Launch the Start menu, type “Advanced system settings,” and open it.
- Click on the “Settings” button under “Performance.”
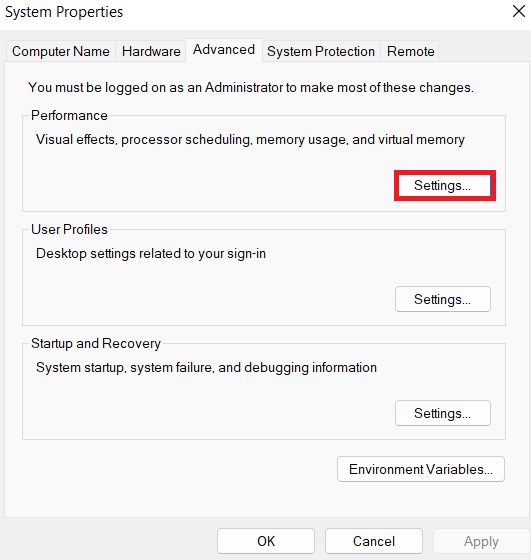
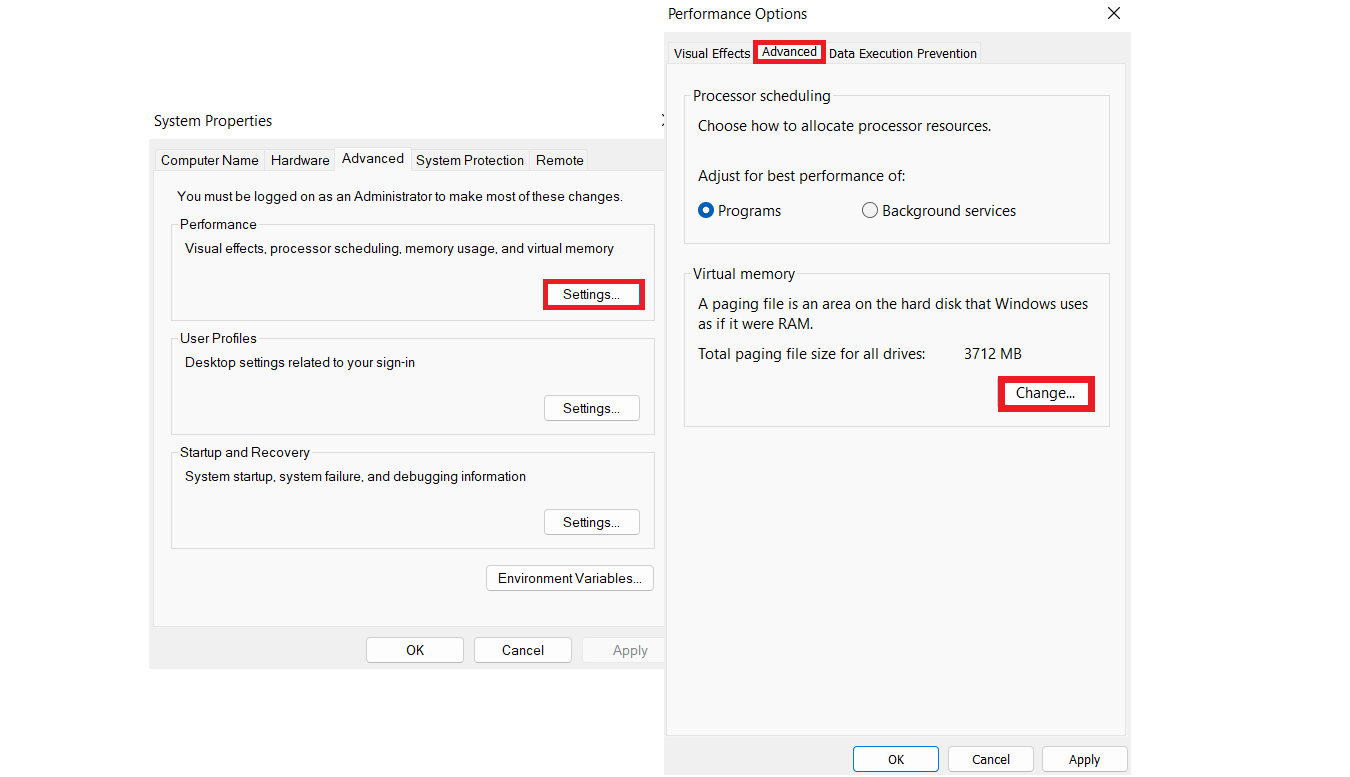
- Switch to the “Advanced” tab in the “Performance” Options dialog.
- Head to the “Virtual Memory” section and click the “Change” button.
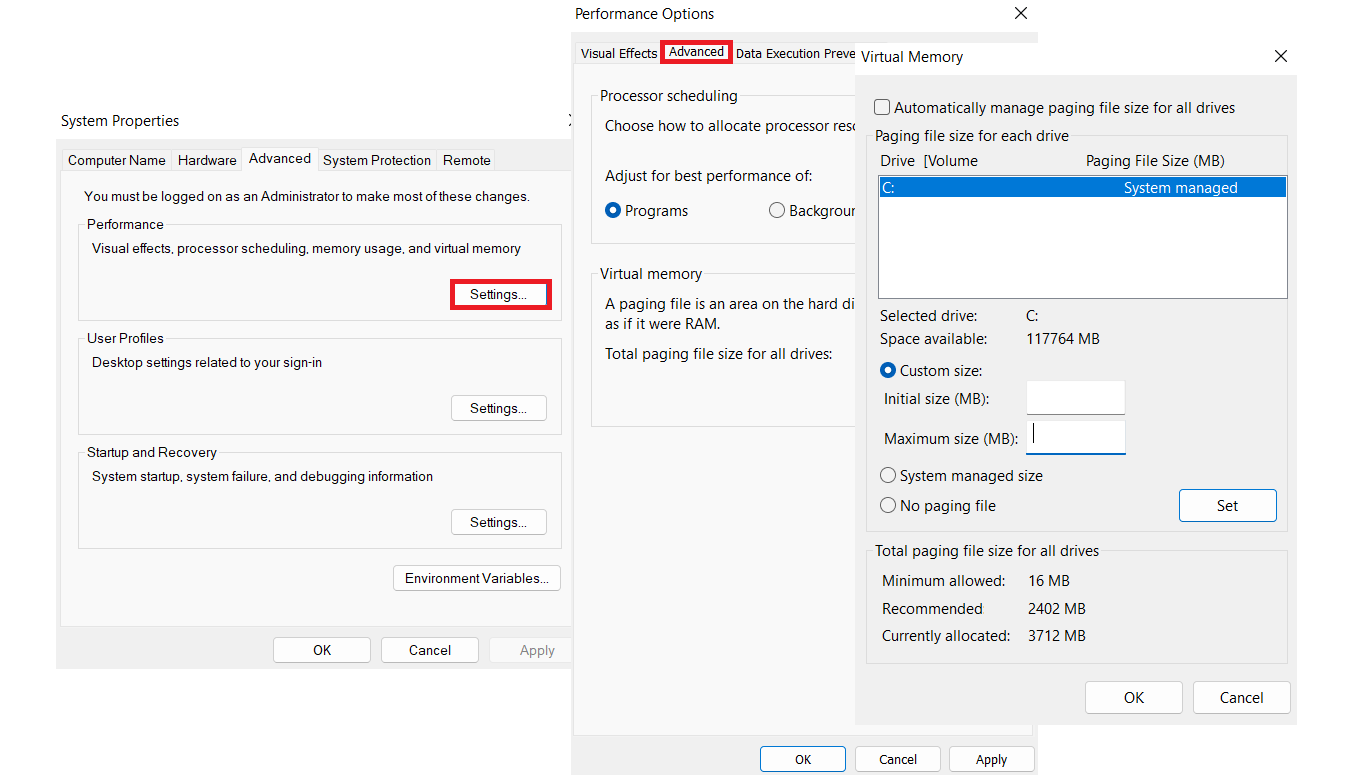
- If you currently use a customized paging file size, check the box next to “Automatically manage paging file size for all drives” and click the OK button.
- On the other hand, if the automatic option is already selected, uncheck the box and go to the “Custom Size” section to set a paging file size for your hard drive.
- You can set the size (in megabytes) to 1.5 times your system memory size. First, however, you use the recommended size at the bottom of the “Virtual Memory” window.
9. Reinstall the Affected Application
One of the problems that could cause “a breakpoint has been reached” error is the program’s installation files. In this case, removing and reinstalling the program can eliminate the Windows exception breakpoint.
Let’s show you how to remove programs from a Windows 10 or Windows 11 PC:
- First, open the Start menu and type “control panel.”
- After the Control Panel opens, head to “Programs” and click “Uninstall a Program.”
- Once you see the “Programs and Features” list, scroll down to the app you want to remove and double-click it.
- Finally, confirm your decision to uninstall the program and follow the subsequent prompts.
10. Perform a System Restore
“A breakpoint has been reached” error may be showing up due to some changes you implemented in your computer. These changes could include:
- A driver update
- A new application
- An uninstalled program
- Windows Update
Suppose you started seeing the error recently, especially after applying any of these changes. In that case, you can reverse them through the System Restore wizard and check if the error will disappear.
Note that you must have created a restore point before you can take your system back to the recorded state. However, Windows often creates restore points automatically, especially after installing an update.
The restore process is similar for Windows 10 and 11, so these steps will guide you if you use any of the operating systems:
- Open the Start menu and type Restore.
- Click on “Create a Restore Point” in the search results.
- After the “System Properties” dialog opens, click on the “System Restore” button under the “System Protection” tab.
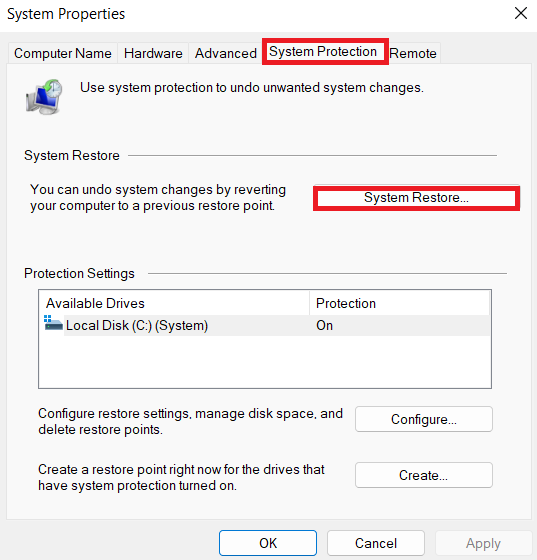
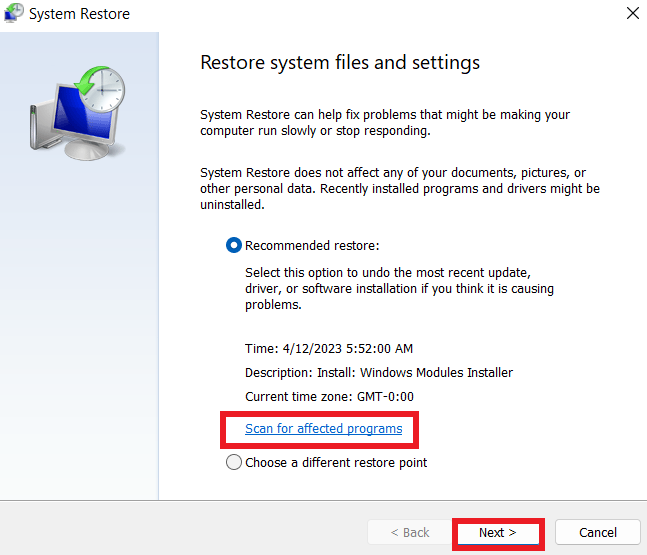
- Click on the Next button after the “System Restore” window opens.
- Now, you’ll see the list of restore points you created or those automatically created by Windows.
- You can click the “Scan for affected programs” button to check the applications and drivers that the “System Restore” client will delete.
- After that, click on the “Next” button, then select “Finish.”
- Allow “Windows” to restore your computer.
Launch the program that triggers the error once your computer starts.
Also Read: How to Resolve Windows Update Error 0x800703e6?
11. Remove Windows Updates
While updates are published to enhance your computer’s performance and make it more secure, they often cause problems.
Some updates may not be compatible with your PC and may end up triggering the breakpoint error. So, if the error started showing up after you installed a major update, you can roll back the update and check if that solves the problem.
Follow these steps if you run Windows 10:
- Press the Windows and S keyboard buttons at the same time to open the search box beside Start.
- Type “Updates” into the text field and click on Check for Updates.
- Click “View update history” under Windows Update.
- When the “View Update History” page opens, take note of your installed updates and check their dates. You should also note their KB numbers.
- Go to the top of the “View Update History” page and click on “Uninstall Updates.”
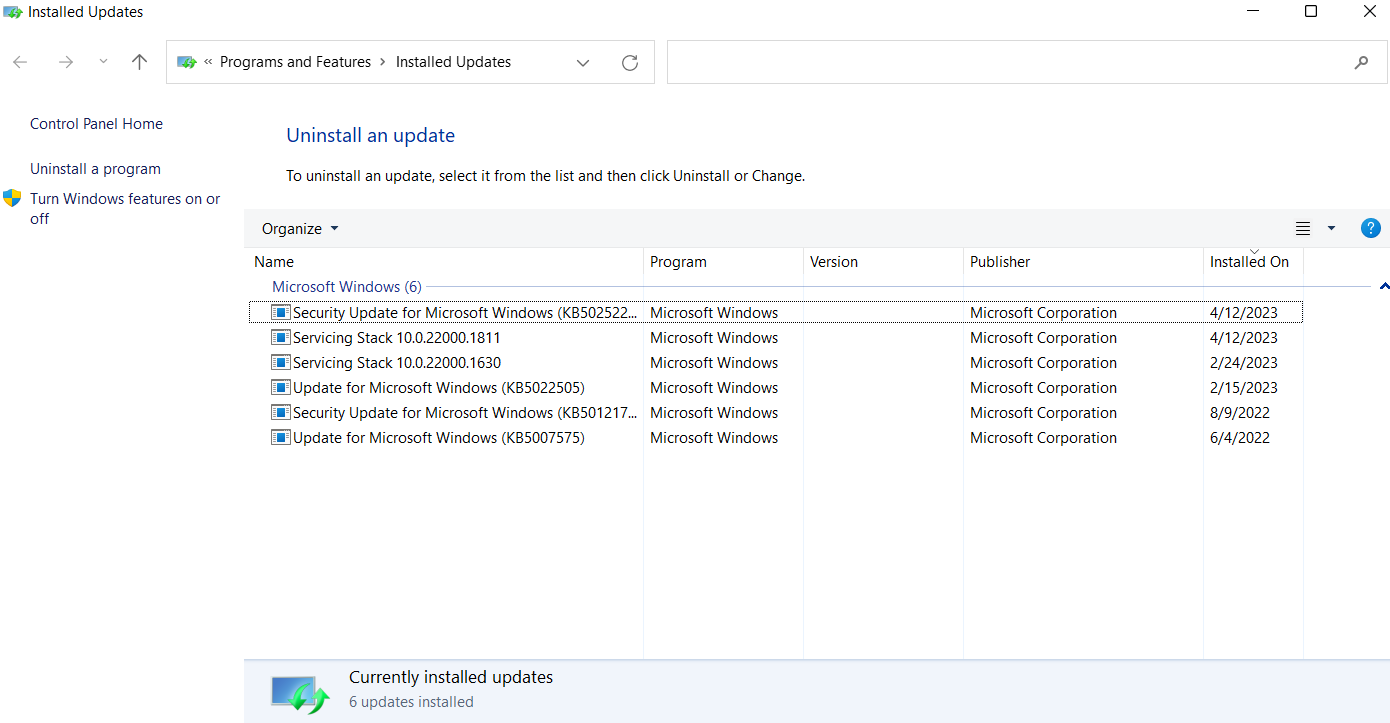
- You’ll now see a list of recently installed updates.
- Identify the KB number of the update you want to remove and select it.
- Allow Windows to remove the update, then restart your computer.
Follow these if you run Windows 11:
Press the Windows and S keyboard buttons at the same time to open the search box beside Start.
- Type “Updates” into the text field and click on “Check for Updates.”
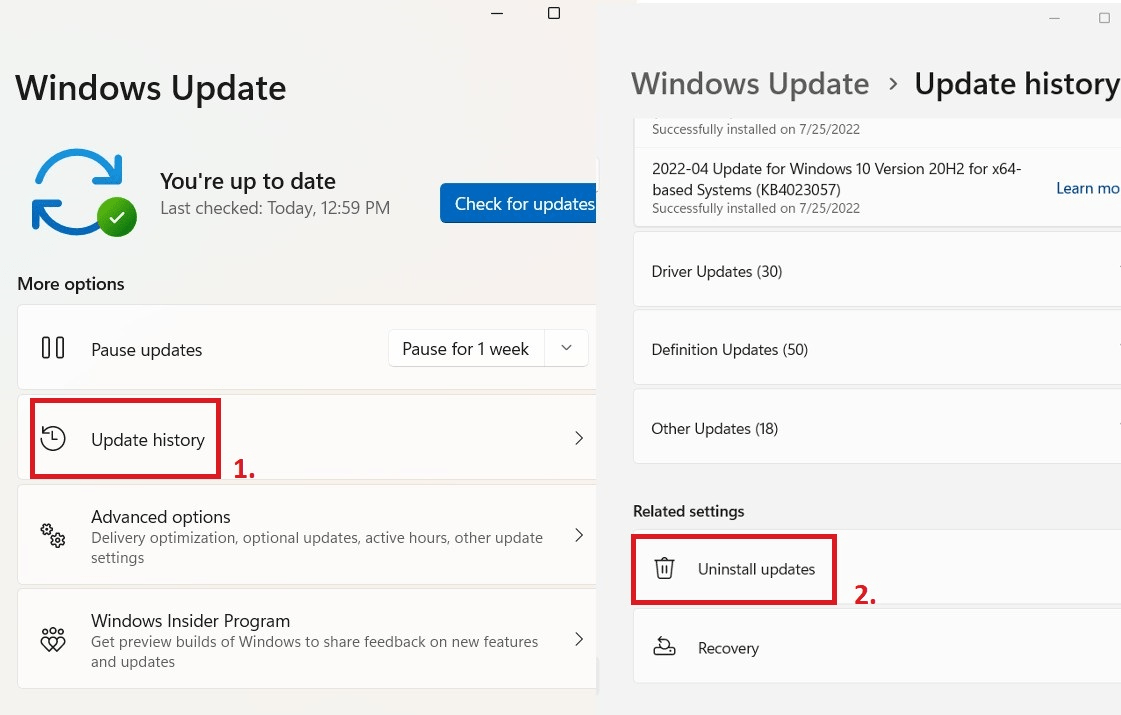
- Select “Update History” once the “Windows Update” page opens.
- After the Windows Update > Update History page opens, scroll down, or collapse the update history sections, and click on “Uninstall Updates.”
- You’ll now see a list of recently installed updates.
- Identify the KB number of the update you want to remove and select it.
- Allow Windows to remove the update, then restart your computer.
Also Read: How to Fix Windows Update Error 0x80092004?
12. Repair Game Files
Game files may get corrupted due to a game crashing, an improper shutdown, or a malware attack. When game files become damaged or go missing, you’ll start to experience in-game issues, startup problems, and errors like the breakpoint issue.
Thankfully, you can use your launcher to find and fix problematic game files. The application will scan a game’s installation folder and replace any file that isn’t up to date or working properly.
So, if you’re seeing the error whenever you open a game, use your launcher to verify game files.
Let’s show you how to do that on different launchers.
Epic Games:
- Launch the “Epic Games Launcher.”
- Head to your games library and right-click on the affected game. You can also click on the three dots beside the game.
- Select “Manage” once the drop-down menu appears.
- Now, click on the “Verify” option.
Steam:
- Reboot your “Windows PC” and start “Steam.”
- After Steam opens, go to your games library and right-click the affected game. You can also select the game and click on its settings icon in the far right.
- Choose “Properties” from the context menu.
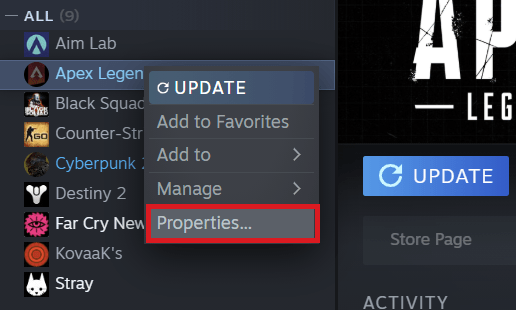
- After the Properties page shows up, click on “Local Files” in the left pane.
- Go to the “Local Files” tab and click on “Verify Integrity of Game Files.”
Origin:
- Launch “Origin.”
- Head to “My Game Library.”
- Now, locate the game you want to repair and right-click it.
- Select “Repair” from the menu.
Battle.net:
- Start the Battle.net application.
- Locate the game’s icon and click on it.
- Click on the cog icon beside the game’s Play button.
- Click on Scan and Repair once you see the context menu.
GOG Galaxy:
- Launch “GOG Galaxy.”
- Select the game you want to repair.
- Click on the game’s preferences button on the right side of the Play button.
- Next, hover your mouse pointer over Manage Installation and select Verify/Repair in the expanded menu.
13. Prevent Your Antivirus Program from Blocking the File
Your antivirus program will prevent a file from executing if it suspects a security threat. You should check and confirm that the file is safe if you’re getting reports from your security application.
In some cases, however, security programs tend to mistake legitimate files and applications for security threats. These cases are called false positives.
If you’re convinced that the file in question is safe, you can stop your antivirus from blocking it in the future. To do that, add it as an exception or an exclusion. You can also add it to the program’s whitelist, depending on the antivirus suite you use.
If you use Windows Security, these steps will show you how to prevent it from blocking the file you’re trying to open:
- Press the ‘Windows and S” keyboard buttons at the same time to open the search box beside Start.
- After the box appears, type “Virus and threat protection.”
- Click on “Virus & Threat Protection” in the search results.
- Once the Virus & Threat Protection window opens, go to the “Virus & Threat Protection Settings” section.
- Click on “Manage Settings.”
- Scroll down to Exclusions once you see the Virus & Threat Protection Settings screen and click on “Add or remove exclusions.”
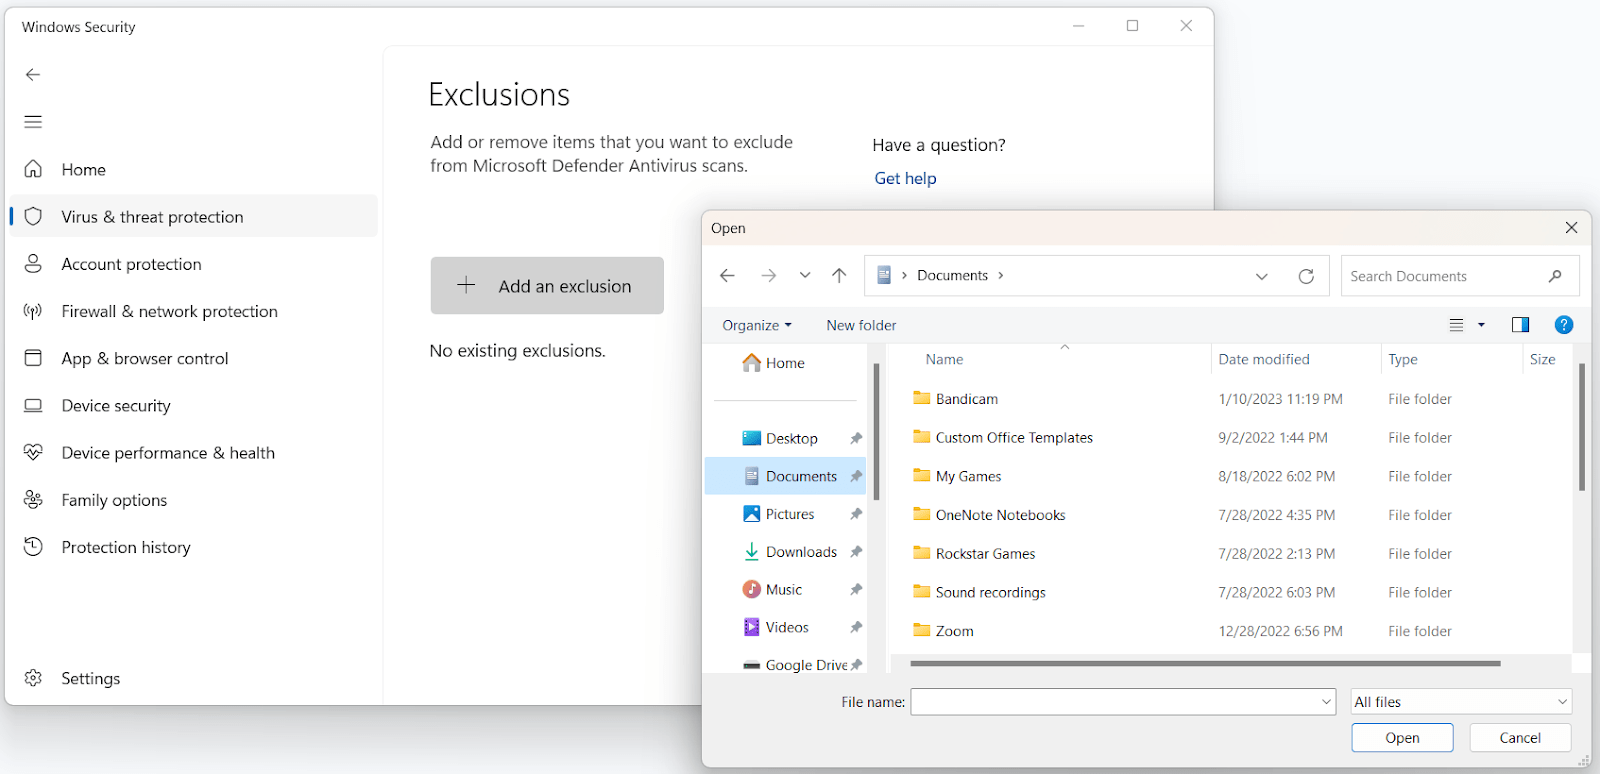
- Click on “Add an Exclusion” immediately you see the Exclusions interface.
- Choose “File” from the drop-down menu.
- Once the “Select File” dialog opens, navigate to the file and double-click it.
14. Run the Windows Memory Diagnostic tool
Memory leaks are bad in any situation. They trigger different types of errors, and the “a breakpoint has been reached” error is one of them. Memory leaks happen when your RAM fails to release unallocated memory. When this happens, new programs will likely not execute.
Memory leaks can be temporary or permanent. Rebooting your system should clear minor memory glitches. However, if the issue is connected to your RAM stick, you may need to change it. You have to run the Windows Memory Diagnostic tool to test your RAM.
These steps will show you how:
- Press the “Windows logo key + R” shortcut to open Run.
- Once Run shows up, type “mdsched.exe” and tap the Enter button.
- Choose “Restart now and check for problems (recommended)” once the Windows Memory Diagnostic mini-window opens.
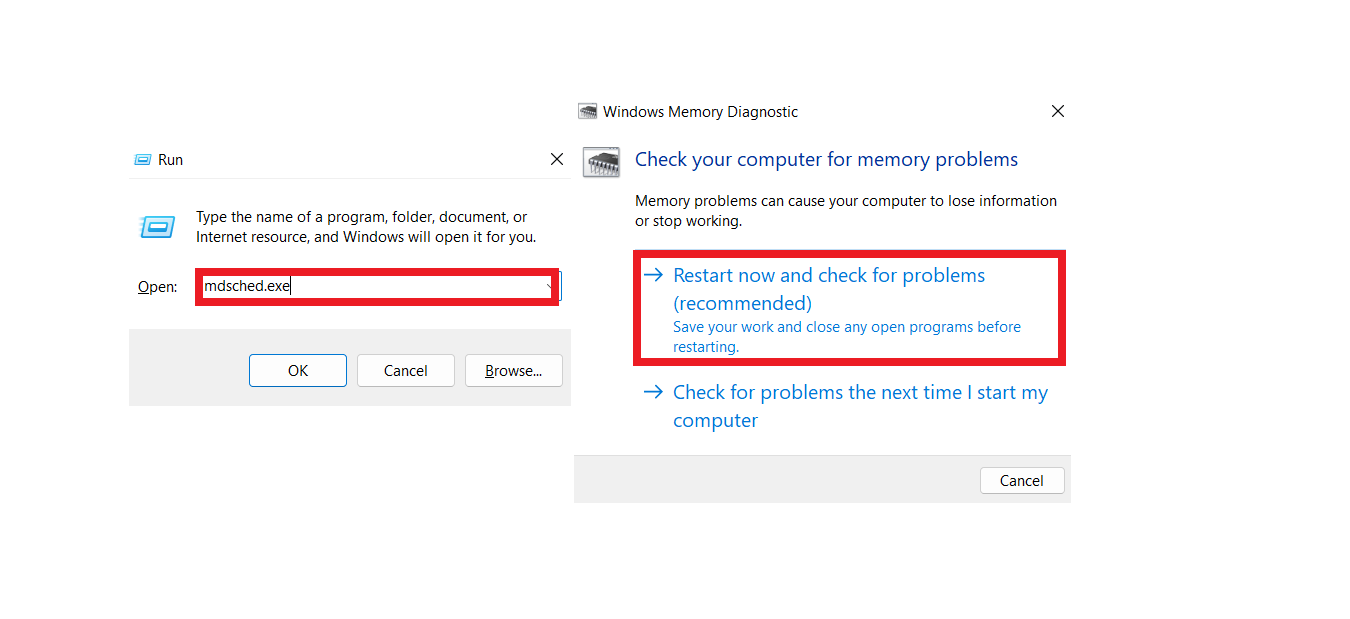
Note: Once you click on this option, you’ll be giving up access to your computer until the tool completes its check.
If you choose the “Check for problems the next time I start my computer” option, you’ll also lose access to your system on your next reboot.
Once your system boots up, the Windows Memory Diagnostic tool’s screen will show up and conduct the test. You should see the results in this interface.
After the test is complete, the tool will automatically restart your computer and display the test results. However, some users reported they hadn’t seen the results after the restart.
If you cannot see the test results, head to the Event Viewer. Follow these steps:
- Press the “Windows logo + X” keyboard combination.
- Click on “Event Viewer” in the menu that shows up on the left side of your screen.
- You can also launch the Run dialog box, type “eventvwr.msc” (no quotes), then hit Enter.
- Once the Event Viewer window appears, navigate to the left pane.
- Expand “Windows Logs,” then click on “System.”
- In the Event Viewer’s middle pane, you’ll find different event entries.
- Go to the right pane of the window and click on “Find.”
- Type “MemoryDiagnostics-Results” (no quotes) and click on the Find Next button.
- The test results will be under General.
If the tool reports that your RAM is defective, you have to replace it. If there’s more than one RAM stick in your system, open your RAM slot, take out one stick, run the diagnostic tool, and check if the error appears. Try this for every other RAM stick and replace the bad one(s).
15. Create Another Administrator Account
The problem might be related to your user account and creating another may get rid of the error for good.
Make sure you grant the new user account admin privileges.
Let’s show you how to create a new user account on Windows 10 and Windows 11:
- Launch the Settings application by right-clicking the Start menu and selecting Settings.
- When the Settings app opens, click on “Accounts.”
Note: On Windows 11, click on Accounts in the left pane of Settings.
- Next, click on “Family & Other Users” in the left pane and select “Add someone else to this PC.”
Note: If you’re running Windows 11, the Family & Other Users option is on the Accounts page.
Click on “I don’t have this person’s sign-in information,” then choose “Add a user without a Microsoft account” on the next page.
- Now, enter the account’s username, and password. You can also choose to add a password hint or choose a few security questions that can be used to reset the password.
- Click on “Next.”
- After creating the account, head back to the “Family & Other Users” page and click on the account you just created.
- Select the “Change Account Type” option.
- Click on “Administrator under Account Type.”
- Now, restart your computer and sign in with the new account to check for the issue.
16. Perform a Clean Boot
Another program or service could be preventing the executable file from running and causing “a breakpoint has been reached” error. Some of your applications launch at startup and continue to run in the background.
In this case, you have to prevent every startup application from running and launch your system in a clean boot state to troubleshoot the problem.
Also read: How to perform a clean boot in Windows 10?
If the file opens without issues while your system is in a clean boot state, it confirms that one of the startup items is responsible for triggering the “a breakpoint has been reached” error.
After you confirm that a startup app is responsible, you can isolate the culprit by starting your programs and services one after the other and opening the file.
Here’s how to perform a clean boot:
- Press the “Windows and S” keyboard buttons at the same time to open the search box beside Start.
- After the box appears, type “System configuration” and click on the first result.
- The System Configuration dialog window will open.
- Head to the Services tab.
- Mark the checkbox for “Hide all Microsoft services” so that you don’t disable operating system services.
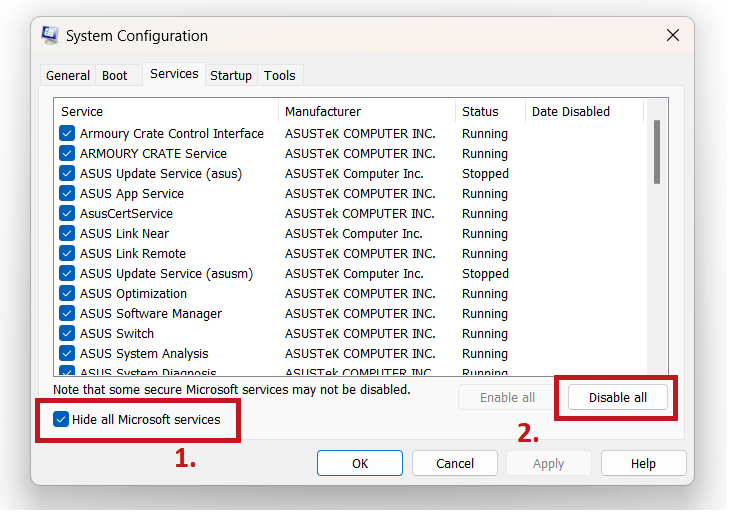
- Now, click on the “Disable All” button to prevent the selected services from running the next time Windows starts.
- After that, go to the “Startup” tab.
- Click on “Open Task Manager.”
- You’ll now see the Startup tab of the “Task Manager.”
- Disable every program by clicking on each and selecting Disable in the bottom-right corner.
- Next, exit the Task Manager, go back to System Configuration, and click on OK.
- Restart your device.
After your computer starts, open the file that triggers the error. If the file opens without issues, it’s clear that one of the startup programs has been clashing with it.
Head to the System Configuration window and enable one service. Restart your device and open the executable file. If the error shows up, then the startup service you just enabled is the culprit. Use the same method to check other startup items and programs.
A Breakpoint Has Been Reached Error: Conclusion
The Windows exception breakpoint error can occur for various reasons, including registry issues, malware attacks, outdated drivers, etc. We’ve provided several effective ways to fix the issue, including turning off automatic startup programs, running DISM and SFC scans, running disk checkers, and updating device drivers.
You can go through the solutions discussed in this guide to diagnose and fix the issue to improve your system’s performance and stability.
A Breakpoint Has Been Reached Error: FAQs
What Is the Best Driver Updater to Update My PC Drivers?
The best driver updater to use is the Auslogics driver updater. It’s a cutting-edge tool that can help you maintain always-up-to-date drivers. It scans for updated drivers and makes it simple to apply them with a single mouse click.
The interface is also user-friendly. After downloading and starting the software, it’ll check for updates automatically. Read more about the Auslogics Driver Updater review.
How Do I Fix My Ghost Recon Breakpoint Not Launching Problem?
Your Ghost Recon not launching could be due to several reasons, such as overclocked GPUs and CPUs, game file errors, outdated graphics drivers, etc. To have in-depth instructions on how to solve it, check out this guide: How to Fix Ghost Recon Breakpoint Crashing Problems.
How Do I Fix My Hard Drive Not Showing Up?
It could be that your hard drive needs formatting, it’s disabled in BIOS, or it’s not correctly connected to your computer. Check out this guide to solve the problem: How to Fix “Hard Drive Is Not Showing Up.”
If you suddenly encounter Error 0x80000003 while trying to execute a random file then read on as this post will show you how you can fix such an error. Obviously, it mostly happens on executable files or .exe files and is most likely caused by the conflict in the execution of some registry files or it could also be caused by missing drivers or it could also be due to some incompatible hardware which is why you’re unable to run the executable file.
When you encounter this error, you will see the following error message on your screen:
“The exception Breakpoint, A breakpoint has been reached, (0x80000003) occurred in the application.”
As you can tell, the Windows Executive STATUS message is a warning and if you are given an option, you must select one of the options from the message box. So if you are running the application in an end-user environment rather than in a development environment, you must contact the supplier of the running application regarding this error message since this shouldn’t be happening when a finished program is running.
Before you get started executing the troubleshooting guide given below, make sure that you create a System Restore Point first since you will be dealing with some critical settings in Windows. Having done this, proceed to the options provided below.
Option 1 – Try to run the CHKDSK utility
Running the CHKDSK utility might also help you resolve Error 0x80000003. If your hard drive has issues with integrity, the update will really fail as the system will think that it’s not healthy and that’s where the CHKDSK utility comes in. The CHKDSK utility repairs hard drive errors that might be causing the problem.
- Open Command Prompt with admin privileges.
- After opening Command Prompt, execute the following command and hit Enter:
chkdsk /f /r
- Wait for the process to be completed and then restart your computer.
Option 2 – Try to run a System File Checker scan
You can also try to run a System File Checker or SFC scan in order to scan your computer for corrupted files that might be the cause behind the Error 0x80000003. Once it finds any corrupted system files, it will automatically fix them. To run System File Checker, here’s what you have to do:
- Tap Win + R to launch Run.
- Type in cmd in the field and tap Enter.
- After opening Command Prompt, type in sfc /scannow
The command will start a system scan which will take a few whiles before it finishes. Once it’s done, you could get the following results:
- Windows Resource Protection did not find any integrity violations.
- Windows Resource Protection found corrupt files and successfully repaired them.
- Windows Resource Protection found corrupt files but was unable to fix some of them.
- Restart your computer after the scan is completed.
Option 3 – Perform a Clean Boot
There are some instances that some conflicting programs installed in your computer might be the one that’s causing the Error 0x80000003 to appear. To identify which program is causing the problem, you need to put your computer in a Clean Boot State. To do so, follow the steps below.
- Log onto your PC as an administrator.
- Type in MSConfig in the Start Search to open the System Configuration utility.
- From there, go to the General tab and click “Selective startup”.
- Clear the “Load Startup items” check box and make sure that the “Load System Services” and “Use Original boot configuration” options are checked.
- Next, click the Services tab and select the “Hide All Microsoft Services” check box.
- Click Disable all.
- Click on Apply/OK and restart your PC. (This will put your PC into a Clean Boot State. And configure Windows to use the usual startup, just simply undo the changes.)
- From there, start to isolate the problem by checking which one of the programs you installed recently is the root cause of the problem.
Option 4 – Run the Memory Diagnostic Tool to check for Memory leaks
- Tap the Win + R keys to open Run and type mdsched.exe and hit Enter to open the Windows Memory Diagnostic Tool.
- After that, it will give two options such as:
- Restart now and check for problems (Recommended)
- Check for problems the next time I start my computer
- Once your computer has restarted, perform a basic scan or you could also go for the “Advanced” options such as “Test mix” or “Pass count”. Simply tap the F10 key to start the test.
Option 5 – Try contacting the developer
If you find that you’re getting Error 0x80000003 on only one particular application, then you can try to contact the developer of the software that’s throwing up this error. All you have to do is search the web for the official support channel of the software and discuss the error from there.
Do You Need Help with Your Device?
Our Team of Experts May Help

Troubleshoot.Tech Experts are There for You!
GET HELP
Troubleshoot.Tech experts work with all versions of Microsoft Windows including Windows 11, with Android, Mac, and more.
Share this article:
You might also like
Hal.dll Error — What is it?
Hal.dll error is a type of dynamic link library error that is common in Windows.
Hal.dll is the critical file in all Windows installations and the error occurs when this file cannot be correctly loaded. Hal is the abbreviation for ‘Hardware Abstraction Layer’. Communication between Windows and different PC hardware is facilitated with this file.
The error causes inconvenience and hampers your ability to use the hardware.
The error message is displayed in either one of the following formats:
- «Windows could not start because the following file is missing or corrupt: C:Windowssystem32hal.dll. Please re-install a copy of the above file.»
- «Cannot find WindowsSystem32hal.dll»
- «C:WindowsSystem32Hal.dll missing or corrupt: Please re-install a copy of the above file.»
Solution
 Error Causes
Hal.dll error occurs due to multiple reasons. These include:
- BIOS are not configured properly
- Damaged hard drive
- Hal.dll file is missing, damaged, or corrupt
- Viral Infection
Further Information and Manual Repair
To fix and resolve the Hal.dll error code on your system, you don’t always have to hire a professional technician for the job.
Though Hal.dll error is critical but easy to resolve, here are some solutions that you can try to fix it right away even if you don’t have any technical expertise.
1) Restart Your PC
Sometimes this can be a temporary error, so try restarting your PC. If the error is resolved then that’s great. However, if it still persists, then try other solutions.
2) Change the Boot Order
The underlying cause for the Hal.dll error is often not properly configured BIOS; if this is the cause, simply change the boot order of the bootable devices like your hard drive.
The BIOS setup utility is used to change boot order settings. This can be done by restarting your PC. Once you restart, press F2 to enter the setup. Now go to SATA operation and change RAID AHCI to RAID ATA.
Save changes and then exit. By doing so, you will be able to re-configure the BIOS and resolve the error.
3) Use BOOTMGR
Another way to resolve is to update the volume boot code to use BOOTMGR.
To do this, access advanced startup options, open the command prompt and type bootsect command and then press Enter. Run the command and then you’ll get the following message:
C: (?Volume{37a450c8-2331-11e0-9019-806e6f6e6963})
Successfully updated NTFS filesystem bootcode.
Bootcode was successfully updated on all targeted volumes.
After that close the command prompt. This is most likely to resolve the error.
4) Repair Registry With Restoro.
In case the error is still not fixed, then this means that the problem is bigger than you thought. It may be due to hard drive failure, viral infection, or sometimes because of hal.dll file corruption. In the event of these error causes, it is recommended to download Restoro.
Restoro is an advanced, next-generation, and multi-functional PC repair tool embedded with numerous utilities like a registry cleaner, an antivirus, and a system optimizer. The registry cleaner utility:
- Scans for all registry issues
- Wipes out the unnecessary files saved in the hard drive like the junk files, cookies, internet history, and temporary files
- Cleans the disk
- Repairs damaged and corrupt files
- Restores the registry
The antivirus utility scans and removes all malicious software from your PC including viruses, Trojans, malware, adware, and spyware. Simultaneously, it also boosts the speed of your system.
It is safe and efficient PC repair software. It has simple navigation and a user-friendly interface. Whether you are using Windows 7, 8 or Vista, it is compatible with all. It can also be used on Windows XP.
Click here to download Restoro and resolve the Hal.dll error today!
Read More
PriceGong is a browser add-in for Internet Explorer, Chrome and Firefox that analyzes web sites your browser visits and attempts to find coupons and other deals associated with the merchant’s product offerings or services. If PriceGoing sees a corresponding deal, it will attempt to inject an affiliate ‘code’ in order to collect various affiliate based commissions if a purchase is made while trying to offer you the best price of that particular product, or, in many cases try and show you an alternative product that is similar even if it is sold by a different merchant. Upon further inspection it was found that PriceGong failed to function in our testing.
While installed, this extension might display additional ads, inject sponsored content into webpages, even if the sponsored content is of lower quality than the original ones.
About Browser Hijackers
Browser hijackers (sometimes known as hijackware) are a kind of malicious software that alters web browser settings without the computer owner’s knowledge or consent. These types of hijacks are increasing at an alarming rate around the globe, and it could be really nefarious and often dangerous too. They’re created to disrupt browser programs for various purposes. In most cases, hijackers are designed for the benefit of online hackers usually through income generation from forced advert mouse clicks and site visits. Though it might seem naive, all browser hijackers are damaging and thus always regarded as security risks. In a much worst case, your browser could be hi-jacked to download malware that will do a great deal of damage to your computer or laptop.
Major symptoms that an internet browser has been hijacked
Signs that an internet browser is hijacked include:
1. home page is changed
2. bookmark and the new tab are also modified
3. the essential web browser settings are modified and unwanted or insecure sites are put into the trusted websites list
4. discover new toolbars that you didn’t add
5. never-ending pop-up ads appear and/or your web browser popup blocker is disabled
6. your web browser has become unstable or starts running sluggishly
7. you’re disallowed access to specific web pages, for example, the website of an antivirus software manufacturer like SafeBytes.
Precisely how browser hijacker infects computers
A browser hijacker can be installed on your computer if you visit an infected website, click an email attachment, or download something from a file-sharing site. They are usually included with toolbars, add-ons, BHO, plug-ins or browser extensions. Other times you may have accidentally accepted a browser hijacker as part of a software program bundle (usually freeware or shareware). An example of some well-known browser hijacker includes Anyprotect, Conduit, Babylon, SweetPage, DefaultTab, RocketTab, and Delta Search, but the names are regularly changing.
The existence of any browser hijacker on your computer can substantially diminish the web browsing experience, record your internet activities that result in troublesome privacy issues, create system stability problems and finally cause your computer to slow down or to a practically unusable state.
Browser Hijacker Malware – Removal
Some hijackers can be removed by uninstalling the freeware they were included with or by removing any extension you have recently added to your system. However, most browser hijackers are hard to get rid of manually. No matter how much you try to eliminate it, it might come back over and over. You should think about performing manual repairs only if you are a tech-savvy individual, as there are potential risks associated with messing around with the system registry and HOSTS file.
Installing and running antivirus application on the affected computer could automatically erase browser hijackers and other malicious programs. SafeBytes Anti-Malware discovers all kinds of hijackers – including PriceGong – and eliminates every trace quickly and efficiently. Use a system optimizer along with your antivirus software to solve various computer registry issues, remove system vulnerabilities, and improve your computer’s overall performance.
Tips on How to Remove Malware that is Blocking Websites or Preventing Downloads
Practically all malware is bad, but certain kinds of malware do much more damage to your PC than others. Some malware variants alter browser settings by including a proxy server or modify the PC’s DNS configuration settings. In these cases, you’ll be unable to visit some or all of the websites, and therefore unable to download or install the required security software to eliminate the infection. If you are reading this now, you may have perhaps recognized that a virus infection is the real cause of your blocked web traffic. So how to proceed if you want to install an anti-malware application like Safebytes? There are a few fixes you can attempt to get around with this particular issue.
Use Safe Mode to resolve the problem
Safe Mode is actually a unique, simplified version of Windows where just bare minimum services are loaded to counteract viruses as well as other troublesome programs from loading. In case the malware is set to load automatically when computer boots, switching into this particular mode could prevent it from doing so. To boot into Safe Mode, hit “F8” key on the keyboard right before Windows boot screen shows up; Or after normal Windows boot up, run MSCONFIG, look over “Safe Boot” under Boot tab, and click Apply. Once you’re in Safe Mode, you can attempt to download and install your antivirus program without the hindrance of the virus. At this point, you could run the antivirus scan to eliminate viruses and malware without any hindrance from another malicious application.
Download the anti-malware program in an alternate web browser
Malicious program code may exploit vulnerabilities in a specific internet browser and block access to all anti-malware software websites. If you appear to have a virus attached to Internet Explorer, then switch to an alternate web browser with built-in security features, such as Firefox or Chrome, to download your favorite anti-malware program – Safebytes.
Create a bootable USB antivirus drive
Another option is to save and operate an anti-malware software program entirely from a Flash drive. Follow these steps to use a flash drive to clean your infected PC.
1) On a virus-free computer, install Safebytes Anti-Malware.
2) Plug in the USB drive to a USB port on the uninfected computer.
3) Double-click on the downloaded file to open the installation wizard.
4) Choose the flash drive as the location for saving the software file. Follow activation instructions.
5) Transfer the flash drive from the clean computer to the infected PC.
6) Double-click the anti-malware software EXE file on the pen drive.
7) Run Full System Scan to detect and clean-up up all sorts of malware.
SafeBytes Anti-Malware: Light-weight Malware Protection for Windows Computer
If you’re looking to buy anti-malware for your laptop or computer, there are lots of brands and packages for you to consider. A few of them do a great job in eliminating threats while some will harm your computer by themselves. You should select a company that builds industry-best anti-malware and has earned a reputation as trustworthy. On the list of highly recommended application by industry analysts is SafeBytes Anti-Malware, a popular security application for Microsoft Windows.
SafeBytes antimalware is a very effective and easy to use protection tool which is ideal for users of all levels of IT literacy. This software could easily detect, eliminate, and protect your computer from the most advanced malware intrusions such as spyware, adware, trojan horses, ransomware, PUPs, worms, parasites as well as other potentially harmful software applications.
SafeBytes possesses a plethora of wonderful features that can help you protect your computer from malware attack and damage. Let’s check out some of them below:
Robust, Anti-malware Protection: Using a critically acclaimed malware engine, SafeBytes provides multilayered protection which is designed to find and remove threats which are hidden deep inside your computer’s operating system.
Real-time Threat Response: SafeBytes provides a totally hands-free live protection that is set to observe, block, and remove all threats at its very first encounter. It will constantly monitor your laptop or computer for hacker activity and also provides users with advanced firewall protection.
Web Filtering: SafeBytes inspects the hyperlinks present on a webpage for possible threats and notifies you if the website is safe to browse or not, through its unique safety ranking system.
Fast Scan: Safebytes Anti-Malware, with its enhanced scanning engine, offers ultra-fast scanning which will immediately target any active on-line threat.
Lightweight: SafeBytes is a light-weight and user friendly anti-virus and antimalware solution. Since it utilizes very little computer resources, this application leaves the computer’s power exactly where it belongs: with you.
24/7 Guidance: Support service is readily available for 24 x 7 x 365 days through chat and email to answer your queries.
SafeBytes can keep your PC protected from most advanced malware threats automatically, thus keeping your internet experience secure and safe. You can rest assured that your computer will be protected in real-time as soon as you put this software to use. So if you are looking for the best anti-malware subscription for your Windows-based PC, we highly recommend SafeBytes Anti-Malware program.
Technical Details and Manual Removal (Advanced Users)
To eliminate PriceGong manually, navigate to the Add/Remove programs list in the Control Panel and choose the offending program you want to remove. For web browser extensions, go to your web browser’s Addon/Extension manager and choose the add-on you want to disable or remove. You might even want to reset your home page and search engine providers, and also clear your web browser cache and cookies.
Finally, check your hard disk for all of the following and clean your registry manually to remove leftover application entries following uninstalls. However, editing the Windows registry is actually a complicated job that only advanced computer users and professionals should attempt to fix the problem. In addition to that, certain malware is capable of replicating or preventing deletion. You’re advised to do this procedure in Windows Safe Mode.
Folders:
C:Documents and SettingsLynnApplication DataPriceGong
C:Documents and SettingsLynnApplication DataPriceGongData
Files:
C:Documents and SettingsLynnApplication DataPriceGongData.xml
C:Documents and SettingsLynnApplication DataPriceGongDataa.xml
C:Documents and SettingsLynnApplication DataPriceGongDatab.xml
C:Documents and SettingsLynnApplication DataPriceGongDatac.xml
C:Documents and SettingsLynnApplication DataPriceGongDatad.xml
C:Documents and SettingsLynnApplication DataPriceGongDatae.xml
C:Documents and SettingsLynnApplication DataPriceGongDataf.xml
C:Documents and SettingsLynnApplication DataPriceGongDatag.xml
C:Documents and SettingsLynnApplication DataPriceGongDatah.xml
C:Documents and SettingsLynnApplication DataPriceGongDatai.xml
C:Documents and SettingsLynnApplication DataPriceGongDataJ.xml
C:Documents and SettingsLynnApplication DataPriceGongDatak.xml
C:Documents and SettingsLynnApplication DataPriceGongDatal.xml
C:Documents and SettingsLynnApplication DataPriceGongDatam.xml
C:Documents and SettingsLynnApplication DataPriceGongDatamru.xml
C:Documents and SettingsLynnApplication DataPriceGongDatan.xml
C:Documents and SettingsLynnApplication DataPriceGongDatao.xml
C:Documents and SettingsLynnApplication DataPriceGongDatap.xml
C:Documents and SettingsLynnApplication DataPriceGongDataq.xml
C:Documents and SettingsLynnApplication DataPriceGongDatar.xml
C:Documents and SettingsLynnApplication DataPriceGongDatas.xml
C:Documents and SettingsLynnApplication DataPriceGongDatat.xml
C:Documents and SettingsLynnApplication DataPriceGongDatau.xml
C:Documents and SettingsLynnApplication DataPriceGongDatav.xml
C:Documents and SettingsLynnApplication DataPriceGongDataw.xml
C:Documents and SettingsLynnApplication DataPriceGongDatax.xml
C:Documents and SettingsLynnApplication DataPriceGongDatay.xml
C:Documents and SettingsLynnApplication DataPriceGongDataz.xml
Registry:
HKEY_CURRENT_USERSoftwarePriceGong
Read More
Many of us are taking the google search engine for granted and it is no true that it has crawled in almost every spore of our digital lives but if we wanted a little more privacy? Do we have options or we are destined to use google and send our information to this company. What if we really wanted that our searches are well safe, secure, and private? We could try other search engines like BING but since BING belongs to Microsoft we would exchange only one company for another without making any progress in the privacy battle. Enter DuckDuckGo.
DuckDuckGo is a privacy-focused search engine that’s been online since 2008. Find websites, maps, videos, news, and more without tracking your searches and serving you targetted ads. It took DUckDuckGo as you can tell sometimes to gain ground and to be recognized but finally, it got the attention it deserves. Its big breakthrough happened in September of 2014 when Apple offered it as a default search engine in Safari and since it has gained more and more ground. It seems people care about their privacy after all.
Since then DuckDuckGo has been gaining ground and all the major browsers have integrated it as an option for a default search engine.
In this article, we will show you how to switch to DuckDuckGo and set it as your preferred search engine in all major browsers.
-
Google Chrome
Launch Chrome and click on the three dots in the upper right.
Choose settings.
Choose Search engine in the list on the left of the screen.
Click on the drop-down box next to Search engine used in the address bar and choose DuckDuckGo. -
Mozilla Firefox
Launch Firefox, click on the three lines hamburger menu icon in the top-right corner of the window.
Click on Preferences.
Click on Search in the menu to the left of the screen.
Under Default Search Engine, click the drop-down box and choose DuckDuckGo. -
Microsoft Edge
Click on the three dots menu button in the top-right corner of the window
Then select Settings.
Click on Privacy, Search and Services in the menu that appears on the left
Scroll down to the Services menu and choose Address bar and search.
Click the dropdown menu next to Search engine used in the address bar and choose DuckDuckGo. -
Apple Safari
Click Safari in the menu bar at the top of the screen
Then click Preferences.
You can also use the Command+, shortcut to quickly bring up Safari’s Preferences.
Click on the Search tab, then choose DuckDuckGo under the Search engine drop-down box. -
Opera
Click on the Settings cog button in the sidebar on the left of the screen.
Under Basic settings scroll down until you see Search engine and a drop-down box.
Select DuckDuckGo from the list.
Read More
Quest 2 has been crowned as the best overall VR headset by many websites, and to be honest it is really a great piece of equipment deserving of every praise it gets. It seems that Meta feels that it can do better so the new upcoming Quest Pro is upgraded and a new line of VR sets from this company. The economic standard Quest line will not be shut down and it will still remain as an economic version of Meta’s VR product line.

Quest Pro will be added as a new line of the better product line with better performance and better quality. It is the first VR headset that is packing Qualcomm Snapdragon XR3+ Gen 1 chipset, 12GB of RAM, 256GB of internal storage, and 10 high-resolution sensors. Of course, this much power and improvement come with a higher price tag, this time that price tag is $1,499.99.
The new VR headset promises industry-leading visuals with a new optical stack instead of Fresnel lenses in Meta Quest 2 with thin-layer pancake optics that fold light reducing the depth of the optical module by 40% and at the same provides clear and sharp visuals.
The headset will give display more vivid colors, richer colors, and higher contrast by incorporating local dimming and quantum dot technology. It composes of specialized backlight hardware accompanied by software algorithms that can control more than individual LED blocks independently.
The Quest Pro will also come packed with new Meta Quest Touch Pro controllers. They will feature three built-in sensors to track the controller’s position completely independent of the headset which means that tracking and range of motion will be improved. These new controllers will also be sold separately at the cost of $299.99 and they can be used with Quest 2.
The headset is available for preorder and it will start shipping in late October on the Meta website
Read More
Portable small Bluetooth speakers are nothing new on the market, most of the time they have given the opportunity for music listening during picnics and walks in nature and also replaced some car speaker systems. The latest star in small portable speakers in JBL Clip 4, small in size, waterproof, and with an incredible high-quality sound.

Performance and quality
Out of the box and after first look speaker looks great, it has excellent design and is very intuitive to work with. Everything is laid out logically and you can start using it right away without reading instructions.
The sound quality is surprisingly very good and clear. I must say I have not expected this clarity and power from a speaker of this size. The volume range is also incredibly good and will fill most needs even on small picnics outdoors where you can hear it loud enough. One thing to mention is that even on their loudness levels sound is still clear without distortion which, to be honest, is to be expected from someone like JBL.
Where you can take JBL Clip 4
You can take it where ever you want, Its size and clip make it perfect for beach and pool trips. Speaker is waterproof and gas IP67 rating, meaning that sand and dirt will not affect it either. Do not take this speaker to your diving adventures since that will break it but a depth around 1 meter underwater should be safe. After your trip do not forget to wash Clip 4 with clean water so all dirt, salt, and other stuff are properly cleaned for longer life of the device.
How long it will play?
JBL claims that the battery will last 10 hours of continuous play. Note that this is meant probably on the largest volume setting so when you use it on lower settings battery is lasting longer. Playing of course on low volumes will extend playback time even longer but here we come at one feature that I do not like, there is no indication of any kind how much battery is left in the speaker, the only indication is a red light when the battery is almost empty which means you could be outside at that point and did not know that low battery was there in the first place when you were packing. Some battery indication would be a great addon.
More stability for JBL Clip 4
The clip itself has been improved from the previous Clip 3 model, it is wider, it goes all the way around the casing, and feels overall better and more stable. Since the clip is now all around casing this means a wider opening can be made making it fit around stuff Clip 3 was not able to.
Conclusion
All in all, Clip 4 is an incredible speaker and one that would highly recommend, the price goes around 79 USD but it can be found even as low as 50 USD on discounts and promotions and if you manage to get one at that price it is a great buy. Sound is good, portability is great, dirt and waterproof are excellent and battery life is really good.
Read More
This post will guide you in fixing the (1058) ERROR_SERVICE_DISABLED error you can encounter when trying to launch various games. Usually, this error pops up during startup and prevents you from running the game. In fact, this error has become quite a headache for many users. Some of the games it affects are Smite, Paladins, Far Cry, and many more.
In most cases, this error is caused by missing or corrupted game files. It could also be caused by the anti-cheat utility you might have installed along with your games. Whichever the cause is, you can try to check out the possible fixes given below to resolve the (1058) ERROR_SERVICE_DISABLED error.
Option 1 – Verify the Integrity of the Game files
This is the first option you can try no matter what kind of issues you are having with Steam games.
- Double click on the game’s icon located on your Desktop and then go to the Library tab in the Steam window.
- From there, look for GTA V from the list of games installed in your library.
- Next, right-click on its entry and select Properties.
- After that, navigate to the Local Files tab and click the “Verify Integrity of Game Files” button.
- Now, wait for the tool to complete checking the game’s integrity. You should see that some of the files may have been downloaded.
- Reopen the game and see if it now runs properly without crashing.
Option 2 – Apply some tweaks in the Service’s startup settings
As pointed out earlier, the error can also occur due to the anti-cheat tools that were installed alongside the game. These tools are usually used by games to check if you are running something which might give you an unfair advantage over other players. These anti-cheat tools include but are not limited to BattlEye, EasyAntiCheat, and PunkBuster. The error might occur if the service’s startup settings are not correctly configured which is why you can apply some tweaks in order to resolve the problem.
- Tap the Win + R keys to open the Run dialog box.
- Next, type “services.msc” in the field and hit Enter or click OK to open Services.
- From the list of Services, look for any of the services mentioned above such as BattlEye, EasyAntiCheat Service, or PunkBuster Service. Then right-click on the service and select Properties from the context menu.
- After that, check if the service is started by checking the Service status. If it is started, click on the Stop button to stop the service and if it is already stopped, leave it as it is, at least for now.
- Next, make sure that the Startup type menu in the Service’s properties is set to Automatic before you go on.
- Now confirm any dialog boxes that may appear as you set the Startup type and then click on the Start button located in the middle before you exit Properties.
Note: You might get the following error message when you click on the Start button:
“Windows could not start the service on Local Computer. Error 1079: The account specified for this service differs from the account specified for other services running in the same process.”
If you got the error message above, then here’s how you can fix it:
- Tap the Win + R keys to open the Run dialog box.
- Next, type “services.msc” in the field and hit Enter or click OK to open Services.
- From the list of Services, look for any of the services mentioned above such as BattlEye, EasyAntiCheat Service, or PunkBuster Service. Then right-click on the service and select Properties from the context menu.
- Now go to the Log On tab and click on the “Browse…” button.
- After that, type in your account’s name under the “Enter the object name to select” box and click on Check Names then wait for the name to be recognized.
- Then click OK once you’re done and type in the password in the Password field when you are prompted to do so. This should resolve the issue.
Option 3 – Try reinstalling the Anti-cheat program
If the first two options did not work out, you can try reinstalling the anti-cheat program.
- Open Steam from your Desktop or by searching for it in the Start menu.
- After opening the Steam client, go to the Library tab in the Steam window and then look for the Rust entry from the list.
- Next, right-click on the game’s icon in the library and select Properties.
- Now go to the Local Files tab under Properties and click the Browse Local Files button.
- From there, look for BattlEye, EasyAntiCheat, or PunkBuster folder depending on the game, and then double click on it to open the folder.
- Then right-click on EasyAntiCheat_setup.exe or the BattlEye installed file in the folder or PunkBuster and select the Run as administrator option.
- Exit the Steam client by clicking Steam > Exit from the menu located at the top.
Read More
What is the Ox80070643 Error Code?
The 0x80070643 error is a Windows Update error. It may appear on your computers due to several reasons. Though this error does not pose any harmful threats to your system it is still advisable to fix it to ensure your system works perfectly and there are no installation issues.
Solution
Error Causes
The error 0x80070643 error code is usually triggered:
- When the MSI software update registration fails
- .NET framework installation becomes corrupted on your PC
Though it does not cause any serious damages it is advisable to repair this issue as it may hamper your ability to install updates on your PC.
Further Information and Manual Repair
If you experience the error 0x80070643 on your PC, you don’t have to panic. This error is rated as easy to resolve. All you have to do to fix this error is to uninstall and reinstall the .NET Framework.
Here is a step by step guide to repairing the error 0x80070643:
- First close all the currently running programs on your PC
- Then go to the start menu and click on the control panel. After you click on it you will see a Programs option here.
- Now click on Programs and then click ‘Programs and Features’
- Under the Programs and Features section, you will see lots of programs. Double click on Microsoft .Net Framework 4 Client Profile.
- Now as you double click on it a dialog box will open in front of the screen with 2 options Repair .Net Framework 4 Client Profile to its original state and the other option would be Remove.Net Framework 4 Client profile from this computer. Click on the first option that says Repair.
- After clicking on the Repair tab, click ‘Next’ and then click ‘Finish’. This shows that the .NET Framework is repaired.
- Now to bring the changes into effect, restart your PC and reboot.
- After rebooting it, go to the start menu again and type Windows Update in the search box.
- Click ‘Windows update’ to check for and install updates.
Follow these steps to resolve the 0x80070643 error code issue immediately. Nonetheless, to avoid the error 0x80070643 from occurring again, it is suggested that you download the Windows Update tool.
This helps keep your system updated. By updating the latest vulnerability and performance improvements on your PC, you can ensure your PC works smoothly and is not exposed to such errors and threats.
Read More
Check your connection. Microsoft Store needs to be online. It looks like you’re not.
Check connection
Code: 0x80072F7D
This is the error that you get if trying to open the Microsoft store on Windows 10 and it fails. If you experienced this error and are unable to access the store do not despair we are here to help you. This particular error is usually due to some internet issues, follow the presented guide step by step in order to solve it and be able to access the Windows store again.
-
Check your Internet connection
Since this error is closely tied to internet connection it is advisable to first eliminate the obvious and check if your computer is connected to the internet.
-
Run Network troubleshooter
Built-in Windows troubleshooter is a great tool and we will be using it in the next few segments in order to locate the issue and fix it.
Open Windows 10 Settings app using the WINDOWS + I
Click on Network & Internet
Click on Network troubleshooter
Select network adapter to diagnose
Press the Next button. -
Run Internet Connections troubleshooter
Press WINDOWS + I to open the Settings app
Click on the Update & Security
Click on the Troubleshoot
Select Additional troubleshooters option
Click on Internet Connections option
Hit Run the troubleshooter button. -
Run Windows Store Apps troubleshooter
Press WINDOWS + I to open the Settings app
Select Update & Security
Click on the Troubleshoot
Use the Additional troubleshooters option
Click on the Windows Store Apps option
Press Run the troubleshooter button -
Temporarily disable security software
Your antivirus or firewall might be interfering with the application, sometimes, in some cases store is detected as a false positive in some security applications, and its access to the internet is cut. Disable your security suite to see if this is the case.
Read More
This post will help you fix the ERR_CONNECTION_RESET error in Google Chrome. This error indicates that the Chrome browser wasn’t able to establish a stable connection or that there really is no connection at all with the website you are trying to open. This error does not occur on all websites though. When you encounter this kind of error message you will see the following message on your Google Chrome browser:
“This website is not available, The connection to example.com was interrupted, Error 101 (net:: ERR_CONNECTION_RESET): The Connection was reset.”
Note: You need to follow the options given below to fix the ERR_CONNECTION_RESET error and make sure to reload the webpage each time you complete following each one of the fixes.
Option 1 – Check the Network Cables and restart the router then reconnect
Of course, the first thing you can try is to check if the network cables connected to your computer or router are properly connected. And if your computer is connected via Wi-Fi, you need to make sure to restart your router once. In addition, you can also forget the Wi-Fi your computer is currently connected to and then try reconnecting again to see if it would work.
Option 2 – Try removing the Proxy
Removing the Proxy might also help you in fixing the ERR_CONNECTION_RESET error in Chrome. Here’s how you can do it:
- Tap the Win + R keys to open the Run dialog box.
- Then type “inetcpl.cpl” in the field and hit Enter to pull up the Internet Properties.
- After that, go to the Connections tab and select the LAN settings.
- From there. Uncheck the “Use a Proxy Server” option for your LAN and then make sure that the “Automatically detect settings” option is checked.
- Now click the OK and the Apply buttons.
- Restart your PC.
Note: If you are using a third-party proxy service, you have to disable it.
Option 3 – Try to increase the Maximum Transmission Unit (MTU)
You can also try increasing the Maximum Transmission Unit to fix the error. To do so, follow these steps:
- Open Settings and go to Network & Internet > Ethernet.
- From there, take off the Active Wireless / Wired Network Connection.
- Next, open Command Prompt as admin.
- Then type the “netsh interface IPv4 set subinterface “Ethernet 4” mtu=1472 store=persistent” command and hit Enter to execute it.
Option 4 – Flush the DNS and reset TCP/IP
Flushing the DNS and reset TCP/IP could also help in fixing the ERR_CONNECTION_RESET error in Chrome. To do so, refer to these steps:
- Click the Start button and type in “command prompt” in the field.
- From the search results that appear, right-click on Command Prompt and select the “Run as administrator” option.
- After opening Command Prompt, you have to type each one of the commands listed below. Just make sure that after you type each command, you hit Enter
- ipconfig /release
- ipconfig /all
- ipconfig /flushdns
- ipconfig /renew
- netsh int ip set dns
- netsh winsock reset
After you key in the commands listed above, the DNS cache will be flushed and the Winsock, as well as the TCP/IP, will reset.
Option 5 – Disable the AppEx Networks Accelerator feature
The AppEx Networks Accelerator is known to slow down network connections. Some users reported that it slows down the network speed by 70% up to 80% which is why you need to disable it. Here’s how you can do it:
- Go to Settings and select Network & Internet and from there select Ethernet > Change adapter options.
- Next, right-click on the network connection and select Properties.
- Then look for AppEx Networks Accelerator and uncheck its checkbox.
- Now click the OK button to save the changes and then check if the error is now fixed.
Option 6 – Delete the WLAN Profiles
Deleting the WLAN Profiles might be a good idea if you are not able to connect to the internet on your computer and if you’re using Wi-Fi. It could be that the networks that were connected previously have gone rogue which is why it is not connecting properly. And so deleting the WLAN profiles might help you in fixing the ERR_CONNECTION_RESET error.
Option 7 – Reinstall the Network Adapter Drivers
- Tap the Win + R keys to launch the Run window and then type in the “devmgmt.msc” command and hit Enter to open the Device Manager window.
- Under the Device Manager, you will see a list of drivers. From there, look for the Network Adapters and expand it.
- Then right-click on each one of the Network drivers and select “Uninstall device”.
- Restart your PC.
Option 8 – Try to disable the Wi-Fi Miniport
- In the Cortana Search box, type “command prompt” then right-click on the search result and select “Run as administrator”.
- After opening Command Prompt with admin privileges, type the commands listed below and hit Enter right after you key in each one of them.
- netsh wlan stop hostednetwork
- netsh wlan set hostednetwork mode=disallow
- Now exit Command Prompt and tap the Win + R keys to open the Run dialog box.
- Type “cpl” in the field and hit Enter to open Network Connections.
- From there, look for Microsoft Virtual Wi-Fi Miniport and right-click on it, and then select Disable.
Option 9 – Start Chrome in Safe Mode
The same with Windows Safe Mode, starting Chrome in Sage mode will open the browser but without all the user settings and extensions. And then try opening the website you were trying to open earlier.
Option 10 – Reset Google Chrome
- Open Google Chrome, then tap the Alt + F keys.
- After that, click on Settings.
- Next, scroll down until you see the Advanced option, once you see it, click on it.
- After clicking the Advanced option, go to the “Restore and clean up the option and click on the “Restore settings to their original defaults” option to reset Google Chrome.
- Now restart Google Chrome.
Read More
As you know, Windows operating system comes with tons of features. Some of which are not intended to be used by normal customers or users directly which means that only a small percentage of the huge user base of the operating system leverages the use of such features. However, they’ve added some major value to the feature list of the operating system. You can find these features under the “Turn Windows Features on and off” option. This indicates that if you want to, you can just type in “Turn Windows Features on and off” in the search box and then enable any feature that you want to enable. Aside from that, there are other ways you can disable or enable the optional Windows Features in your Windows 10 computer.
Option 1 – via Control Panel
- Open Control Panel and select Uninstall a Program.
- After that, select the “Turn Windows features On or Off” option on the left side.
Option 2 – via Command Prompt
- Tap the Win + X combination on your keyboard or right-click on the Start button and then click on Command Prompt (Admin). Alternatively, you can also type “cmd” in the Cortana search box and right-click on the Command Prompt icon, and select the “Run as administrator” option.
- If a User Account Control or UAC prompt appears, click on Yes.
- Next, type in the following command to see the list of the available features.
DISM /online /get-features /format:table | more
- Now all you have to do is copy the name of the feature that you want to enable and for you to do that, you need to execute the following command:
DISM /online /enable-feature /featurename:[Enter the name of the feature here] –All
Note: Now if you want to disable a feature that’s already enabled in your computer, refer to these sub-steps:
- First, you need to check what features are enabled, and for you to find out, enter this command: DISM /online /get-features /format:table | find “Enabled» | more
- And if you want to check the detailed information about a particular feature, you can enter this command: DISM /online /get-featureinfo/featurename:[Enter the name of the feature here]
Option 3 – via Windows Powershell
As you know, the Windows Powershell is a very important tool in Windows 10, and a powerful one at that since you can do a lot of things using this command line. So while you use this tool you need to populate the list of available features first and then you have to download the feature your desired feature.
- Search for PowerShell in the Cortana search box and then run it with administrator privileges.
- Next, type in the following command to populate the list of available features:
Get-WindowsOptionalFeature –Online
- After that, enter the following command to install any feature you want to enable from the list of available features:
Get-WindowsOptionalFeature -Online -FeatureName *Type feature name*
- Now enter the following command to enable your desired feature:
Enable-WindowsOptionalFeature -Online -FeatureName “Type feature name” –all
- And if you want to disable any enabled feature, just enter the following command:
Disable-WindowsOptionalFeature -Online -FeatureName “Type feature name”
Option 4 – via an external installation source
You also have the option to fetch the latest features from an updated offline source. The source could be an ISO any other type of image or just a folder. So you need to decide if you want to use Windows Powershell or Command Prompt.
- If you want to use Command Prompt, just enter this command: exe /online /enable-feature /featurename:< /All /Source:<Enter the path of the feature here>
- If you want to use Windows Powershell, use this command: Install-WindowsFeature –Source “<Enter the path of the feature here>”
Note: If you want to get the latest features, you need to get the latest version of the image of the operating system that you are trying to install the feature from.
Read More
![]()
Copyright © 2023, ErrorTools. All Rights Reserved
Trademark: Microsoft Windows logos are registered trademarks of Microsoft. Disclaimer: ErrorTools.com is not affiliated with Microsoft, nor claims direct affiliation.
The information on this page is provided for information purposes only.
![]()
Summary: Did you recently experience an unusual error message saying – ‘The exception breakpoint has been reached?’ Here, we’re sharing the causes behind the error and the best possible fixes. Moreover, keep data recovery software handy to prevent data loss due to any system error.

Contents
- What Does ‘The Exception Breakpoint Has Been Reached’ Mean?
- What Causes A Breakpoint Has Been Reached Error?
- How Do I Fix The Exception Breakpoint?
- Quick Fixes
- Advanced Fixes
- FAQ
Though Windows 11 promises the highest security and great user experience, it may run into problems sometimes. ‘The exception breakpoint has been reached’ is one such error that many users are reporting over tech forums like Reddit, Microsoft support, etc.
We dug through all the scenarios under which users have experienced this issue on their system and came up with some findings that may help you understand and fix the error.
What Does ‘The Exception Breakpoint Has Been Reached’ Mean?
The error message – the exception breakpoint has been reached or a breakpoint has been reached is not the error you get to encounter usually. This bug check also contains a value of 0x80000003. It mostly occurs when you try to open a few applications, including games, browsers, and cloud storage programs, or while shutting down your system without closing the running programs/apps.
What Causes A Breakpoint Has Been Reached Error?
The breakpoint 0x80000003 error may occur for many reasons, such as invalid user input or corrupted user profile, device failure, memory leaks, corrupted system files, or insufficient memory to run apps. Even the leftover keys of uninstalled applications may cause the Windows registry mix-up and result in the “exception breakpoint has been reached” error.
How Do I Fix The Exception Breakpoint?
Quick Fixes
#1 Update Problematic App
If you’re facing issues with some particular app, it might be due to the outdated or incompatible version of the app installed on your system. You can try updating the application by visiting the official website of the app.
#2 Install the latest Windows version
If you’re using older versions of Windows like 7, 8, 8.1, or 10, we’d suggest trying to install the latest version of Windows 10. And, if your system is showing you the option to install Windows 11, you may go ahead and do so. And, then check if the problem is fixed.
Advanced Fixes
#3 Terminate apps before shutting down your system
Many users have reported that terminating the application has fixed the error for them. So, if you could close it normally, do it. Else, follow the steps below:
- Press Ctrl + Shift + Esc keys on your keyboard to open Task Manager.
- Now, select the problematic app and click End task.

- Once done, now try to shut down your system and reboot it to see if the exception breakpoint error is resolved.
#4 Disable Automatic Apps from Startup Items
Some applications start automatically on starting up your system. Such apps can sometimes cause conflict and issues. You can determine the cause by disabling the third-party apps from Startup items.
- Access Task Manager in the same way we mentioned above and then select the apps you want to start with the system. Click Disable to remove apps from Startup Items.

Finally, reboot your system to see if the error persists.
#5 Run SFC Scan
Corrupted or damaged system files may arise an exception breakpoint error. You can run DISM and SFC scan to fix the issue. DISM (Deployment Image Service Management) and System File Checker (SFC) fix the issues with Windows images and system files. Follow the steps to run these commands:
- Press Windows + S to access Search, type cmd, and then click Run as administrator.
- In the elevated cmd window, type Dism /Online /Cleanup-Image /CheckHealth command and hit Enter.

- Next, type Dism /Online /Cleanup-Image /ScanHealth and press Enter. Let the process complete.

- Once done, type Dism /Online /Cleanup-Image /RestoreHealth and hit Enter.

- Once this is done, type the sfc/scannow command and hit Enter.

Finally, close the window and reboot your system.
#6 Run Disk Checker
Sometimes, your hard disk may be faulty or corrupted, causing this issue on your system. It can also have bad sectors. You can scan and check your disk for issues and resolve them for eliminating the problem.
- Open Command Prompt and run it as administrator as discussed above.
- Type CHKDSK /f/r D: and hit Enter. (Replace D: with your disk letter).

Let the process complete. Once done, close the window and shut down your system to see if everything is alright now with your system.
#7 Set Page file to Automatic
If you encounter the error on MSFS, allow Windows to manage the paging file size automatically. Otherwise, do it manually with the following steps:
- Open Windows Search by pressing Windows + S and type Adjust the appearance and performance of Windows. Click Open.

- On the Performance Options window, move to the Advanced tab and click Change.

- Next, select the checkbox beside the ‘Automatically manage paging file size for all drives’ option and click OK to complete.

Restart your system and apply the changes.
#8 Check for Memory Leaks
You may run Windows Memory Diagnostic Tool to check for memory leaks, which is a built-in tool to check issues with your RAM and memory leaks. Follow these steps:
- Open the Windows Memory Diagnostic tool from Search and then select ‘Restart now and check for problems (recommended)’.

- Once your system reboots, the tool will start scanning your system memory. You can look for Advanced options, such as Test mix or Pass count and press F10 to start the test.

Finally, restart the system and check if your system is free from issues.
#10 Uninstall Problematic Apps
If updating the application doesn’t work, uninstall the problematic application for good. Follow the given steps to do so:
- Open Settings and go to Apps.

- Next, go to Apps & features and then scroll down to locate the problematic app.
- Select that app and click Uninstall.

- On the prompted message box, click Uninstall again to confirm your action.

Once done with the uninstallation process, restart your system.
#10 Create a new User Profile
As a corrupted user profile may also cause ‘a breakpoint has been reached’ error, try creating a new user local profile on your system and provide it administrator rights. Follow the given steps:
Use Netplwiz
- Open the Run dialog box by pressing Windows + R, type netplwiz, and click OK.

- Now, click Add in Users tab.

- Enter username and domain on the next prompt.

- Follow the on-screen instructions and click on Local account to proceed with further instructions to complete the process.
Use Windows Settings
- Open Settings by pressing Windows + I and follow Account > Family & Other users. You can also see Other users option.
- Under Other users on the right panel, click Add someone else to this PC.

- Provide the email address or phone number to create a local account. You can also go by selecting ‘I don’t have this person’s sign-in information’ to Add a user without a Microsoft account.

Next, provide a username, and password or choose security questions and click Next and the process will complete.
Many users have benefitted from the methods shared in this blog. Hopefully, you would also be able to fix the ‘The exception breakpoint has been reached’ error. If you still find some problems, turn off the GPU overclocking and if there is any screen-saver software installed on your system, remove it.
FAQ
1. Does exception mean error?
The exception is referred to an unusual or unprecedented event, occurring after the execution of a software or application. When an undesired result or event affects the normal program flow, the exception runtime error occurs.
2. What is exception 0x80000003?
The exception breakpoint 0x80000003 error or the exception breakpoint has been reached is the same error. However, the bug check value may also appear with different error messages, such as KERNEL_MODE_EXCEPTION_NOT_HANDLED, KMODE_EXCEPTION_NOT_HANDLED, and more.
3. How do I fix service exceptions?
The SYSTEM_SERVICE_EXCEPTION error is a Blue Screen of Death (BSOD) error that you can fix with some easy-to-follow methods, including
- Update your Windows
- Uninstall Antivirus and VPN Programs
- Remove Recently Connected Hardware
- Disable Internal Webcam
- Update drivers
- Run System Checker Utility
- Reset Windows
4. What does breakpoint mean in software?
The Breakpoint is a point in any program or software where the code stops executing. There can be up to 30 session breakpoints, external breakpoints, and debugger breakpoints. The breakpoints can be active (which takes effect) and inactive (which are ignored at runtime).
About The Author
Mansi Verma
Mansi Verma is a Senior Technology Writer at Stellar®. She is a Tech enthusiast, holding over 8 years of experience in Data Recovery, IoT, Artificial Intelligence, and the Robotics technology domain. She loves researching and providing DIY solutions to solve Windows technical issues. In her spare time, she likes reading novels, and poetry. She also enjoys Travelling, Rafting, Trekking, etc.
 При запуске и работе игр и программ в Windows некоторые пользователи сталкиваются с ошибкой приложения 0x80000003 «Unknown Software Exception» и другими вариантами ошибок с этим же кодом, например, «Exception Break Point Has Been Reached».
В этой инструкции подробно о возможных причинах этой ошибки и способах её исправить в Windows 11, Windows 10 и предыдущих версиях системы.
Способы исправить ошибку 0x80000003

Сбой 0x80000003 может появляться в играх и программах и обычно связана с невозможностью обратиться к той или иной области памяти или получением неверных данных из неё: однако, это не всегда возникает из-за проблем с оперативной памятью, чаще влияют иные факторы.
По порядку рассмотрим варианты решения для ошибки 0x80000003 Unknown Software Exception и иных вариантов этого сбоя.
Отключение антивируса
Прежде всего, попробуйте временно отключить ваш антивирус, либо добавить папку с расположением игры или программы в исключения антивируса, а затем понаблюдать, решит ли это проблему. Если у вас установлен лишь встроенный антивирус Windows, можно использовать инструкцию Как добавить исключения в Microsoft Defender.
Причина, по которой антивирус может вызывать появление рассматриваемой ошибки — реакция на какие-то, подозрительные с точки зрения антивируса, действия программы и «вмешательство», что особенно актуально для полученного неофициальным способом ПО.
Выполните чистую загрузку Windows
Попробуйте выполнить чистую загрузку Windows и снова проверить работу игры или программы, которая сообщает об ошибке приложения 0x80000003. Если при чистой загрузке проблема не проявляется, с большой вероятностью причина — сторонние фоновые программы или службы, которые мешают её нормальной работе.

Подробно о том, как выполнить чистую загрузку и найти проблемные сторонние службы и ПО в отдельном материале: Чистая загрузка Windows.
Выполните проверку компьютера на вирусы и наличие вредоносного ПО
Ещё одна возможная причина ошибки 0x80000003 — наличие вирусов, майнеров и другого вредоносного ПО на компьютере. Если имеющийся у вас антивирус не находит ничего подозрительного, рекомендую выполнить проверку ещё двумя инструментами (которые не помешают работе имеющегося антивируса):
- Kaspersky Virus Removal Tool
- AdwCleaner
Если угрозы были найдены и успешно очищены, проверьте работу игры или программы снова: возможно, ошибка перестанет появляться.
Проверка оперативной памяти
Проверьте оперативную память на ошибки и стабильность работы. Для этого можно использовать встроенные средства Windows — Как использовать средство диагностики памяти Windows.

Также доступны сторонние инструменты проверки оперативной памяти, о которых в статье: Как проверить оперативную память ПК или ноутбука.
Если предыдущие способы не сработали, несколько дополнительных вариантов, которые могут помочь исправить ошибку 0x80000003 «Unknown Software Exception»:
- Если ошибка появилась после каких-то изменений в системе или установке новых системных программ, попробуйте использовать точки восстановления системы на дату, когда проблема не наблюдалась.
- Выполните проверку и восстановление системных файлов Windows.
- В некоторых случаях может помочь создание нового пользователя Windows, переустановка и запуск программы или игры из-под нового аккаунта.
Учитывайте: ошибка 0x80000003 может быть вызвана проблемами с самой игрой или программой, особенно в случае, если это не вполне лицензионный её вариант (в последнем случае — из-за ошибок во внесенных модификациях). Возможное решение — попробовать другую версию проблемного ПО, а также загрузку и установку из другого источника.
Download Windows Repair & Speedup Tool to fix errors automatically
Windows is a feature-rich operating system with several tiny components coming together. This raises a good probability of the different types of errors that a user may encounter. One such error is A breakpoint has been reached, 0x80000003 which a user can encounter upon their execution of any random file. But one thing is obvious that this file would be an executable file and the other thing is obvious this error is caused due to some Registry files conflicting with the execution or and drivers missing or not compatible with the hardware to run the program.
The exception Breakpoint, A breakpoint has been reached, (0x80000003) occured in the application.

This Windows Executive STATUS message is a warning. If given an option, you need to choose one of the options from the message box. If you are running the application in an end-user environment, rather than in a development environment, you need to contact the supplier of the running application about this message, as this should not happen when a finished program is running.
There are a few things you could try and see if they help you fix the problem.
- Run chkdsk
- Run System File Checker at Boot time
- Run that file in Clean Boot State
- Run a scan to check Memory issues
- Contact the developers of that particular software
First of all, we would recommend you to create a System Restore point. Because we will be playing with registry files and modifying some really critical Windows settings. Having done this, we will continue on our quest of fixing error 0x80000003.
1] Run CHKDSK
Maybe you need to run CHKDSK so that it can fix and recover any damaged segments on the drive. In an elevated CMD run the chkdsk /r command.
2] Run SFC /SCANNOW
Run System File Checker offline. This will repair corrupted or damaged Windows files. You will need to run this command from elevated CMD, i.e., command prompt launched with admin privileges.
3] Boot Windows in a clean boot state
Boot in Clean Boot State and try to execute the same file. This will help if any processes are obstructing the removal.
4] Run a scan to check Memory issues
The Memory Diagnostic Tool lets you check for possible memory problems, including testing the Random Access Memory (RAM) on your computer. The tool helps you figure out bad memory, memory issues, and usually takes 20 minutes to complete.
Using the Memory Diagnostic Tool is pretty straightforward. Save all your important work. Then, hit WINKEY + R to open the Run window. Now, type in the command mdsched.exe in the Run window. Reboot your computer.
After a reboot, perform a basic scan or go for the ‘Advanced’ options like ‘Test mix’ or ‘Pass count’. Hit F10 to start the test.
I hope the tests throw up something useful.
Read: How to find & fix Memory Leaks manually.
5] Contact the Developer
If nothing mentioned above works out for you, then you can try contacting the developer of the software throwing this error.
You can search the Internet for their official support channel and discuss this error there.
All the best!
Ayush has been a Windows enthusiast since the day he got his first PC with Windows 98SE. He is an active Windows Insider since Day 1 and has been a Windows Insider MVP.