Hi everyone!
So I’ve stumbled upon this issue as well, and I might have a temporary solution for some.
I noticed that the Fusion frames were rendering in the timeline correctly, however upon final export it fails. That’s where you can use one of resolve’s features to finish you render.
The feature is called «Use render cached images» and it’s under the «Advanced Settings» of your «Render Settings». What this does is it uses the already cached images in your timeline to finish the render.
That means that prior to rendering, you need to cache the whole clip that causes your render failures. To be able to cache Fusion compositions in your timeline you need to make sure you have a couple of settings set correctly:
- Under «Project Settings» check «Automatically cache composites in User Mode», «Automatically cache transitions in User Mode» and «Automatically cache Fusion Effects in User Mode»
- In your timeline, on the specific clip that causes problems, set «Render Cache Fusion Output» to «On» and check «Render Cache Color Output»
Next make sure all frames are cached in your timeline. This means that the bar on top of the timeline turned from red to blue for all frames of the clips that cause problems.
- What your timeline should look like
- Annotation 2020-01-07 010521.png (86 KiB) Viewed 81040 times
Now, if you render, the renderer should use the cached images and therefore skip the Fusion compositing part, resulting in a finished render.
However, I don’t know what this does to image quality. I’ve looked at the result and it looks fine by me, and because I’m working on a small client, it wouldn’t be that big of a deal. But there’s a reason renderers don’t use cached images by default.
Also, BlackMagic, this no reason for you not fix the issue. Please, make this a priority. I recently switched from Premiere to Resolve and I’ve been loving the performance and interface. However, Fusion seems to be lacking in performance and stability compared to After Affects, which was a real bummer.
To finish off, I’ve included some logging I found while debugging the issue. These all seem to be from the time I started rendering. I didn’t help me, because it’s a very generic error, but it might give your developers an indication as to where the problem is located.
- Code: Select all
[0x000073a0] | SyManager            | ERROR | 2020-01-07 00:36:51,450 | There is no current clip, SetCurrentFrame failed.
[0x00001470] | GPUManager           | ERROR | 2020-01-07 00:36:52,629 | Exception caught while running GPU algorithms: .
[0x00001470] | GPUManager           | INFO  | 2020-01-07 00:36:52,629 | Flushing GPU memory...
[0x00001470] | GPUManager           | ERROR | 2020-01-07 00:36:52,965 | Exception caught while running GPU algorithms: .
[0x00001470] | GPUManager           | INFO  | 2020-01-07 00:36:52,968 | Flushing GPU memory...
[0x00005d78] | UI                   | WARN  | 2020-01-07 00:36:53,018 | Unable to submit frame to GPU scopes, legacy OpenGL uploads not supported (Color Page).
[0x00001470] | GPUManager           | ERROR | 2020-01-07 00:36:53,537 | Exception caught while running GPU algorithms: .
[0x00001470] | GPUManager           | INFO  | 2020-01-07 00:36:53,537 | Flushing GPU memory...
[0x00001470] | GPUManager           | ERROR | 2020-01-07 00:36:53,918 | Exception caught while running GPU algorithms: .
[0x00001470] | GPUManager           | INFO  | 2020-01-07 00:36:53,921 | Flushing GPU memory...
[0x00005d78] | UI                   | WARN  | 2020-01-07 00:36:53,956 | Unable to submit frame to GPU scopes, legacy OpenGL uploads not supported (Color Page).
[0x00001470] | GPUManager           | ERROR | 2020-01-07 00:36:54,364 | Exception caught while running GPU algorithms: .
[0x00001470] | GPUManager           | INFO  | 2020-01-07 00:36:54,364 | Flushing GPU memory...
[0x00001470] | GPUManager           | ERROR | 2020-01-07 00:36:54,775 | Exception caught while running GPU algorithms: .
[0x00005d78] | UI                   | WARN  | 2020-01-07 00:36:54,798 | Unable to submit frame to GPU scopes, legacy OpenGL uploads not supported (Color Page).
[0x00005980] | GsManager            | INFO  | 2020-01-07 00:36:55,047 | Recording cancelled after 3 frames.
[0x00001470] | GPUManager           | INFO  | 2020-01-07 00:36:55,146 | Flushing GPU memory...
Fix: Export Failed — Rendering Error in DaVinci Resolve
The other day I had issues exporting a video in DaVinci Resolve. It would reach at 99%, and then give me this error:
«Rendering Error
The Fusion composition on the current frame or clip could not be processed successfully.»
Here’s how I got around it:
- From DaVinci Resolve menu, click on Preferences.
- Navigate to the User tab.
- From the list on the left, make sure you are in UI Settings.
- Disable Stop renders when a frame or clip cannot be processed.
- Click Save.
Disclaimer: The content provided in this article is for informational purposes only. You are solely responsible for verifying the information as being appropriate for your personal use.
Popular posts from this blog
It is still uncertain when will NVIDIA release any Web Drivers for macOS Mojave, but we can try a workaround.
After installing 3rd-party kexts in /Library/Extensions, or replacing vanilla kexts with patched kexts in System/Library/Extensions, you may want to repair their permissions and rebuild the kext cache to ensure they work as intented. Here’s how.
Apple released 3 new Live Wallpapers for the iPhone Xs and Xs Max. Follow this simple and safe process below to download them onto an earlier model of iPhone that supports 3D Touch, such as an iPhone 8 or X.
Hi everyone!
So I’ve stumbled upon this issue as well, and I might have a temporary solution for some.
I noticed that the Fusion frames were rendering in the timeline correctly, however upon final export it fails. That’s where you can use one of resolve’s features to finish you render.
The feature is called «Use render cached images» and it’s under the «Advanced Settings» of your «Render Settings». What this does is it uses the already cached images in your timeline to finish the render.
That means that prior to rendering, you need to cache the whole clip that causes your render failures. To be able to cache Fusion compositions in your timeline you need to make sure you have a couple of settings set correctly:
- Under «Project Settings» check «Automatically cache composites in User Mode», «Automatically cache transitions in User Mode» and «Automatically cache Fusion Effects in User Mode»
- In your timeline, on the specific clip that causes problems, set «Render Cache Fusion Output» to «On» and check «Render Cache Color Output»
Next make sure all frames are cached in your timeline. This means that the bar on top of the timeline turned from red to blue for all frames of the clips that cause problems.
- What your timeline should look like
- Annotation 2020-01-07 010521.png (86 KiB) Viewed 76441 times
Now, if you render, the renderer should use the cached images and therefore skip the Fusion compositing part, resulting in a finished render.
However, I don’t know what this does to image quality. I’ve looked at the result and it looks fine by me, and because I’m working on a small client, it wouldn’t be that big of a deal. But there’s a reason renderers don’t use cached images by default.
Also, BlackMagic, this no reason for you not fix the issue. Please, make this a priority. I recently switched from Premiere to Resolve and I’ve been loving the performance and interface. However, Fusion seems to be lacking in performance and stability compared to After Affects, which was a real bummer.
To finish off, I’ve included some logging I found while debugging the issue. These all seem to be from the time I started rendering. I didn’t help me, because it’s a very generic error, but it might give your developers an indication as to where the problem is located.
- Code: Select all
[0x000073a0] | SyManager            | ERROR | 2020-01-07 00:36:51,450 | There is no current clip, SetCurrentFrame failed.
[0x00001470] | GPUManager           | ERROR | 2020-01-07 00:36:52,629 | Exception caught while running GPU algorithms: .
[0x00001470] | GPUManager           | INFO  | 2020-01-07 00:36:52,629 | Flushing GPU memory...
[0x00001470] | GPUManager           | ERROR | 2020-01-07 00:36:52,965 | Exception caught while running GPU algorithms: .
[0x00001470] | GPUManager           | INFO  | 2020-01-07 00:36:52,968 | Flushing GPU memory...
[0x00005d78] | UI                   | WARN  | 2020-01-07 00:36:53,018 | Unable to submit frame to GPU scopes, legacy OpenGL uploads not supported (Color Page).
[0x00001470] | GPUManager           | ERROR | 2020-01-07 00:36:53,537 | Exception caught while running GPU algorithms: .
[0x00001470] | GPUManager           | INFO  | 2020-01-07 00:36:53,537 | Flushing GPU memory...
[0x00001470] | GPUManager           | ERROR | 2020-01-07 00:36:53,918 | Exception caught while running GPU algorithms: .
[0x00001470] | GPUManager           | INFO  | 2020-01-07 00:36:53,921 | Flushing GPU memory...
[0x00005d78] | UI                   | WARN  | 2020-01-07 00:36:53,956 | Unable to submit frame to GPU scopes, legacy OpenGL uploads not supported (Color Page).
[0x00001470] | GPUManager           | ERROR | 2020-01-07 00:36:54,364 | Exception caught while running GPU algorithms: .
[0x00001470] | GPUManager           | INFO  | 2020-01-07 00:36:54,364 | Flushing GPU memory...
[0x00001470] | GPUManager           | ERROR | 2020-01-07 00:36:54,775 | Exception caught while running GPU algorithms: .
[0x00005d78] | UI                   | WARN  | 2020-01-07 00:36:54,798 | Unable to submit frame to GPU scopes, legacy OpenGL uploads not supported (Color Page).
[0x00005980] | GsManager            | INFO  | 2020-01-07 00:36:55,047 | Recording cancelled after 3 frames.
[0x00001470] | GPUManager           | INFO  | 2020-01-07 00:36:55,146 | Flushing GPU memory...
There are many reasons you might receive the “Render Job failed” error when rendering your videos in Davinci Resolve.
However, some of them are more common than others, therefore I’ve gathered the most common ones in this article.
I’ve seen there are two types of errors that occur for most people. The first one is related to rendering fusion composition & the second is a video file that could not be decoded correctly.
However, the solutions shared in this article will work on both error types.
Anyways, let’s solve this problem of yours!
1. Export Rendered Cache Files
This one is actually quite genius, and solved the problem immediately when I was facing this problem.
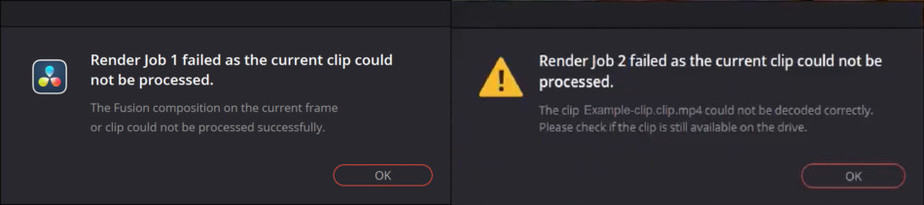
So let’s get to it! Here’s a picture of the two most normal errors to experience:
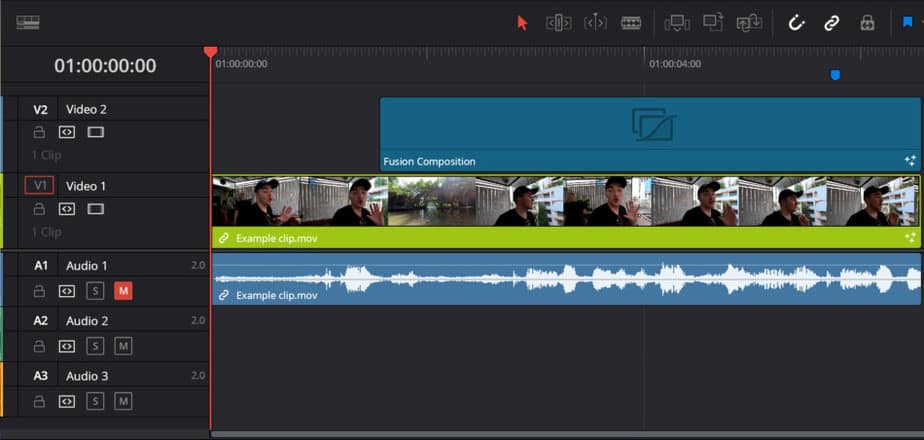
Here you can see my timeline, just a normal clip and a fusion composition which are causing this error:
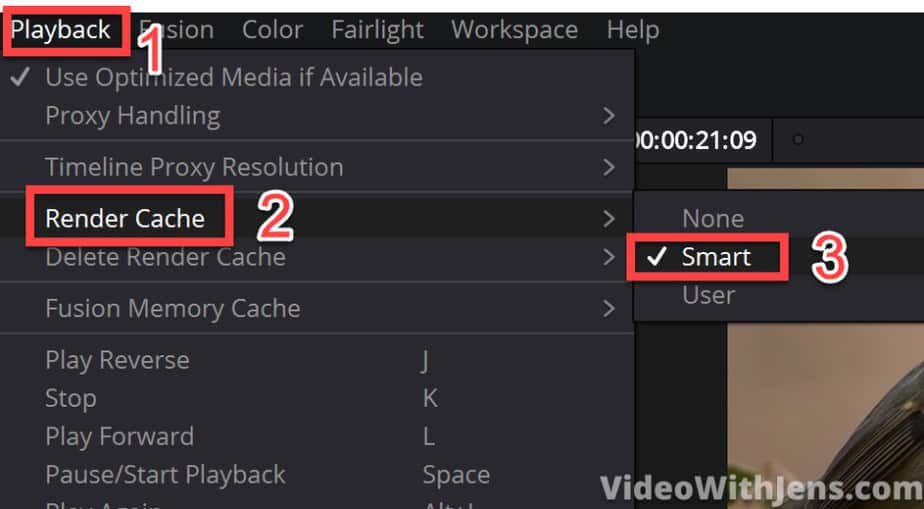
The first thing you want to do is open “Playback > Render Cache > Smart“:
Once that is done you will see a red line, which is slowly turning blue above your clips in the timeline. Let it finish rendering before moving on. At least it should render the clip which is causing you problems (if you know which it is).
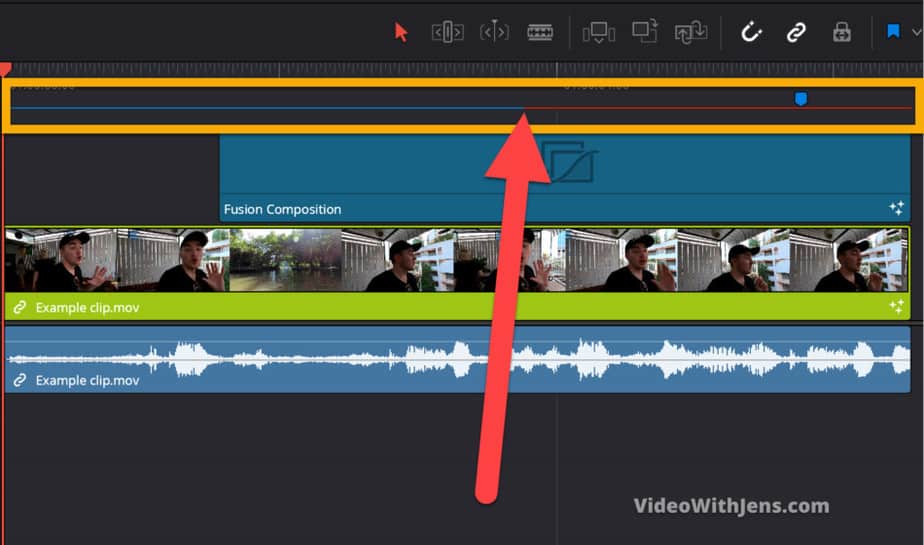
Once it’s done it will be totally blue like this:
Now, go to the “Deliver” page:
![]()
Go to the “Render Settings” window:
Now we are getting into more uncommon territory for a lot of people.
Go ahead and open the “Advanced Settings“:
AND finally, we have found the golden nugget!
Now you want to tick off the box next to “Use render cached images“. What this does, is use the cached files we created when that red line turned blue. So it basically renders how the timeline memory created of your timeline and in that memory, all the files worked, thus they work in the rendered file as well!
So tick off the box next to “Use render cached images” and hit “Add to Render Queue“:
Now head over to the “Render Queue” and start the render job! Hopefully, once it’s done, it looks like the picture below:
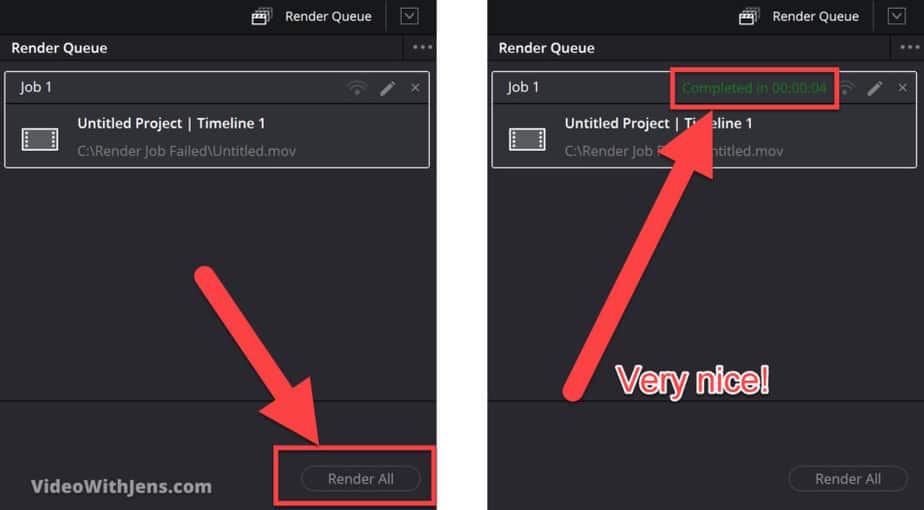
2. Copy the Timeline and Create a New Project
This one is very easy, which is the reason I’m placing it as number two on the list!
If it doesn’t work, no big deal just proceed to the next method.
So we are not going to copy the timeline as it sounds. Instead, we are going to copy all the clips in the timeline.
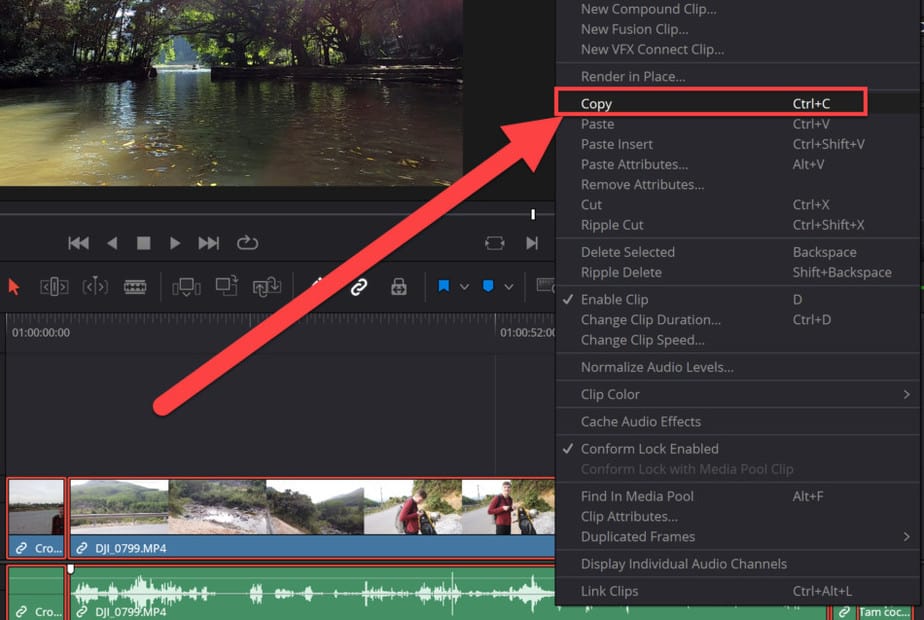
You can do this by simply pressing “CTRL+A” or “Cmd+A”(on a Mac), then press “CTRL+C” or “Cmd+C”(on a Mac) to copy.
If you are not the shortcut kind of person, you can select all your clips by dragging over them and then right-click a clip > Copy.
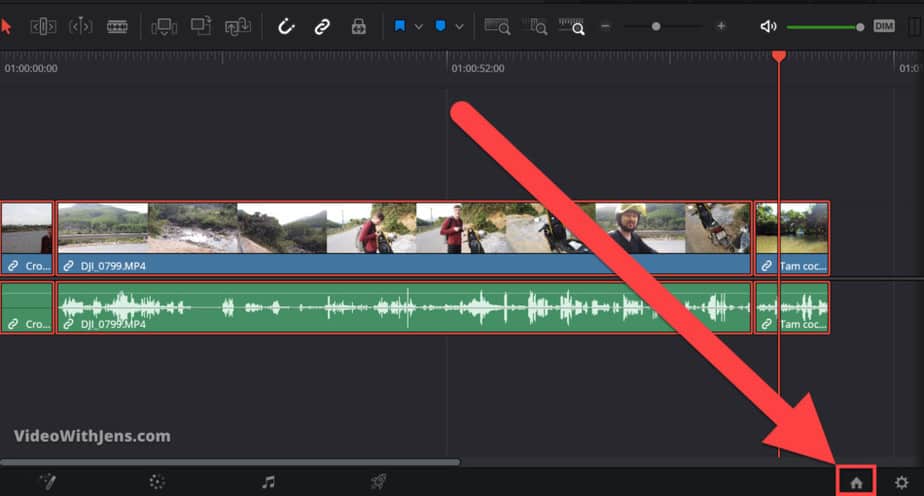
Next, save your current project.
Then, click on this house icon in the bottom right-hand corner:
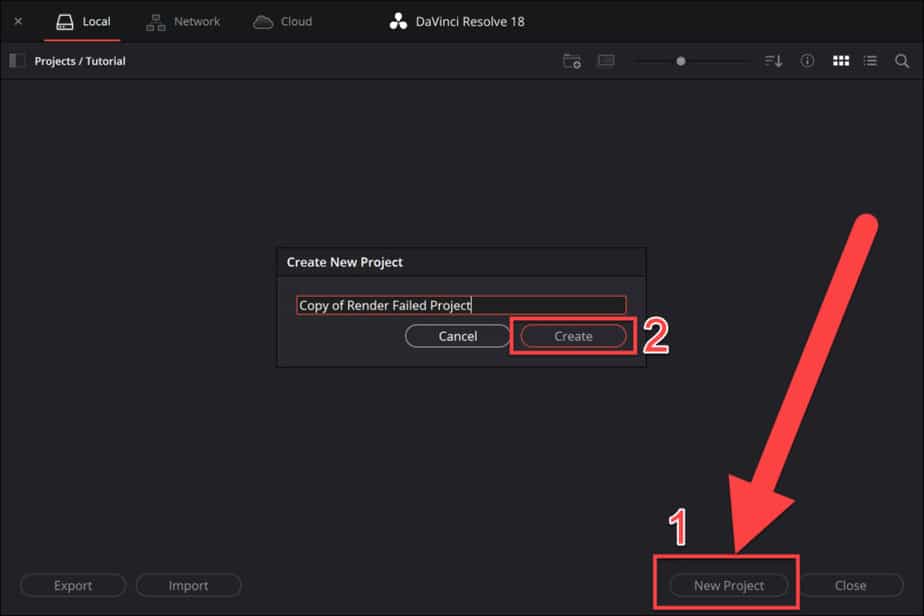
In this window go ahead and click on “New Project“, then call it whatever you want and click on “Create“:
Inside your new project, click once on the timeline and then press “CTRL+V” or “Cmd+V” (on a Mac).
For those who don’t like shortcuts: Right-click on the timeline and click on “Paste“.
Once you’ve done this, go ahead and try to render!
If it didn’t work. We have other methods which has worked for a bunch of people:
3. Convert Your Videos to DNxHR
- Select the clips in your timeline.
- Right-click and click on “Render in Place…“
- Set “Format” to “QuickTime“.
- Set “Codec” to “DNxHR” and “Type” to “DNxHR HQ“.
- Click on “Render“.
This solution seems to have worked for some people as well.
If you’re having the fusion composition error, this solution most likely will not work. (All the others work for both errors).
However, let’s go into a bit more in detail on how to do it and some consequences of doing this.
The consequence of converting to the DNxHR codec is that the file size is HUGE. If you are used to handling such as .MP4 and .MOV.
Why is this?
We’ll not go too much into detail on this, however, DNxHR is utilizing something called intraframe compression. These are ALOT less compressed than a .MP4 which is normally paired with an H.264 codec which usually compresses the video a lot.
So by converting your video to DNxHR, it will be a lot less compressed, then it’s a lot easier on your computer when playing it back as well and gives you a better experience while editing.
Here’s how much larger your files will get:
You can see it’s quite a lot, but if you have enough disk space, you can just delete it afterward, as you will still have your original footage.
It’s worth a shot! However, you could try the other solutions first.
Here’s a more detailed description of how to do it:
First, select the clips in your timeline, or if you know which clip is causing the error select that one.
Then click on “Render in Place…“
Next, you want to change the following:
- Format – QuickTime
- Codec – DNxHR
- Type – DNxHR HQ
If you want a bit smaller file size you could try changing to DNxHR ‘SQ’ instead of ‘HQ’. As the only difference is that HQ is of higher quality. That said people who have solved this error used ‘HQ’…
Choose one of them, and then click on “Render“:
The rendering takes a little bit of time.
Once it’s done you can see that you have now both your old format and new format in your “Media Pool“:
And you don’t have to add the new files to the timeline, as they will have swapped places as part of the render process! You can see in the picture below that it has changed from .mp4 to .mov.
.mov is representing the QuickTime format:
Next, go ahead and render your project! Fingers crossed…
If you want to swap the clips in the timeline back to the original files, “select the clips > right-click > Decompose to Original”: (You will still have them on your computer and in the media pool.)
4. Change Workspace Options
This is the option almost everyone suggests. And my least favorite solution to the problem, which is why it’s the last on the list…
This solution does work, and most of these errors will get solved by using it. The problem with doing this you will render out your project even if there is an error, and then it will be included in your final product.
However, after experimenting a little bit with this solution, I’ve found that sometimes the error is just in the render faze, and I could not see any negative impact on the exported file.
So without further ado, here’s solution number 4:
Click on “Davinci Resolve” in the left-hand top corner of Davinci Resolve. Then click on “Preferences…“.
Then in the window that pops up, click on “User“, then “UI Settings“.
Next, uncheck the option called “Stop renders when a frame or clip cannot be processed“.
Watch the picture below:
Once you have done this go ahead and click on “Save“, located in the lower right-hand corner of the window:

That’s it!
Now you can go ahead and try to render your video again.
Afterward, watch through your video if there are any errors, etc. A common one to watch out for is this:

There’s a big chance you have seen this one inside Davinci Resolve. However, it’s actually possible to render this one into your final product as well.
That’s it and I really hope one of these solutions solved your problem!
If you are facing problems with the “Add to Render Queue” button turning gray, check out this article.
Best regards,
Your friend, Jens.
How To Fix «Render Job Failed» Error, Davinci Resolve 16
Jake Earp
HD
05:48
How To Fix «Render Job Failed» Error, Davinci Resolve 16
![]()
Дата публикации:
28.08.2019 02:26
Продолжительность:
05:48
Ссылка:
https://thewikihow.com/video_3Ielsf2cpg4
Действия:
Источник:
Описание
**EDIT** If this solution did not work for you, please check out the comments. Some awesome viewers have left other solutions that have worked for them and others! Keep up the great work YOUTUBE COMMUNITY!
If you are having problems exporting your project through DaVinci Resolve 16 and are getting the “Render Job Failed Error”, don’t panic. There is a solution to get your project to render without giving the error and starting over.
Hopefully there will be a fix soon, this is the first beta version that has given me any issues with exporting.
Error Code — Render Job 1 failed as the current clip could not be processed.
The Fusion composition on the current frame or clip could not be processed successfully.
**Link to monitor is an affiliate link**
Most recent Jake Earp channel videos
- Mac Studio Max Unboxing 🖥 Feed
- Mac Studio Unboxing And Setup: Don’t Make The Same Mistake
- How To Install Flow Control On Rocket Appartamento Espresso Machine
Подписывайтесь на наш Telegram канал!@thewikihowоткрытьМониторим видео тренды 24/7
Explore more videos from Jake Earp
Фото обложки и кадры из видео
How To Fix «Render Job Failed» Error, Davinci Resolve 16, Jake Earp
https://thewikihow.com/video_3Ielsf2cpg4
Аналитика просмотров видео на канале Jake Earp
Гистограмма просмотров видео «How To Fix «Render Job Failed» Error, Davinci Resolve 16» в сравнении с последними загруженными видео.
Теги:
Davinci Resolve 16
Davinci Resolve 16 Editing Tutorial
Davinci Resolve
Render Failure
Fusion Error
Export Problems
Error
Gpu
Public Beta
Blackmagic
How To
Resolve
еще
Похожие видео

02:41
67 497 просмотров.

06:54
77 576 просмотров.

08:02
12 670 просмотров.
![Davinci Resolve 18 - Tutorial For Beginners In 15 Minutes! [ Complete ]](https://i.ytimg.com/vi/aLIHKHkvKMM/mqdefault.jpg)
15:17
298 903 просмотра.

05:26
25 880 просмотров.

03:10
46 145 просмотров.

06:37
630 946 просмотров.

13:27
64 039 просмотров.

07:30
94 405 просмотров.
Davinci resolve render error смотреть последние обновления за сегодня на .
How to fix «Render Job Failed» Error | DaVinci Resolve 16
![]()
206194
![]()
3607
![]()
![]()
929
![]()
00:05:48
![]()
27.08.2019
EDIT If this solution did not work for you, please check out the comments. Some awesome viewers have left other solutions that have worked for them and others! Keep up the great work YOUTUBE COMMUNITY!
If you are having problems exporting your project through DaVinci Resolve 16 and are getting the “Render Job Failed Error”, don’t panic. There is a solution to get your project to render without giving the error and starting over.
Hopefully there will be a fix soon, this is the first beta version that has given me any issues with exporting.
Ultrawide Curved Monitor I can’t imagine life without now: 🤍
Error Code: Render Job 1 failed as the current clip could not be processed.
The Fusion composition on the current frame or clip could not be processed successfully.
Link to monitor is an affiliate link
Rendering Failed — Davinci Resolve 17 — How to fix a rendering error
![]()
67497
![]()
2246
![]()
![]()
524
![]()
00:02:41
![]()
16.11.2020
Davinci Resolve 17 is fantastic and full of new features…however I’ve hit a rash of «Rendering Failed» issues that drives me nuts. Here is how I solve it! Never run into a rendering error showing render failures again!
Help me buy hardware for more benchmarking videos-
🤍
Davinci Resolve Studio
🤍
My Editing Workstation
Processor: 🤍
Motherboard: 🤍
GPU: 🤍
Memory: 🤍
Hard Drive 1: 🤍
Hard Drive 2: 🤍
Hard Drive 3: 🤍
Mouse: 🤍
Keyboard: 🤍
Color Grading Panel — 🤍
Case: 🤍
Fans and controller: 🤍 🤍
My favorite Photo Editor Company — 🤍
My Camera Setups
Cinema: Dreamy look 🤍
Crisp, action, Corporate look: 🤍
Favorite Lens of All Times: 🤍
Speedbooster to make it fit: 🤍
Gimbal that can support all of it: 🤍
Channel Graphics By Saad Shah (🤍GargoylesAtWork)
🤍
As an Amazon Associate I earn from qualifying purchases.
A production of John’s Films LLC
00:00 Intro
0:32 The error
0:41 The fix
1:57 Wrap up
Davinci Resolve, Rendering Failed, rendering failed davinci resolve, davinci resolve render error, davinci resolve failed, davinci resolve error, rendering error, render fail, rendering failed, could not be processed successfully, error, render error, rendering failure, resolve render error, resolve crash, render crash, davinci resolve 17,resolve 17 rendering failed, resolve 17 render error, render failure, resolve 16 error
Davinci Resolve Render Freezes / Crashes / Stops (EASY FIX)
![]()
55750
![]()
1101
![]()
![]()
194
![]()
00:05:21
![]()
12.10.2021
In this video I will show you guys how to fix any davinci resolve render issues such as freezing, crashing, slow rendering or glitches after your render. After watching this video I guarantee that you will be able to successfully render your video with no errors or crashes.
Full Tutorial: 🤍
#davinciresolve
How to fix Render Job has failed in Davinci Resolve 17 — Quick guide
![]()
14468
![]()
393
![]()
![]()
166
![]()
00:01:26
![]()
25.01.2022
How to fix Render Job has failed in Davinci Resolve 17
The Fusion composition on the current frame or clip could not be processed successfully.
Go to Preferences, User, UI
uncheck «Stop renders when a frame or clip cannot be processed»
Remember to delete the failed export file
Get a FREE Title pack for Davinci Resolve
🤍
Title Packs
🤍
Join the Facebook Group — For Davinci Resolve tutorials, tips, and secrets
🤍
Useful links
My online courses 🤍
Buy me a coffee 🤍
— Website Hosting —
US Hosting 🤍
UK Hosting 🤍
Siteground 🤍
Website Speed Up 🤍
Cloudflare CDN 🤍
Webmaster tools 🤍
— Website Page Builders —
Elementor Pro 🤍
Divi 🤍
— Video —
Titles Motion VFX 🤍
Tube Buddy 🤍
Music 🤍
Video Keyboards 🤍
Fiverr 🤍
VPN IpVanish 🤍
Email Marketing 🤍
Appsumo 🤍
My Gear 🤍
How To Prevent Davinci Resolve From Render Crashing | Crash Fix | Render Crash | Davinci Resolve 17
![]()
23308
![]()
797
![]()
![]()
144
![]()
00:02:09
![]()
13.04.2021
Do You Want To Learn How To Prevent Your Davinci Resolve 17 From Crashing in Rendering Process ?
Quick And Easy Method For Making Davinci Resolve 17 Crash Fix in Render Tab
▶ Music & Sound Effects I Use:
🔥 Artlist* ▶ 🤍 ( 2 Months FREE! )
▶ Stock Footage I Use:
🔥 Artgrid* ▶ 🤍
▶ Stock Footage,SFX,Plugins,Templates:
🔥 Motion Array* ▶ 🤍 (Click to Get $50 OFF!)
Business E-mail Here ➡ molin1994🤍abv.bg
Very quick tutorial showing the four very quick and easy fixes to stop Davinci Resolve 17 crashing on render.
All of that and many more coming up!
This is Easy and Fast Tutorial On How You Can Turn Solve Your Crashing Problem With Rendering Using Resolve 17
Quick and Easy Davinci Resolve 17 Begginers Tutorial
#davinciresolve #rendercrash #davinciresolve17
Dont Forget To LIKE, COMMENT and SUBSCRIBE ! It Helps ALOT
So if you are interested on improving yourself as a editor hit that Subscribe Button and let’s begin.
▶Make sure to like the video if it was useful to you, subscribe to the channel to make sure you dont miss a video and leave a comment if you have any ideas,suggestions or feedback. Thanks for being here 😇
DISCLAIMER:
—
The links above marked with * are affiliate links,
when you make a purchase on one of those sites,
I will get a small kickback to no extra cost for you!
Thanks for supporting me and my channel! Cheers!
How To Fix Rendering Error In Davinci Resolve 18 | #12
![]()
1511
![]()
19
![]()
![]()
10
![]()
00:01:14
![]()
07.08.2022
How To Fix Rendering Error In Davinci Resolve 18
Thank you for watching.
SOCIAL MEDIA
➣ YouTube 🤍
➣ Instagram 🤍
Last video:
How To Install Open Shell on Windows 11 🤍
♫ Music source:
Youtube music
➣ Copyright Disclaimer Under Section 107 of the Copyright Act 1976, allowance is made for «fair use» for purposes such as criticism, comment, news reporting, teaching, scholarship, and research. Fair use is a use permitted by copyright statute that might otherwise be infringing. Non-profit, educational or personal use tips the balance in favor of fair use.
✅ SOLUCIÓN al Error RENDER JOB FAILED // Davinci Resolve
![]()
4954
![]()
271
![]()
![]()
44
![]()
00:01:56
![]()
30.06.2021
✅ Solución al problema Rendering issues fix render job failed as the current clip could not be processed de Davilci Resolve.
🠟 🠟 🠟 APRENDE MÁS EN MI CANAL 🠟 🠟 🠟
💻 Videos más populares: 🤍
🐧 Linux y software libre — Aprende todo sobre linux: 🤍
🖌 Curso de GIMP — Tutoriales de HERRAMIENTAS y DISEÑO: 🤍
► Más contenido en Tutos PC: 🤍
✅¿Te gustó el video?🔔 Podes SUSCRIBIRTE y activar la CAMPANITA 🔔
Un ME GUSTA 👍 me ayuda a hacer crecer el canal
How To FIX Render STOP Problem in DaVinci Resolve
![]()
5500
![]()
93
![]()
![]()
35
![]()
00:04:14
![]()
27.03.2022
In this video, I will show you how to fix render issues such as freezing, crashing, slow rendering or glitches. After watching this video I am sure that you will be able to successfully render your video with no errors or crashes.
DaVinci Resolve rendering issues fix render job failed as the current clip could not be processed
![]()
107034
![]()
3535
![]()
![]()
1108
![]()
00:04:24
![]()
18.02.2020
Did you also get the render job failed as the current clip could not be processed?
Steps needed:
1-Open Preferences —
2- Click User (on top) —
3- be in UI settings tab —
4- uncheck the last option
It only took me 1:30 to get to the first step
Subscribe? Click like or share the videos with your fellow creators.
Thanks a ton for watching!
Discord 💬 → 🤍
Steam 🎮→ 🤍
💼📧edimdoesbusiness🤍gmail.com
🤳-Socials-👀
🤍
🤍
🤍
How To Fix DaVinci Resolve Rendering Error
![]()
3340
![]()
68
![]()
![]()
20
![]()
00:01:52
![]()
15.09.2020
On DaVinci Resolve I was getting an error stating «Render failed as the current clip could not be processed.» In this video I show you how I was able to fix it, hint its as simple as changing a setting!
DaVinci Resolve render job failed Error beheben Tutorial deutsch [2022]
![]()
999
![]()
51
![]()
![]()
27
![]()
00:03:17
![]()
30.04.2022
In diesem DaVinci Resolve 17 Tutorial deutsch 2022 zeige ich Euch was man gegen den Fehler render job failed tun kann. Um diese Fehlermeldung zu beheben kann man viele Sachen in den Einstellungen und in dem Deliver Bereich bei dem man Videos exportieren kann tun. #davinciresolve #davinciresolvetutorials #davinciresolve17
🔎Seiten aus dem Video:
DaVinci Resolve: 🤍
🛒 Digitale Produkte [LUTs, Stream Overlays, Texturen und mehr]:
*Shop: 🤍
✨Persönliche Empfehlungen:
envato elements Millionen Animationen + Designs inklusive einer Vielzahl an Kursen: 🤍
Fiverr für Dienstleistungen: 🤍
Erfolgreich lernen: 🤍
100 Youtube Cash Nischen: 🤍
Einkommen per Youtube aufbauen: 🤍
Windows 10 Grundlagen: 🤍
💰Spenden:
Hier könnt Ihr meine Arbeit freiwillig unterstützen: 🤍
🔧Mein Equipment:
Kamera Sony Alpha 6600: 🤍
Objektiv Sigma 16mm 1.4: 🤍
Cam Link Elgato 4K: 🤍
Mikrofon Rode Podcaster: 🤍
Mikrofonarm TONOR inklusive Popschutz: 🤍
Kopfhörer SONY WH-1000XM3: 🤍
Tastatur K800 Illuminated: 🤍
Maus Roccat Kone AIMO Gaming: 🤍
LED Licht dimmbar Neewer 2er-Pack: 🤍
SSD Festplatte SanDisk 1TB: 🤍
Bildschirm iiyama: 🤍
Greenscreen Ständer: 🤍
Greenscreen Tuch: 🤍
Grafiktablet HUION HS610: 🤍
🎬Playlists:
►Twitch Playlist: 🤍
►Twitch Studio Playlist: 🤍
►Streamlabs OBS Playlist: 🤍
►Photoshop Playlist: 🤍
►Photoshop Werkzeuge Playlist: 🤍
►Youtube Playlist: 🤍
►DaVinci Resolve Playlist: 🤍
►Sonstige interessante Videos Playlist: 🤍
►Photoshop creation without voice Playlist: 🤍
►GIMP Playlist: 🤍
►OBS Studio Playlist: 🤍
🤝Lass und Freunde werden:
Instagram: 🤍
✉Contact:
contactandy342🤍gmail.com
*Eigenwerbung. Die mit * gekennzeichneten Links enthalten Werbung.
Die mit gekennzeichneten Links sind Affiliate Links. Über
diese Links erhalte ich eine kleine Provision von dem Kauf.
Für Dich enstehen dabei keine zusätzlichen Kosten.
Media Offline and Render Job Fail in Davinci Resolve Fixes
![]()
19722
![]()
491
![]()
![]()
124
![]()
00:06:36
![]()
16.01.2021
Media Offline can really derail your project! There are a lot of different reasons Media Offline might show up.
Here I’ve compiled a variety of reasons and tips on how to resolve the problem.
Hope these can help you and let me know in the comment section if it does!
Enjoy Davinci!
«NO» Sound from Freesound.com user Jorickhoofd
Fix Export Failed — Rendering Error in DaVinci Resolve
![]()
16857
![]()
![]()
![]()
![]()
00:01:19
![]()
17.05.2020
The other day I had issues exporting a video in DaVinci Resolve. It would reach at 99%, and then give me this error:
«Rendering Error
The Fusion composition on the current frame or clip could not be processed successfully.»
Here’s how I got around it.
Text version of the tutorial: 🤍
Follow us on:
Blog: 🤍
Shop: 🤍
Music: 🤍
Facebook: 🤍
Twitter: 🤍
YouTube: 🤍
SOLVED: Davinci Resolve Render Job Failed… Easy step by step fix
![]()
46145
![]()
3370
![]()
![]()
1768
![]()
00:03:10
![]()
05.05.2020
«Render Job Failed as the current clip could not be processed. Could not be decoded correctly. Please check if the clip is still available on the drive.»
Steps to Fix:
1. go to Davinci Resolve drop down menu
3. go to Preferences
3. go to User in the top section
4. Uncheck the box «Stop renders when a frame or clip cannot be processed.»
—
By me a Coffee: 🤍
Patreon: 🤍
Buy some Soap made by Shonna: 🤍
—
Thank you for Watching! Are you interested in MORE? Please, Subscribe!
Our Main Channel: 🤍
Watch it for Days: 🤍
PlayinIt Channel: 🤍
Nezumi Soaps: 🤍
Shonna’s Channel: 🤍
Nephew’s Channel: 🤍
—
#DavinciResolve #JobRenderFail #DavinciResolveFix
Fix RENDER Errors & SPEED UP EXPORTS in DaVinci Resolve 16!
![]()
20773
![]()
407
![]()
![]()
120
![]()
00:10:19
![]()
07.11.2020
Get my FREE Video Production Checklist! — 🤍
The video edited in this: 🤍
This will help you fix errors like failed to render and speed up your exports!
In this video, I’m showing you how to fix the GPU render errors that happen when you try to export a video in DaVinci Resolve 16. This tutorial has DaVinci Resolve Tips and Hacks that will help you speed up the delivery process with optimized media and render cache. DaVinci Resolve optimized media and render cache are two easily overlooked things when you’re going through your export settings. The best way to do this is to pick the correct render cache settings and delivery settings.
❓Quick Questions ❓
Is this something that you’re already using? Let me know in the comments!
Thank you for watching. If you liked this video hit the 👍 button for the algorithm, and consider subscribing and hitting the bell icon to stay up-to-date and get informed about any future videos!
#️⃣ SOCIAL MEDIA #️⃣
🔥 Instagram — 🤍
🔥 Facebook — 🤍
🔥 Twitter — 🤍
—
This video is NOT sponsored by anyone.
—
🎥 GEAR USED PRODUCING THIS VIDEO 🎥 — Full list available here: 🤍
—
📷 Canon EOS M50 Video Creator Kit — 🤍
🦍 Joby Gorillapod Kit — 🤍
💡 Studio Light Kit — 🤍
☀️ K&F Concept Variable ND Filter — 🤍
🔴 SanDisk Extreme Pro 64GB SD Card — 🤍
💽 LaCie 2big 8TB Thunderbolt 3 Dock — 🤍
📚 TABLE OF CONTENTS 📚
0:00 Intro
1:14 The Problem
1:37 2 Fixes
2:49 Render Cache Settings & Optimized Media
3:52 Using Optimized Media
5:08 Render Cache Options
6:44 Dealing with GPU Memory Errors
7:40 Dealing with Bad Clip Cache on Transitions
8:22 Delivery Settings
8:54 Rendering Out The Video
9:07 Summary
9:52 Quick Question & Outro
Affiliate Disclaimer: This video and description contain affiliate links. As an Amazon Associate, I earn from qualifying purchases.
Hashtags: #RayBeliveau #DaVinciResolve
⚠️ERROR RENDER CLIP en DAVINCI RESOLVE😡
![]()
727
![]()
45
![]()
![]()
26
![]()
00:02:11
![]()
21.05.2021
😡¿Cuánta rabia nos dan estos errores al renderizar?
Espero que esta sea vuestra solución💪
👇Deja en los comentarios tu experiencia para futuras actualizaciones👇
📲Mas información en nuestras redes sociales
Contacto: aforofilms🤍gmail.com
Síguenos:
Instagram 🤍
Facebook 🤍
📽️¿Qué equipo utilizo?
Sony A7 iii
Estabilizador Ronin S
Lente Tamron 28-75 f 2.8
Micro Rode Go
Micro Lavalier APGTEK
Adaptador lentes E-Mount 👉 EF canon
Jaula SmallRig
#ERRORDAVINCI #RENDERCLIP #EXPORTARDAVINCI
DaVinci Resolve 16 GPU Rendering Error 100% Official Fix
![]()
2710
![]()
10
![]()
![]()
6
![]()
00:26:16
![]()
18.09.2020
#VideoEditor #DaVinciResolve16 #OfficialFix
Please show some love here as I look and dig and found the one thing that we all overlooked and miss as a pretentious problem that many of us face with DR16. Thank you to my supporters and much love everyone but it’s time to end this chapter in my books. «The Problem Solver»
David Birch — E-Mount Sucks
MichaelTheMaven
Antonio Brown
Peter Kondziolka
Robin Ivarsson
Yuuki
Juri Choi
MorrisRamen
New Wireless LAV system here — SYNCO WMic-T1 — 🤍
⚡ SUBSCRIBE FOR MORE ⚡
💡💡SUPPORT THE CHANNEL 💡💡
🚀 💰DONATION by PAYPAL LINK HERE💰 🚀
🤍
Venmo 🤍 ThePandaPhotographerr
cash.app/$ThePandaPhotographer
Sigma 18-35 Art Lens for Canon, Nikon, Sony, and Pentax — 🤍
New GoPro HERO 9 Black — 🤍
GoPro Hero 8 BLACK — 🤍
GoPro 7 Black Bundle Kit — 🤍
GoPro Pro 3.5mm Mic Adapter — 🤍
GoPro Vlogging Protective Case for GoPro and Audio — 🤍
FEELWORLD FM8 Universal Compact Shotgun Video Microphone — 🤍
Chronos ND filters 4 pack — 🤍
Chronos ND Filters — 🤍
Chronos ND Filters — 🤍
CHECK UPDATED PRICES HERE
Sony Noise Cancelling Headphones WHXB900N — 🤍
Sony WH-H900N h.Ear on 2 Wireless Over-Ear — 🤍
Click now to buy
FEELWORLD FW568 5.5 — 🤍
CAMVATE Side Handgrip (Leather-Covered) L Type — 🤍
CAMVATE Super Clamp Articulated Mini Ball Head — 🤍
LimoStudio Camera L-Bracket — 🤍
VILTROX 8W/720LM 2500K~8500K Bi-Color — 🤍
BOYA BY-MM1 Shotgun Video Microphone — 🤍
Zhiyun Crane V2 Gimbal — 🤍
Zhiyun Crane 3 Gimbal — 🤍
Zecti 15.7″ Portable Carbon Fiber Camera Slider — 🤍
BUY NOW —
🤍
🤍
IrixLens 11mm F/4 — 🤍
IrixLens 15mm f/2.4 — 🤍
IrixLens 150mm F/2.8 Maro — 🤍
Camera backpack
Tenba Axis 32L —
Link 1: 🤍
Link 2: 🤍
Canon Gear —
Canon 80D: 🤍
Canon Portrait and Travel Two Lens Kit — 🤍
Canon Battery Grip — 🤍
LP-E6 LP E6N Rechargeable Battery Charger Set — 🤍
Canon EF 85mm f/1.8 — 🤍
━━━━━━━━━━━━━━━━━━━━━━━━━━━━━━━
🎧 — All music is non-copyrighted
👉 To optimize your Youtube channel with TubeBuddy.
🤍
👉 Shutterstock Ref Link:
🤍
👉 Pateron Link:
🤍
━━━━━━━━━━━━━━━━━━━━━━━━━━━━━━━
🤓 LET’S CONNECT! 🤘🏼
✅Official Website — 🤍
✅🤍
✅Twitter — 🤍
✅🤍
✅🤍
━━━━━━━━━━━━━━━━━━━━━━━━━━━━━━━
📣 Full Disclosure & Ethics Statement:
⚙️I am an Amazon affiliate
❤️❤️Sometimes I share the links to the products/services I’d review,
My opinions and reviews are ALWAYS honest. There will never be enough money to convince me to sell you garbage! But, if I really like a product, I have no problem helping to promote a company that has improved. I always appreciate your help and support! ❤️❤️
Come risolvere i problemi di render di DaVinci Resolve
![]()
10210
![]()
235
![]()
![]()
151
![]()
00:04:17
![]()
30.12.2019
Qualche volta capita che DaVinci Resolve si rifiuti di renderizzare la tua timeline. In questo episodio di minutaggio ti spiegheró un trucco che uso quando si verifica questo problema di render.
Se vuoi velocizzare DaVinci, guarda quest’altro video: 🤍
Minutaggio è la serie assolutamente gratuita sul videomaking e montaggio.
Animazione sigla fatta da:
🤍
Brano sigla di:
🤍
#minutaggio
how to fix «95% of all RENDERING ERROR» in DaVinci Resolve.
![]()
968
![]()
10
![]()
![]()
0
![]()
00:04:12
![]()
30.11.2021
In this video, I will share a small solution that will help to fix about 95% of all the rendering issue you face on DaVinci Resolve like video clips cannot be processed, fusion clips cannot be processed….
Subscribe for more.
Timestamp:
0:00 intro
0:22 limitation
0:52 prerequisite
2:02 solution
2:51 tips
3:52 outro
#techcycle #davinciresolve #davinciresolve17 #davinci17 #resolve17 #davinci #resolve #video #guide #tutorial #howto #performance #windows #windows11 #videoediting #editing #editingtips #tips #blackmagicdesign #blackmagic
Support us by using our affiliate link:
Amazon:
🤍 (International)
🤍 (India)
Social Media
Twitter: 🤍
Instagram: 🤍
How to fix FRAME DROPPED rendering issue in Davinci Resolve
![]()
22875
![]()
284
![]()
![]()
111
![]()
00:01:54
![]()
09.09.2019
In this video we are going to look at one of the solutions that worked for me to fix the TIME OUT WAITING FOR FRAME, FRAME DROPPED rendering issue in Davinci Resolve.
if the above fix is not working, try this
how to fix «95% of all RENDERING ERROR» in DaVinci Resolve.
🤍
How to fix VIDEO/FUSION clip cannot be processed error DaVinci Resolve
🤍
How to fix FUSION CLIP CANNOT BE PROCESSED error in Davinci Resolve
🤍
Subscribe for more.
#techcycle #resolve #davinciresolve #resolvetip #davinci #blackmagicdesign #blackmagic #videoediting #video #editor #editing #performance #render #videorender #rendererror #error #tips #editingtips
Support us by using our affiliate link:
Amazon:
🤍 (India)
🤍 (International)
Flipkart: 🤍
Contact us through WhatsApp: 🤍
Contact us through Telegram:
Telegram Channel: 🤍
Telegram Group: 🤍
Follow Us On
Twitter: 🤍
Instagram: 🤍
Facebook: 🤍
Music
Come Home — Declan DP
🤍
How To Fix Render Glitches On Davinci Resolve (2021)
![]()
8767
![]()
408
![]()
![]()
184
![]()
00:01:08
![]()
12.02.2021
Vlog Channel
🤍
My Discord Channel 🤍
My Twitch 🤍
My Twitter 🤍
My TikTok 🤍
Camera- IPod Touch (Garage Sale)
Editing Software- Davinci Resolve (Free)
Thumbnail Software- Pixlr (Free)
Microphone- Blue Yeti (Christmas)
(Clean, family-friendly content)
How To Fix “Render Job Error” | DaVinci Resolve 16
![]()
689
![]()
24
![]()
![]()
6
![]()
00:02:50
![]()
26.04.2020
In this quick video we show you how to fix DaVinci Resolve render error. When the message “Render job failed as current clip could not be processed” is shown this is how you correct it.
⚡️Try FILMORA 4 Free 👉👉 🤍
⚡️Filmora Video Editor Best For Beginners👇
🤍
Best Gear at budget
M50 Camera : 🤍
Boya BYM1 Mic : 🤍
🤔 ABOUT THIS VIDEO 👇
Davinci resolve is free video editing software that you can use to edit your videos. After you have edited your video with all the images and graphics and music, you may want to download it into your PC or desktop.
But sometimes you may get a render job fail error message.
How do you Fix a Davinci Resolve Render job error?
Well in this DaVinci Resolve short video tutorial we show you exactly how to go about correcting the render error message.
It is quite simple. Using the preference tab in Davinci Resolve 16 any one can easily render or export their video to their laptop.
📚 RECOMMENDED RESOURCES 👇
Get-Response Email Automation Free Trial: 🤍
Webhosting with Bluehost: 🤍
👇 FOR GREATE CONTENT, SUBSCRIBE TO OUR YOUTUBE CHANNEL 👇
🤍
★☆★ CLICK BELOW TO CONNECT TODAY AND GET MORE GREATE CONTENT ★☆★
PowaMax-Life Blog: 🤍
Facebook: 🤍
Pinterest: 🤍
Twitter: 🤍
#PowaMax-Life.com #davinciResolve16 #DavinciResolve #DavinciResolveTutorial #RenderingVideos #RenderingErrorResolved
To Your Success,
PowaMax-Life.com
SOLUCIÓN ERROR DE RENDERIZACIÓN DaVinci Resolve
![]()
144
![]()
15
![]()
![]()
6
![]()
00:01:58
![]()
14.01.2023
00:40 Esto solucionara tus problema al momento de hacer render
#davinciresolve18 #davinciresolve #davinciresolveerrorsolución
.
.
.
La rolita de fondo la tome de; Sessions: Diana | Colección segura para creadores | Riot Games Music
🤍
«Render Job Failed» Error QUICK FIX | Davinci Resolve Tutorial
![]()
2635
![]()
45
![]()
![]()
12
![]()
00:02:54
![]()
01.07.2020
DAVINCI RESOLVE TUTORIAL
Let me know if I went too fast. Here’s what I do to get rid of that pesky Render Job Failed pop up error, a few simple fixes.
Subscribe to my channel — 🤍
Follow me on Instagram — 🤍
Fresh LUTS — 🤍
Screen Record Software —
Monosnap
Video Editing Software:
Davinci Resolve 16
DaVinci Resolve Not Exporting Your Whole Video?
![]()
14948
![]()
547
![]()
![]()
213
![]()
00:00:45
![]()
30.10.2021
If you are only getting a *piece* of your video exported, this is the one for you! This video is in response to one of the most common questions I get on the channel, enjoy!
-If you enjoy the content, please consider doing one of these! 🤍
DaVinci Resolve 17 Glitch Export Render FIXED !!!!!!
![]()
26567
![]()
383
![]()
![]()
107
![]()
00:03:29
![]()
22.01.2021
DaVinci Resolve is one of my favorite video editing programs. But it has a couple different flaws I still like to make my Motion Graphics in After Effects and Export them as a mov file DaVinci Resolve has a problem when encoding fast-moving Graphics that causes some glitches when rendering out as H. 264. One of the only ways I’ve found personally to get around this is to render a h. 265 or a DNX flavor Style of encoding in my render settings when I do this the glitches go away. The only problem is the video file becomes extremely large which I don’t mind because I upload to Youtube and I let YouTube do the compressing.
🤍PortlandEventFilms.com
🤍Facebook.com/PortlandEventFilms
🤍instagram.com/portlandeventfilms/
Gear:
Sony A7Sii 🤍
Sony A6300 🤍
Rode VideoMic Pro 🤍
Sennheiser ew G3 🤍
Edelkrone Slider Small 🤍
Zoom H1 🤍
Tascam DR-40 🤍
Matchstick Lapel 🤍
Manfrotto Pixi Tripode 🤍
Manfrotto 502HD Tripode 🤍
Manfrotto 535 Carbon Fiber Video Tripode 🤍
Aputure AL-528w LED Light 🤍
Sony 16-35mm F4 🤍
Sony 55mm F1.8 🤍
How to get rid of rendering problem in Davinci resolve.(2020)
![]()
7647
![]()
128
![]()
![]()
17
![]()
00:05:49
![]()
03.10.2020
How to get rid of rendering problem in Davinci resolve.(2020)
How to get rid of rendering problem in Davinci resolve.(2020)
here I’m gonna show you how to get rid of the rendering problem in Davinci resolve…
first of all, let’s see the cases that most people stuck in
..number one is that after 1 or 2 minutes later it’s not rendering
number two your render job is not starting ..
number three you can’t add your job to the render queue
number four is that your pc stop working while rendering .. the list goes on and on…
so these are the cases most people complaining about..
..so today I’m gonna give you 16 tips to get rid of the rendering problem in Davinci resolve so without farther a do let’s get into the video ..
00:09 Restart Davinci Resolve
00:20 Delete your Rendered cache
00:44 Turn on Smart option
00:54 Quick Export
01:17 In & Out method
01:50 Video Depth
02:02 Correct Resolution
02:53 Save project
03:06 Compound clip
03:25 Not to use much application
03:32 Render speed
03:57 Do nothing while rendering
04:24 Clear temp and Prefetch
04:44 Disable internet connection
05:24 Restart your pc
#davinci
#resolve
#resolve16
#rendering_solution
#x_studio
#2020
#how_to _solve_rendering_problem?
How to fix VIDEO/FUSION clip cannot be processed error DaVinci Resolve
![]()
20675
![]()
571
![]()
![]()
201
![]()
00:02:25
![]()
25.06.2020
In this video, we will look into a way to fix, video clip cannot be processed, fusion clip cannot be processed rendering error in DaVinci Resolve. This fix can be used to solve all the rendering issues in DaVinci resolve. We are using the render cache option to fix the rendering error in DaVinci Resolve.
This video might also help to fix rendering issue
How to fix FRAME DROPPED rendering issue in Davinci Resolve
🤍
How to fix FUSION CLIP CANNOT BE PROCESSED error in Davinci Resolve
🤍
Subscribe for more.
#techcycle #davinciresolve #resolve16 #resolve #blackmagicdesign #davinciresolve16 #video #editing #videoediting #rendering #videorendering #guide #tutorial #fix #solution #youtube #youtuber #howto #tips
Support us by using our affiliate link:
Amazon:
🤍 (International)
🤍 (India)
Flipkart: 🤍
Contact us through WhatsApp: 🤍
Contact us through Telegram:
Telegram Channel: 🤍
Telegram Group: 🤍
Follow Us On
Twitter: 🤍
Instagram: 🤍
Facebook: 🤍
Music
Come Home — Declan DP
🤍
How To Fix DaVinci Resolve Render Job Failed as the Current Clip Could Not Be Processed Error
![]()
6602
![]()
188
![]()
![]()
49
![]()
00:00:41
![]()
26.03.2021
In This Video We Will See How To Fix DaVinci Resolve Render Job Failed as the Current Clip Could Not Be Processed Error
Here Are The Steps To Fix DaVinci Resolve Render Job Failed as the Current Clip Could Not Be Processed Error
1. Click OK Button
2. Remove Job From Render Queue
3. Click DaVinci Resolve
4. Click Preferences
5. Click User
6. Click UI Settings
7. Untick Stop renders when a frame or clip cannot be processed
8. Click Save Button
9. Again Add to Render Queue
10. Click Start Render
11. Done!
Contact Us
Facebook: 🤍
Twitter: 🤍
Wikipedia: 🤍
YouTube: 🤍
Don’t Forget To Like Share And Subscribe
SOLUCIÓN 🤗 RENDER JOB FAILED 🤯 Davinci Resolve 🖥
![]()
9904
![]()
263
![]()
![]()
81
![]()
00:05:25
![]()
26.05.2020
Solución al problema de render en davinci resolve:
«Render job 1 failed as the current clip could not be processed. The Fusion composition on the current frame or clip could not be processed successfully.»
Como exportar sin errores en Davinci Resolve
Como exportar cualquier archivo en Danvici Resolve
Solución definitiva para exportar en Davinci Resolve
Síguenos en nuestras redes sociales:
°FACEBOOK:
🤍
°INSTAGRAM:
🤍
°INSTAGRAM:
🤍
🤍
MÚSICA DE:
🤍
DaVinci Resolve 16 FIX ISSUES! — Slow Rendering Times and Render Job Failed
![]()
910
![]()
15
![]()
![]()
0
![]()
00:02:13
![]()
25.02.2021
In this video I’m going to show you how I have solved two of the most common issues many people are having with DaVinci Resolve. The first one is slow rendering times and the second one is when you start the rendering, but at some point it fails giving you a pop up message saying that rendering failed because of a certain video (render job failed as the current clip could not be processed).
If you are experiencing these two issues, watch this video till the end to check the solutions that worked in my case!
Let me know your thoughts on this in the comments below! Thanks for watching!
#DaVinciResolve #Resolve #FixVideo #FixFailedVideo #FixSlowSpeed
PC Configuration:
CPU: AMD Ryzen 5900X
GPU: NVIDIA GTX 1080Ti 11 GB RAM
RAM: 32 GB DDR4 3200 Mhz Corsair Vengeance RGB Pro
Storage: 1TB ADATA m.2 NVME SSD
Buy DaVinci Resolve from Amazon: 🤍
My Gear! (Affiliate Links)
Camera: 🤍
Lens: 🤍
Other lens: 🤍
ITX Case: 🤍
Video Card: 🤍
CPU: 🤍
m2 SSD: 🤍
SATA3 SSD1: 🤍
SATA3 SSD2: 🤍
PSU: 🤍
RAM: 🤍
Godox Light: 🤍
Portable LED: 🤍
Mic: 🤍
Cockpit: 🤍
Wheel: 🤍
Pedals: 🤍
Mouse: 🤍
Keyboard: 🤍
Headphones: 🤍
Subscribe to TechieSetup for weekly PC, gaming and tech videos!
FOLLOW ME:
Facebook: 🤍
Instagram: 🤍
Twitter: 🤍
Music:
🤍
Disclosure: Amazon links provided are linked to my Amazon Affiliate account & support the channel at no extra cost to you.
Davinci Resolve 17.4 — How To Fix Audio Artifacting/Issue After Rendering (2022)
![]()
956
![]()
34
![]()
![]()
12
![]()
00:02:26
![]()
19.11.2021
Hey, This is my second channel. My first is a Gaming channel generally around Diablo 2 which is exciting even though it is a 20 year old game. It has several new mods and was just announced that they are making Diablo 2 Ressurrected, which is an official Diablo 2 remake. Check it out and give me a Sub over there too.
🤍
Cara Memperbaiki Render dan Playback Bermasalah | Tutorial DaVinci Resolve
![]()
8309
![]()
229
![]()
![]()
79
![]()
00:04:11
![]()
16.06.2020
Render crash atau playback berhenti sendiri? coba cara ini
Download Footage dan Audio buat latihan di sini:
🤍 (login gmail)
Link download DaVinci Resolve 16 GRATIS:
🤍
Alternatif Link download DaVinci Resolve 16 GRATIS:
🤍
(cari file download di kotak Latest Downloads)
BELAJAR BASIC DAVINCI RESOLVE 16:
🤍
Setting keyboard kalian biar sama kayak keyboard gua:
🤍
Kepoin instagram:
🤍
Bisnis yok:
info🤍sineasore.com
#davinciresolveindonesia #rendercrash #playbackcrash
Mac Studio M1 MAX vs Windows — DaVinci Resolve 17 Performance and Rendering Error Fix
![]()
2288
![]()
54
![]()
![]()
17
![]()
00:08:14
![]()
18.06.2022
In this video, I compared the DaVinci Resolve 17 Free Version playback and render performance between my old windows PC and the new Mac Studio M1 Max basic model.
I also showed a way of fixing a render job failed error.
👉FREE 20+ Essential Templates in Package 2022: 🤍
👉Animated Ribbon Text Banner: 🤍
☕Like my video? Buy me a coffee: 🤍
Chapters
00:00 Mac Studio Intro
00:28 Testing Windows Environment
03:46 Testing Mac Studio M1 Max
05:25 Render Job Failed Error
07:00 Performance Summary
Thanks for watching!
Essential Video Editing
How to fix FUSION CLIP CANNOT BE PROCESSED error in Davinci Resolve
![]()
3974
![]()
49
![]()
![]()
20
![]()
00:01:39
![]()
20.08.2020
In this video, we will look into one of the ways by which you can fix the Fusion clip cannot be processed rendering error in Davinci resolve.
If the above guide is not working, you can follow these guides which might help you to fix the issue
How to fix VIDEO/FUSION clip cannot be processed error DaVinci Resolve
🤍
How to fix FRAME DROPPED rendering issue in Davinci Resolve
🤍
#techcycle #davinciresolve #resolve #davinci #davinci16 #resolve16 #blackmagicdesign #blackmagic #tutorial #editing #video #videoediting #guide #howto #windows #fusion #fusion16 #compositing
Support us by using our affiliate link:
Amazon:
🤍 (International)
🤍 (India)
Flipkart: 🤍
Contact us through WhatsApp: 🤍
Contact us through Telegram:
Telegram Channel: 🤍
Telegram Group: 🤍
Follow Us On
Twitter: 🤍
Instagram: 🤍
Music
Come Home — Declan DP
🤍
Colors Washed Out After Rendering — Davinci Resolve Issue FIXED
![]()
10014
![]()
385
![]()
![]()
57
![]()
00:05:13
![]()
04.04.2022
In this video, shot on my Canon R6, I tell you how I solve the Color Issue in Davinci Resolve when we export our video.
Get one month of free music to use in your videos by clicking this link:
🤍
Check out the prices of the gear I use:
My NEW Camera 🤍
My Awesome Camera: 🤍
My new favorite lens 🤍
Good Budget Lens for these cameras: 🤍
The great RF 35mm 1.8 🤍
Secondary Camera: 🤍
Entry level Camera: 🤍
The best ND filters money can buy 🤍
The best budget Variable ND filters 🤍
and 🤍 (they are great and affordable)
Very affordable alternative 🤍 (not the best but they do the job)
SD Cards 🤍
Camera bag 1 🤍
Gimbal: 1 🤍
Canon 24mm the pancake lens. 1 🤍
Canon 50mm 1.8 🤍
Yongnuo 50mm 1.8 🤍
Canon 10-18mm 🤍
Canon 55-250mm 🤍
smc PENTAX-M 1:1.7 50mm: 🤍
smc PENTAX 135mm F/3.5 🤍
Adapter: 🤍
🤍
Speed booster: 🤍
Lenses I am planning on buying this year (if I’ll have the money!)
🤍 or 🤍
🤍 or 🤍
🤍
🤍
My Microphones
Tonor TC-2030 🤍
Microphone Rode Videomicro, 🤍
Synco G1 🤍
Lavalier Boya By-M1 🤍
Tripods:
Manfrotto Pixie 🤍
AmazonBasics 🤍
Joby Gorillapod 3k 🤍
Andoer Tripod Ball Head 🤍
Joby Gorillapod 5K 🤍
Lights
Main light 🤍
Main Soft Box 🤍
Soft Boxes 🤍
Awesome Led 🤍
Viltrox Store 🤍
Other Leds: 🤍 🤍
without battery 🤍
with 2 batteries 🤍
🚨ERROR en TAREA DE RENDERIZACIÓN 1 DaVinci Resolve | SOLUCIÓN ✅
![]()
512
![]()
25
![]()
![]()
10
![]()
00:01:06
![]()
15.09.2022
Primero revisa que entre los clips no hay espacios vacíos ese es el error más común. Una vez revisado si el error vuelve a salir utiliza esta solución.
Como solucionar el error en tarea de renderización 1 debido a que no es posible procesar el clip actual.
DaVinci Resolve es el software de edición que utilizamos y es de los más completos del mercado, incluso en su versión gratuita puedes realizar buenos trabajos de edición. 👉🤍
¡Gracias por ver el video!
⭐ Es un placer leer comentarios y responderlos, no olvides dejar el tuyo.
🌎 — 🤍
🐦 — 🤍
📸 — 🤍
💬 — 🤍
🟣 — 🤍
📌 — info🤍liberbiz.com
Créditos:
🎬 — Elky Peña [Producción y Edición para liberbiz.com]
📱 — 🤍
Davinci Resolve Cache/gallery error windows fix
![]()
9701
![]()
167
![]()
![]()
39
![]()
00:04:19
![]()
04.11.2019
In this video I show you how I solved my error problem with Davinci resolve write errors. While this may not work for some it did stop the errors for me.
Check out Crafted Shutter for How To videos on Da Vinci Resolve: 🤍
Что ищут прямо сейчас на
Fix: Export Failed — Rendering Error in DaVinci Resolve
The other day I had issues exporting a video in DaVinci Resolve. It would reach at 99%, and then give me this error:
«Rendering Error
The Fusion composition on the current frame or clip could not be processed successfully.»
Here’s how I got around it:
- From DaVinci Resolve menu, click on Preferences.
- Navigate to the User tab.
- From the list on the left, make sure you are in UI Settings.
- Disable Stop renders when a frame or clip cannot be processed.
- Click Save.
Disclaimer: The content provided in this article is for informational purposes only. You are solely responsible for verifying the information as being appropriate for your personal use.
Popular posts from this blog
It is still uncertain when will NVIDIA release any Web Drivers for macOS Mojave, but we can try a workaround.
After installing 3rd-party kexts in /Library/Extensions, or replacing vanilla kexts with patched kexts in System/Library/Extensions, you may want to repair their permissions and rebuild the kext cache to ensure they work as intented. Here’s how.
These days I’m all about discovering ways for people to use Notion without the use of databases, as databases slow things down. I’m also an advocate for minimalism while still having an efficient workflow. Today I’m giving a tip with an example of daily journal entries. Usually, a Notion template comes with a database for journal pages, with a «Date created» property which is mighty convenient. But you can also replicate that without a database. This will make it super fast for you to start journaling on a new page with the current date and time already added to the title. Create a simple text page where all your journal entries will be stored (no databases/tables). Optional: You may create a subpage to serve as an Archive for past entries. Again this should be a simple text page, not a database. You may also have multiple archives, named after the 12 months or years to keep things more organized. Type / , then template , then select the Template button . Give
Go to davinciresolve
«render job failed as the current clip could not be processed» error driving me mad !
For the first time, I work on an entire music video project through Resolve. I really liked the workflow with Fusion inside Resolve, but I’m having so many problems rendering that I’m wondering if I’m not going to redo my entire edit in After/Premiere.
Every time I try to render my final video, I always get an error like :
«Render job 1 failed as the current clip could not be processed.
The fusion composition on the current frame or clip could not be processed successfully».
It’s really starting to drive me crazy, I’ve tried everything», cached/uncached, auto, on, letting my entire timeline pre-load, etc.. I ALWAYS have this problem.
if any of you have an idea, because I’m on the verge of redoing everything in Adobe, which would really annoy me, considering the work already done on this video !
For eventual future reference, pb solved by :
The problem seems solved since I unchecked the optin «stop renders when a frame or clip cannot be processed» in the advanced options of the deliver tab AND setting the render speed at 75.
Archived post. New comments cannot be posted and votes cannot be cast.
There are many reasons you might receive the “Render Job failed” error when rendering your videos in Davinci Resolve.
However, some of them are more common than others, therefore I’ve gathered the most common ones in this article.
I’ve seen there are two types of errors that occur for most people. The first one is related to rendering fusion composition & the second is a video file that could not be decoded correctly.
However, the solutions shared in this article will work on both error types.
Anyways, let’s solve this problem of yours!
1. Export Rendered Cache Files
This one is actually quite genius, and solved the problem immediately when I was facing this problem.
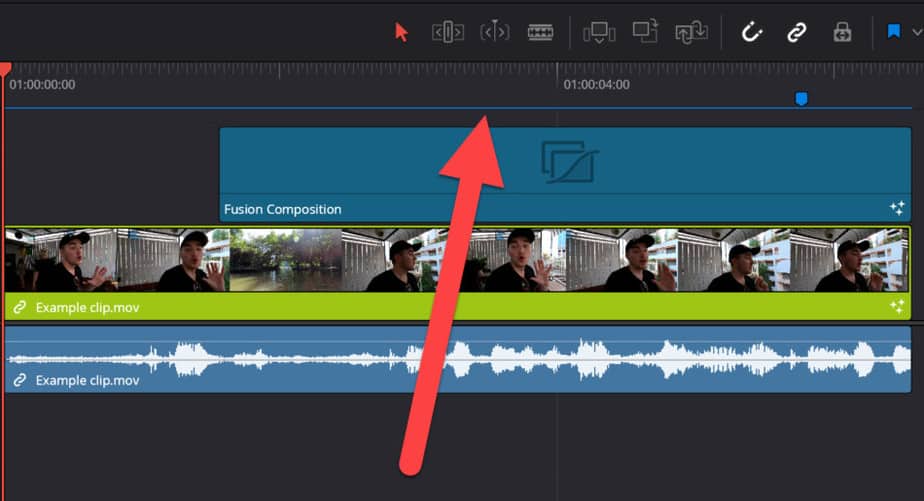
So let’s get to it! Here’s a picture of the two most normal errors to experience:
Here you can see my timeline, just a normal clip and a fusion composition which are causing this error:
The first thing you want to do is open “Playback > Render Cache > Smart“:
Once that is done you will see a red line, which is slowly turning blue above your clips in the timeline. Let it finish rendering before moving on. At least it should render the clip which is causing you problems (if you know which it is).
Once it’s done it will be totally blue like this:
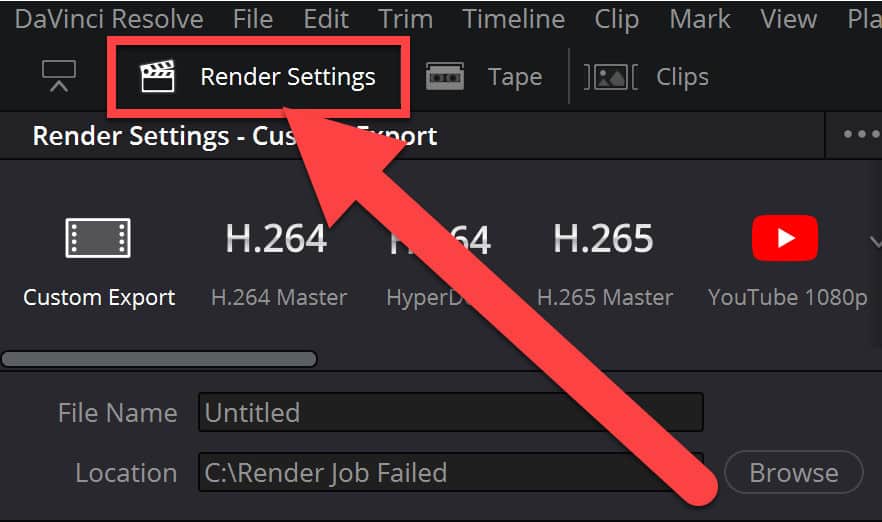
Now, go to the “Deliver” page:
![]()
Go to the “Render Settings” window:
Now we are getting into more uncommon territory for a lot of people.
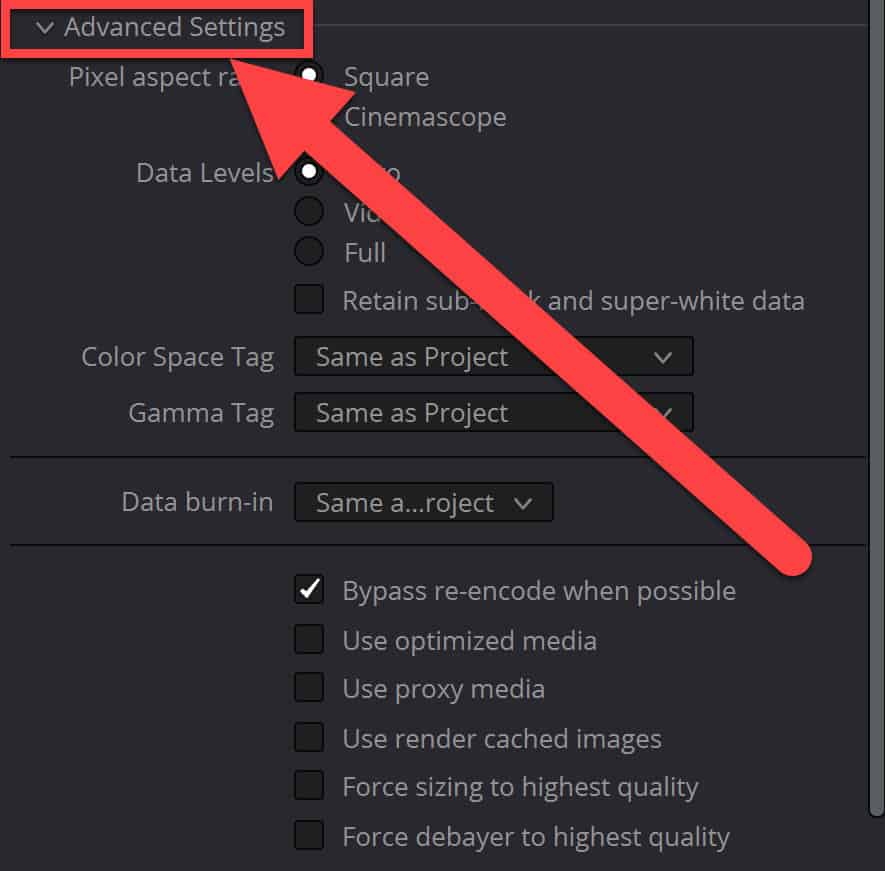
Go ahead and open the “Advanced Settings“:
AND finally, we have found the golden nugget!
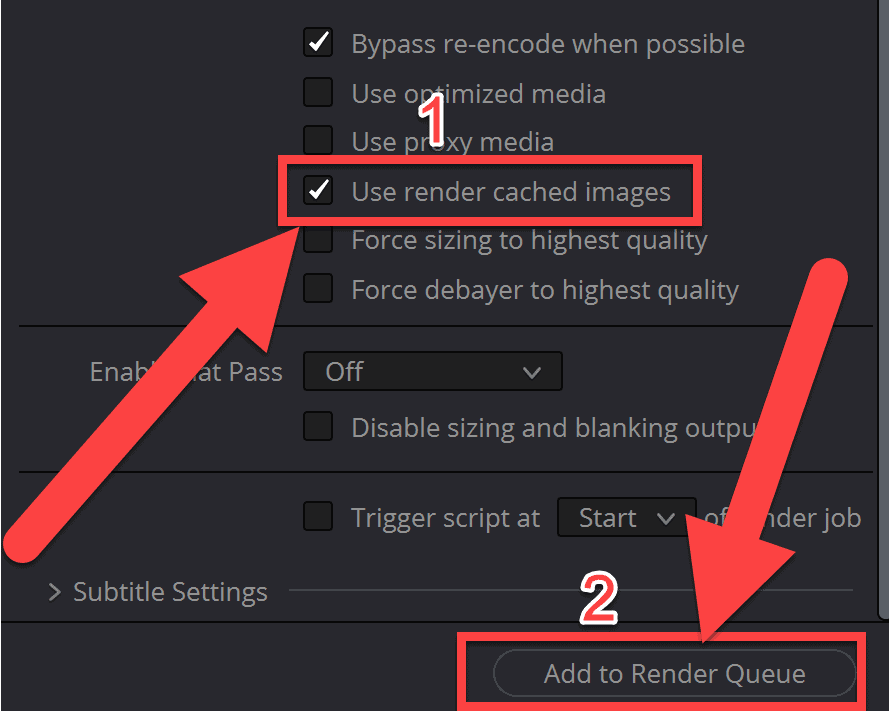
Now you want to tick off the box next to “Use render cached images“. What this does, is use the cached files we created when that red line turned blue. So it basically renders how the timeline memory created of your timeline and in that memory, all the files worked, thus they work in the rendered file as well!
So tick off the box next to “Use render cached images” and hit “Add to Render Queue“:
Now head over to the “Render Queue” and start the render job! Hopefully, once it’s done, it looks like the picture below:
2. Copy the Timeline and Create a New Project
This one is very easy, which is the reason I’m placing it as number two on the list!
If it doesn’t work, no big deal just proceed to the next method.
So we are not going to copy the timeline as it sounds. Instead, we are going to copy all the clips in the timeline.
You can do this by simply pressing “CTRL+A” or “Cmd+A”(on a Mac), then press “CTRL+C” or “Cmd+C”(on a Mac) to copy.
If you are not the shortcut kind of person, you can select all your clips by dragging over them and then right-click a clip > Copy.
Next, save your current project.
Then, click on this house icon in the bottom right-hand corner:
In this window go ahead and click on “New Project“, then call it whatever you want and click on “Create“:
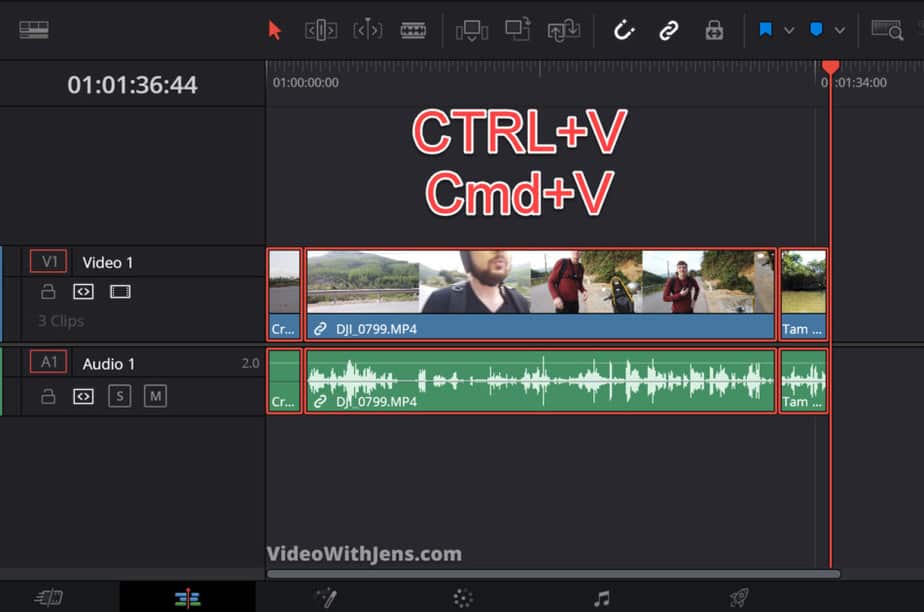
Inside your new project, click once on the timeline and then press “CTRL+V” or “Cmd+V” (on a Mac).
For those who don’t like shortcuts: Right-click on the timeline and click on “Paste“.
Once you’ve done this, go ahead and try to render!
If it didn’t work. We have other methods which has worked for a bunch of people:
3. Convert Your Videos to DNxHR
- Select the clips in your timeline.
- Right-click and click on “Render in Place…“
- Set “Format” to “QuickTime“.
- Set “Codec” to “DNxHR” and “Type” to “DNxHR HQ“.
- Click on “Render“.
This solution seems to have worked for some people as well.
If you’re having the fusion composition error, this solution most likely will not work. (All the others work for both errors).
However, let’s go into a bit more in detail on how to do it and some consequences of doing this.
The consequence of converting to the DNxHR codec is that the file size is HUGE. If you are used to handling such as .MP4 and .MOV.
Why is this?
We’ll not go too much into detail on this, however, DNxHR is utilizing something called intraframe compression. These are ALOT less compressed than a .MP4 which is normally paired with an H.264 codec which usually compresses the video a lot.
So by converting your video to DNxHR, it will be a lot less compressed, then it’s a lot easier on your computer when playing it back as well and gives you a better experience while editing.
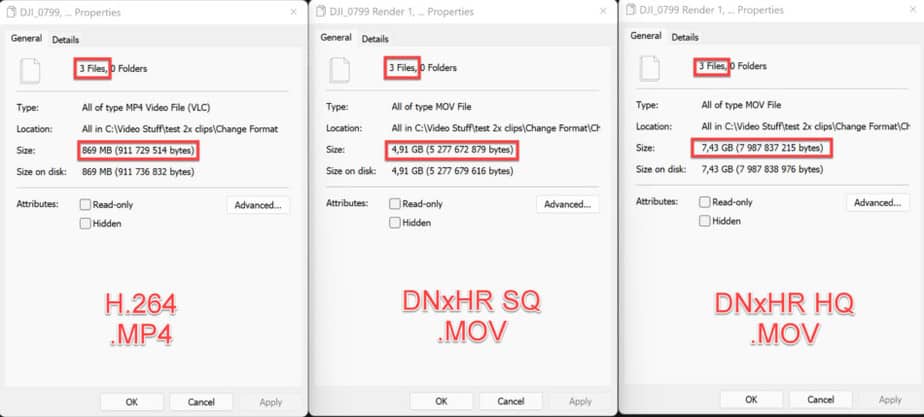
Here’s how much larger your files will get:
You can see it’s quite a lot, but if you have enough disk space, you can just delete it afterward, as you will still have your original footage.
It’s worth a shot! However, you could try the other solutions first.
Here’s a more detailed description of how to do it:
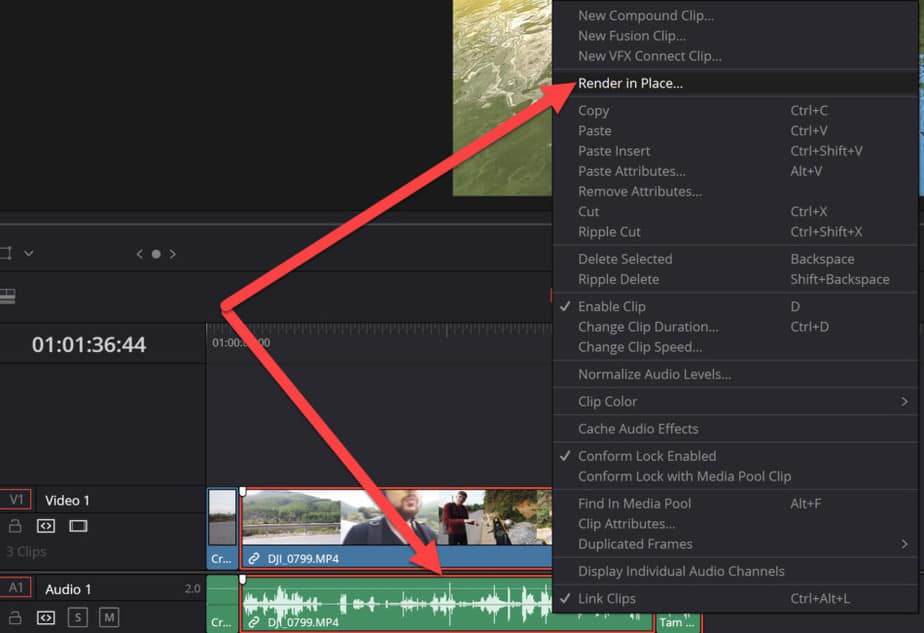
First, select the clips in your timeline, or if you know which clip is causing the error select that one.
Then click on “Render in Place…“
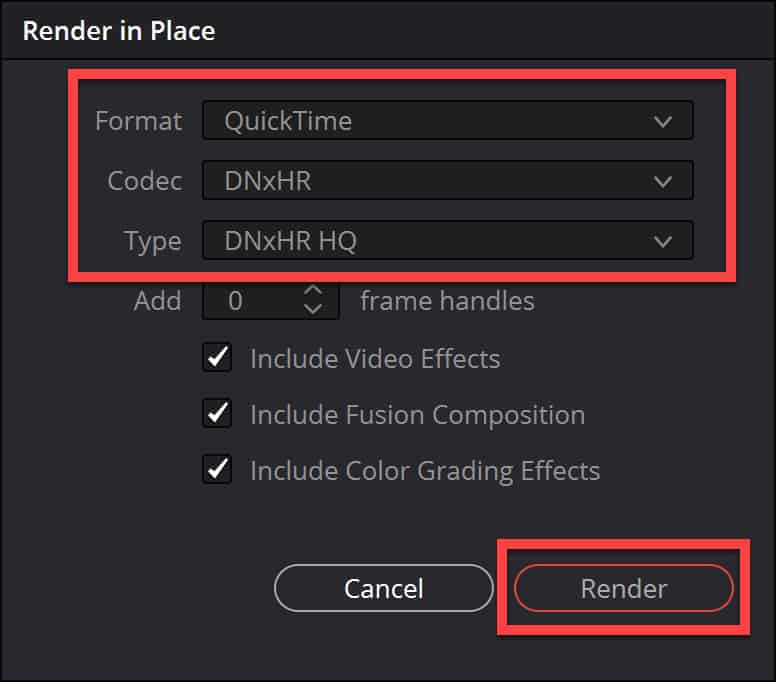
Next, you want to change the following:
- Format – QuickTime
- Codec – DNxHR
- Type – DNxHR HQ
If you want a bit smaller file size you could try changing to DNxHR ‘SQ’ instead of ‘HQ’. As the only difference is that HQ is of higher quality. That said people who have solved this error used ‘HQ’…
Choose one of them, and then click on “Render“:
The rendering takes a little bit of time.
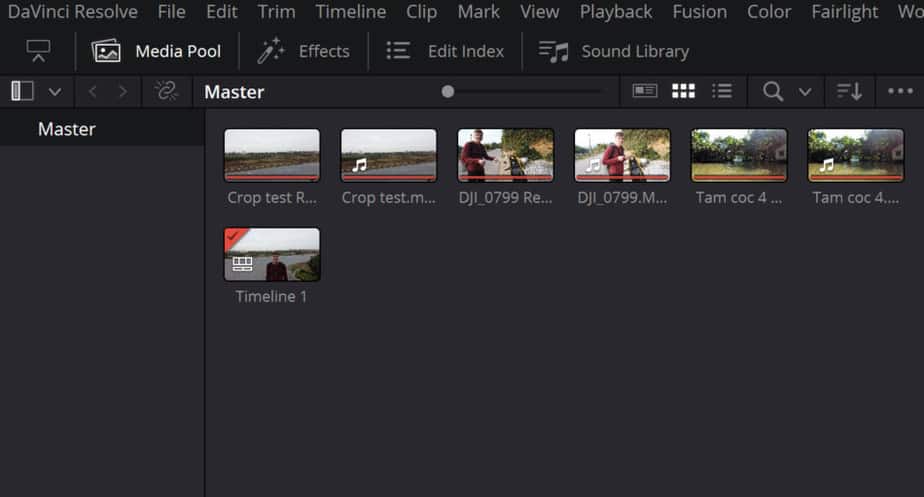
Once it’s done you can see that you have now both your old format and new format in your “Media Pool“:
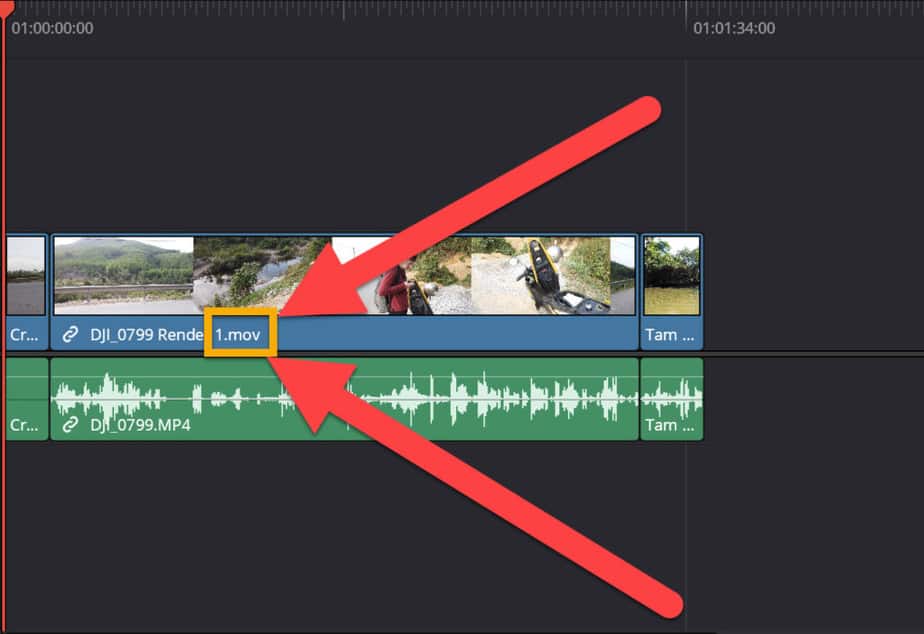
And you don’t have to add the new files to the timeline, as they will have swapped places as part of the render process! You can see in the picture below that it has changed from .mp4 to .mov.
.mov is representing the QuickTime format:
Next, go ahead and render your project! Fingers crossed…
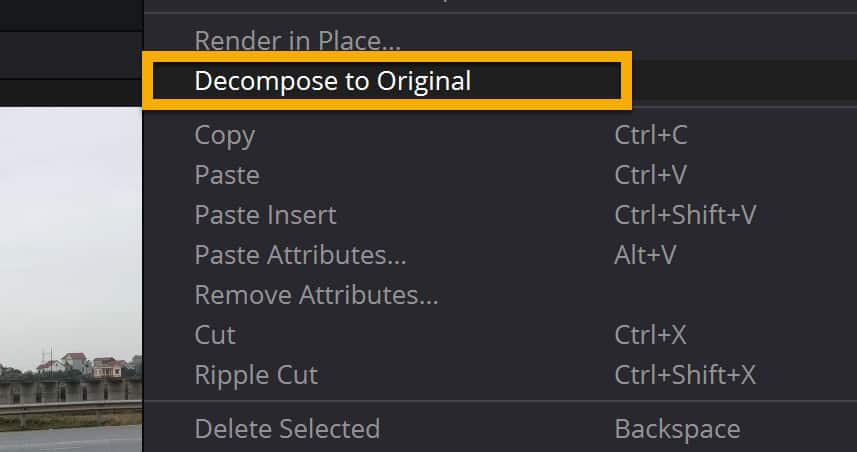
If you want to swap the clips in the timeline back to the original files, “select the clips > right-click > Decompose to Original”: (You will still have them on your computer and in the media pool.)
4. Change Workspace Options
This is the option almost everyone suggests. And my least favorite solution to the problem, which is why it’s the last on the list…
This solution does work, and most of these errors will get solved by using it. The problem with doing this you will render out your project even if there is an error, and then it will be included in your final product.
However, after experimenting a little bit with this solution, I’ve found that sometimes the error is just in the render faze, and I could not see any negative impact on the exported file.
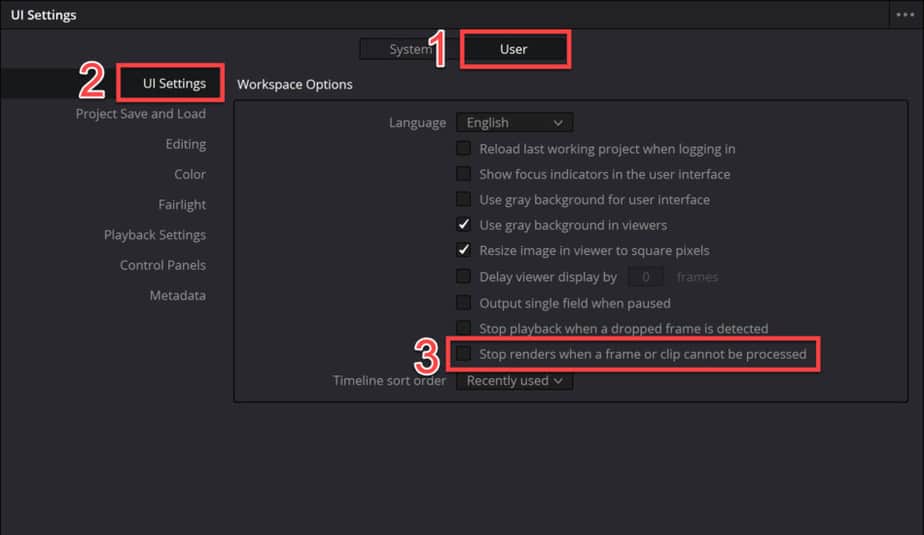
So without further ado, here’s solution number 4:
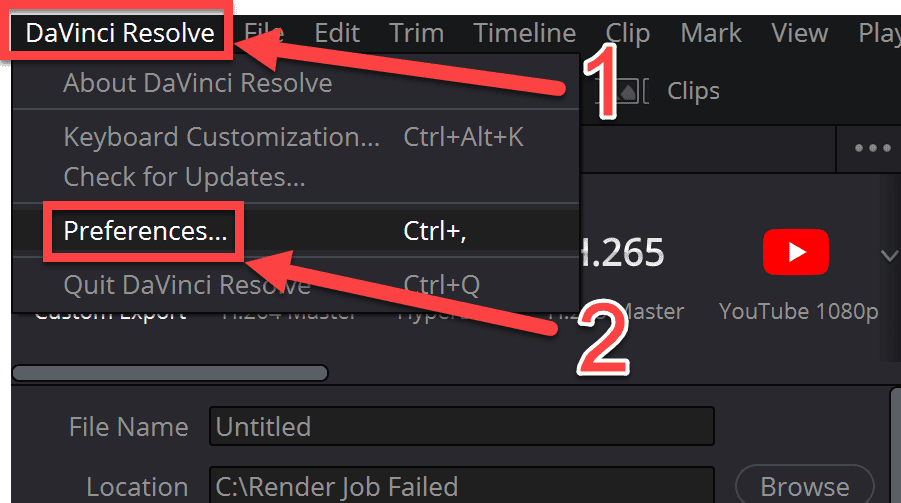
Click on “Davinci Resolve” in the left-hand top corner of Davinci Resolve. Then click on “Preferences…“.
Then in the window that pops up, click on “User“, then “UI Settings“.
Next, uncheck the option called “Stop renders when a frame or clip cannot be processed“.
Watch the picture below:
Once you have done this go ahead and click on “Save“, located in the lower right-hand corner of the window:
That’s it!
Now you can go ahead and try to render your video again.
Afterward, watch through your video if there are any errors, etc. A common one to watch out for is this:
There’s a big chance you have seen this one inside Davinci Resolve. However, it’s actually possible to render this one into your final product as well.
That’s it and I really hope one of these solutions solved your problem!
If you are facing problems with the “Add to Render Queue” button turning gray, check out this article.
Best regards,
Your friend, Jens.
UPDATE:
In case anyone has a similar problem in the future.
I did some Tests to determine the origin of this issue.
First I wanted to make sure that the original video file that I´m trying to edit is not corrupted. So I rendered it on my old PC that I still have here. It rendered just fine.
Now that I knew that the issue does not come from the file I´m left with either a Software or a Hardware Problem on my new PC.
Next I installed Resolve on a clean windows partition that I still had on the new PC and that I had not touched for a few months (I guess a virtual machine would have worked as well, but this was more efficient). It rendered just fine.
Now I knew that it is not a Hardware Issue.
I suspected the AMD GPU Driver might be at fault, so I upgraded it to the newest version on the clean Windows partition. The render started to crash.
OK, so it is a GPU driver issue. I downgraded the driver again a few times until it started to render without crashing. I found that the AMD GPU Driver Version 21.10.2 is the last stable Version where the render works.
I downgraded the AMD GPU driver to that Version on my primary system and tested again.
The render process was completed without crashing.
If Anybody knows why the current AMD Drivers make Resolve crash during render, or how I can fix that. Please let me know!
Hello there,
I created an account just to post this, because I´m all out of ideas.
I´m trying to render a video with DaVinci, however it always crashes at the exact same point during the render process.
Not only does DaVinci crash, but also the AMD GPU driver times out.
My system:
CPU: Ryzen 5900X
GPU: Sapphire Nitro 6800XT
RAM: 16GB
Attached are my render settings and Screenshots that show how the crash looks (Unresponsive white screen) and the driver Timeout error that is displayed.
Can please anybody try to help me with this?
If more information is required, I´m glad to provide it.
Thank you.


High-end post-production software like DaVinci Resolve (version 18, 17, etc.) crashing randomly can be a frustrating experience.
I can relate to the feeling of starting the render, going to sleep, and waking up the next day only to find out Resolve crashing on me!
Sometimes Resolve can crash during startup, rendering, opening a project, importing media, editing, or opening Fusion, etc.
This post contains proven fixes to help you solve the Resolve crashing issue – step-by-step.
Let’s get started right away!
Table Of Contents
- DaVinci Resolve Minimum System Requirements
- Why Does my DaVinci Resolve Keep Crashing?
- DaVinci Resolve Crashing on Startup
- DaVinci Resolve Fusion Crashing
- DaVinci Resolve Crashes When Rendering
- Related Articles
- Conclusion
DaVinci Resolve Minimum System Requirements
The first step is to look into the minimum system requirements as suggested by BlackMagic Design.
| System | Minimum Requirements | Example |
|---|---|---|
| OS | 64 bit | Windows 10, macOS 10.12.6, Linux CentOS |
| CPU | Quad Core (4 Core) or more | Intel, AMD |
| GPU | 4 GB VRAM or more | NVidia (CUDA 3.0), AMD (OpenCL 1.2), Metal (from Apple) |
| Memory | 16 GB RAM or more | |
| Storage | Internal Storage for Application and Projects, Permanently Connected Storage for Cache, Optimized Media, Stills |
SSD, RAID Configuration |
Meeting the minimum system requirements should solve most of the crashing problems.
But…
Despite meeting minimum requirements (and sometimes exceeding requirements), there are crashes and freezes.

There are many reasons why Resolve could crash.
Why Does my DaVinci Resolve Keep Crashing?
- Incompatible or unstable Graphics card drivers (like some Nvidia gaming and studio drivers).
- Not using a dedicated graphics card (and relying on an integrated graphics card),
- Insufficient system memory RAM (8 GB or less),
- Insufficient GPU VRAM (2 GB or less),
- DaVinci Resolve Beta version, which could be riddled with bugs.
DaVinci Resolve Crashing on Startup
Many users face crashes after launching Resolve – during the splash screen, which loads different modules like Edit, Color, looking for a control surface, etc.
Either DaVinci Resolve doesn’t respond or closes unexpectedly.
| Problem | Solution |
|---|---|
| The system runs only on an Integrated Graphics Card because there is no dedicated Graphics Card. | An Integrated Graphics card is not sufficient to run DaVinci Resolve. You need to have a dedicated GPU. |
| Have Graphics Card but Resolve recognizes only Integrated Graphics Card | Either disable the Integrated Graphics Card or update Video Card Driver, which will make Resolve recognize the GPU. |
| Have a good GPU with sufficient VRAM but still crashes. | Update the Video Card Driver to the correct version – not necessarily the latest one. Revert to the previous version if needed. |
| My system meets minimum system requirements but still crashing | Roll back to the previous stable version of Resolve. |
1. Use a Dedicated Graphics Card
A system that runs only on Integrated Graphics cards and doesn’t have a dedicated GPU can cause crashing during startup.
Sometimes, if you’re lucky, you can get away with importing footage inside the “Media” tab of Resolve with the integrated graphics card.
But when you start editing, Resolve can crash on you.
It is better to install a dedicated GPU (if you don’t have one). Make sure the minimum onboard memory or VRAM has 4GB.
Or…
If you have one, be sure to make the dedicated graphics card the default display adapter.
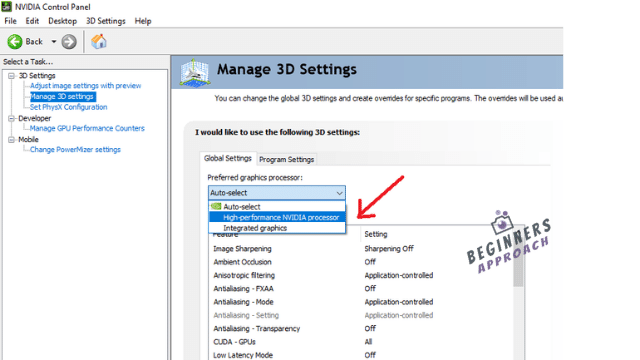
How to set Nvidia or AMD GPU as Default Display Adapter
- Right-click on your desktop > Click on Nvidia Control Panel (or AMD Catalyst Control Center).
- Click on “Manage 3D Settings” under “3D Settings”
- Under “Global Settings” > Preferred Graphics Processor > Select “High-Performance NVidia Processor”
- Click on “Apply”
- Now click on “Set PhysX Configuration” under “3D Settings”.
- “Select a PhysX Processor” > Select the dedicated graphics card listed.
- Click on “Apply”
Now try to launch DaVinci Resolve.
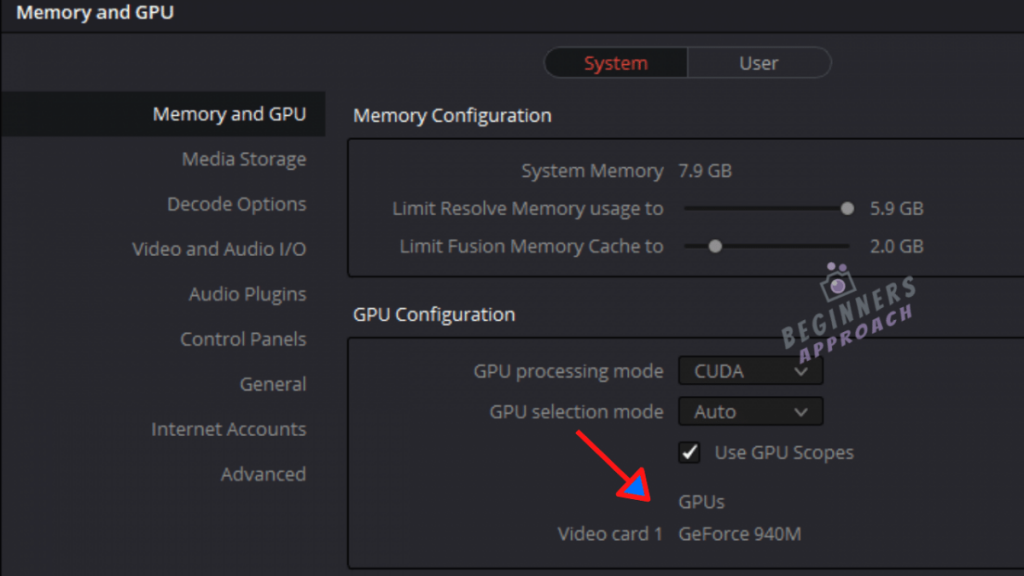
From the menu bar, click on “DaVinci Resolve” > “Preferences“, you should be able to see the name of your dedicated graphics card against “Video card 1” under GPU configuration.
If the above still doesn’t display the GPU, go to “Device Manager” -> “Display Adapters“, and you will see:
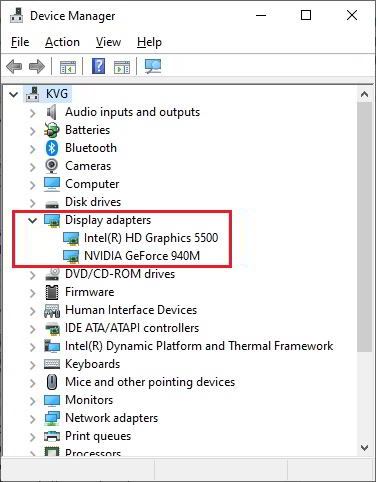
Right Click on the Integrated Graphics (in this case, Intel(R) HD Graphics 5500) and disable the driver.
Now this will force the system to use only the dedicated graphics driver.
(I am assuming here that you are powering the monitor through your dedicated graphics card, like NVidia GeForce GTX 1050, and not from the motherboard-integrated graphics card. Laptops, by default, will have a connection from the dedicated GPU to the display monitor.)
If the above doesn’t solve the issue, then it’s time to update the correct video driver.
2. Install the Correct Video Driver for Nvidia or AMD Graphics Card
NVidia comes with Gaming drivers as well as Studio drivers.
As the name suggests, Gaming drivers are released frequently to support new and high-end games.
Whereas, Nvidia Studio Drivers are aimed at creative application works like editing, grading, content creation, animation, etc.
Nvidia states studio drivers are more stable.
So, if you are in the habit of automatically updating gaming drivers through the “GeForce Experience” app, and find Resolve crashing on you, then it’s time to switch over to Studio driver.
- Launch the GeForce Experience app.
- Click on the 3 dots (More) option.

- Click on Studio driver.
- If not displayed, then, head over to Nvidia Official website and select your GPU from the list and download it.

- Click on Search.
- Click on Download!
If the Studio driver is not available for your GPU, then update the Gaming driver to the latest version.
If the latest versions (of gaming or studio) drivers crash, then roll back to the previous ones, which are stable.
The correct version of either the Gaming or Studio version of Nvidia should run DaVinci Resolve with no crashes.
It is up to you to decide which one fits you.
Related Article:
Most Common DaVinci Resolve GPU Issues (& How to Fix Them)
How to Make DaVinci Resolve Use GPU (Helpful Tips!)
After successfully launching Resolve, importing media, creating a timeline, and starting your editing…
There come’s a time to add some 3d Fusion titles, which might need a lot of customizing, or…
You might need to do some green screen keying or another compositing.
So, when you click on the “Fusion” tab,
CRASH!
Most of the users who can work with no issues in other tabs like Edit, Fairlight, Color, etc, might face a crash on clicking the Fusion tab.
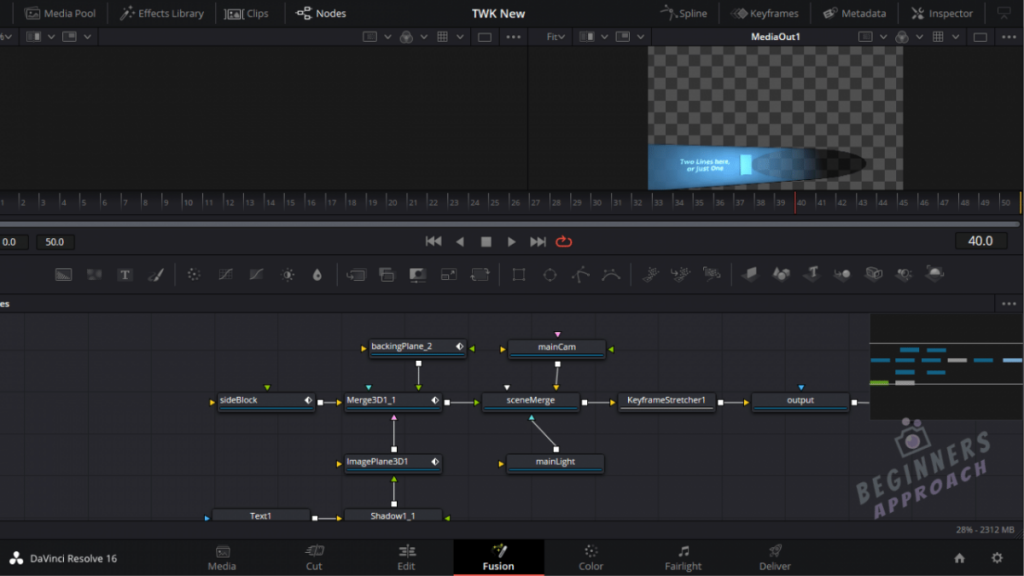
Or sometimes, after clicking on the Fusion tab, during the building of node-based compositions (which might involve tracking operations, painting, etc), Resolve can crash.
DaVinci Resolve Fusion tab crashes mainly because of the following:
- Insufficient System Memory – Fusion requires more than 16 GB RAM (32 GB recommended by Blackmagic Design)
- Insufficient Graphics Card VRAM – 2 to 4GB for 1080p, 6 to 8GB for 4K
- No discrete or dedicated GPU (Integrated Graphics is NOT sufficient to run Fusion)
- Incompatible Video driver
1. Insufficient System Memory:
You might get away with simple editing, audio, and color correction work with 8GB or less RAM (if you are lucky), but working inside Fusion will demand more RAM.
That’s where Resolve can crash on you.
If you have insufficient RAM, please upgrade to 16 GB. If you are going to do a lot of VFX work and graphics work, 32 GB RAM and more should be your target.
What if you have sufficient RAM, but still Resolve crashes?
A very frustrating one! Follow the next step.
2. Insufficient Graphics Card Onboard Memory (VRAM)
When you work with 1080p h.264, a minimum of 2 to 4GB GPU VRAM is necessary. Anything below than that might crash Resolve.
But if you’re working with 4K h.264 or h.265 (heavily compressed codec), a 2 to 4 GB RAM is insufficient and can crash on you.
Fusion (or, for that matter, Resolve) is very GPU hungry. The more VRAM – the better.
If the problem persists, then try updating the Video card driver to the appropriate version (as discussed above).
If you still face the same issue, then try the below:
Memory and GPU Configuration inside Resolve
From the menu bar, click on “DaVinci Resolve” -> “Preferences“, then click on “Memory and GPU” -> “System”.
Under “Memory Configuration”:
Try increasing the memory for “Limit Fusion Memory Cache to“, which will take the memory from “Limit Resolve Memory Usage to” which is 75% of the total system RAM.
For example, if you have 16 GB total RAM, “Limit Resolve Memory Usage to” will be defaulted to 75%, which is “12 GB”. If your “Limit Fusion Memory Cache to” is set around 4 GB, then try to increase beyond 4GB, say 8 GB.
Give “Save” and restart Resolve.
See if it solves the issue; if not, revert the changes.
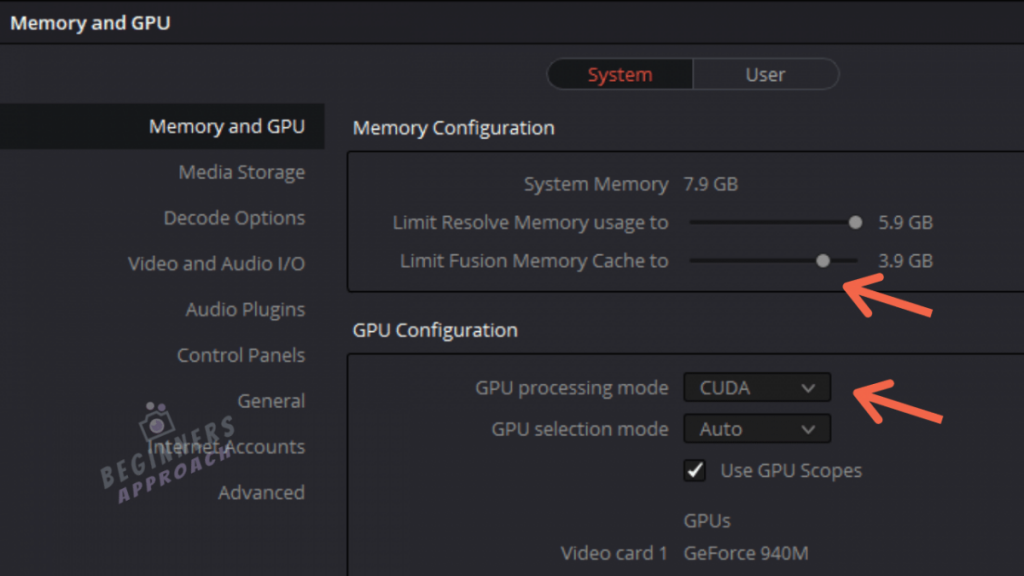
Under GPU Configuration:
“GPU Processing Mode” -> Instead of “Auto”, try selecting “CUDA” for NVidia GPUs or “OpenCL” for AMD GPUs. Give “Save” and restart Resolve.
GPU & DaVinci Resolve (9 Things Most Beginners Don’t Know)
If the above doesn’t solve your issue, then see that your System managed Paging file size is sufficient.
Virtual Memory, Swap File, or Paging File:
A Paging file is an area on the hard disk that Windows uses as if it were RAM.
Generally, the operating system decides its own paging file size based on the amount of RAM installed.
Typically, it selects the drive where the OS is installed and allocates a portion of hard disk as virtual memory or paging file size.
The most important point here is: Don’t cram your C: disk. Leave some breathing space. I mean to tell, have sufficient free space. (Let the strip be blue instead of red).
There is no need to alter the paging file size (let it be system managed).
But if you would like to define the paging file size manually, then proceed at your own risk (changing the values could make your system unstable).
- Go to “Control Panel” > “System” > “Advanced System Settings” > Click on “Settings” under “Performance” > Click on “Advanced” > Click on “Change” under “Virtual Memory”.
- Uncheck “Automatically manage paging file size for all drives”, Click on the “Custom Size” radio button > Enter “Initial Size” and “Maximum Size”.
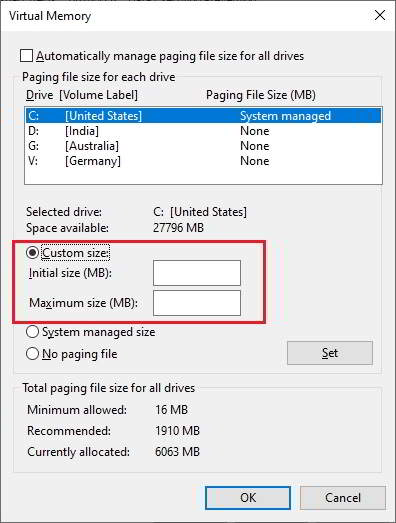
Based on the “Currently Allocated” size, you can define the “Initial Size” which in this case will be more than the currently allocated one. (Again, reminding you – please be very careful here; this could make your system unstable. Do your own research before committing the numbers.)
Most of the crashes happen during rendering.
Most users have the experience of render crashing at around 20% to 30%, 50% to 60% and…
Around 95% to 99% as well!!!
Sometimes during editing you add simple transitions with no crashing issues. But the same transitions can cause crashes during rendering!
Basically Resolve can crash at any point while rendering.
DaVinci Resolve Crashes When Rendering
DaVinci Resolve crashes while rendering because of the following:
| Problem | Reason |
|---|---|
| Incompatible Graphics Driver | Certain Nividia Cuda, AMD OpenCL Drivers |
| Insufficient GPU VRAM | Less than 4GB |
| Insufficient System Memory (RAM) | Less than 8GB |
| Unstable DaVinci Resolve version | Beta versions are known to have bugs |
Solution for Render Crashing in Resolve
1. Incompatible Graphics Driver
Choosing the correct graphics driver for your GPU is VERY critical.
It need not be the latest one.
(Refer to the above section on Video drivers on how to select the correct driver).
2. Insufficient GPU VRAM:
As Blackmagic claims, rendering required resolution (frame size) like 1080p, 4K, etc, and image processing (like temporal noise reduction, motion effects, OpenFX plugins, etc) mainly depend on GPU and its onboard memory.
A minimum of 4GB VRAM is recommended.
3. DaVinci Resolve Beta Version:
The Beta version, as the name suggests, is released to test out new features, bug fixes, support new camera codecs, and enhancements by the public. If there are bugs reported by the public, then Blackmagic will reproduce the bugs from their side and then fix them through future beta or public beta versions.
The unstable beta version of Resolve, along with incompatible GPU video drivers, can cause random crashes not only during rendering but also during editing, audio, fusion, and color grading works.
It’s always a best practice to roll back to the previous STABLE version, let’s say, from 18.0.4 beta to 18 (or 17 if needed!)
4. Insufficient system memory (RAM) will also cause crashes during rendering. Hence a minimum of 8GB or more than that is recommended.
Apart from doing all the above, if you still face issues, try out the below workarounds.
Workarounds for Render Crashing
1. Render Speed = Set the value other than Maximum
- Go to the “Delivery” tab -> Choose “Custom” -> Click on “File” out of Video, Audio, File -> Scroll down.
- Render Speed -> Set it to 100 or 75, or 50.
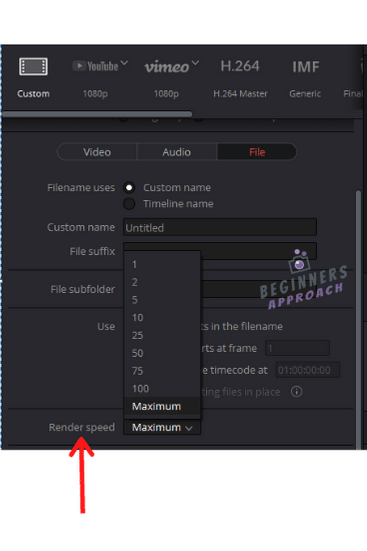
Essentially, we are trying to reduce the render speed.
A setting of “Maximum” will put more demand on your system’s resources like CPU, GPU and RAM.
Let’s reduce the stress. Let the system take more time to render with less stress.
2. Disabling Viewer Updates during Render
- Go to the “Delivery” tab -> Click on the 3 dots above the viewer -> “Updates During Renders” -> Select “Off” or “Minimal”
- Choosing “Off” or “Minimal” will speed up rendering with less stress on your system’s resources.
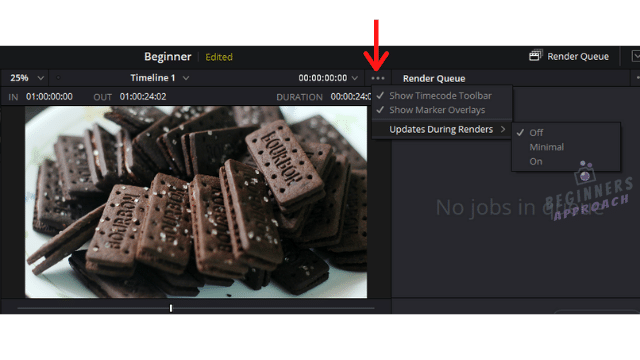
For some users, sometimes minimizing DaVinci Resolve during render has finished the render without crashing!
3. Export “Optimized Media” or “Render Cached Images”
If you optimized your media or rendered cached your timeline, you can check either of these 2 options. Sometimes, this setting can save Resolve from crashing.
- Go to the “Deliver” tab.
- Click on “Custom? -> “Video” -> “Advanced Settings”
- Check either “Use Optimized Media” or “Use Render Cached Images”
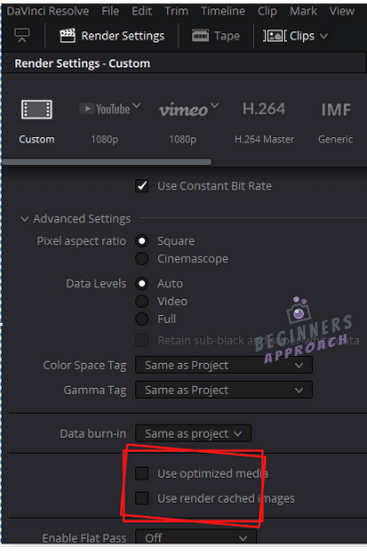
But keep in mind that the video settings for optimized media or render cache should be of high quality.
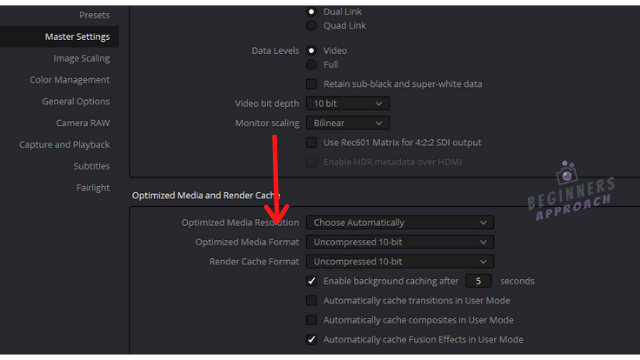
If you were following offline editing or proxy workflow, then this step shouldn’t be followed. Because checking this option during export will result in lower resolution file.
4. Uncheck”Reload Last Working Project”
Uncheck this option, if you’re directly taken to the last project after launching Resolve. If the project that you were working on crashed and when you again launched, then you’ll be forced to open the same project.
- From the menu bar, go to “DaVinci Resolve” -> “Preferences” -> “User”
- Uncheck “Reload last working project when logging in” (if already checked).
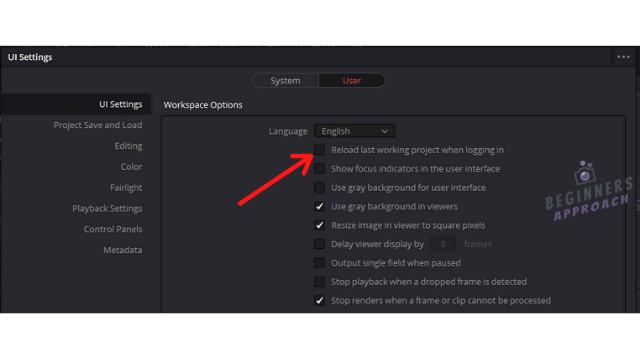
But always keep in mind that a stable version of Resolve coupled with a compatible graphics driver will never crash on you (given that you have sufficient RAM and GPU memory)!
You have come a long way in troubleshooting DaVinci Resolve crashes.
But if you are still facing issues, then it’s time to follow the below steps (not necessarily in the same order):
- Completely uninstall DaVinci Resolve (and all the relevant DLLs), then either again download the latest version from the website or roll back to the previous best version and re-install.
- Over-clocked CPU can also cause issues.
- Disable your antivirus and see if Resolve works with no issue. Or..
- Disable the firewall and check if there are any crashes.
- Try disabling both the antivirus and firewall and see if Resolve is crashing or not.
The above is to make sure that other software is not interfering with Resolve.
If the issue is persistent, then…
It’s time to capture logs immediately after the crash and submit to Blackmagic Design for further analysis.
Blackmagic Design would require the following from you:
- Logs
- Your System Information – system brand, model, year, OS version, your DaVinci Resolve version number, etc.
- Your Project Export (.drp format) = “File” -> “Export Project”
2 Ways to Generate Logs Immediately after DaVinci Resolve Crash
- Restart Resolve -> From the Menu bar, go to “Help” -> Click on “Create Diagnostics Log on Desktop“. Or..
- If Resolve doesn’t launch, then go to “C:/Program Files/Blackmagic Design/DaVinci Resolve” for Windows or “/Library/Application Support/Blackmagic Design/DaVinci Resolve” for Mac. Run the CaptureLogs.bat application.
This is how the log will be generated:
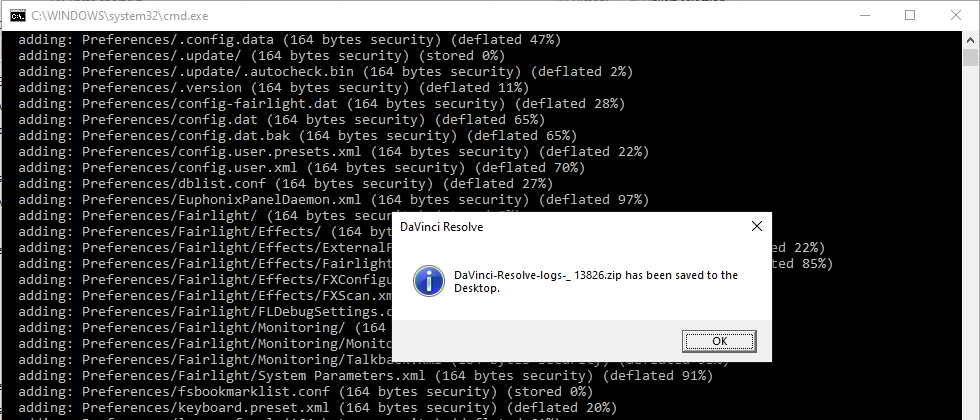
Head over to “https://forum.blackmagicdesign.com/” -> “DaVinci Resolve” and search for relevant topics on troubleshooting. (Be sure to read the forum rules before posting your queries).
While working inside DaVinci Resolve, crashes can also occur because of external factors like laptop battery dying, hard disk crashing, power outage, OS issues, or similar other reasons which are out of our hands.
Read the below posts for more actionable information:
- How to recover and restore accidentally deleted or crashed projects in DaVinci Resolve.
- Tips to Save Your Precious Work in DaVinci Resolve (IMPORTANT!)
After you have successfully sorted out the crash issue, now it’s time to make sure DaVinci’s performance is optimized to run smoothly in your system – desktop or laptop.
Getting smooth “REAL-TIME PLAYBACK” speeds up your editing and grading works.
Click on “Easy fixes for lagging DaVinci Resolve”.
Conclusion
Not only lower-end systems, even powerful systems with 6/8 cores CPU (Intel or Ryzen), 16/32GB RAM, Nvidia RTX 2080Ti, and SSD/RAID storage, can crash.
In most cases, the main culprit is not installing the correct version of the graphics driver of your GPU.
As discussed several times above, the unstable beta version of DaVinci Resolve and incompatible graphics drivers can cause crashes.
So spend some time and follow this guide to troubleshoot your issue.
This guide can not guarantee 100% of crash fixes, but it still covers solutions for most of the commonly occurring crashes.