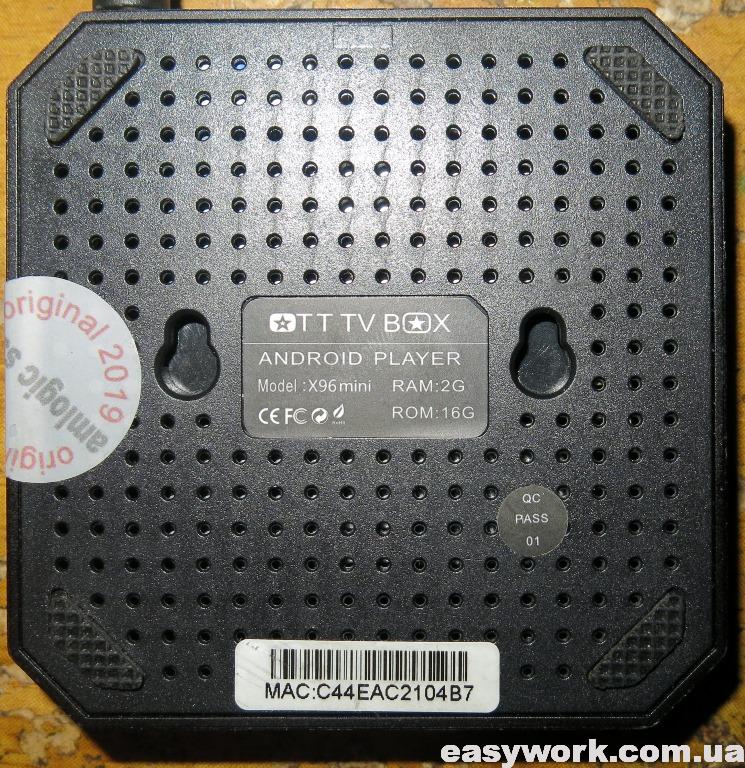
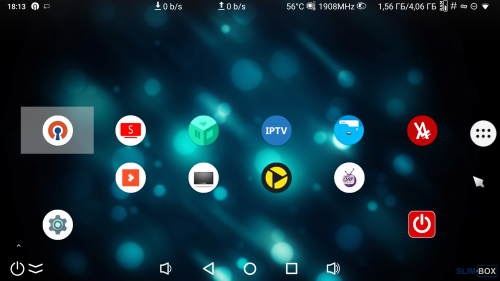
Приставка X96 mini 2/16 Gb широко распространена. Данный экземпляр при подключении к телевизору не выдает изображение и не реагирует на пульт.

Светодиод горит тускло красным цветом и не меняет свой цвет на синий.

Маркировка используемого блока питания — RSF-DY009-0502000.

Приставка со стороны задней крышки выглядит следующим образом. На ней наклейка с точным названием модели.
Крышка отщелкивается и мы можем получить доступ к плате. Запоминаем расположение крышки, т.к. на ней находится термопрокладка, которая должна попасть на процессор Amlogic S905W.

Маркировка платы Q6X V2.2 17355. По отзывам на 4PDA данная маркировка имеет проблемы при прошивке.

С обратной стороны плата выглядит следующим образом.

Входное напряжение равно 5.2 В и поэтому неисправность внешнего блока питания исключается.

Далее входное напряжение понижается при помощи DC/DC преобразователей с маркировкой S15BLQ.

Напряжения на плате распределены следующим образом. Также необходимо обратить внимание на исправность электролитического конденсатора 100 мкФ х 10 В. Он один на плате.

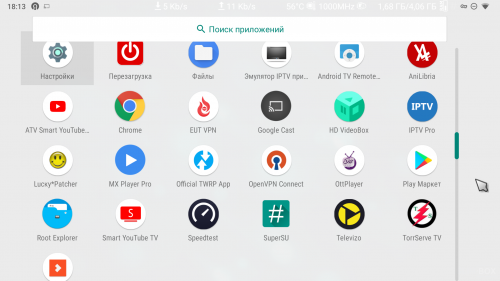
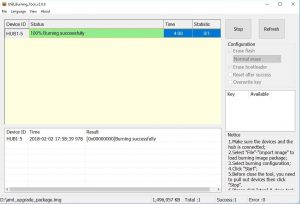
Для прошивки устройства я использовал программу USB Burning Tool 2.09. При подключении необходимо выполнить сброс приставки. Для этого удобно использовать спичку (токонепроводящий предмет). USB шнур необходимо вставлять в белый разъем. Вот подробная инструкция по прошивке через ПК. Если кому-то не нравится — то вот другая.

После этого в программе отображается устройство с пометкой Connect success.

Однако прошивка прерывалась на 7%. Ошибка была либо [0x30201004]UBOOT/Disk initialize/Send command/Error result.
![Ошибка [0x30201004]](https://easywork.com.ua/wp-content/uploads/2020/01/remont-pristavki-x96-mini-2-16-gb-ne-vklyuchaetsya-13.jpg)
В версии программы USB Burning Tool 2.12 код ошибки сменился на [0x32030201]Uboot/Get result/DiskInitial error.
![Ошибка [0x32030201]](https://easywork.com.ua/wp-content/uploads/2020/01/remont-pristavki-x96-mini-2-16-gb-ne-vklyuchaetsya-14.jpg)
Кому-то помог при прошивке выбор опции «Force Erase All». Однако при этом придется в дальнейшем восстанавливать MAC-адрес. Такая проблема может быть при проблемах с флеш-памятью.
В таком случае можно попробовать воспользоваться оболочкой LibreELEC. По следующей ссылке описана штатная установка LibreELEC — KODI — 8.2.3.1 на X96 Mini Amlogic S905W. Нас интересует вариант полноценной загрузки LibreELEC с miniSD карты, описанный тут и тут.

Задействованные программы Win32DiskImager и Burn_Card_Maker. Однако мне это не помогло, т.к. неисправность была где-то гораздо глубже. Возможно кому-то данная инструкция и вышеуказанные ссылки помогут.
Ранее прошивал TV Box X96 mini, которая зависала на заставке.
Announcement
[0x32030201]Uboot/Get result/DiskInitial error
![]()
Comment
Make sure you only use Amlogic USB Burning Tool version 2.1.7.0 or newer. Uninstall old versions before installing the new version.
If you have need to buy new USBa-to-USBa cable, make sure it is as short as possible, like 1 foot length.
Note: If you have DDR ram and not LPDDR ram then you may need to plug DC power jack in after releasing reset button.
Comment
![]()
Make sure you only use Amlogic USB Burning Tool version 2.1.7.0 or newer. Uninstall old versions before installing the new version.
If you have need to buy new USBa-to-USBa cable, make sure it is as short as possible, like 1 foot length.
Note: If you have DDR ram and not LPDDR ram then you may need to plug DC power jack in after releasing reset button.
Thank you. I have a pendoo x10 plus (s905x2) and followed all your instructions. But still problem remains.
Is it possible that the vendor has locked the firmware (secure boot or else) so I could not burn new one to it?
Comment
Make sure you only use Amlogic USB Burning Tool version 2.1.7.0 or newer. Uninstall old versions before installing the new version.
If you have need to buy new USBa-to-USBa cable, make sure it is as short as possible, like 1 foot length.
Note: If you have DDR ram and not LPDDR ram then you may need to plug DC power jack in after releasing reset button.
Comment
![]()
Comment
![]()
Comment
Even thou I resent shortening anything in electrical devices I might try that but if we translate:
«. . . ? . . . ?? . ?? . ? . . ?? . ? . . . . . . . . »
we get:
«Guys. For those who have boxing is no longer responding to a computer connection. Or, like my box, when connected, only red ice turned on.»
I have no problem connecting box with computer. This is what I do:
Nr1.OPEN USB_Burning_Tool
Nr2.Load Image
Nr3.Press START
Nr4.Connect box with USB Cable (Connected almost instantly)
Nr5.boot appears on the box screen
I have tried all possible options like holding reset button (removing a bit cotton from cotton stick makes it a great tool for holding a reset button constantly) before, after and in the meantime of Nr. 1,2,3,4,5 without any success.
Источник
Ошибка 0x32030201 uboot get result diskinitial error
У вас тут тема Обсуждение или Прошивка?
Не могу понять одного.
Зачем было создавать эту тему, если топикстартер даже не удосужился должным образом оформить шапку.
То, что сейчас в шапке — характеристики и пару фото, в каждом магазине есть.
Складывается такое впечатление, что владельцев A95X на процессоре S905X просто послали.
Напомнило:
— О чём вы поёте?
— Вы ещё не в саду?
— Нет.
— Идите в сад.
— Вы там будете петь?
— Вы там будете слушать.
Сообщение отредактировал bynevsky — 12.09.16, 15:50
 bynevsky,
написано тема обсуждение, ваш пост с нашими прошивками? NEXBOX A95X — Прошивка
Сообщение отредактировал nefzumot — 12.09.16, 15:33
Booting from SD card:
1. Download recovery-twrp3020-nexbox_a95x.img and rename it as recovery.img
2. Copy TWRP recovery.img to the root of your external SD card
3. Power down your device
4. Power up your device by pressing (and holding) reset button found in AV port (use a thin non-metal object — e.g. toothpick, plastic straw, etc)
5. Your device will boot into TWRP
6. Use TWRP to install the recovery flashable TWRP zip or use TWRP’s ‘flash image’ option to install the TWRP recovery.img
7. Reboot recovery
делать по аналогии наверно.
bynevsky,
ваши возмущения непонятны, два разных девайса на разных прошивках и с разным железом,тема была закрыта, топикстартер возможно не знает что ее открыли
Сообщение отредактировал nefzumot — 12.09.16, 15:56
Источник
Ошибка 0x32030201 uboot get result diskinitial error
Обсуждение Vorke Z1
TV Box
Обсуждение »
32GB
Communication Wifi Connectivity: Built in 2.4G/5G Support IEEE 802.11 ab/g/n/ac
Ethernet: 10/100M/1000M RGMII
Bluetooth: 4.0
Media Video Output:
Built-in HDMI 2.0a transmitter including both controller and PHY with HDR, CEC and HDCP 2,2, [email protected] max resolution output
Video Codecs:
VP9-10 Profile-2 up to [email protected]
H.265 HEVC [email protected] up to [email protected]
H.264 AVC [email protected] up to [email protected]
H.264 MVC up to 1080P @60fps
MPEG-4 [email protected] up to [email protected] (ISO-14496)
WMV/VC-1 SP/MP/AP up to [email protected]
AVS-P16(AVS+) /AVS-P2 JiZhun Profile up to [email protected]
MPEG-2 MP/HL up to [email protected] (ISO-13818)
MPEG-1 MP/HL up to [email protected] (ISO-11172)
RealVideo 8/9/10 up to [email protected]
WebM up to VGA
Multiple language and multiple format sub-title video support
MJPEG and JPEG unlimited pixel resolution decoding (ISO/IEC-10918)
Supports JPEG thumbnail, scaling, rotation and transition effects
Supports *.mkv,*.wmv,*.mpg, *.mpeg, *.dat, *.avi, *.mov, *.iso, *.mp4, *.rm and *.jpg file
Audio Supported:
Audio Decoder:supports MP3 / AAC / WMA / RM / FLAC / OGG and programmable with 5.1 down-mixing
Audio Output:HDMI/SPDIF Data Output
Picture Supported: HD JPEG/BMP/GIF/PNG/TIFF
Resolution: [email protected]
KODI: 16.1
Interface 1* HDMI 2.0 output with CEC 2.0 4K*2K @ 60Hz
2* High speed USB 2.0,support U DISK and USB HDD
1* TF CARD Support 1
32GB
1* 3.5 Phone out CVBS&L/R output
1* SPDIF output
1* RJ45 LAN Ethernet 10M/100M/1000M
Other Features Support DLNA, Google TV Remote, LAN, 3D Moive, Email, Office suit etc
Power 5V/2A Power ON :blue; Standby :Red
Dimensions&Weight 130*109*24mm
214g
Package Contents 1 x TV box
1 x IR remote
1 x HDMI cable
1 x Power adapter (A right AC Adapter will be sent as your shipping country)
1 x User manual
Источник
Ошибка 0x32030201 uboot get result diskinitial error
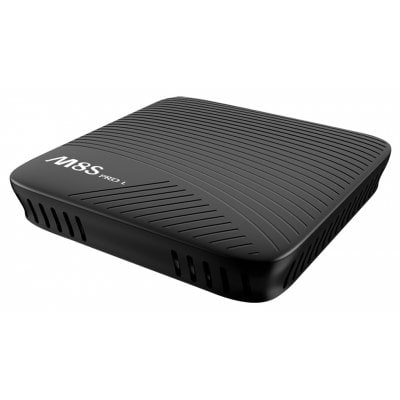
Обсуждение Mecool M8S PRO L
TV Box
Обсуждение »


В теме нет куратора. По вопросам наполнения шапки обращайтесь к модераторам раздела через кнопку  под сообщениями, на которые необходимо добавить ссылки.
Сообщение отредактировал bolschoy58 — 03.08.22, 07:19
File: M8S_PRO_L-NHG47L-20171216.10 2705.V0928.img
Size: 1.32 GB
Такую кто-нибудь ставил?
http://freaktab.com/fo…-nexus-rom-android-7-1
Сообщение отредактировал fandos_ural — 15.01.18, 21:07
Там сказано, что прошивка на основе AndroidTV. Значит такая же кастрированная. )
Сообщение отредактировал xam711 — 16.01.18, 13:59
однако не так.
там сказано:»Nano Nexus ROM posted in this thread will give you phone OS»
т.е. полноценную ось!
Хотя и минимальную (Nano), а именно:
This package is designed for users who want the smallest Google footprint possible while still enjoying native «Okay Google» and Google Search support. In this package you will find the core Google system base, Google Android Shared Services, off-line speech files, Google Play Store, Google Calendar Sync, Face Detection for Media, Face Unlock, Dialer Framework and the following Play Store applications:
Device Health Services
Google Package Installer (replaces stock/AOSP Package Installer)
Google Play services
Google Search
Сообщение отредактировал LBand — 16.01.18, 23:39
Источник
Ошибка 0x32030201 uboot get result diskinitial error
Выкладываю архив для рекавери стоковой прошивки X96Max_Plus2_20191213-1457: https://yadi.sk/d/M—962_4tEv_HQ
Это для боксов версий 4/64 и 4/32..
По просьбе тех, кто запорол систему, а компа перепрошиться нет..
ВАЖНО: осталась возможность зайти в стоковый рекавери через резет.
Кто не знает : «навесной рекавери» берём здесь — X96 Air [Android] (Пост Vasily_5 #90518739)
Если нет архиватора —  RAR_v5.30.Build38_crk.apk.zip ( 4.52 МБ )
(просто убрать zip переименованием)
Инструкция для салаг:
Разархивирум архив, папку с архивом и zip из навесного кидаем на флешь c fat32, можно и с чем-то уже записанным..
Входим в стоковое рекавери через ресёт. Пультом выбираем udate from EXT—> update from Udisk —> выбираем файлик zip с навесным..
Система сама перегрузится в TWRP.. Выбираем язык и сдвигаем слайдер — это уже подключенной мышью..
МОНТИРОВАНИЕ: ставим все галки, которые ставяться, кроме » системный раздел только для чтения»
ОЧИСТКА —> ВЫБОРОЧНАЯ ОЧИСТКА: все галки , кроме MicroSDCard.. Если в памяти что-то ценное, то и память устройства — не ставим галку.. (если случай тяжёлый, может помочь форматирование раздела data здесь же, . но далеко не всегда это необходимо)
ВОСТАНОВЛЕНИЕ: выбрать накопитель — вашу флешь, выбрать архив( он сам должен опрределиться), свайп для прошивки — ждемс..
Выскочил окно ЗАГРУЗКА В СИСТЕМУ
как войти в стоковое рекавери
Это второе обновление стока, но если удасться им восстановиться — то в дальнейшем он без проблем обновиться на крайний..
Сообщение отредактировал bandanaØ777 — 02.07.20, 12:06
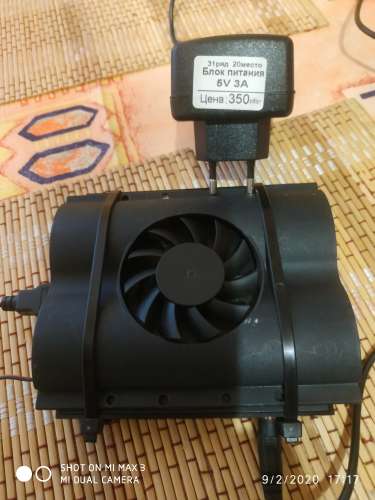
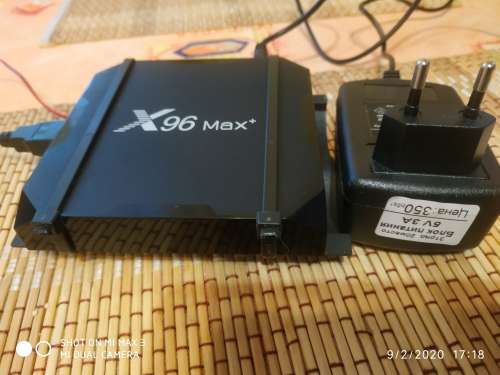
Блок Питания 5В/3А цена на рынке 350р, вентилятор охлаждения HDD(б/у) с барахолки 100р, USB папа 50р, работа паяльником 50р. Самому лень было. 😀 4е пластиковых стяжки из гаража — бесплатно. HDMI High Speed (1м) кабель был старый. Подключил. При работе вентилятор крутит в пол-силы, но этого хватает для охлаждения. Шума нет.
Пока доволен.
Сообщение отредактировал Лютый Мизантроп — 24.11.20, 00:51
Сообщение отредактировал Джедай Василий — 18.05.20, 21:48
Источник
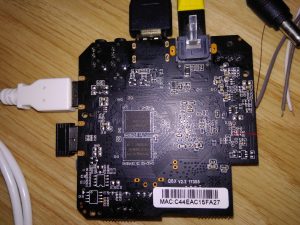
So I bought a media player again. It’s Vontar X96 mini with 1GB RAM and 8GB eMMC and according to rule “Don’t turn it on, take it apart!” it’s exactly what I did:
After assembling and turning it on, Android 7 popped up but this was not my target OS. I wanted to use LibreELEC so I followed installation howto: downloaded and burned latest image to SD card, replaced dtb file with gxl_p212_1g.dtb, and run reboot update from Android terminal.
Box rebooted into working LibreELEC, nice! Now I wanted to burn it into internal eMMC so I run installtointernal despite a big red warning on howto page and warning in the script itself, rebooted and… I got sad. The LED was blinking red-blue and the box stopped booting. I tried all voodoo recovery instructions (holding reset button, powering from both usb and adapter, with HDMI, without it…) to boot into upload mode where the box would be detected by a PC and I would use USB Burning Tool but nothing helped. I also wrote to the seller to get help, they’ve sent me USB Burning Tool, factory image and Upgrade instruction which was nice but it didn’t work either.
So I hooked up serial interface to see what’s going on inside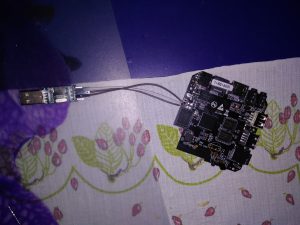 and the result was following:
GXL:BL1:9ac50e:a1974b;FEAT:ADFC318C;POC:3;RCY:0;EMMC:0;READ:0;0.0;CHK:0;
TE: 100781

BL2 Built : 20:32:17, Sep 8 2017.
gxl g6296b83 - xiaobo.gu@droid12

set vcck to 1120 mv
set vddee to 1070 mv
Board ID = 2
CPU clk: 1200MHz
DQS-corr enabled
DDR scramble enabled
DDR3 chl: Rank0 16bit @ 792MHz
Rank0: 1024MB(auto)-2T-11
DataBus test pass!
AddrBus test pass!
-s
Load fip header from eMMC, src: 0x0000c200, des: 0x01400000, size: 0x00004000
New fip structure!
Load bl30 from eMMC, src: 0x00010200, des: 0x01100000, size: 0x0000d600
Load bl31 from eMMC, src: 0x00020200, des: 0x05100000, size: 0x0002c600
Load bl33 from eMMC, src: 0x00050200, des: 0x01000000, size: 0x00065e00
NOTICE: BL3-1: v1.0(release):a625749
NOTICE: BL3-1: Built : 11:25:15, Aug 25 2017
[BL31]: GXL CPU setup!
NOTICE: BL31: BL33 decompress pass
mpu_config_enable:ok
[Image: gxl_v1.1.3243-377db0f 2017-09-07 11:28:58 qiufang.dai@droid07]
OPS=0xa2
0 a4 b0 46 ef c9 98 14 5e dc ac 58 [0.326773 Inits done]
secure task start!
high task start!
low task start!
ERROR: Error initializing runtime service opteed_fast


U-Boot 2015.01-g2d1a155-dirty (Oct 08 2017 - 12:02:50)

DRAM: 1 GiB
Relocation Offset is: 36eb3000
register usb cfg[0][1] = 0000000037f5a960
[CANVAS]canvas init
boot_device_flag : 1
Nand PHY Ver:1.01.001.0006 (c) 2013 Amlogic Inc.
init bus_cycle=6, bus_timing=7, system=5.0ns
reset failed
get_chip_type and ret:fffffffe
get_chip_type and ret:fffffffe
chip detect failed and ret:fffffffe
nandphy_init failed and ret=0xfffffff1
MMC: aml_priv->desc_buf = 0x0000000033eb36b0
aml_priv->desc_buf = 0x0000000033eb59d0
SDIO Port B: 0, SDIO Port C: 1
emmc/sd response timeout, cmd8, status=0x1ff2800
emmc/sd response timeout, cmd55, status=0x1ff2800
init_part() 293: PART_TYPE_AML
[mmc_init] mmc init success
dtb magic edfe0dd0
 Amlogic multi-dtb tool
 Single dtb detected
start dts,buffer=0000000033eb8200,dt_addr=0000000033eb8200
 Amlogic multi-dtb tool
 Single dtb detected
parts: 11
00: logo 0000000002000000 1
01: recovery 0000000002000000 1
02: rsv 0000000000800000 1
03: tee 0000000000800000 1
04: crypt 0000000002000000 1
05: misc 0000000002000000 1
06: boot 0000000002000000 1
07: system 0000000080000000 1
08: cache 0000000020000000 2
09: data ffffffffffffffff 4
"Synchronous Abort" handler, esr 0x96000210
ELR: 37ec0b44
LR: 37ec0afc
x0 : 0000000033f38210 x1 : 000000000000000c
x2 : 0000000037f443f9 x3 : 0000000000000004
x4 : 0000000000000000 x5 : 0000000033f383a0
x6 : 0000000033ec13b0 x7 : 0000000000000020
x8 : 0000000000000034 x9 : 0000000000000000
x10: 000000000000000f x11: 0000000037f38d00
x12: 0000000000000000 x13: 0000000000000000
x14: 0000000000000000 x15: 0000000000000000
x16: 0000000000000000 x17: 0000000000000000
x18: 0000000033ea2e28 x19: 000000000000000a
x20: 0000000000000000 x21: 0000000033eb8200
x22: 0000000000000000 x23: 0000000033ebe6bc
x24: 0000000037f72000 x25: 0000000000000000
x26: 0000000000006468 x27: 0000000000000000
x28: 000000000000000a x29: 0000000033e92b70

Resetting CPU ...

resetting ...
GXL:BL1:9ac50e:a1974b;FEAT:ADFC318C;POC:3;RCY:0;EMMC:0;READ:0;0.0;CHK:0;
TE: 100780

BL2 Built : 20:32:17, Sep 8 2017.
gxl g6296b83 - xiaobo.gu@droid12

set vcck to 1120 mv
set vddee to 1070 mv
Board ID = 2
CPU clk: 1200MHz
DQS-corr enabled
DDR scramble enabled
DDR3 chl: Rank0 16bit @ 792MHz
Rank0: 1024MB(auto)-2T-11
DataBus test pass!
AddrBus test pass!
-s
Load fip header from eMMC, src: 0x0000c200, des: 0x01400000, size: 0x00004000
New fip structure!
Load bl30 from eMMC, src: 0x00010200, des: 0x01100000, size: 0x0000d600
Load bl31 from eMMC, src: 0x00020200, des: 0x05100000, size: 0x0002c600
Load bl33 from eMMC, src: 0x00050200, des: 0x01000000, size: 0x00065e00
NOTICE: BL3-1: v1.0(release):a625749
NOTICE: BL3-1: Built : 11:25:15, Aug 25 2017
[BL31]: GXL CPU setup!
NOTICE: BL31: BL33 decompress pass
mpu_config_enable:ok
[Image: gxl_v1.1.3243-377db0f 2017-09-07 11:28:58 qiufang.dai@droid07]
OPS=0xa2
0 a4 b0 46 ef c9 98 14 5e dc ac 58 [0.326738 Inits done]
secure task start!
high task start!
low task start!
ERROR: Error initializing runtime service opteed_fast


U-Boot 2015.01-g2d1a155-dirty (Oct 08 2017 - 12:02:50)

DRAM: 1 GiB
Relocation Offset is: 36eb3000
register usb cfg[0][1] = 0000000037f5a960
[CANVAS]canvas init
boot_device_flag : 1
Nand PHY Ver:1.01.001.0006 (c) 2013 Amlogic Inc.
init bus_cycle=6, bus_timing=7, system=5.0ns
reset failed
get_chip_type and ret:fffffffe
get_chip_type and ret:fffffffe
chip detect failed and ret:fffffffe
nandphy_init failed and ret=0xfffffff1
MMC: aml_priv->desc_buf = 0x0000000033eb36b0
aml_priv->desc_buf = 0x0000000033eb59d0
SDIO Port B: 0, SDIO Port C: 1
emmc/sd response timeout, cmd8, status=0x1ff2800
emmc/sd response timeout, cmd55, status=0x1ff2800
init_part() 293: PART_TYPE_AML
[mmc_init] mmc init success
dtb magic edfe0dd0
 Amlogic multi-dtb tool
 Single dtb detected
start dts,buffer=0000000033eb8200,dt_addr=0000000033eb8200
 Amlogic multi-dtb tool
 Single dtb detected
parts: 11
00: logo 0000000002000000 1
01: recovery 0000000002000000 1
02: rsv 0000000000800000 1
03: tee 0000000000800000 1
04: crypt 0000000002000000 1
05: misc 0000000002000000 1
06: boot 0000000002000000 1
07: system 0000000080000000 1
08: cache 0000000020000000 2
09: data ffffffffffffffff 4
"Synchronous Abort" handler, esr 0x96000210
ELR: 37ec0b44
LR: 37ec0afc
x0 : 0000000033f38210 x1 : 000000000000000c
x2 : 0000000037f443f9 x3 : 0000000000000004
x4 : 0000000000000000 x5 : 0000000033f383a0
x6 : 0000000033ec13b0 x7 : 0000000000000020
x8 : 0000000000000034 x9 : 0000000000000000
x10: 000000000000000f x11: 0000000037f38d00
x12: 0000000000000000 x13: 0000000000000000
x14: 0000000000000000 x15: 0000000000000000
x16: 0000000000000000 x17: 0000000000000000
x18: 0000000033ea2e28 x19: 000000000000000a
x20: 0000000000000000 x21: 0000000033eb8200
x22: 0000000000000000 x23: 0000000033ebe6bc
x24: 0000000037f72000 x25: 0000000000000000
x26: 0000000000006468 x27: 0000000000000000
x28: 000000000000000a x29: 0000000033e92b70

Resetting CPU ...

resetting ...
The box was in a boot loop without accepting any input or keystrokes. Some guides suggest to short out some pins on flash chip but my eMMC has BGA package so this was not possible. I randomly shorted out some resistors and capacitors nearby the eMMC but without luck. I was afraid I’ll need to use JTAG which seemed quite hard to solder and there were no howtos for using this method. Then I took some time to rethink this.
The point of shorting out pins is to avoid detecting the eMMC and to force the main chip boot into upload mode. So to avoid detecting it, it should be enough to break the communication by grounding some of the DATA, CLK or CMD lanes. So again I took ampermeter (to see if I’m not grounding power lane), attached one probe to GND and with the other one I was probing pins around the eMMC chip. After few tries, the status LED stayed blue and the board got detected, bingo!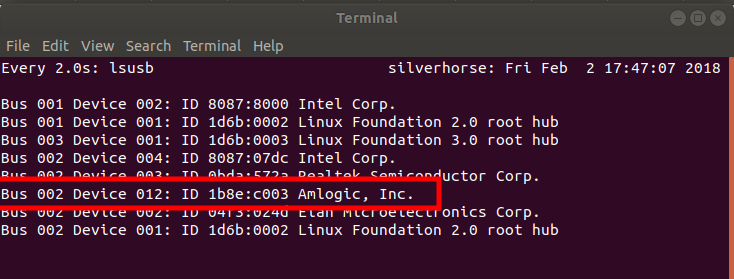
For those with the same board, it was this pin:
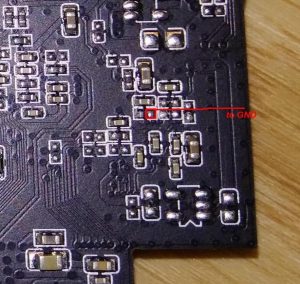
You can find GND on all connector shields (HDMI, USB).
Now it was just a piece of cake, I connected it to Windows machine, grounded pin again and used the upload utility:
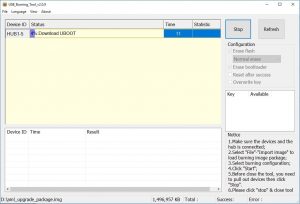
 Of course I tried to run and install LibreELEC to eMMC again but this time it worked and I wasn’t able to simulate the boot loop again, even with uploading garbage to /dev/dtb.
Hope this guide will help someone, if you have some questions or ideas please leave a comment.
Bye!
-
rodrii03
- Posts: 3
- Joined: Mon Sep 30, 2019 9:21 pm
Mon Sep 30, 2019 9:42 pm
hello my tv box is damaged and does not turn on, every time I want to install the atvexperience firmware it tells me the following error
[0x32030201] Uboot / Get Result / Diskinitial error
I don’t know how much of Ram I had, I forgot to notice, inside the tvbox it says S905XQ4_V1.0 2017.11.23
I tried the different firmwares on the download page but none of them works, which one I would have to install.
-

ricklar
- Moderator
- Posts: 889
- Joined: Fri Nov 30, 2018 10:30 pm
- Has thanked: 139 times
- Been thanked: 249 times
#2
Tue Oct 01, 2019 2:03 am
MXQ devices are not supported by ATV-X firmware.
You tried and were not lucky, so go back to original Firmware, or look to XDA-developers to find a possible ROM match to the MXQ device.
BE KIND, BE NICE, BE RESPECTFUL TO OTHERS, RESPECT THE MODERATORS,
*IMPORTANT NOTE* ONLY PM MODERATORS OR DEVELOPERS AS A LAST RESORT!!!
 My test device: H96 Pro+ 3gb/32gb DDR4 Plus own Tanix, Beelink, Alfawise, X96S, Odroid-N2, Khadas VIM3L, X3, ADT-3, X96-Air
GEARBEST.com
PLEASE ENJOY ATVX!
-
vrj
- Posts: 1
- Joined: Sat Jan 18, 2020 12:29 pm
#3
Sat Jan 18, 2020 1:23 pm
[HELP] mxq pro 4k
I tried flashing two boxes both seem to be bricked
I had a problem when flashing, I got the following error [0x32030201]Uboot/Get result/DiskInitial error
I looked on the forums and found a suggestion to untick erase bootloader option, so i did so.
The flash was successful but when I connect to tv nothing happens.
can someone pleases help, is there anything I can do
modEDIT: Read post above, same applies in your case for you to.
-
Nanu
- Posts: 1
- Joined: Sun Jul 26, 2020 5:39 pm
#4
Sun Jul 26, 2020 5:59 pm
I can’t flash my box I get to 4% with some roms and 7% with other. On the motherboard it says amlogic s905x quad core. It has android 7.1 with stock firmware and it works like crap. I tried with usb burning tool 2.2.0 and 2.1.7 , I tried all the combinations of starting the program first, after, plugging extra energy, etc. But it stops with 7% formating , get result/diskinitial error in some cases , and 4% read checkpara /error result in others.. I already spent about 4 hs between reaserching posible solutions and trying different ways of doing it. Haven’t tried with sd (I would have to buy one )
Loading
Firsr sorry for my bad english…I try wrtitting with google transelete..
Im having buying a used GTking for 50€ but the seller forget asking to me this gt king isnt turn on jus lightng red eye…
So i treid a couples fw (original 906P0,Alvatech) for my S/N B922 beeling GT King but i have this:
I copied from my log
17:28:40 971][HUB1-3][Inf]————-ERASE FLASH————
[17:28:40 971][HUB1-3][Inf]—disk_initial 1
[17:28:40 971][HUB1-3][Inf]—Send command success
[17:28:41 143][HUB1-3][Err]—failed:[17:28:41 143][HUB1-3][Err]—Check command return failed
[17:28:41 158][HUB1-3][Err]--[0x32030201]Uboot/Get result/DiskInitial error
[17:28:41 158][HUB1-3][Inf]—Close device handle 0x00000248
Please help me!What is your tipp?Can i send back for the seller while this GT KING is a brick or can i make it?
I have tried the SD burncard maker and there is no video to interact with. I can only get access with USB burning tool. Everytime I try I get this error.
[23:01:04 192][HUB1-3][Inf]—Open device handle \?usb#vid_1b8e&pid_c003#5&2a35e47&0&3#{a5dcbf10-6530-11d2-901f-00c04fb951ed} 0x00000598
[23:01:07 244][HUB1-3][Inf]—0-7-0-16
[23:01:07 245][HUB1-3][Inf]—CheckFileRunState succeed
[23:01:07 245][HUB1-3][Inf]— low_power
[23:01:07 250][HUB1-3][Inf]—Send command success
[23:01:07 254][HUB1-3][Inf]—Read command status success
[23:01:07 254][HUB1-3][Inf]————-Download meson1.dtb————
[23:01:07 255][HUB1-3][Inf]—0-7-0-16
[23:01:07 255][HUB1-3][Inf]—Enc(0xedfc318c)
[23:01:07 256][HUB1-3][Inf]— download mem dtb normal 39019
[23:01:07 256][HUB1-3][Inf]—Send download command success
[23:01:07 269][HUB1-3][Inf]—Read command status success
[23:01:07 280][HUB1-3][Inf]—Transfer complete
[23:01:07 280][HUB1-3][Inf]—Send download get_status command succeed
[23:01:07 284][HUB1-3][Inf]—get_status success
[23:01:07 786][HUB1-3][Inf]————-ERASE FLASH————
[23:01:09 787][HUB1-3][Inf]—send command diskinit
[23:01:09 787][HUB1-3][Inf]—disk_initial 1
[23:01:09 787][HUB1-3][Inf]—Send command success
[23:01:10 889][HUB1-3][Err]—failed:[23:01:10 890][HUB1-3][Inf]—Read command diskinit status
[23:01:10 890][HUB1-3][Err]—Check command return failed
[23:01:10 927][HUB1-3][Err]—[0x32030201]Uboot/Get result/DiskInitial error
[23:01:10 927][HUB1-3][Inf]—Close device handle 0x00000598