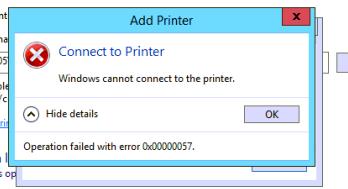
Несколько раз столкнулся со следующей проблемой: при попытке подключить некий сетевой принтер с одного из принт-серверов на клиенте появляется ошибка 0x00000057 Windows cannot connect to the printer. Ошибка появляется на этапе установки драйвера принтера с принт-сервера и, как я выяснил в дальнейшем, исправляется на стороне клиента. Ниже приведу последовательность действий, которая помогла мне решить эту ошибку.
Драйвер принтера не установлен. Невозможно завершить операцию (ошибка 0x00000057)
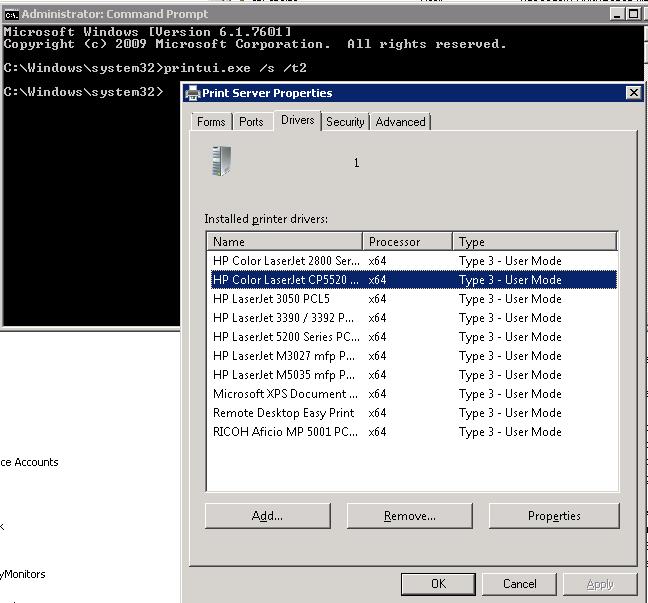
В том случае, если драйвер подключаемого сетевого принтера уже установлен на проблемном компьютере, стоит попробовать вручную удалить его из хранилища драйверов. Для этого откройте диалоговое окно со списком установленных локально драйверов печати и удалите драйвер подключаемого принтера (и x64 и x86 версии).
printui.exe /s /t2
 После удаления драйвера попытайтесь еще раз подключить сетевой принтер
Если это не помогло, или драйвер отсутствовал на клиентской системе, выполните следующие операции.
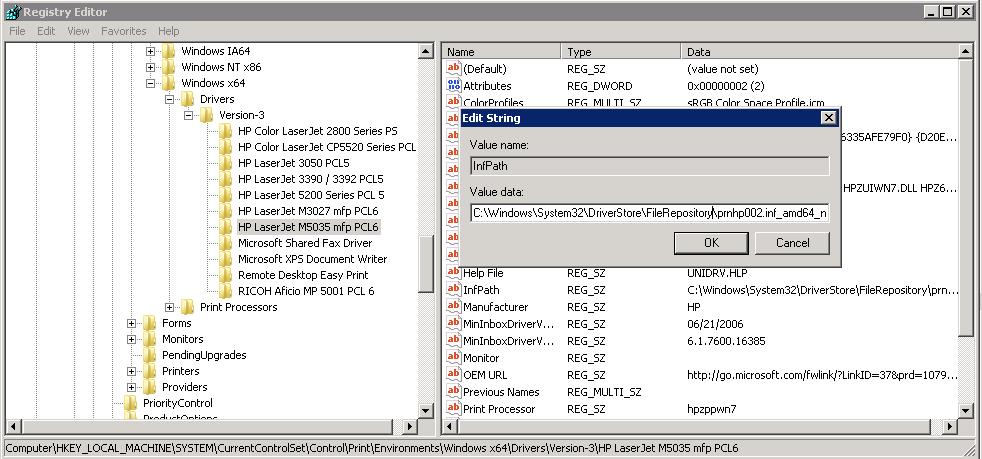
- Нам понадобится компьютер, на котором данный принтер установлен корректно и успешно печатает. На этом компьютере запустите редактор реестра и перейдите в следующую ветку реестра
- на x64 системе: HKEY_LOCAL_MACHINE SystemCurrentControlSetControlPrintEnvironmentsWindows NT x64DriversVersion-3
- на x86 системе HKEY_LOCAL_MACHINESystemCurrentControlSetControlPrintEnvironmentsWindows NT x86DriversVersion-3
- Найдите ветку с именем драйвера принтера, который вы хотите установить и экспортируйте ее в Reg файл.
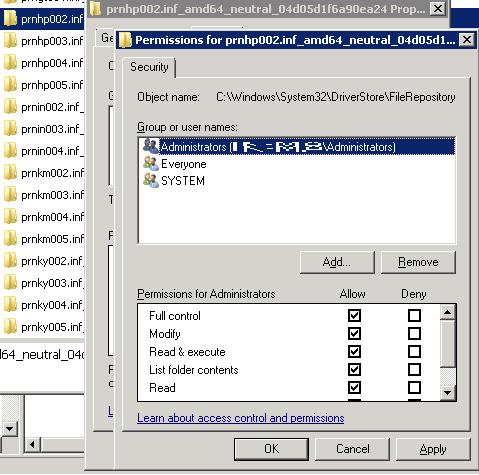
- Затем в данной ветке найдите значение ключа InfPath. В моем примере это C:WindowsSystem32DriverStoreFileRepositoryprnhp002.inf_amd64_neutral_04d05d1f6a90ea24prnhp002.inf
- Перейдите в каталог C:WindowsSystem32DriverStoreFileRepository и найдите имя папки, на которую указывает ключ
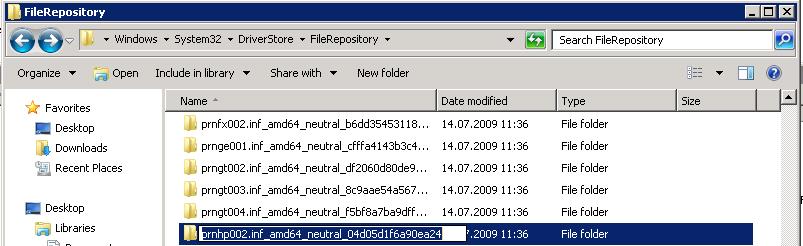
- Теперь на проблемном компьютере попытайтесь найти эту папку. Скорее всего она будет присутствовать, но будет пустой. Это свидетельствует о том, что процесс установки драйвера аварийно прервался
- Отредактируйте NTFS разрешения на данную папку (скорее всего понадобится сделать себя ее владельцем), и добавить права Full Control для группы локальных администраторов.
- Импортируйте reg файл на проблемном компьютере и скопируйте содержимое папки драйвера с нормального компьютера на проблемный.
- Перезапустите службу печати;
net stop spooler & net start spooler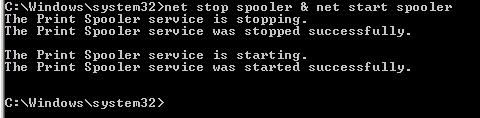
- Попробуйте подключить принтер. Клиент должен успешно скачать и установить драйвер с принт-сервера.
Если ни одно из решений не помогло, перейдите в каталог C:WindowsSystem32DriverStore, создайте резервную копию файла infpub.dat, а затем предоставьте группе локальных администраторов полные права на него (Full Control). После этого попытайтесь установить сетевой притер.
If you are getting Windows cannot connect to the printer error message while connecting to a network printer, these tips and tricks can resolve the issue. You can find various error codes, including 0x00000002, 0x0000007a, 0x00004005, 0x00000057, and 0x00000006. Although each error code defines different things, the solutions are the same to eliminate the problem.
Windows cannot connect to the printer

Network Printer error 0x00000002, 0x0000007a, 0x00004005, 0x00000057, 0x00000006
To fix these network printer errors, follow these suggestions:
- Restart Print Spooler
- Use Printer troubleshooter
- Install required drivers
- Tweak LAN Manager authentication level
- Manually add a local printer
Continue reading to learn more about these steps in detail.
1] Restart Print Spooler
The Print Spooler service lets you connect the printer to your computer. If this service is not running, you cannot see the printer on your computer. In case you stopped it earlier due to any reason (or, even if you didn’t), you need to verify if it is running or not. Like any other background, you can find it in the Services panel.
Search for services in the Taskbar search box, and click on the individual result to open Services on your Windows 10 computer. Next, find out the Print Spooler service and double-click on it.
If it is showing as Stopped, you need to click on the Start button.
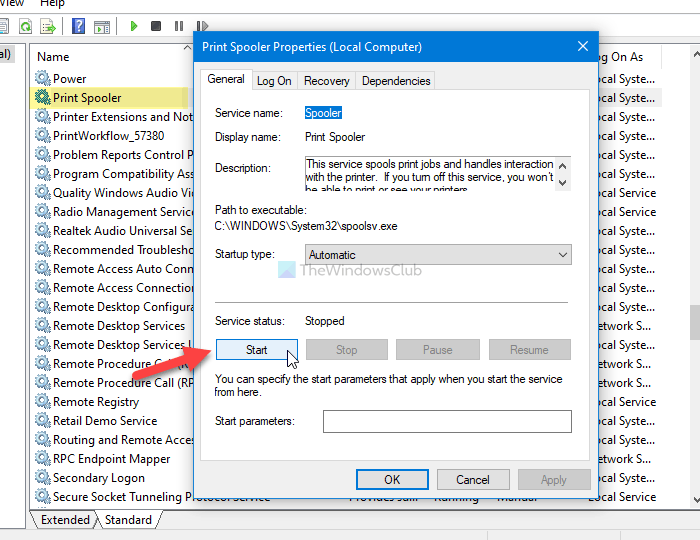
Alternatively, if it shows as Running, click the Stop button, and Start button to restart the service.
Click the OK button to save the change.
Now, restart your computer and check if the problem remains or not.
Read: Unable to print after a Blackout or Power Outage.
2] Use Printer troubleshooter
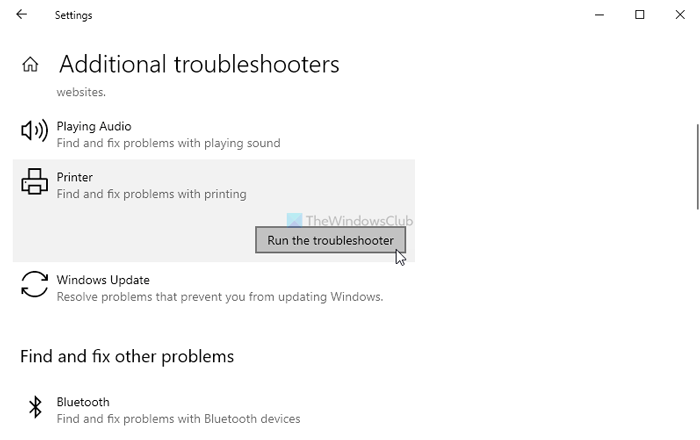
As Windows 10 includes troubleshooters, you can use the Printer troubleshooter to fix common or basic problems like this one. For that, press Win+I to open Windows Settings. Then, go to Update & Security > Troubleshoot > Additional troubleshooters to open the Troubleshooter page in Windows 10.
Once it is opened, find out the Printer troubleshooter, select it, and click the Run the troubleshooter button.
Next, you have to follow the screen instructions as the solutions might be different on your computer.
Related post: Windows couldn’t connect to the Printer.
3] Install required Printer drivers
When you bought the printer, you got a driver CD with it, which lets you establish a better connection between your computer and the printer. If you haven’t installed it already, it is suggested to do that and restart your computer.
However, if you haven’t got it with your printer, you can find the driver on the official website of the printer manufacturer.
4] Tweak LAN Manager authentication level
The LAN Manager authentication level lets you choose the authentication protocol for network logons – in this case, network printer. It is possible to change the LAN Manager authentication level using the Local Group Policy Editor and the Registry Editor.
Once done, restart your computer to get the change.
If none of the aforementioned solutions is working, you can add your printer manually. The following steps will do the job for you.
FIX: Printer is in Error State.
5] Manually add a local printer
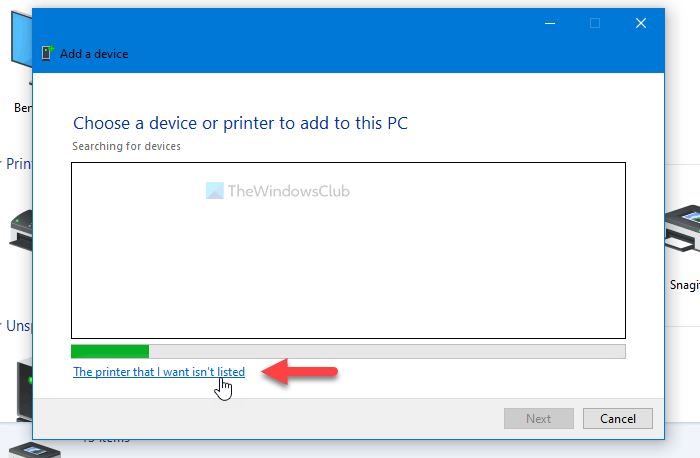
Search for the control panel in the Taskbar search box, and click on the individual result to open Control Panel on your computer. Then, click on the Devices and Printer option, and click the Add a printer button.
After that, your computer will search for printers. However, you have to skip it and click The printer that I want isn’t listed option.
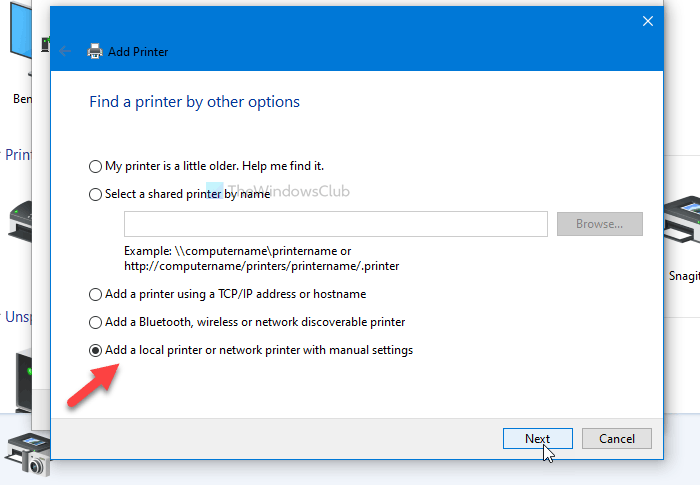
Now, select the Add a local printer or network printer with manual settings radio button and choose the Next option.
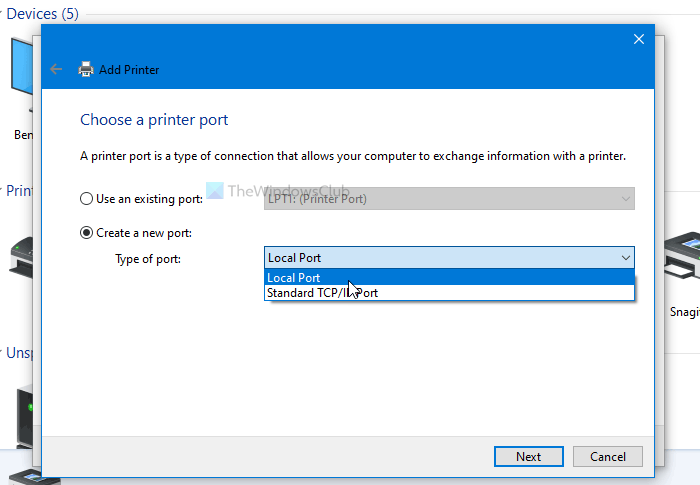
Following that, it asks you to choose an existing port or a new port. It is suggested to select the Create a new port and choose the Local Port option from the drop-down list.
Once you click the Next button, it asks you to enter the port name. Then, you can install the generic drivers for your local printer.
At last, you need to restart your computer and check if it solves the issue or not.
That’s all! These are the working solutions to fix Windows cannot connect to the printer error on Windows 10.
Related: Network Printer error 0x00000bcb – Cannot connect to the printer.
If you are getting Windows cannot connect to the printer error message while connecting to a network printer, these tips and tricks can resolve the issue. You can find various error codes, including 0x00000002, 0x0000007a, 0x00004005, 0x00000057, and 0x00000006. Although each error code defines different things, the solutions are the same to eliminate the problem.
Windows cannot connect to the printer
Network Printer error 0x00000002, 0x0000007a, 0x00004005, 0x00000057, 0x00000006
To fix these network printer errors, follow these suggestions:
- Restart Print Spooler
- Use Printer troubleshooter
- Install required drivers
- Tweak LAN Manager authentication level
- Manually add a local printer
Continue reading to learn more about these steps in detail.
1] Restart Print Spooler
The Print Spooler service lets you connect the printer to your computer. If this service is not running, you cannot see the printer on your computer. In case you stopped it earlier due to any reason (or, even if you didn’t), you need to verify if it is running or not. Like any other background, you can find it in the Services panel.
Search for services in the Taskbar search box, and click on the individual result to open Services on your Windows 10 computer. Next, find out the Print Spooler service and double-click on it.
If it is showing as Stopped, you need to click on the Start button.
Alternatively, if it shows as Running, click the Stop button, and Start button to restart the service.
Click the OK button to save the change.
Now, restart your computer and check if the problem remains or not.
Read: Unable to print after a Blackout or Power Outage.
2] Use Printer troubleshooter
As Windows 10 includes troubleshooters, you can use the Printer troubleshooter to fix common or basic problems like this one. For that, press Win+I to open Windows Settings. Then, go to Update & Security > Troubleshoot > Additional troubleshooters to open the Troubleshooter page in Windows 10.
Once it is opened, find out the Printer troubleshooter, select it, and click the Run the troubleshooter button.
Next, you have to follow the screen instructions as the solutions might be different on your computer.
Related post: Windows couldn’t connect to the Printer.
3] Install required Printer drivers
When you bought the printer, you got a driver CD with it, which lets you establish a better connection between your computer and the printer. If you haven’t installed it already, it is suggested to do that and restart your computer.
However, if you haven’t got it with your printer, you can find the driver on the official website of the printer manufacturer.
4] Tweak LAN Manager authentication level
The LAN Manager authentication level lets you choose the authentication protocol for network logons – in this case, network printer. It is possible to change the LAN Manager authentication level using the Local Group Policy Editor and the Registry Editor.
Once done, restart your computer to get the change.
If none of the aforementioned solutions is working, you can add your printer manually. The following steps will do the job for you.
FIX: Printer is in Error State.
5] Manually add a local printer
Search for the control panel in the Taskbar search box, and click on the individual result to open Control Panel on your computer. Then, click on the Devices and Printer option, and click the Add a printer button.
After that, your computer will search for printers. However, you have to skip it and click The printer that I want isn’t listed option.
Now, select the Add a local printer or network printer with manual settings radio button and choose the Next option.
Following that, it asks you to choose an existing port or a new port. It is suggested to select the Create a new port and choose the Local Port option from the drop-down list.
Once you click the Next button, it asks you to enter the port name. Then, you can install the generic drivers for your local printer.
At last, you need to restart your computer and check if it solves the issue or not.
That’s all! These are the working solutions to fix Windows cannot connect to the printer error on Windows 10.
Related: Network Printer error 0x00000bcb – Cannot connect to the printer.
Автор:
Janice Evans
Дата создания:
25 Июль 2021
Дата обновления:
22 Январь 2023

Ошибка 0x00000057 — это ошибка принтера в Windows, которая не позволяет пользователю добавить принтер. Эта ошибка обычно возникает из-за ранее установленных поврежденных драйверов и проблем с разрешениями. Поэтому, когда вы пытаетесь добавить принтер, он устанавливается, но не добавляет принтер из-за поврежденных файлов в DriverStore.
В этом руководстве я перечислил два метода, которые помогали мне в прошлом. Первый способ удалит драйвер, а второй метод — скопировать драйвер с рабочего компьютера. Если метод 1 работает для вас, то второй метод не требуется.
Метод 1: восстановить поврежденные системные файлы
Загрузите и запустите Restoro для сканирования и восстановления поврежденных и отсутствующих файлов из Вот, как только это будет сделано, перейдите к приведенным ниже методам. Важно убедиться, что все системные файлы не повреждены и не повреждены, прежде чем переходить к приведенным ниже методам.
Метод 2: Свойства сервера печати
1. Удерживая клавишу Windows, нажмите R
2. В диалоговом окне запуска введите services.msc и нажмите ОК

3. Найдите службу «Диспетчер очереди печати», щелкните ее правой кнопкой мыши и выберите Остановить.

4. После остановки удерживайте клавишу Windows и снова нажмите R. В диалоговом окне запуска введите
printui.exe / s / t2
и нажмите ОК.
Найдите здесь под полем имени свой принтер, который вызывает проблемы, щелкните его и выберите «Удалить». Когда вас спросят, если вы хотите удалить драйвер, выберите соответствующие запросы для подтверждения удаления.
5. После удаления вернитесь в консоль служб, щелкните правой кнопкой мыши службу диспетчера очереди печати и выберите Пуск.
Теперь попробуйте заново добавить / переустановить принтер. Если по-прежнему не работает, перейдите к способу 2.
Способ 3 можно посмотреть здесь: Ошибка 0x00005b3 — Хотя номер ошибки другой, но процедура работает и для этой ошибки.
Метод 4: скопируйте файлы каталога драйверов с рабочей машины
Для пользователей, которые пытаются установить эти драйверы на несколько машин, в случаях, когда некоторые из них не работают, а некоторые устанавливаются успешно, вы можете попытаться скопировать файлы из каталога драйверов с рабочей машины на ту, которая не работает.
- Перейдите к машине с установленным и исправно работающим драйвером. нажмите Windows и р одновременно клавиши на клавиатуре, чтобы открыть Бегать
- Введите regedit, и либо нажмите Войти или щелкните хорошо открыть Редактор реестра.
- С помощью редактора реестра перейдите в следующее место:
HKEY_LOCAL_MACHINE System CurrentControlSet Control Print Environments Windows NT x86 Drivers Version-3
- В этой папке найдите подключ драйвера принтера, с которым у вас возникли проблемы. Нажмите это, и ищите InfPath на правой панели. Обратите внимание на путь.
- открыто Мой компьютер / Этот компьютер, и перейдите к % systemroot% System32 DriverStore FileRepository, и найдите папку, указанную в InfPath
- Перейдите к компьютеру, на котором у вас возникли проблемы с установкой драйвера, и перейдите к вышеупомянутому FileRepository папка и посмотрите, есть ли там папка. Если папка есть, но пуста, значит предыдущая установка не удалась.
- В этом случае вам нужно будет стать владельцем папки и предоставь себе полный контроль.
- Щелкните правой кнопкой мыши папку и выберите Свойства, затем перейдите к Безопасность
- Нажмите Advanced, и + Изменить в Владелец на вершине. Нажмите хорошо вернуться к Свойства
- Нажмите Edit, и из Группы или имена пользователей, найдите своего пользователя и проверьте Разрешить полный контроль коробка в Разрешения для аутентифицированных пользователей Нажмите ХОРОШО. Закройте Свойства окно, нажав ХОРОШО.
- После того, как вы позаботились о безопасности папки, копировать содержимое папки с рабочей машины на машину, выдающую ошибку 0x00000057.
- Теперь вы можете попробовать установить драйвер снова, он должен работать и не вызывать у вас головной боли.
Несколько раз столкнулся со следующей проблемой: при попытке подключить некий сетевой принтер с одного из принт-серверов на клиенте появляется ошибка 0x00000057 Windows cannot connect to the printer. Ошибка появляется на этапе установки драйвера принтера с принт-сервера и, как я выяснил в дальнейшем, исправляется на стороне клиента. Ниже приведу последовательность действий, которая помогла мне решить эту ошибку.
Драйвер принтера не установлен. Невозможно завершить операцию (ошибка 0x00000057)
В том случае, если драйвер подключаемого сетевого принтера уже установлен на проблемном компьютере, стоит попробовать вручную удалить его из хранилища драйверов. Для этого откройте диалоговое окно со списком установленных локально драйверов печати и удалите драйвер подключаемого принтера (и x64 и x86 версии).
printui.exe /s /t2
После удаления драйвера попытайтесь еще раз подключить сетевой принтер
Если это не помогло, или драйвер отсутствовал на клиентской системе, выполните следующие операции.
- Нам понадобится компьютер, на котором данный принтер установлен корректно и успешно печатает. На этом компьютере запустите редактор реестра и перейдите в следующую ветку реестра
- на x64 системе: HKEY_LOCAL_MACHINE SystemCurrentControlSetControlPrintEnvironmentsWindows NT x64DriversVersion-3
- на x86 системе HKEY_LOCAL_MACHINESystemCurrentControlSetControlPrintEnvironmentsWindows NT x86DriversVersion-3
- Найдите ветку с именем драйвера принтера, который вы хотите установить и экспортируйте ее в Reg файл.
- Затем в данной ветке найдите значение ключа InfPath. В моем примере это C:WindowsSystem32DriverStoreFileRepositoryprnhp002.inf_amd64_neutral_04d05d1f6a90ea24prnhp002.inf
- Перейдите в каталог C:WindowsSystem32DriverStoreFileRepository и найдите имя папки, на которую указывает ключ
- Теперь на проблемном компьютере попытайтесь найти эту папку. Скорее всего она будет присутствовать, но будет пустой. Это свидетельствует о том, что процесс установки драйвера аварийно прервался
- Отредактируйте NTFS разрешения на данную папку (скорее всего понадобится сделать себя ее владельцем), и добавить права Full Control для группы локальных администраторов.
- Импортируйте reg файл на проблемном компьютере и скопируйте содержимое папки драйвера с нормального компьютера на проблемный.
- Перезапустите службу печати;
net stop spooler & net start spooler - Попробуйте подключить принтер. Клиент должен успешно скачать и установить драйвер с принт-сервера.
Если ни одно из решений не помогло, перейдите в каталог C:WindowsSystem32DriverStore, создайте резервную копию файла infpub.dat, а затем предоставьте группе локальных администраторов полные права на него (Full Control). После этого попытайтесь установить сетевой притер.
If you are getting Windows cannot connect to the printer error message while connecting to a network printer, these tips and tricks can resolve the issue. You can find various error codes, including 0x00000002, 0x0000007a, 0x00004005, 0x00000057, and 0x00000006. Although each error code defines different things, the solutions are the same to eliminate the problem.
Windows cannot connect to the printer

Network Printer error 0x00000002, 0x0000007a, 0x00004005, 0x00000057, 0x00000006
To fix these network printer errors, follow these suggestions:
- Restart Print Spooler
- Use Printer troubleshooter
- Install required drivers
- Tweak LAN Manager authentication level
- Manually add a local printer
Continue reading to learn more about these steps in detail.
1] Restart Print Spooler
The Print Spooler service lets you connect the printer to your computer. If this service is not running, you cannot see the printer on your computer. In case you stopped it earlier due to any reason (or, even if you didn’t), you need to verify if it is running or not. Like any other background, you can find it in the Services panel.
Search for services in the Taskbar search box, and click on the individual result to open Services on your Windows 10 computer. Next, find out the Print Spooler service and double-click on it.
If it is showing as Stopped, you need to click on the Start button.
Alternatively, if it shows as Running, click the Stop button, and Start button to restart the service.
Click the OK button to save the change.
Now, restart your computer and check if the problem remains or not.
Read: Unable to print after a Blackout or Power Outage.
2] Use Printer troubleshooter
As Windows 10 includes troubleshooters, you can use the Printer troubleshooter to fix common or basic problems like this one. For that, press Win+I to open Windows Settings. Then, go to Update & Security > Troubleshoot > Additional troubleshooters to open the Troubleshooter page in Windows 10.
Once it is opened, find out the Printer troubleshooter, select it, and click the Run the troubleshooter button.
Next, you have to follow the screen instructions as the solutions might be different on your computer.
Related post: Windows couldn’t connect to the Printer.
3] Install required Printer drivers
When you bought the printer, you got a driver CD with it, which lets you establish a better connection between your computer and the printer. If you haven’t installed it already, it is suggested to do that and restart your computer.
However, if you haven’t got it with your printer, you can find the driver on the official website of the printer manufacturer.
4] Tweak LAN Manager authentication level
The LAN Manager authentication level lets you choose the authentication protocol for network logons – in this case, network printer. It is possible to change the LAN Manager authentication level using the Local Group Policy Editor and the Registry Editor.
Once done, restart your computer to get the change.
If none of the aforementioned solutions is working, you can add your printer manually. The following steps will do the job for you.
FIX: Printer is in Error State.
5] Manually add a local printer
Search for the control panel in the Taskbar search box, and click on the individual result to open Control Panel on your computer. Then, click on the Devices and Printer option, and click the Add a printer button.
After that, your computer will search for printers. However, you have to skip it and click The printer that I want isn’t listed option.
Now, select the Add a local printer or network printer with manual settings radio button and choose the Next option.
Following that, it asks you to choose an existing port or a new port. It is suggested to select the Create a new port and choose the Local Port option from the drop-down list.
Once you click the Next button, it asks you to enter the port name. Then, you can install the generic drivers for your local printer.
At last, you need to restart your computer and check if it solves the issue or not.
That’s all! These are the working solutions to fix Windows cannot connect to the printer error on Windows 10.
Related: Network Printer error 0x00000bcb – Cannot connect to the printer.
If you are getting Windows cannot connect to the printer error message while connecting to a network printer, these tips and tricks can resolve the issue. You can find various error codes, including 0x00000002, 0x0000007a, 0x00004005, 0x00000057, and 0x00000006. Although each error code defines different things, the solutions are the same to eliminate the problem.
Windows cannot connect to the printer
Network Printer error 0x00000002, 0x0000007a, 0x00004005, 0x00000057, 0x00000006
To fix these network printer errors, follow these suggestions:
- Restart Print Spooler
- Use Printer troubleshooter
- Install required drivers
- Tweak LAN Manager authentication level
- Manually add a local printer
Continue reading to learn more about these steps in detail.
1] Restart Print Spooler
The Print Spooler service lets you connect the printer to your computer. If this service is not running, you cannot see the printer on your computer. In case you stopped it earlier due to any reason (or, even if you didn’t), you need to verify if it is running or not. Like any other background, you can find it in the Services panel.
Search for services in the Taskbar search box, and click on the individual result to open Services on your Windows 10 computer. Next, find out the Print Spooler service and double-click on it.
If it is showing as Stopped, you need to click on the Start button.
Alternatively, if it shows as Running, click the Stop button, and Start button to restart the service.
Click the OK button to save the change.
Now, restart your computer and check if the problem remains or not.
Read: Unable to print after a Blackout or Power Outage.
2] Use Printer troubleshooter
As Windows 10 includes troubleshooters, you can use the Printer troubleshooter to fix common or basic problems like this one. For that, press Win+I to open Windows Settings. Then, go to Update & Security > Troubleshoot > Additional troubleshooters to open the Troubleshooter page in Windows 10.
Once it is opened, find out the Printer troubleshooter, select it, and click the Run the troubleshooter button.
Next, you have to follow the screen instructions as the solutions might be different on your computer.
Related post: Windows couldn’t connect to the Printer.
3] Install required Printer drivers
When you bought the printer, you got a driver CD with it, which lets you establish a better connection between your computer and the printer. If you haven’t installed it already, it is suggested to do that and restart your computer.
However, if you haven’t got it with your printer, you can find the driver on the official website of the printer manufacturer.
4] Tweak LAN Manager authentication level
The LAN Manager authentication level lets you choose the authentication protocol for network logons – in this case, network printer. It is possible to change the LAN Manager authentication level using the Local Group Policy Editor and the Registry Editor.
Once done, restart your computer to get the change.
If none of the aforementioned solutions is working, you can add your printer manually. The following steps will do the job for you.
FIX: Printer is in Error State.
5] Manually add a local printer
Search for the control panel in the Taskbar search box, and click on the individual result to open Control Panel on your computer. Then, click on the Devices and Printer option, and click the Add a printer button.
After that, your computer will search for printers. However, you have to skip it and click The printer that I want isn’t listed option.
Now, select the Add a local printer or network printer with manual settings radio button and choose the Next option.
Following that, it asks you to choose an existing port or a new port. It is suggested to select the Create a new port and choose the Local Port option from the drop-down list.
Once you click the Next button, it asks you to enter the port name. Then, you can install the generic drivers for your local printer.
At last, you need to restart your computer and check if it solves the issue or not.
That’s all! These are the working solutions to fix Windows cannot connect to the printer error on Windows 10.
Related: Network Printer error 0x00000bcb – Cannot connect to the printer.
Автор:
Janice Evans
Дата создания:
25 Июль 2021
Дата обновления:
5 Февраль 2023
Ошибка 0x00000057 — это ошибка принтера в Windows, которая не позволяет пользователю добавить принтер. Эта ошибка обычно возникает из-за ранее установленных поврежденных драйверов и проблем с разрешениями. Поэтому, когда вы пытаетесь добавить принтер, он устанавливается, но не добавляет принтер из-за поврежденных файлов в DriverStore.
В этом руководстве я перечислил два метода, которые помогали мне в прошлом. Первый способ удалит драйвер, а второй метод — скопировать драйвер с рабочего компьютера. Если метод 1 работает для вас, то второй метод не требуется.
Метод 1: восстановить поврежденные системные файлы
Загрузите и запустите Restoro для сканирования и восстановления поврежденных и отсутствующих файлов из Вот, как только это будет сделано, перейдите к приведенным ниже методам. Важно убедиться, что все системные файлы не повреждены и не повреждены, прежде чем переходить к приведенным ниже методам.
Метод 2: Свойства сервера печати
1. Удерживая клавишу Windows, нажмите R
2. В диалоговом окне запуска введите services.msc и нажмите ОК
3. Найдите службу «Диспетчер очереди печати», щелкните ее правой кнопкой мыши и выберите Остановить.
4. После остановки удерживайте клавишу Windows и снова нажмите R. В диалоговом окне запуска введите
printui.exe / s / t2
и нажмите ОК.
Найдите здесь под полем имени свой принтер, который вызывает проблемы, щелкните его и выберите «Удалить». Когда вас спросят, если вы хотите удалить драйвер, выберите соответствующие запросы для подтверждения удаления.
5. После удаления вернитесь в консоль служб, щелкните правой кнопкой мыши службу диспетчера очереди печати и выберите Пуск.
Теперь попробуйте заново добавить / переустановить принтер. Если по-прежнему не работает, перейдите к способу 2.
Способ 3 можно посмотреть здесь: Ошибка 0x00005b3 — Хотя номер ошибки другой, но процедура работает и для этой ошибки.
Метод 4: скопируйте файлы каталога драйверов с рабочей машины
Для пользователей, которые пытаются установить эти драйверы на несколько машин, в случаях, когда некоторые из них не работают, а некоторые устанавливаются успешно, вы можете попытаться скопировать файлы из каталога драйверов с рабочей машины на ту, которая не работает.
- Перейдите к машине с установленным и исправно работающим драйвером. нажмите Windows и р одновременно клавиши на клавиатуре, чтобы открыть Бегать
- Введите regedit, и либо нажмите Войти или щелкните хорошо открыть Редактор реестра.
- С помощью редактора реестра перейдите в следующее место:
HKEY_LOCAL_MACHINE System CurrentControlSet Control Print Environments Windows NT x86 Drivers Version-3
- В этой папке найдите подключ драйвера принтера, с которым у вас возникли проблемы. Нажмите это, и ищите InfPath на правой панели. Обратите внимание на путь.
- открыто Мой компьютер / Этот компьютер, и перейдите к % systemroot% System32 DriverStore FileRepository, и найдите папку, указанную в InfPath
- Перейдите к компьютеру, на котором у вас возникли проблемы с установкой драйвера, и перейдите к вышеупомянутому FileRepository папка и посмотрите, есть ли там папка. Если папка есть, но пуста, значит предыдущая установка не удалась.
- В этом случае вам нужно будет стать владельцем папки и предоставь себе полный контроль.
- Щелкните правой кнопкой мыши папку и выберите Свойства, затем перейдите к Безопасность
- Нажмите Advanced, и + Изменить в Владелец на вершине. Нажмите хорошо вернуться к Свойства
- Нажмите Edit, и из Группы или имена пользователей, найдите своего пользователя и проверьте Разрешить полный контроль коробка в Разрешения для аутентифицированных пользователей Нажмите ХОРОШО. Закройте Свойства окно, нажав ХОРОШО.
- После того, как вы позаботились о безопасности папки, копировать содержимое папки с рабочей машины на машину, выдающую ошибку 0x00000057.
- Теперь вы можете попробовать установить драйвер снова, он должен работать и не вызывать у вас головной боли.
Код ошибки 0x0000011b связанный с сетевым принтером начал появляться после обновления некоторых патчей как KB5005627, KB5005652, KB5005563, KB5005573 KB5005565 и KB5005613 в разных редакциях и версиях Windows 11/10, которое Microsoft выпустила, чтобы закрыть уязвимость PrintNightmare в очереди печати. На самом деле, уязвимость не закрывалась, если администратор не создавал вручную дополнительный параметр в реестре. По это причине, microsoft с обновлениями автоматически начала создавать данный параметр в реестре, что и привело к массовой ошибке 0x0000011b.
Кроме того, microsoft убрала возможность по умолчанию запуск принтера в сети без прав администратора в патче KB5005652 от 10 августа. Это приводит к ошибке 0x0000011b при попытке подключится к принтеру в одной сети у того пользователя, который не имеет достаточных прав. Он просто не сможет установить драйвер принтера из сети/сервера.
В данной инструкции о том, как исправить ошибку «Windows не удается подключиться к принтеру» код ошибки 0x0000011b в Windows 11/10.

1. Удалить обновление KB5005565
1. В Windows 11/10 напишите в поиске меню пуска «Панель управления» и откройте её. Далее перейдите в удаление программ.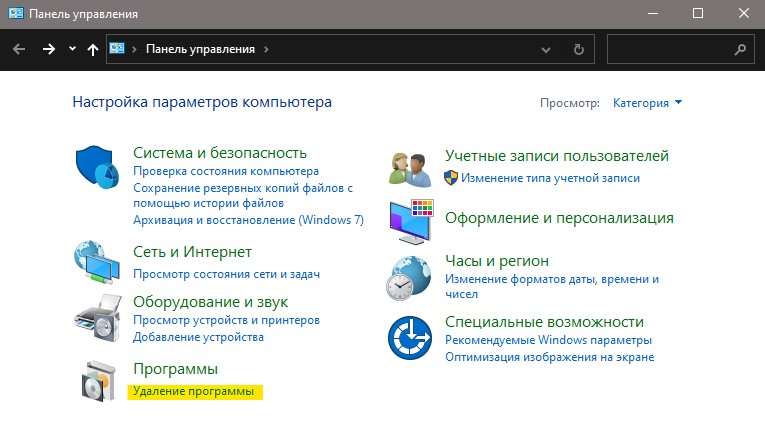
2. Слева нажмите на «Просмотр установленных обновлений«.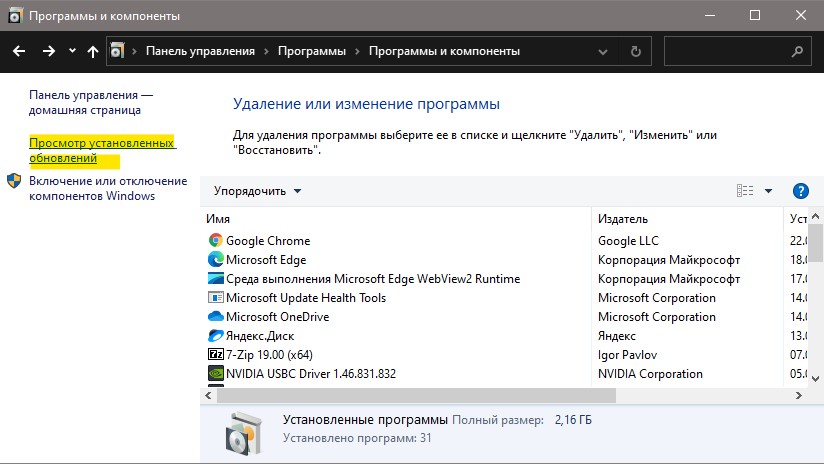
3. Выделите «Обновление безопасности KB5005565» и нажмите выше «Удалить«. Перезагрузите ПК и ошибка 0x0000011b устранится.
Без удаления обновлений
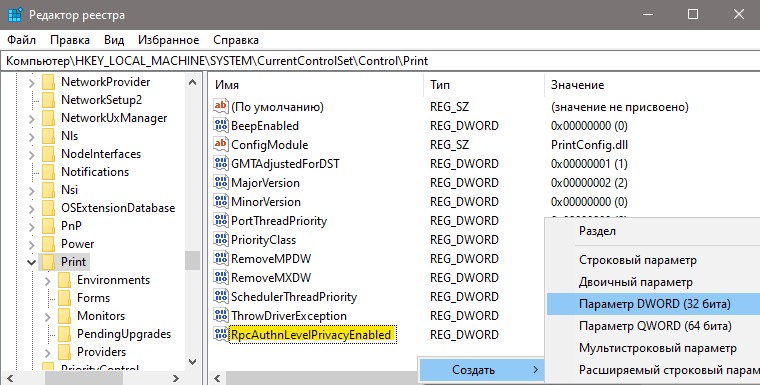
Если вы не желаете удалять обновление безопасности, то нажмите Win+R и введите regedit, чтобы открыть редактор реестра. В реестре перейдите по пути:
HKEY_LOCAL_MACHINESYSTEMCurrentControlSetControlPrint
- Щелкните правой кнопкой мыши справа по пустому месту
- Создать > Параметр DWORD (32 бита)
- Назовите его RpcAuthnLevelPrivacyEnabled
- Щелкните по нему дважды и установите 0
- Перезагрузите ПК
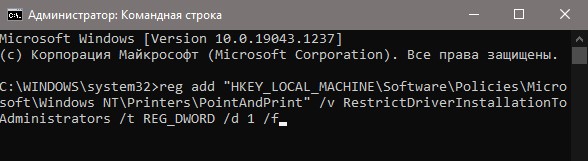
2. Ошибка 0x0000011b установки драйвера принтера
Если пользователи в сети не могут устанавливать принтеры с помощью драйверов на удаленном компьютере или сервере, или обновлять драйвер принтера, то запустите командную строку от имени администратора и введите:
reg add "HKEY_LOCAL_MACHINESoftwarePoliciesMicrosoftWindows NTPrintersPointAndPrint" /v RestrictDriverInstallationToAdministrators /t REG_DWORD /d 1 /f
Смотрите еще:
- Как установить принтер по умолчанию в Windows 11/10
- Исправить ошибку pcl xl error при печати на принтере
- Ошибка 0x00000709 при подключении принтера в Windows 10
- Ошибка 0x00000709 при подключении принтера в Windows 10
- Не найден сетевой путь ошибка 0x80070035
[ Telegram | Поддержать ]
Несколько раз столкнулся со следующей проблемой: при попытке подключить некий сетевой принтер с одного из принт-серверов на клиенте появляется ошибка 0x00000057 Windows cannot connect to the printer. Ошибка появляется на этапе установки драйвера принтера с принт-сервера и, как я выяснил в дальнейшем, исправляется на стороне клиента. Ниже приведу последовательность действий, которая помогла мне решить эту ошибку.
Драйвер принтера не установлен. Невозможно завершить операцию (ошибка 0x00000057)
В том случае, если драйвер подключаемого сетевого принтера уже установлен на проблемном компьютере, стоит попробовать вручную удалить его из хранилища драйверов. Для этого откройте диалоговое окно со списком установленных локально драйверов печати и удалите драйвер подключаемого принтера (и x64 и x86 версии).
printui.exe /s /t2
После удаления драйвера попытайтесь еще раз подключить сетевой принтер
Если это не помогло, или драйвер отсутствовал на клиентской системе, выполните следующие операции.
- Нам понадобится компьютер, на котором данный принтер установлен корректно и успешно печатает. На этом компьютере запустите редактор реестра и перейдите в следующую ветку реестра
- на x64 системе: HKEY_LOCAL_MACHINE SystemCurrentControlSetControlPrintEnvironmentsWindows NT x64DriversVersion-3
- на x86 системе HKEY_LOCAL_MACHINESystemCurrentControlSetControlPrintEnvironmentsWindows NT x86DriversVersion-3
- Найдите ветку с именем драйвера принтера, который вы хотите установить и экспортируйте ее в Reg файл.
- Затем в данной ветке найдите значение ключа InfPath. В моем примере это C:WindowsSystem32DriverStoreFileRepositoryprnhp002.inf_amd64_neutral_04d05d1f6a90ea24prnhp002.inf
- Перейдите в каталог C:WindowsSystem32DriverStoreFileRepository и найдите имя папки, на которую указывает ключ
- Теперь на проблемном компьютере попытайтесь найти эту папку. Скорее всего она будет присутствовать, но будет пустой. Это свидетельствует о том, что процесс установки драйвера аварийно прервался
- Отредактируйте NTFS разрешения на данную папку (скорее всего понадобится сделать себя ее владельцем), и добавить права Full Control для группы локальных администраторов.
- Импортируйте reg файл на проблемном компьютере и скопируйте содержимое папки драйвера с нормального компьютера на проблемный.
- Перезапустите службу печати;
net stop spooler & net start spooler
- Попробуйте подключить принтер. Клиент должен успешно скачать и установить драйвер с принт-сервера.
Если ни одно из решений не помогло, перейдите в каталог C:WindowsSystem32DriverStore, создайте резервную копию файла infpub.dat, а затем предоставьте группе локальных администраторов полные права на него (Full Control). После этого попытайтесь установить сетевой притер.
i get error code 0x00000574 when trying to add a network printer to my computer. how can i fix this. thanks
Read these next…

Windows 10 Enterprise not allowing downloads or search
Windows
Hello All,We just got a new machine that came with its own computer. The computer has Windows 10 Enterprise on it. All of our PCs are running Windows 10 Pro. I joined the new PC to the domain and logged in as the domain admin. Everything worked great. The…

Bring your dog to work day
Holidays
Do you work from home or office? Doesn’t matter. Let’s see those pets that work right alongside you. Well, mine mostly sleeps but they are there! This is Peanut. Her bed is next to my desk. I have to walk her up and down the stairs due to her rickety bon…

Snap! — Space Immunities, Stretching Metal, Defining Sandwich, 3D Printed Steel
Spiceworks Originals
Your daily dose of tech news, in brief.
Welcome to the Snap!
Flashback: june 23, 1912: Computer Pioneer Alan Turing Born (Read more HERE.)
Bonus Flashback: June 22, 2000: Possible evidence of liquid water found on Mars (Read more HERE.)
…
Has anyone else heard anything about RHEL becoming closed source?
Linux
Would anyone care to share their thoughts about what this might indicate for things to come?
A few weeks ago, Jay Lecroix Opens a new window made some passing references to the changes IBM has made to CentOS/CentOS Strea…

IT Documentation
Software
Let me begin by stating I am aware that there are tonnes of posts for this question. But, I was denied financial leeway for unnecessary expenses; and this in their opinion is one. I, recently, acquired the role of and IT do-it-all. for more than a decade,…
Несколько раз столкнулся со следующей проблемой: при попытке подключить некий сетевой принтер с одного из принт-серверов на клиенте появляется ошибка 0x00000057 Windows cannot connect to the printer. Ошибка появляется на этапе установки драйвера принтера с принт-сервера и, как я выяснил в дальнейшем, исправляется на стороне клиента. Ниже приведу последовательность действий, которая помогла мне решить эту ошибку.
Драйвер принтера не установлен. Невозможно завершить операцию (ошибка 0x00000057)
В том случае, если драйвер подключаемого сетевого принтера уже установлен на проблемном компьютере, стоит попробовать вручную удалить его из хранилища драйверов. Для этого откройте диалоговое окно со списком установленных локально драйверов печати и удалите драйвер подключаемого принтера (и x64 и x86 версии).
printui.exe /s /t2
После удаления драйвера попытайтесь еще раз подключить сетевой принтер
Если это не помогло, или драйвер отсутствовал на клиентской системе, выполните следующие операции.
- Нам понадобится компьютер, на котором данный принтер установлен корректно и успешно печатает. На этом компьютере запустите редактор реестра и перейдите в следующую ветку реестра
- на x64 системе: HKEY_LOCAL_MACHINE SystemCurrentControlSetControlPrintEnvironmentsWindows NT x64DriversVersion-3
- на x86 системе HKEY_LOCAL_MACHINESystemCurrentControlSetControlPrintEnvironmentsWindows NT x86DriversVersion-3
- Найдите ветку с именем драйвера принтера, который вы хотите установить и экспортируйте ее в Reg файл.
- Затем в данной ветке найдите значение ключа InfPath. В моем примере это C:WindowsSystem32DriverStoreFileRepositoryprnhp002.inf_amd64_neutral_04d05d1f6a90ea24prnhp002.inf
- Перейдите в каталог C:WindowsSystem32DriverStoreFileRepository и найдите имя папки, на которую указывает ключ
- Теперь на проблемном компьютере попытайтесь найти эту папку. Скорее всего она будет присутствовать, но будет пустой. Это свидетельствует о том, что процесс установки драйвера аварийно прервался
- Отредактируйте NTFS разрешения на данную папку (скорее всего понадобится сделать себя ее владельцем), и добавить права Full Control для группы локальных администраторов.
- Импортируйте reg файл на проблемном компьютере и скопируйте содержимое папки драйвера с нормального компьютера на проблемный.
- Перезапустите службу печати;
net stop spooler & net start spooler - Попробуйте подключить принтер. Клиент должен успешно скачать и установить драйвер с принт-сервера.
Если ни одно из решений не помогло, перейдите в каталог C:WindowsSystem32DriverStore, создайте резервную копию файла infpub.dat, а затем предоставьте группе локальных администраторов полные права на него (Full Control). После этого попытайтесь установить сетевой притер.
If you are getting Windows cannot connect to the printer error message while connecting to a network printer, these tips and tricks can resolve the issue. You can find various error codes, including 0x00000002, 0x0000007a, 0x00004005, 0x00000057, and 0x00000006. Although each error code defines different things, the solutions are the same to eliminate the problem.
Windows cannot connect to the printer
Network Printer error 0x00000002, 0x0000007a, 0x00004005, 0x00000057, 0x00000006
To fix these network printer errors, follow these suggestions:
- Restart Print Spooler
- Use Printer troubleshooter
- Install required drivers
- Tweak LAN Manager authentication level
- Manually add a local printer
Continue reading to learn more about these steps in detail.
1] Restart Print Spooler
The Print Spooler service lets you connect the printer to your computer. If this service is not running, you cannot see the printer on your computer. In case you stopped it earlier due to any reason (or, even if you didn’t), you need to verify if it is running or not. Like any other background, you can find it in the Services panel.
Search for services in the Taskbar search box, and click on the individual result to open Services on your Windows 10 computer. Next, find out the Print Spooler service and double-click on it.
If it is showing as Stopped, you need to click on the Start button.
Alternatively, if it shows as Running, click the Stop button, and Start button to restart the service.
Click the OK button to save the change.
Now, restart your computer and check if the problem remains or not.
Read: Unable to print after a Blackout or Power Outage.
2] Use Printer troubleshooter
As Windows 10 includes troubleshooters, you can use the Printer troubleshooter to fix common or basic problems like this one. For that, press Win+I to open Windows Settings. Then, go to Update & Security > Troubleshoot > Additional troubleshooters to open the Troubleshooter page in Windows 10.
Once it is opened, find out the Printer troubleshooter, select it, and click the Run the troubleshooter button.
Next, you have to follow the screen instructions as the solutions might be different on your computer.
Related post: Windows couldn’t connect to the Printer.
3] Install required Printer drivers
When you bought the printer, you got a driver CD with it, which lets you establish a better connection between your computer and the printer. If you haven’t installed it already, it is suggested to do that and restart your computer.
However, if you haven’t got it with your printer, you can find the driver on the official website of the printer manufacturer.
4] Tweak LAN Manager authentication level
The LAN Manager authentication level lets you choose the authentication protocol for network logons – in this case, network printer. It is possible to change the LAN Manager authentication level using the Local Group Policy Editor and the Registry Editor.
Once done, restart your computer to get the change.
If none of the aforementioned solutions is working, you can add your printer manually. The following steps will do the job for you.
FIX: Printer is in Error State.
5] Manually add a local printer
Search for the control panel in the Taskbar search box, and click on the individual result to open Control Panel on your computer. Then, click on the Devices and Printer option, and click the Add a printer button.
After that, your computer will search for printers. However, you have to skip it and click The printer that I want isn’t listed option.
Now, select the Add a local printer or network printer with manual settings radio button and choose the Next option.
Following that, it asks you to choose an existing port or a new port. It is suggested to select the Create a new port and choose the Local Port option from the drop-down list.
Once you click the Next button, it asks you to enter the port name. Then, you can install the generic drivers for your local printer.
At last, you need to restart your computer and check if it solves the issue or not.
That’s all! These are the working solutions to fix Windows cannot connect to the printer error on Windows 10.
Related: Network Printer error 0x00000bcb – Cannot connect to the printer.
Автор:
Janice Evans
Дата создания:
25 Июль 2021
Дата обновления:
22 Январь 2023
Ошибка 0x00000057 — это ошибка принтера в Windows, которая не позволяет пользователю добавить принтер. Эта ошибка обычно возникает из-за ранее установленных поврежденных драйверов и проблем с разрешениями. Поэтому, когда вы пытаетесь добавить принтер, он устанавливается, но не добавляет принтер из-за поврежденных файлов в DriverStore.
В этом руководстве я перечислил два метода, которые помогали мне в прошлом. Первый способ удалит драйвер, а второй метод — скопировать драйвер с рабочего компьютера. Если метод 1 работает для вас, то второй метод не требуется.
Метод 1: восстановить поврежденные системные файлы
Загрузите и запустите Restoro для сканирования и восстановления поврежденных и отсутствующих файлов из Вот, как только это будет сделано, перейдите к приведенным ниже методам. Важно убедиться, что все системные файлы не повреждены и не повреждены, прежде чем переходить к приведенным ниже методам.
Метод 2: Свойства сервера печати
1. Удерживая клавишу Windows, нажмите R
2. В диалоговом окне запуска введите services.msc и нажмите ОК
3. Найдите службу «Диспетчер очереди печати», щелкните ее правой кнопкой мыши и выберите Остановить.
4. После остановки удерживайте клавишу Windows и снова нажмите R. В диалоговом окне запуска введите
printui.exe / s / t2
и нажмите ОК.
Найдите здесь под полем имени свой принтер, который вызывает проблемы, щелкните его и выберите «Удалить». Когда вас спросят, если вы хотите удалить драйвер, выберите соответствующие запросы для подтверждения удаления.
5. После удаления вернитесь в консоль служб, щелкните правой кнопкой мыши службу диспетчера очереди печати и выберите Пуск.
Теперь попробуйте заново добавить / переустановить принтер. Если по-прежнему не работает, перейдите к способу 2.
Способ 3 можно посмотреть здесь: Ошибка 0x00005b3 — Хотя номер ошибки другой, но процедура работает и для этой ошибки.
Метод 4: скопируйте файлы каталога драйверов с рабочей машины
Для пользователей, которые пытаются установить эти драйверы на несколько машин, в случаях, когда некоторые из них не работают, а некоторые устанавливаются успешно, вы можете попытаться скопировать файлы из каталога драйверов с рабочей машины на ту, которая не работает.
- Перейдите к машине с установленным и исправно работающим драйвером. нажмите Windows и р одновременно клавиши на клавиатуре, чтобы открыть Бегать
- Введите regedit, и либо нажмите Войти или щелкните хорошо открыть Редактор реестра.
- С помощью редактора реестра перейдите в следующее место:
HKEY_LOCAL_MACHINE System CurrentControlSet Control Print Environments Windows NT x86 Drivers Version-3
- В этой папке найдите подключ драйвера принтера, с которым у вас возникли проблемы. Нажмите это, и ищите InfPath на правой панели. Обратите внимание на путь.
- открыто Мой компьютер / Этот компьютер, и перейдите к % systemroot% System32 DriverStore FileRepository, и найдите папку, указанную в InfPath
- Перейдите к компьютеру, на котором у вас возникли проблемы с установкой драйвера, и перейдите к вышеупомянутому FileRepository папка и посмотрите, есть ли там папка. Если папка есть, но пуста, значит предыдущая установка не удалась.
- В этом случае вам нужно будет стать владельцем папки и предоставь себе полный контроль.
- Щелкните правой кнопкой мыши папку и выберите Свойства, затем перейдите к Безопасность
- Нажмите Advanced, и + Изменить в Владелец на вершине. Нажмите хорошо вернуться к Свойства
- Нажмите Edit, и из Группы или имена пользователей, найдите своего пользователя и проверьте Разрешить полный контроль коробка в Разрешения для аутентифицированных пользователей Нажмите ХОРОШО. Закройте Свойства окно, нажав ХОРОШО.
- После того, как вы позаботились о безопасности папки, копировать содержимое папки с рабочей машины на машину, выдающую ошибку 0x00000057.
- Теперь вы можете попробовать установить драйвер снова, он должен работать и не вызывать у вас головной боли.
Несколько раз столкнулся со следующей проблемой: при попытке подключить некий сетевой принтер с одного из принт-серверов на клиенте появляется ошибка 0x00000057 Windows cannot connect to the printer. Ошибка появляется на этапе установки драйвера принтера с принт-сервера и, как я выяснил в дальнейшем, исправляется на стороне клиента. Ниже приведу последовательность действий, которая помогла мне решить эту ошибку.
Драйвер принтера не установлен. Невозможно завершить операцию (ошибка 0x00000057)
В том случае, если драйвер подключаемого сетевого принтера уже установлен на проблемном компьютере, стоит попробовать вручную удалить его из хранилища драйверов. Для этого откройте диалоговое окно со списком установленных локально драйверов печати и удалите драйвер подключаемого принтера (и x64 и x86 версии).
printui.exe /s /t2
После удаления драйвера попытайтесь еще раз подключить сетевой принтер
Если это не помогло, или драйвер отсутствовал на клиентской системе, выполните следующие операции.
- Нам понадобится компьютер, на котором данный принтер установлен корректно и успешно печатает. На этом компьютере запустите редактор реестра и перейдите в следующую ветку реестра
- на x64 системе: HKEY_LOCAL_MACHINE SystemCurrentControlSetControlPrintEnvironmentsWindows NT x64DriversVersion-3
- на x86 системе HKEY_LOCAL_MACHINESystemCurrentControlSetControlPrintEnvironmentsWindows NT x86DriversVersion-3
- Найдите ветку с именем драйвера принтера, который вы хотите установить и экспортируйте ее в Reg файл.
- Затем в данной ветке найдите значение ключа InfPath. В моем примере это C:WindowsSystem32DriverStoreFileRepositoryprnhp002.inf_amd64_neutral_04d05d1f6a90ea24prnhp002.inf
- Перейдите в каталог C:WindowsSystem32DriverStoreFileRepository и найдите имя папки, на которую указывает ключ
- Теперь на проблемном компьютере попытайтесь найти эту папку. Скорее всего она будет присутствовать, но будет пустой. Это свидетельствует о том, что процесс установки драйвера аварийно прервался
- Отредактируйте NTFS разрешения на данную папку (скорее всего понадобится сделать себя ее владельцем), и добавить права Full Control для группы локальных администраторов.
- Импортируйте reg файл на проблемном компьютере и скопируйте содержимое папки драйвера с нормального компьютера на проблемный.
- Перезапустите службу печати;
net stop spooler & net start spooler - Попробуйте подключить принтер. Клиент должен успешно скачать и установить драйвер с принт-сервера.
Если ни одно из решений не помогло, перейдите в каталог C:WindowsSystem32DriverStore, создайте резервную копию файла infpub.dat, а затем предоставьте группе локальных администраторов полные права на него (Full Control). После этого попытайтесь установить сетевой притер.
If you are getting Windows cannot connect to the printer error message while connecting to a network printer, these tips and tricks can resolve the issue. You can find various error codes, including 0x00000002, 0x0000007a, 0x00004005, 0x00000057, and 0x00000006. Although each error code defines different things, the solutions are the same to eliminate the problem.
Windows cannot connect to the printer
Network Printer error 0x00000002, 0x0000007a, 0x00004005, 0x00000057, 0x00000006
To fix these network printer errors, follow these suggestions:
- Restart Print Spooler
- Use Printer troubleshooter
- Install required drivers
- Tweak LAN Manager authentication level
- Manually add a local printer
Continue reading to learn more about these steps in detail.
1] Restart Print Spooler
The Print Spooler service lets you connect the printer to your computer. If this service is not running, you cannot see the printer on your computer. In case you stopped it earlier due to any reason (or, even if you didn’t), you need to verify if it is running or not. Like any other background, you can find it in the Services panel.
Search for services in the Taskbar search box, and click on the individual result to open Services on your Windows 10 computer. Next, find out the Print Spooler service and double-click on it.
If it is showing as Stopped, you need to click on the Start button.
Alternatively, if it shows as Running, click the Stop button, and Start button to restart the service.
Click the OK button to save the change.
Now, restart your computer and check if the problem remains or not.
Read: Unable to print after a Blackout or Power Outage.
2] Use Printer troubleshooter
As Windows 10 includes troubleshooters, you can use the Printer troubleshooter to fix common or basic problems like this one. For that, press Win+I to open Windows Settings. Then, go to Update & Security > Troubleshoot > Additional troubleshooters to open the Troubleshooter page in Windows 10.
Once it is opened, find out the Printer troubleshooter, select it, and click the Run the troubleshooter button.
Next, you have to follow the screen instructions as the solutions might be different on your computer.
Related post: Windows couldn’t connect to the Printer.
3] Install required Printer drivers
When you bought the printer, you got a driver CD with it, which lets you establish a better connection between your computer and the printer. If you haven’t installed it already, it is suggested to do that and restart your computer.
However, if you haven’t got it with your printer, you can find the driver on the official website of the printer manufacturer.
4] Tweak LAN Manager authentication level
The LAN Manager authentication level lets you choose the authentication protocol for network logons – in this case, network printer. It is possible to change the LAN Manager authentication level using the Local Group Policy Editor and the Registry Editor.
Once done, restart your computer to get the change.
If none of the aforementioned solutions is working, you can add your printer manually. The following steps will do the job for you.
FIX: Printer is in Error State.
5] Manually add a local printer
Search for the control panel in the Taskbar search box, and click on the individual result to open Control Panel on your computer. Then, click on the Devices and Printer option, and click the Add a printer button.
After that, your computer will search for printers. However, you have to skip it and click The printer that I want isn’t listed option.
Now, select the Add a local printer or network printer with manual settings radio button and choose the Next option.
Following that, it asks you to choose an existing port or a new port. It is suggested to select the Create a new port and choose the Local Port option from the drop-down list.
Once you click the Next button, it asks you to enter the port name. Then, you can install the generic drivers for your local printer.
At last, you need to restart your computer and check if it solves the issue or not.
That’s all! These are the working solutions to fix Windows cannot connect to the printer error on Windows 10.
Related: Network Printer error 0x00000bcb – Cannot connect to the printer.
Автор:
Janice Evans
Дата создания:
25 Июль 2021
Дата обновления:
5 Февраль 2023
Ошибка 0x00000057 — это ошибка принтера в Windows, которая не позволяет пользователю добавить принтер. Эта ошибка обычно возникает из-за ранее установленных поврежденных драйверов и проблем с разрешениями. Поэтому, когда вы пытаетесь добавить принтер, он устанавливается, но не добавляет принтер из-за поврежденных файлов в DriverStore.
В этом руководстве я перечислил два метода, которые помогали мне в прошлом. Первый способ удалит драйвер, а второй метод — скопировать драйвер с рабочего компьютера. Если метод 1 работает для вас, то второй метод не требуется.
Метод 1: восстановить поврежденные системные файлы
Загрузите и запустите Restoro для сканирования и восстановления поврежденных и отсутствующих файлов из Вот, как только это будет сделано, перейдите к приведенным ниже методам. Важно убедиться, что все системные файлы не повреждены и не повреждены, прежде чем переходить к приведенным ниже методам.
Метод 2: Свойства сервера печати
1. Удерживая клавишу Windows, нажмите R
2. В диалоговом окне запуска введите services.msc и нажмите ОК
3. Найдите службу «Диспетчер очереди печати», щелкните ее правой кнопкой мыши и выберите Остановить.
4. После остановки удерживайте клавишу Windows и снова нажмите R. В диалоговом окне запуска введите
printui.exe / s / t2
и нажмите ОК.
Найдите здесь под полем имени свой принтер, который вызывает проблемы, щелкните его и выберите «Удалить». Когда вас спросят, если вы хотите удалить драйвер, выберите соответствующие запросы для подтверждения удаления.
5. После удаления вернитесь в консоль служб, щелкните правой кнопкой мыши службу диспетчера очереди печати и выберите Пуск.
Теперь попробуйте заново добавить / переустановить принтер. Если по-прежнему не работает, перейдите к способу 2.
Способ 3 можно посмотреть здесь: Ошибка 0x00005b3 — Хотя номер ошибки другой, но процедура работает и для этой ошибки.
Метод 4: скопируйте файлы каталога драйверов с рабочей машины
Для пользователей, которые пытаются установить эти драйверы на несколько машин, в случаях, когда некоторые из них не работают, а некоторые устанавливаются успешно, вы можете попытаться скопировать файлы из каталога драйверов с рабочей машины на ту, которая не работает.
- Перейдите к машине с установленным и исправно работающим драйвером. нажмите Windows и р одновременно клавиши на клавиатуре, чтобы открыть Бегать
- Введите regedit, и либо нажмите Войти или щелкните хорошо открыть Редактор реестра.
- С помощью редактора реестра перейдите в следующее место:
HKEY_LOCAL_MACHINE System CurrentControlSet Control Print Environments Windows NT x86 Drivers Version-3
- В этой папке найдите подключ драйвера принтера, с которым у вас возникли проблемы. Нажмите это, и ищите InfPath на правой панели. Обратите внимание на путь.
- открыто Мой компьютер / Этот компьютер, и перейдите к % systemroot% System32 DriverStore FileRepository, и найдите папку, указанную в InfPath
- Перейдите к компьютеру, на котором у вас возникли проблемы с установкой драйвера, и перейдите к вышеупомянутому FileRepository папка и посмотрите, есть ли там папка. Если папка есть, но пуста, значит предыдущая установка не удалась.
- В этом случае вам нужно будет стать владельцем папки и предоставь себе полный контроль.
- Щелкните правой кнопкой мыши папку и выберите Свойства, затем перейдите к Безопасность
- Нажмите Advanced, и + Изменить в Владелец на вершине. Нажмите хорошо вернуться к Свойства
- Нажмите Edit, и из Группы или имена пользователей, найдите своего пользователя и проверьте Разрешить полный контроль коробка в Разрешения для аутентифицированных пользователей Нажмите ХОРОШО. Закройте Свойства окно, нажав ХОРОШО.
- После того, как вы позаботились о безопасности папки, копировать содержимое папки с рабочей машины на машину, выдающую ошибку 0x00000057.
- Теперь вы можете попробовать установить драйвер снова, он должен работать и не вызывать у вас головной боли.
Код ошибки 0x0000011b связанный с сетевым принтером начал появляться после обновления некоторых патчей как KB5005627, KB5005652, KB5005563, KB5005573 KB5005565 и KB5005613 в разных редакциях и версиях Windows 11/10, которое Microsoft выпустила, чтобы закрыть уязвимость PrintNightmare в очереди печати. На самом деле, уязвимость не закрывалась, если администратор не создавал вручную дополнительный параметр в реестре. По это причине, microsoft с обновлениями автоматически начала создавать данный параметр в реестре, что и привело к массовой ошибке 0x0000011b.
Кроме того, microsoft убрала возможность по умолчанию запуск принтера в сети без прав администратора в патче KB5005652 от 10 августа. Это приводит к ошибке 0x0000011b при попытке подключится к принтеру в одной сети у того пользователя, который не имеет достаточных прав. Он просто не сможет установить драйвер принтера из сети/сервера.
В данной инструкции о том, как исправить ошибку «Windows не удается подключиться к принтеру» код ошибки 0x0000011b в Windows 11/10.
1. Удалить обновление KB5005565
1. В Windows 11/10 напишите в поиске меню пуска «Панель управления» и откройте её. Далее перейдите в удаление программ.
2. Слева нажмите на «Просмотр установленных обновлений«.
3. Выделите «Обновление безопасности KB5005565» и нажмите выше «Удалить«. Перезагрузите ПК и ошибка 0x0000011b устранится.
Без удаления обновлений
Если вы не желаете удалять обновление безопасности, то нажмите Win+R и введите regedit, чтобы открыть редактор реестра. В реестре перейдите по пути:
HKEY_LOCAL_MACHINESYSTEMCurrentControlSetControlPrint
- Щелкните правой кнопкой мыши справа по пустому месту
- Создать > Параметр DWORD (32 бита)
- Назовите его RpcAuthnLevelPrivacyEnabled
- Щелкните по нему дважды и установите 0
- Перезагрузите ПК
2. Ошибка 0x0000011b установки драйвера принтера
Если пользователи в сети не могут устанавливать принтеры с помощью драйверов на удаленном компьютере или сервере, или обновлять драйвер принтера, то запустите командную строку от имени администратора и введите:
reg add "HKEY_LOCAL_MACHINESoftwarePoliciesMicrosoftWindows NTPrintersPointAndPrint" /v RestrictDriverInstallationToAdministrators /t REG_DWORD /d 1 /f
Смотрите еще:
- Как установить принтер по умолчанию в Windows 11/10
- Исправить ошибку pcl xl error при печати на принтере
- Ошибка 0x00000709 при подключении принтера в Windows 10
- Ошибка 0x00000709 при подключении принтера в Windows 10
- Не найден сетевой путь ошибка 0x80070035
[ Telegram | Поддержать ]
Автор:
Janice Evans
Дата создания:
25 Июль 2021
Дата обновления:
6 Апрель 2023
Ошибка 0x00000057 — это ошибка принтера в Windows, которая не позволяет пользователю добавить принтер. Эта ошибка обычно возникает из-за ранее установленных поврежденных драйверов и проблем с разрешениями. Поэтому, когда вы пытаетесь добавить принтер, он устанавливается, но не добавляет принтер из-за поврежденных файлов в DriverStore.
В этом руководстве я перечислил два метода, которые помогали мне в прошлом. Первый способ удалит драйвер, а второй метод — скопировать драйвер с рабочего компьютера. Если метод 1 работает для вас, то второй метод не требуется.
Метод 1: восстановить поврежденные системные файлы
Загрузите и запустите Restoro для сканирования и восстановления поврежденных и отсутствующих файлов из Вот, как только это будет сделано, перейдите к приведенным ниже методам. Важно убедиться, что все системные файлы не повреждены и не повреждены, прежде чем переходить к приведенным ниже методам.
Метод 2: Свойства сервера печати
1. Удерживая клавишу Windows, нажмите R
2. В диалоговом окне запуска введите services.msc и нажмите ОК
3. Найдите службу «Диспетчер очереди печати», щелкните ее правой кнопкой мыши и выберите Остановить.
4. После остановки удерживайте клавишу Windows и снова нажмите R. В диалоговом окне запуска введите
printui.exe / s / t2
и нажмите ОК.
Найдите здесь под полем имени свой принтер, который вызывает проблемы, щелкните его и выберите «Удалить». Когда вас спросят, если вы хотите удалить драйвер, выберите соответствующие запросы для подтверждения удаления.
5. После удаления вернитесь в консоль служб, щелкните правой кнопкой мыши службу диспетчера очереди печати и выберите Пуск.
Теперь попробуйте заново добавить / переустановить принтер. Если по-прежнему не работает, перейдите к способу 2.
Способ 3 можно посмотреть здесь: Ошибка 0x00005b3 — Хотя номер ошибки другой, но процедура работает и для этой ошибки.
Метод 4: скопируйте файлы каталога драйверов с рабочей машины
Для пользователей, которые пытаются установить эти драйверы на несколько машин, в случаях, когда некоторые из них не работают, а некоторые устанавливаются успешно, вы можете попытаться скопировать файлы из каталога драйверов с рабочей машины на ту, которая не работает.
- Перейдите к машине с установленным и исправно работающим драйвером. нажмите Windows и р одновременно клавиши на клавиатуре, чтобы открыть Бегать
- Введите regedit, и либо нажмите Войти или щелкните хорошо открыть Редактор реестра.
- С помощью редактора реестра перейдите в следующее место:
HKEY_LOCAL_MACHINE System CurrentControlSet Control Print Environments Windows NT x86 Drivers Version-3
- В этой папке найдите подключ драйвера принтера, с которым у вас возникли проблемы. Нажмите это, и ищите InfPath на правой панели. Обратите внимание на путь.
- открыто Мой компьютер / Этот компьютер, и перейдите к % systemroot% System32 DriverStore FileRepository, и найдите папку, указанную в InfPath
- Перейдите к компьютеру, на котором у вас возникли проблемы с установкой драйвера, и перейдите к вышеупомянутому FileRepository папка и посмотрите, есть ли там папка. Если папка есть, но пуста, значит предыдущая установка не удалась.
- В этом случае вам нужно будет стать владельцем папки и предоставь себе полный контроль.
- Щелкните правой кнопкой мыши папку и выберите Свойства, затем перейдите к Безопасность
- Нажмите Advanced, и + Изменить в Владелец на вершине. Нажмите хорошо вернуться к Свойства
- Нажмите Edit, и из Группы или имена пользователей, найдите своего пользователя и проверьте Разрешить полный контроль коробка в Разрешения для аутентифицированных пользователей Нажмите ХОРОШО. Закройте Свойства окно, нажав ХОРОШО.
- После того, как вы позаботились о безопасности папки, копировать содержимое папки с рабочей машины на машину, выдающую ошибку 0x00000057.
- Теперь вы можете попробовать установить драйвер снова, он должен работать и не вызывать у вас головной боли.