Download Windows Speedup Tool to fix errors and make PC run faster
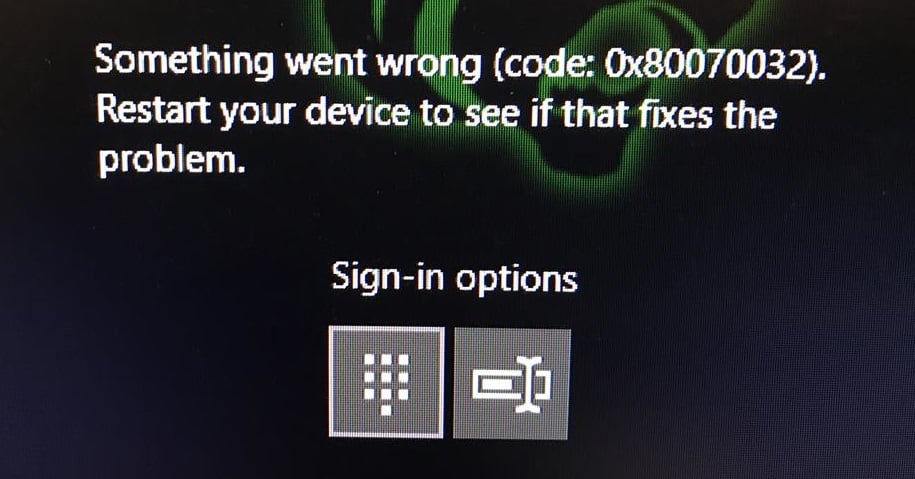
At times while trying to update Windows, the process might get stuck and return the error code 0x80070032. If you encounter the Windows Update error 0x80070032, then read through this article for the resolution.

We’re having trouble restarting to finish the install (0x80070032)
The error is caused when a specific Windows update is stuck, and you need to pass through it. To resolve Windows Update error 0x80070032, try the following solutions sequentially:
- Restart the computer
- Uninstall the latest update
- Reset Windows Update components
- Run the Windows Update troubleshooter
1] Restart the computer
The first approach the solving this problem should be to simply restart the computer. If this helps, it could save you a lot of time.
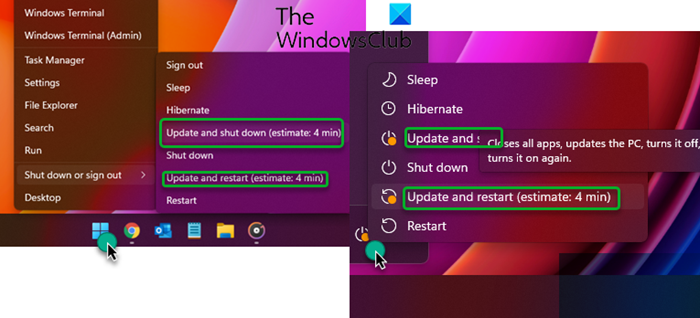
You could use the Restart button that you see in Settings or use the Update and shut down or Update and restart options from the WinX Menu or the Start Menu.
2] Uninstall the latest update
In case the latest update is problematic, or the file is corrupt, it will cause the Windows Update error 0x80070032. To resolve this error, simply uninstalling the current update will be helpful for most users. The procedure to uninstall updates on Windows 11 is as follows:
- Right-click on the Start button and select Settings.
- In the Settings window, go to the Windows Update tab on the list on the left-hand side.
- In the right pane, click on Update history. The Update history page will show the list of recent updates.
- If you scroll down a little, you will find the option to Uninstall updates.
- Click on it to open the page to open the Installed updates page in the Control Panel.
- Simply right-click on the latest updates and select uninstall.
3] Reset Windows Update components
If uninstalling the latest update doesn’t work, then you can consider resetting Windows Update components. Doing so will change the settings related to Windows Updates to default.
4] Run the Windows Update troubleshooter
The Windows Update troubleshooter is an excellent tool for diagnosing issues related to Windows Updates and resolving them if possible. The procedure to run the Windows update troubleshooter in Windows 11 is as follows:
- Right-click on the Start button and select Settings.
- In the Settings window, go to the System tab on the list on the left-hand side.
- In the right pane, scroll down and select Troubleshoot. In the next window, select Other troubleshooters.
- This will open the list of built-in troubleshooters for Windows 11.
- From the list, click on Run corresponding to the Windows Update troubleshooter.
The troubleshooter will start detecting problems and resolve them if in scope.
Please let us know if this helped you in the comment section.
NOTE: Error 0x80070032 can also be seen for – WslRegisterDistribution failed | Microsoft Store | When copying files | Windows Backup.
How do I fix Windows Update failed to install?
If Windows Update fails to install or will not download on Windows PC, then first, run the System File Checker and DISM tool, delete temporary files, use Windows Update troubleshooter, and try again. If that doesn’t help in any way, reset the Catroot folder, delete the SoftwareDistribution folder, and set the Windows Update service to Automatic or Manual, Background Intelligence Transfer Service to Manual, etc.
What is 0x80070032 file history?
Error 0x80070032 for File History occurs when you try to turn on the Automatic backup my files option. So, if you receive this error and want to fix the 0x80070032 backup error on your Windows PC, then delete the old backups, and then try again. You may also need to reset or delete all backup settings and reconfigure the File History backup to fix this error.
Hope this is helpful.
Anand Khanse is the Admin of TheWindowsClub.com, a 10-year Microsoft MVP (2006-16) & a Windows Insider MVP (2016-2022). Please read the entire post & the comments first, create a System Restore Point before making any changes to your system & be careful about any 3rd-party offers while installing freeware.
Windows 10 attracts users in large numbers because of its amazing GUI and prominent features. Although there’s no doubt when it comes to its popularity; however, it is not the best version of Windows.
This version comes with various flaws, such as error 0x80070032, which are worth noting by Microsoft. Microsoft claims that Windows 10 will revolutionize the Operating System world.
However, most users are unable to take this. This is because users experience problems with Windows 10 in some way or another.
What Is Error 0x80070032? How Does It Happen?
After you install Windows 10, the PIN sometimes stops working, showing an error 0x80070032. If it occurs, you cannot log in to Windows using your PIN passcode and don’t know what to do. Keep on reading further.
Windows 10 OS comes with a feature called Windows Hello for the sake of protection. It is an access control and biometric identity which enables logging into Windows through fingerprint, facial recognition, iris, or PIN passcode.
Unfortunately, Hello is not available for Windows 10 users. Older devices, which do not have the necessary hardware elements, like iris or fingerprint scanners, have to buy biometric USB iris/fingerprint scanners or forget about Windows Hello.
Normally, iris, facial, or fingerprint recognition login is accompanied by PIN passcodes. This is the most protected way to sign in to Windows 10 as a PIN passcode is simpler to memorize, while the facial contours, fingerprint, or iris of the user are very hard to counterfeit.
On Windows Hello, users come across problems like PIN passwords or fingerprints that would not work. The most common login error is the PIN 0x80070032 error. Most users claim that this issue occurred after they installed Windows 10 Fall Creators Update when compromised fingerprint or PIN login.
The most common issue with Windows 10 is “Apps won’t sync in Windows 10“, which shows up along with the error 0x80070032 code.
It even flashes a message which says, “We can’t sync at the moment. But you may find more info about this error code at www.windowsphone.com.”
The most affected application by this error code is Windows 10 Mail application. As per records, users cannot synchronize their accounts using the Mail application as this app turns non-operational. Here, you will get to learn how to resolve this issue.
Microsoft has investigated the error 0x80070032, but they have not announced the official approval of this bug or its patch. There are various reasons why your PIN stops working while flashing the error 0x80070032.
It shows up on your computer screen as “Something went wrong. Try again later. Error code: 0x80070032.” So, look at various solutions to eliminate this annoying error code.

PS: Regarding the Windows Update Error 0x80070020, here are your top solutions.
Reasons Why the Error Code 0x80070032 Occurs
Microsoft servers are the main reason for initiating this issue with the Mail application. Here, the accounts of users do not sync with servers properly.
Besides, here is the full review of Unsecapp.exe for the WMI Client Application for your reference.
Remove the NGC Folder’s Content to Eliminate 0x80070032
If you cannot log into Windows 10 using your PIN, try signing into your account and removing the NGC folder’s content.
Before you do that, you need to take the folder’s ownership. To perform this action, go through the instructions listed below.
Steps to get rid of the error 0x80070032:
- 1: First, you must log into Windows 10 with your password.
- 2: Tap Windows + X keys and choose ‘File Explorer.’
- 3: Now, go to C:WindowsServiceProfilesLocalServiceAppDataLocalMicrosoft.
- 4: Next, right-tap on the folder NGC and choose ‘Properties.’
- 5: Navigate to the tab ‘Security,’ select ‘Advanced,’ and then look for the section ‘Owner.’

- 6: Tap on the link ‘Change‘ and type in the user or administrator and object names.
- 7: Choose ‘Check Names‘ and hit ‘O.K.’
- 8: Check against the option ‘Replace Owner on subcontainers and Objects,’ After this, select ‘Apply‘ and press O.K. to save the changes.
- 9: Next, see if you can access this NGC folder. Mark all the stored files in the folder if you can and remove those files.
- 10: Tap Windows + I keys to open Settings.
- 11: Now, open the ‘Account Settings‘ tab and choose ‘Sign-in Options.’
- 12: Select ‘Add a PIN‘ by following the on-screen instructions to set a PIN.
Resolve the 0x80070032 Error Using ‘I Forgot My PIN.’
Another method to eliminate the error 0x80070032 is by choosing the option ‘I forgot my PIN.’ To perform this action, you have to follow the following procedure.
Steps to eliminate the error 0x80070032:
- 1: Tap Windows + I keys to open Settings on your system.
- 2: Select the section ‘Accounts‘ and then choose ‘Sign-in options.’
- 3: Find the ‘PIN‘ tab and tap on ‘I forgot my PIN.’

- 4: Tap on ‘Continue‘ to confirm your action.
- 5: Now, you need to type in a new PIN. Once you have entered the passcode, press O.K.
- 6: You could be asked to type your Microsoft account passcode. In that case, change the account type from Microsoft to Local and try all the steps again.
Resolve the Error 0x80070032 Through PIN Recreation
This is another effective way to get rid of the error code 0x80070032. It is performed by recreating the PIN.
By the way, if you are facing an issue with ERR_CERT_DATE_INVALID, click to read more.
Steps to get rid of the error 0x80070032:
- 1: Tap Windows + I keys to open Settings.
- 2: Go to the section ‘Accounts‘ and then ‘Sign-in Options.’
- 3: Navigate to the PIN section and choose ‘Remove.’

- 4: Tap on ‘Remove‘ to confirm your action.
- 5: Type in your account’s password and hit O.K.
- 6: Once done, tap on ‘Add‘ and enter a new PIN.
- 7: Tap O.K. to save it and see if the issue persists or not;
Note: If you are a Dell user facing the error 0x80070032 on your system, try eliminating the security tools from Dell Data Protection. Also, remove their leftovers or temporary files through Windows Registry or Reimage.
Solutions for Fixing the Error 0x80070032 on Mail
Here are various fixes that can assist you in resolving the issue with the Mail application on Windows 10 systems.
Method 1: Switch to Microsoft from a Local Account
This method is great for resolving the error code problem on Windows. Follow the instructions to get rid of this annoying Error.
1: Firstly, you have to switch from Microsoft to a local account. To do so, visit ‘Settings‘ with the help of Cortana. Within the ‘Settings‘ tab, look for ‘Accounts‘ to open the settings associated with the user accounts.

2: Next, you have to choose ‘Sign in with a local account‘ instead, which you will find under the account’s right-pane window. After that, enter the password of the present Microsoft account. Tap on ‘Next‘ to create a new local account.

3: Type in the local account’s details, such as username and passcode. Next, tap on the tab ‘Next‘ again. In the next tab, you will see a button branded as ‘Sign out and finish.’ Select this button to sign out of your Microsoft account.

4: Next, repeat the steps. Visit ‘Settings‘ and choose ‘Accounts.’ Then, select ‘Sign in‘ with a Microsoft account instead. Type in the local account’s password, along with the username and password of the Microsoft account, for signing in again. See if you could check Mail by syncing the account.

Method 2: Reinstall Mail
Try this one out if the primary method cannot offer you a proper fix to the error code problem. Here, you have to reinstall Mail to fix the syncing problem. To perform this action, follow some simple steps listed below.
1: Visit PowerShell from the search results once you have searched for it. Right-tap on this tab and choose ‘Run as Administrator.’ Please note that opening this tab as an administrator is significant, or you will face an error.

2: Within the PowerShell tab, type the command.
Get-appxprovisionedpackage – online | where-object {$ .packagename – like “*windowscommunicationsapps*”} |remove – appxprovisionedpackage – online

Once you have executed this command, close PowerShell and install the Mail application again from Windows Store.
After you have installed this application, run the same, and check whether the error 0x80070032 has been resolved.
Repair Errors Automatically
Here, we have tried our best to offer the best solutions to fix this annoying error code 0x80070032. Users can fix this issue using the solutions mentioned here.
Automatic software is best if you do not like to struggle with repair techniques. There are lots of repair tools available online for fixing Windows-related errors.
So, choose the best one and eliminate your issue. However, it is recommended to use the above-listed methods to fix the Error.
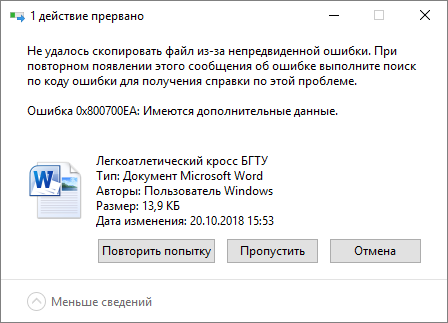
Копирование файлов из одной папки в другую является одной из самых простых процедур в Windows, но даже такая простая процедура может завершиться ошибкой, если отвечающие за нее механизмы вдруг дадут сбой. Ошибка обычно идентифицируется как непредвиденная и без прямого указания на ее причину, сообщается лишь ее код — 0x80070032. И это понятно, потому что причины ошибки могут быть разные.
Это и сбой в механизме обмена данными между носителями, и физические повреждения дисков, и сбой системных служб.
Отключите автономные файлы
Если проблема возникла при копировании данных с локального сервера, к примеру, NAS, возможно, имеет место сбой механизма сетевого копирования в Центре синхронизации.
Решением в таком случае может стать временное отключение функции автономных файлов.
Откройте классическую панель управления, запустите апплет «Центр синхронизации», слева кликните ссылку «Управление автономными файлами».
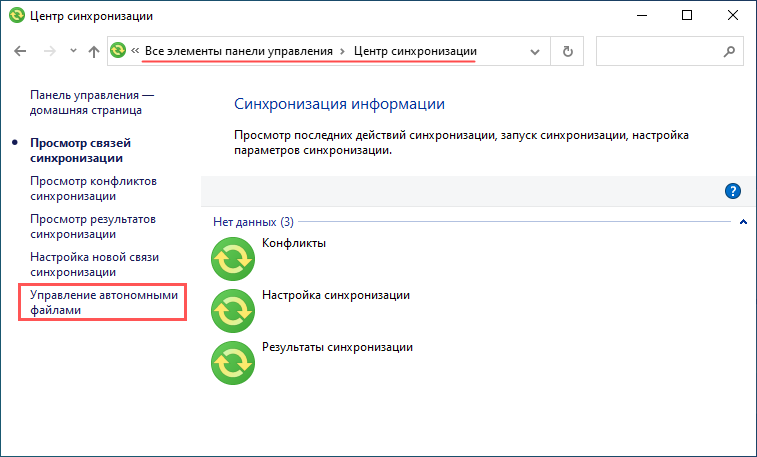
И нажмите в открывшемся окне кнопку «Отключить автономные файлы».
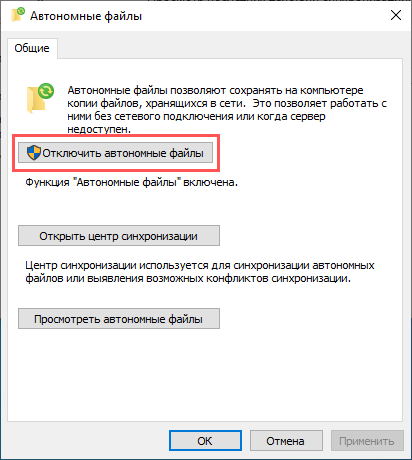
Перезагрузите систему и попробуйте скопировать данные.
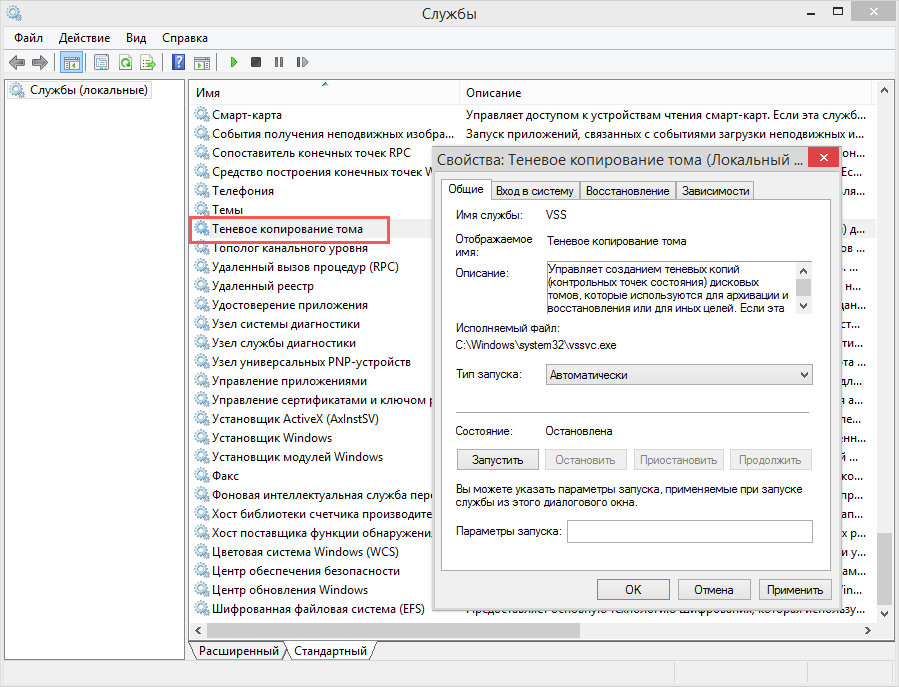
Проверьте состояние служб
Если вы установили, что ошибка возникает при создании системных точек восстановления, проверьте состояние служб, отвечающих за теневое копирование.
Запустите командой services.msc оснастку управления службами и отыщите в списке службы «Теневое копирование тома».
И «Программный поставщик теневого копирования».
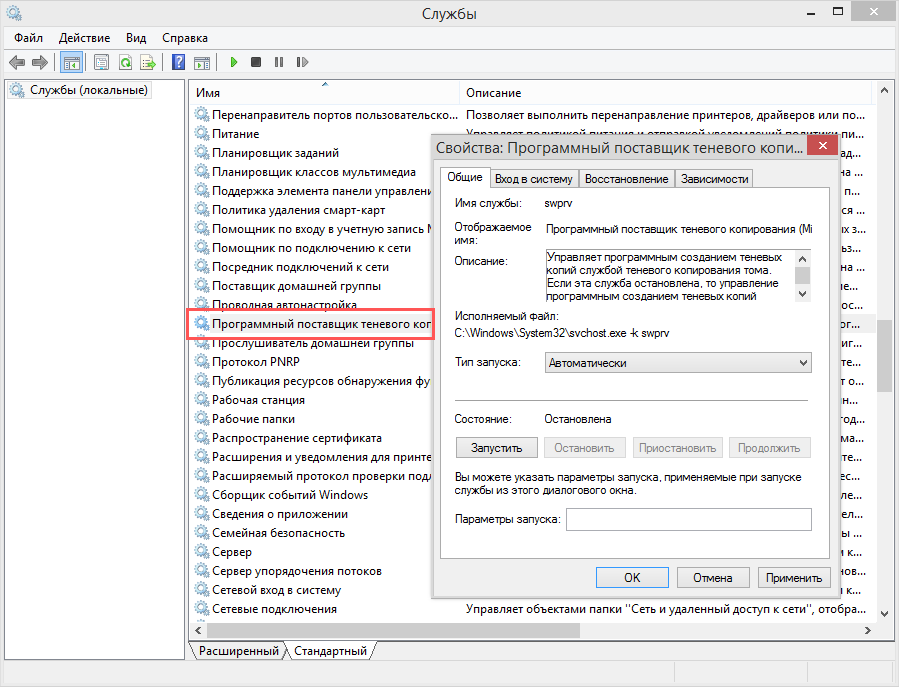
Измените их тип запуска на «Автоматически», запустите (а лучше перезагрузите ПК) и проверьте корректность создания точек восстановления.
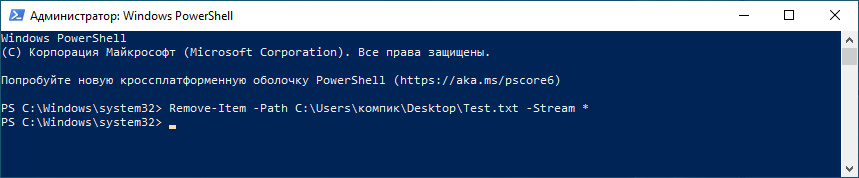
Удалите альтернативные потоки данных
В некоторых случаях причиной ошибки «Не удалось скопировать файл» с кодом 0x80070032 может стать записанный в этот файл альтернативный поток данных. Это особенно актуально для тех случаев, когда файл копируется на устройство под управлением операционной системы, отличной от Windows.
Для удаления альтернативных потоков можно использовать консоль PowerShell.
Запустите ее и выполните команду такого вида:
Remove-Item -Path «полный путь к файлу» -Stream *
Также очистить альтернативные потоки данных можно с помощью специальной консольной утилиты Streams от Sysinternals, перейдя в командной строке в папку с исполняемым файлом утилиты и выполнив команду:
Streams.exe -d «полный путь к файлу»
Но вполне будет достаточно и возможностей PowerShell.
![]() Загрузка…
Загрузка…
Порой, когда пользователь пытается улучшить операционную систему, он сталкивается с зависанием и появлением ошибки с кодом 0x80070032. Для многих это уведомление не значит ровным счетом ничего, поэтому оно ставит их в тупик. Поэтому сегодня мы разберемся, как же быть.
Что это такое?
Ошибка 0x80070032 означает проблемы с перезапуском для завершения установки обновления операционной системы. Возникает она тогда, когда начинает подвисать конкретный центр обновлений Windows. Получается, что пользователь не может ни вперед пройти, ни назад вернуться.
Как избавиться от ошибки?
Чтобы решить проблему, можно попробовать несколько способов:
- Выполнить перезагрузку устройства.
- Удалить последние установленные файлы.
- Сбросить компоненты.
- Осуществить запуск службы устранения неполадок Центра обновления Windows
Перезагрузка устройства
Это самый простой и доступный для всех вариант. Иногда этого хватает, чтобы все заработало, как надо.
Для того, чтобы перезагрузить устройство, достаточно просто нажать на кнопку перезапуска, сделать это можно или через меню Пуск (это более желательный вариант), либо через экстренную перезагрузку (но так лучше не делать).

Удаление последних установленных файлов
При условии, что последнее обновление оказалось проблематичным или файл был поврежден, это будет приводить к возникновению ошибки 0x80070032. Для ее устранения достаточно удаления текущего обновления. Делается это следующим способом:
- Вызвать меню Пуск.
- Перейти к настройкам.
- Найти раздел Центра обновления Windows (в списке слева).
- Зайти в журнал.
- Просмотреть список.
- Прокрутить вниз.
- Удалить нужное обновление. Сделать это можно нажав на необходимый файл правой кнопкой мыши, а затем выбрать пункт «Удалить».

Сбросить компоненты Центра обновления Windows
При условии, что не сработало удаление обновления, можно попробовать сбросить компоненты. Это обеспечит изменение настроек, что связаны с операционной системой на значения, стоящие по умолчанию.
Запуск средства устранения неполадок
Средство устранения неполадок представляет собой простой и понятный инструмент, который позволит провести диагностику возникших проблем. После того, как данная задача будет решена, служба предложит возможные варианты действий для того, чтобы ошибка более не возникала.
Ошибка 0x80070032 возникает в Windows 10, где есть функция Hello. В ней ПИН-код и/или отпечаток пальца используется для доступа к ОС. Из-за сбоя в системных файлах становится невозможным ввести ПИН и/или задействовать отпечаток пальца.
Способы решения ошибки 0x80070032
Решается это такими способами:
- Удаление папки NGC. Во время нажатия на кнопку «Перегрузка системы» нажимаем Shift. В появившемся окне следуем по пути: «Анализ и диагностика проблем» => «Расширенные настройки» => «Командная строка». Запускаем последовательно следующие две команды их копированием в Командную строку и нажатием на Enter:
- takeown /f C:WindowsServiceProfilesLocalServiceAppDataLocalMicrosoftNGC
- icacls C:WindowsServiceProfilesLocalServiceAppDataLocalMicrosoftNGC /grant administrators:f
Далее перегружаем компьютер и задаем новый код, так как предыдущее действие удалило системную папку со старым ПИН. NGC.
- Использование инструмента восстановления (удаления) ПИН. Перейдите по пути: «Параметры» => «Учетные записи» => «Параметры входа». В блоке ПИН-код нажмите на «Я не помню свой ПИН-код». Следуйте дальнейшим инструкциям в окне для установки нового кода. Еще можно не восстанавливать ПИН, а удалить его. Это также решит ошибку 0x80070032.