Что такое код ошибки Windows 0x800700d8 (01.29.23)
С момента выпуска в Windows 10 было немало проблем и ошибок, включая код ошибки Windows 0x800700d8. Многие пользователи Windows сообщают, что код ошибки 0x800700d8 отображается после невозможности установить обновление или обновление Windows 10.
Если вы столкнетесь с кодом ошибки Windows 0x800700d8 при установке обновлений Windows 10 или обновлении Windows 10, этот пост будет поможет вам.
Код ошибки Windows 0x800700d8 — это код ошибки обновления, предназначенный только для Windows 10. Это сообщение об ошибке обычно возникает при попытке установить обновление Windows 10 или обновление.
Что вызывает код ошибки 0x800700d8 в Windows 10?
Код ошибки обновления 0x800700d8 может появиться по нескольким причинам, в том числе:
Совет для профессионалов: просканируйте свой компьютер на наличие проблем с производительностью, нежелательных файлов, вредоносных приложений и угроз безопасности
которые могут вызвать проблемы в системе или снизить производительность.
Проблемы с бесплатным сканированием для ПК.Специальное предложение. Об Outbyte, инструкции по удалению, лицензионное соглашение, политика конфиденциальности.
- Вмешательство сторонней антивирусной программы — некоторые чрезмерно защищающие антивирусные программы могут препятствовать обмену данными Центра обновления Windows с серверами обновления ОС, что может привести к ошибка обновления
- Медленное сетевое подключение
- Поврежденные компоненты Центра обновления Windows
- Общий сбой обновления Windows
- Несовместимые компоненты Центра обновления Windows
- Несоответствия в зависимостях и компонентах Центра обновления Windows
Независимо от того, что вызывает проблему, знайте, что вы можете исправить код ошибки 0x800700d8 в Windows 10.
Как исправить код ошибки 0x800700d8 в Windows 10
Используйте следующие решения, чтобы исправить ошибку обновления Windows 10 с кодом 0x800700d8.
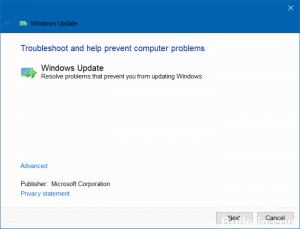
Решение № 1. Запустите средство устранения неполадок Windows.
Воспользуйтесь встроенным средством устранения неполадок обновления Windows 10, чтобы решить проблему с ошибкой Центра обновления Windows 0x800700d8. Средство устранения неполадок находится в разделе Настройки & gt; Обновить & amp; Безопасность & gt; Инструмент устранения неполадок & gt; Центр обновления Windows & gt; Запустите средство устранения неполадок.
После запуска средства устранения неполадок перезагрузите компьютер и переустановите обновления, чтобы проверить, возникает ли ошибка по-прежнему.
Решение № 2: отключите / удалите стороннюю программу. антивирусное программное обеспечение
Если вы используете на своем компьютере антивирусную программу стороннего производителя, она может помешать обновлению Windows 10 и вызвать ошибку Центра обновления Windows 0x800700d8. Отключение или полное удаление может помочь решить проблему.
Если ошибка устранена после отключения / удаления антивирусной программы, вы можете установить / включить ее снова.
Решение №3: Используйте Windows 10 Помощник по обновлению
В ряде отчетов пользователей ПК указывается, что ошибка Центра обновления Windows 0x800700d8 может возникнуть, если вы установите ожидающее обновление с помощью встроенного компонента Центра обновления Windows. В отчетах также говорится, что эту ошибку можно обойти, установив обновления вручную с помощью помощника по обновлению Windows 10.
Чтобы использовать помощник по обновлению Windows:
Помощник по обновлению должен уметь исправить код ошибки 0x800700d8. Если это не так, попробуйте следующее решение.
Решение № 4. Отключите «Отложить обновления / обновления» (только если применимо)
Вы можете столкнуться с ошибкой Центра обновления Windows 0x800700d8, если ваш компьютер настроен на паузу или отложите обновления / обновления вместо того, чтобы правильно их устанавливать. «Отложить обновления» может задерживать обновления Windows на несколько месяцев.
Обратите внимание, что не все версии Windows имеют эту опцию Windows Update. Чтобы узнать, существует ли он, проверьте Центр обновления Windows и щелкните меню «Дополнительные параметры», чтобы увидеть, включен ли параметр «Отложить обновления», затем снимите флажок и посмотрите, устраняет ли это ошибку.
Решение № 5: Сброс (очистить ) Компоненты Центра обновления Windows
Ошибка Центра обновления Windows 0x800700d8 может быть результатом некоторых незначительных сбоев внутри Центра обновления Windows, которые останавливают установку новых обновлений. Чтобы решить эту проблему, вручную сбросьте соответствующие компоненты и зависимости Центра обновления Windows:
net stop wuauserv
net stop cryptSvc
чистые стоповые биты
net stop msiserver
Эти коды остановят несколько служб, таких как Windows Update, MSI Installer, Cryptographic и BITS.
ren C: Windows SoftwareDistribution SoftwareDistribution.old
ren C: Windows System32 catroot2 Catroot2.old
Переименование этих двух папок заставит вашу ОС Windows создавать новые папки для хранения файлов обновлений и установки обновлений.
net stop wuauserv
net stop cryptSvc
net stop bit
net stop msiserver
Теперь перезагрузите компьютер и проверьте если вы все еще сталкиваетесь с ошибкой Центра обновления Windows 0x800700d8.
Решение №6: Обновите BIOS
Иногда, когда BIOS и прошивка устарели, вы можете столкнуться с кодом ошибки Центра обновления Windows 0x800700d8. В этом случае просто обновите BIOS и прошивку вашего ПК до последней версии или выпуска с официального сайта производителя и посмотрите, решит ли это проблему. Убедитесь, что вы следуете рекомендациям производителя.
Заключительные мысли
Чтобы ваш компьютер оставался в безопасности и работал оптимально, вам необходимо установить все ожидающие обновления. Невозможность установить обновления Windows, обозначенная кодом ошибки 0x800700d8, может создать проблемы. Если возникает эта проблема, воспользуйтесь одним из следующих решений, чтобы исправить ее.
YouTube видео: Что такое код ошибки Windows 0x800700d8
01, 2023
Обновлено 2023 января: перестаньте получать сообщения об ошибках и замедлите работу вашей системы с помощью нашего инструмента оптимизации. Получить сейчас в эту ссылку
- Скачайте и установите инструмент для ремонта здесь.
- Пусть он просканирует ваш компьютер.
- Затем инструмент почини свой компьютер.
Код ошибки 0x800700d8 используется операционными системами Windows, чтобы сообщать о проблеме программистам и системным пользователям. Есть тысячи разных коды ошибок это можно найти в сотнях мест на компьютере. Им часто требуются обширные компьютерные знания для декодирования и ремонта, но многие из них можно отремонтировать с помощью простых пошаговых решений, которые можно найти в Интернете или с помощью вспомогательного персонала.

Код ошибки отображается на экране компьютера в виде числа или комбинации цифр и букв, соответствующих ошибке или типу возникшей ошибки. Большинство наиболее распространенных ошибок Windows можно исправить с помощью быстрого поиска, но более сложные или неясные ошибки требуют помощи хорошо обученного пользователя в операционной системе Windows. Коды ошибок Windows не дают точной и полезной информации, но являются общими кодами, которые обеспечивают отправную точку для решения. При правильной проверке и проверке коды ошибок Windows передают обработчик ошибок в проблему.
Как исправить код ошибки 0x800700d8
Сбросить компоненты Windows Update
- Нажмите Windows + R, чтобы открыть диалоговое окно «Выполнить».
- Введите «cmd» в текстовое поле и нажмите Ctrl + Shift + Enter, чтобы открыть всплывающую подсказку.
- Нажмите Да, чтобы предоставить доступ администратору при запросе контроля учетных записей.
- Если вы находитесь в режиме высокой подсказки, введите следующие команды по порядку, а затем нажмите клавишу ВВОД после каждой команды:
net stop wuauserv
net stop cryptSvc
чистые стоповые бит
net stop msiserver - После успешного отключения всех служб выполните следующие команды в одном и том же окне CMD и нажмите Enter после каждой команды, чтобы переименовать папки SoftwareDistribution и Catroot2:
ren C: Windows SoftwareDistribution SoftwareDistribution.old
ren C: Windows System32 catroot2 Catroot2.old - Введите эти последние команды по порядку и нажмите Enter после каждой команды, чтобы запустить те же службы, которые были ранее отключены:
net start wuauserv
net start cryptSvc
чистые стартовые биты
net start msiserver - Введите Exit в командной строке, чтобы закрыть его.
Обновление за январь 2023 года:
Теперь вы можете предотвратить проблемы с ПК с помощью этого инструмента, например, защитить вас от потери файлов и вредоносных программ. Кроме того, это отличный способ оптимизировать ваш компьютер для достижения максимальной производительности. Программа с легкостью исправляет типичные ошибки, которые могут возникнуть в системах Windows — нет необходимости часами искать и устранять неполадки, если у вас под рукой есть идеальное решение:
- Шаг 1: Скачать PC Repair & Optimizer Tool (Windows 10, 8, 7, XP, Vista — Microsoft Gold Certified).
- Шаг 2: Нажмите «Начать сканирование”, Чтобы найти проблемы реестра Windows, которые могут вызывать проблемы с ПК.
- Шаг 3: Нажмите «Починить все», Чтобы исправить все проблемы.

Запуск средства устранения неполадок Windows Update
- Нажмите Windows + R, чтобы открыть диалоговое окно «Выполнить».
- Введите «ms-settings: Устранение неполадок» и нажмите Enter, чтобы открыть вкладку «Устранение неполадок».
- Обратитесь к разделу «Ввод в эксплуатацию и эксплуатация» в правой части экрана.
- Когда вы увидите Центр обновления Windows, нажмите на него.
- Затем нажмите «Выполнить поиск и устранение неисправностей».
- После запуска этой утилиты подождите, пока не будет рекомендована стратегия восстановления.
- Как только вы нашли подходящий патч для решения этой проблемы, нажмите «Применить этот патч», чтобы успешно применить стратегию.
- После успешного применения патча перезагрузите компьютер.
Выполнить чистую загрузку
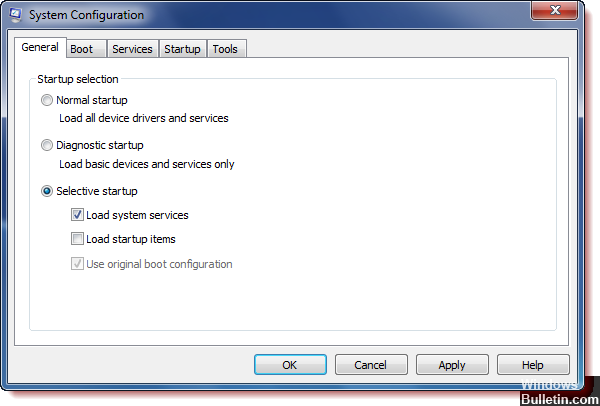
- Войдите в систему как администратор.
- В области поиска на панели задач введите msconfig и выберите System Configuration в результатах.
- На вкладке «Службы конфигурации системы» выберите «Скрыть все службы Microsoft», а затем выберите «Отключить все».
- На вкладке «Пуск» конфигурации системы выберите «Открыть диспетчер задач».
- В разделе «Запуск» диспетчера задач выберите элемент для каждого элемента запуска, а затем выберите «Отключить».
- Закройте диспетчер задач.
- На вкладке «Пуск» конфигурации системы выберите «ОК».
https://answers.microsoft.com/en-us/windows/forum/all/error-0x800700d8-windows-10/ffe571b4-d88f-429e-8cf5-1f6e459a4b12
Совет экспертов: Этот инструмент восстановления сканирует репозитории и заменяет поврежденные или отсутствующие файлы, если ни один из этих методов не сработал. Это хорошо работает в большинстве случаев, когда проблема связана с повреждением системы. Этот инструмент также оптимизирует вашу систему, чтобы максимизировать производительность. Его можно скачать по Щелчок Здесь

CCNA, веб-разработчик, ПК для устранения неполадок
Я компьютерный энтузиаст и практикующий ИТ-специалист. У меня за плечами многолетний опыт работы в области компьютерного программирования, устранения неисправностей и ремонта оборудования. Я специализируюсь на веб-разработке и дизайне баз данных. У меня также есть сертификат CCNA для проектирования сетей и устранения неполадок.
Сообщение Просмотров: 82
by Matthew Adams
Matthew is a freelancer who has produced a variety of articles on various topics related to technology. His main focus is the Windows OS and all the things… read more
Updated on March 4, 2021
- Windows Updates are released frequently, but they are very sensitive to corrupted system information.
- The article below will show you how to handle Windows Update error 0x800700d8.
- For more articles covering similar subjects, head to our Windows Update Errors Hub.
- If other things are bothering you, you can also check out our Windows 10 Errors page.

XINSTALL BY CLICKING THE DOWNLOAD FILE
This software will keep your drivers up and running, thus keeping you safe from common computer errors and hardware failure. Check all your drivers now in 3 easy steps:
- Download DriverFix (verified download file).
- Click Start Scan to find all problematic drivers.
- Click Update Drivers to get new versions and avoid system malfunctionings.
- DriverFix has been downloaded by 0 readers this month.
Error 0x800700d8 is one of numerous Windows Update error codes. The error 0x800700d8 messages states:
There were problems installing some updates, but we’ll try again later.
Consequently, users can’t install certain updates when error 0x800700d8 arises. The potential fixes for that issue are pretty similar to other Windows Update error codes that share the same error message.
How do I fix Windows 10 error 0x800700d8?
1. Run the Windows Update troubleshooter
Some users have said that the Windows Update troubleshooter can fix error 0x800700d8.
- To open that troubleshooter, click the Type here to search taskbar button.
- Enter troubleshoot in the Type here to search box.
- Then select Troubleshoot settings to open a list of troubleshooters in Settings.

- Select the Windows Update troubleshooter.
- Click Run the troubleshooter to open the Windows Update troubleshooter.

- If the troubleshooter provides a resolution, click Apply this fix.
2. Uninstall third-party antivirus software
There might be a third-party antivirus utility blocking Windows updates from installing.
- Right-click your Start button to select Run.
- To open the Windows uninstaller, enter appwiz.cpl in Run and click OK.

- Select your third-party antivirus utility.
- Click the Uninstall option.
- Select the Yes option to confirm.
- The antivirus utility might leave behind some residual files.
- The How to remove software leftovers guide provides further details for erasing residual files.
Before uninstalling an antivirus utility, you can try disabling it first. To do so, right-click the antivirus utility’s system tray icon and select a disable or turn off option on its context menu.
If that doesn’t fix error 0x800700d8, uninstall the antivirus software to ensure it isn’t blocking updates.
3. Turn off deferred upgrades
Some users have confirmed they’ve fixed error 0x800700d8 by turning off deferred upgrades in Windows 10.
- Press the Windows key + S keyboard shortcut to open the Type here to search box.
- Enter the keyword Windows Update in search box.
- Then click Windows Update settings to open the window shown directly below.

- Click the Advanced options to open further update settings.

- In more recent Windows 10 versions, you’ll need to select 0 values in both the Choose when updates are installed deferral drop-down menus.
- In older Windows 10 builds, you’ll need to uncheck a selected Defer upgrades check box.
- Restart Windows after disabling deferred updates.
4. Reset Windows Update components
- Reset Windows Update components can fix WU glitches.
- Open Windows 10’s Type here to search utility.
- Enter cmd to search for the Command Prompt.
- Right-click Command Prompt to expand a context menu on when you’ll need to select Run as administrator.
- Next, enter these commands separately and press Return after each:
net stop wuauserv
net stop cryptSvc
net stop bits
net stop msiserver
- Press the Windows key + E hotkey to open File Explorer.
- Go to C: > Windows in File Explorer.
- Right-click the SoftwareDistribution folder and select Rename.

- Enter SoftwareDistribution.old as the new title for that subfolder, and press the Return key.
- Open the C: > Windows > System32 folder in File Explorer.

- Then right-click catroot2 and select Rename to change its folder title to Catroot2.old.
- Open the Command Prompt as administrator.
- Input these commands to restart the previously stopped services:
net start wuauserv
net start cryptSvc
net start bits
net start msiserver
- Restart your desktop or laptop after resetting Windows Update.
Those potential resolutions for error 0x800700d8 are worth a shot. Note that you can manually download required updates from the Microsoft Update Catalog.
Enter the KB numbers for updates in the search box there, and then install any downloaded updates. You can also utilize the Update Assistant to update Windows 10 to a new build version.
Let us know if the solutions above helped you by leaving us your feedback in the comments section below.
Still having issues? Fix them with this tool:
SPONSORED
If the advices above haven’t solved your issue, your PC may experience deeper Windows problems. We recommend downloading this PC Repair tool (rated Great on TrustPilot.com) to easily address them. After installation, simply click the Start Scan button and then press on Repair All.
![]()
Newsletter
by Matthew Adams
Matthew is a freelancer who has produced a variety of articles on various topics related to technology. His main focus is the Windows OS and all the things… read more
Updated on March 4, 2021
- Windows Updates are released frequently, but they are very sensitive to corrupted system information.
- The article below will show you how to handle Windows Update error 0x800700d8.
- For more articles covering similar subjects, head to our Windows Update Errors Hub.
- If other things are bothering you, you can also check out our Windows 10 Errors page.
XINSTALL BY CLICKING THE DOWNLOAD FILE
This software will keep your drivers up and running, thus keeping you safe from common computer errors and hardware failure. Check all your drivers now in 3 easy steps:
- Download DriverFix (verified download file).
- Click Start Scan to find all problematic drivers.
- Click Update Drivers to get new versions and avoid system malfunctionings.
- DriverFix has been downloaded by 0 readers this month.
Error 0x800700d8 is one of numerous Windows Update error codes. The error 0x800700d8 messages states:
There were problems installing some updates, but we’ll try again later.
Consequently, users can’t install certain updates when error 0x800700d8 arises. The potential fixes for that issue are pretty similar to other Windows Update error codes that share the same error message.
How do I fix Windows 10 error 0x800700d8?
1. Run the Windows Update troubleshooter
Some users have said that the Windows Update troubleshooter can fix error 0x800700d8.
- To open that troubleshooter, click the Type here to search taskbar button.
- Enter troubleshoot in the Type here to search box.
- Then select Troubleshoot settings to open a list of troubleshooters in Settings.
- Select the Windows Update troubleshooter.
- Click Run the troubleshooter to open the Windows Update troubleshooter.
- If the troubleshooter provides a resolution, click Apply this fix.
2. Uninstall third-party antivirus software
There might be a third-party antivirus utility blocking Windows updates from installing.
- Right-click your Start button to select Run.
- To open the Windows uninstaller, enter appwiz.cpl in Run and click OK.
- Select your third-party antivirus utility.
- Click the Uninstall option.
- Select the Yes option to confirm.
- The antivirus utility might leave behind some residual files.
- The How to remove software leftovers guide provides further details for erasing residual files.
Before uninstalling an antivirus utility, you can try disabling it first. To do so, right-click the antivirus utility’s system tray icon and select a disable or turn off option on its context menu.
If that doesn’t fix error 0x800700d8, uninstall the antivirus software to ensure it isn’t blocking updates.
3. Turn off deferred upgrades
Some users have confirmed they’ve fixed error 0x800700d8 by turning off deferred upgrades in Windows 10.
- Press the Windows key + S keyboard shortcut to open the Type here to search box.
- Enter the keyword Windows Update in search box.
- Then click Windows Update settings to open the window shown directly below.
- Click the Advanced options to open further update settings.
- In more recent Windows 10 versions, you’ll need to select 0 values in both the Choose when updates are installed deferral drop-down menus.
- In older Windows 10 builds, you’ll need to uncheck a selected Defer upgrades check box.
- Restart Windows after disabling deferred updates.
4. Reset Windows Update components
- Reset Windows Update components can fix WU glitches.
- Open Windows 10’s Type here to search utility.
- Enter cmd to search for the Command Prompt.
- Right-click Command Prompt to expand a context menu on when you’ll need to select Run as administrator.
- Next, enter these commands separately and press Return after each:
net stop wuauserv
net stop cryptSvc
net stop bits
net stop msiserver
- Press the Windows key + E hotkey to open File Explorer.
- Go to C: > Windows in File Explorer.
- Right-click the SoftwareDistribution folder and select Rename.
- Enter SoftwareDistribution.old as the new title for that subfolder, and press the Return key.
- Open the C: > Windows > System32 folder in File Explorer.
- Then right-click catroot2 and select Rename to change its folder title to Catroot2.old.
- Open the Command Prompt as administrator.
- Input these commands to restart the previously stopped services:
net start wuauserv
net start cryptSvc
net start bits
net start msiserver
- Restart your desktop or laptop after resetting Windows Update.
Those potential resolutions for error 0x800700d8 are worth a shot. Note that you can manually download required updates from the Microsoft Update Catalog.
Enter the KB numbers for updates in the search box there, and then install any downloaded updates. You can also utilize the Update Assistant to update Windows 10 to a new build version.
Let us know if the solutions above helped you by leaving us your feedback in the comments section below.
Still having issues? Fix them with this tool:
SPONSORED
If the advices above haven’t solved your issue, your PC may experience deeper Windows problems. We recommend downloading this PC Repair tool (rated Great on TrustPilot.com) to easily address them. After installation, simply click the Start Scan button and then press on Repair All.
![]()
Newsletter

Несколько пользователей Windows обращались к нам с вопросами после просмотра 0x800700d8 код ошибки после невозможности установить обновление или обновление до Windows 10 из более старой версии Windows. Большинство затронутых пользователей сообщают, что эта проблема возникает независимо от типа интернет-сети, к которой они подключены (частная или общедоступная). Как оказалось, эта проблема, похоже, является эксклюзивной для Windows 10.

Что вызывает 0x800700d8 ошибка в Windows 10?
Мы исследовали эту конкретную проблему, изучив различные отчеты пользователей и стратегии восстановления, которые обычно используются затронутыми пользователями в аналогичной ситуации. Оказывается, есть несколько разных сценариев, в которых будет выдан этот код ошибки:
- Сторонние AV-помехи — Как выясняется, известно, что несколько различных антивирусных программ с избыточной защитой вызывают эту проблему, эффективно останавливая связь WU с серверами обновления. Если этот сценарий применим, вы сможете решить проблему, отключив защиту в реальном времени или удалив сторонний пакет.
- Общий глюк — Вы можете столкнуться с проблемой из-за общего сбоя, который уже покрывается стратегией восстановления, включенной в Windows 10. В этом случае вы сможете решить проблему с помощью средства устранения неполадок Центра обновления Windows для автоматического устранения сбоя.
- WU не может обработать обновление — Некоторые обновления сталкиваются с некоторыми препятствиями, когда пользователь пытается установить их в новой сборке после обновления из более старой версии Windows. В этом случае вы сможете избежать кода ошибки, полагаясь на помощника по обновлению, чтобы обновить вашу сборку Windows 10 до последней версии.
- Машина настроена на «Отложить обновления» — Существуют определенные версии Windows, в которых предусмотрена возможность задержки определенных обновлений (кроме обновлений безопасности). Как оказалось, вы можете столкнуться с этим кодом ошибки, если на вашем компьютере разрешены отложенные обновления. В этом случае вы можете решить проблему, отключив откладывать обновления.
- Компоненты Glitch WU — В некоторых случаях код ошибки 0x800700d8 может сохраняться из-за некоторых несоответствий с тем, как Центр обновления Windows взаимодействует с остальными компонентами, используемыми во время процедуры обновления. В этом случае вы можете решить проблему, сбросив все компоненты и зависимости, участвующие в процессе обновления.
Способ 1. Удалите сторонний антивирус (если применимо)
Как выясняется, одна из наиболее частых причин, вызывающих 0x800700d8 Код ошибки при попытке установить ожидающее обновление — это чрезмерно защищающий антивирусный пакет. Есть несколько пакетов безопасности, о которых пострадавшие пользователи продолжают сообщать после того, как они блокируют процесс установки обновления: Sophos, McAffee, AVAST, Comodo и некоторые другие.
Если вы используете сторонний антивирус и подозреваете, что он может быть ответственным за неудачные обновления, вы сможете решить проблему, отключив защиту в реальном времени во время установки обновления или удалив антивирус. Suite полностью и переключившись на параметр безопасности по умолчанию (Защитник Windows).
Итак, давайте начнем с отключения защиты в реальном времени стороннего антивируса, который у вас активен. Как и следовало ожидать, эта процедура будет отличаться в зависимости от пакета безопасности, который вы используете, но с большинством пакетов вы сможете сделать это прямо из контекстного меню панели задач.

Как только вы отключите защиту в режиме реального времени, попробуйте еще раз установить обновление, которое ранее было неудачным, и посмотрите, завершен ли процесс.
Если вы все еще сталкиваетесь с 0x800700d8 код ошибки, давайте исключим возможность ее возникновения из-за стороннего антивируса, полностью удалив программу и выполнив действия, необходимые, чтобы убедиться, что вы не оставляете никаких остатков файлов.
Если вы решите пойти по этому пути, мы рекомендуем вам ознакомиться с этой статьей (Вот) — он проведет вас через этапы установки программы безопасности, не оставляя после себя каких-либо оставшихся файлов, которые могут вызвать ту же проблему.
Метод 2: запуск средства устранения неполадок Центра обновления Windows
Если вы уверены, что проблема не в программном пакете стороннего производителя, давайте предпримем соответствующие шаги, чтобы убедиться, что ваша операционная система не может решить проблему автоматически. В Windows 10 Microsoft значительно улучшила модуль устранения неполадок, а средство устранения неполадок Центра обновления Windows является одной из самых надежных утилит такого рода.
Несколько затронутых пользователей сообщили, что им удалось исправить 0x800700d8 код ошибки и установите обновление Windows без проблем после автоматического исправления компонента WU с помощью средства устранения неполадок Центра обновления Windows.
Эта встроенная утилита включает в себя широкий спектр стратегий восстановления, которые могут применяться автоматически при обнаружении проблемы. Вот краткое руководство по запуску средства устранения неполадок Центра обновления Windows:
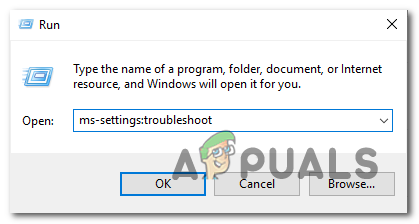
- Нажмите Клавиша Windows + R открыть Бегать диалоговое окно. Затем введите «ms-settings: устранение неполадок»И нажмите Войти открыть Исправление проблем вкладка Настройки таб.

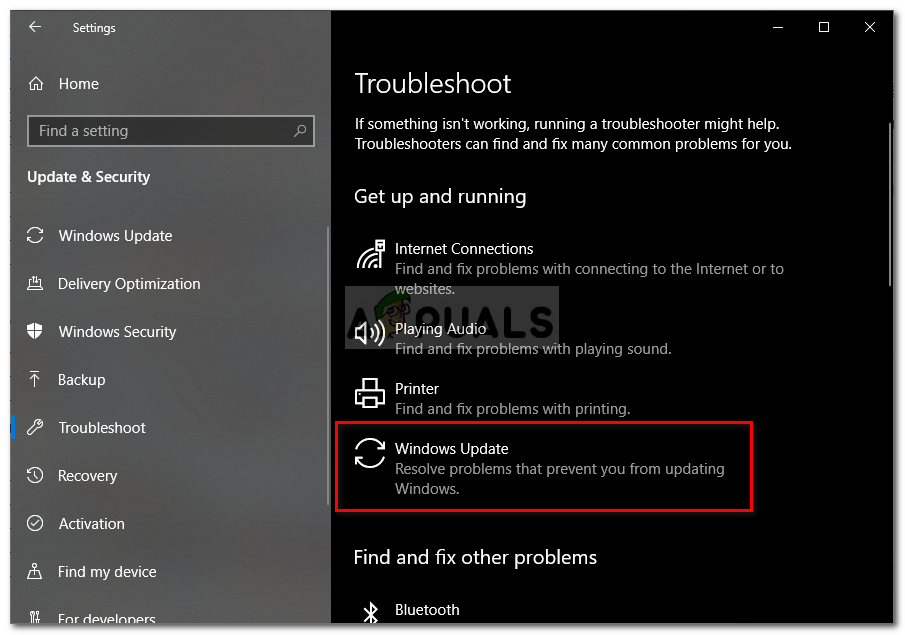
- Как только вы окажетесь внутри основного Исправление проблем вкладку, перейдите в правую часть экрана и перейдите к Вставай и работай раздел. Как только вы доберетесь туда, нажмите Центр обновления Windows, затем нажмите Запустите средство устранения неполадок.

- После запуска утилиты дождитесь завершения первоначального сканирования и рекомендованной стратегии восстановления. Эта процедура является ключевой, поскольку она определяет, применима ли какая-либо из стратегий восстановления, включенных в утилиту, в этом сценарии.
- Если подходящее исправление найдено, нажмите Применить это исправление применять рекомендованную стратегию ремонта.

Примечание: В зависимости от типа исправления, которое рекомендуется, вам может потребоваться выполнить несколько шагов, чтобы применить его.
- После успешного применения исправления перезагрузите компьютер и посмотрите, будет ли проблема решена после завершения следующего запуска.
Если то же самое 0x800700d8 код ошибки все еще возникает, перейдите к следующей потенциальной стратегии ремонта ниже.
Метод 3. Обновите последнюю версию вручную
Некоторые пользователи, с которыми мы сталкиваемся 0x800700d8 код ошибки каждый раз, когда они пытались установить ожидающее обновление с помощью встроенного компонента WU, сообщали, что им удалось обойти проблему, установив обновление вручную.
Эта процедура проще, чем кажется — все, что вам нужно сделать, это вручную загрузить и установить последнюю сборку Windows. Скорее всего, переход по этому пути позволит избежать кода ошибки, поскольку ручные обновления обрабатываются Помощником по обновлению, а не Центром обновления Windows.
Вот краткое руководство по установке последнего обновления Windows 10 вручную с помощью Помощника по обновлению:
- Посетите эту ссылку (Вот) из браузера по умолчанию и нажмите Обновить сейчас использовать Помощник по обновлению.

- Открой Windows10Upgrade.exe установочный исполняемый файл, который вы только что загрузили, и нажмите Обновить сейчас , чтобы начать процесс обновления.
- Начнется сканирование, чтобы определить, готов ли ваш компьютер обработать обновление. Если все в порядке, нажмите Обновить чтобы помощник по обновлению загрузил обновление.
- Дождитесь завершения процесса (не закрывайте окно, пока процесс не завершится).

- По завершении загрузки Помощник по обновлению автоматически начнет установку ранее загруженного файла. Терпеливо подождите, пока ваша сборка WIndows обновится до последней версии, затем перезагрузите компьютер.

- При следующем запуске системы у вас будет последняя сборка Windows, поэтому нет необходимости использовать Центр обновления Windows для установки обновления, которое ранее не удавалось.
Если Помощник по обновлению не позволил вам обойти 0x800700d8 код ошибки или вы не хотите использовать его, чтобы избежать кода ошибки, перейдите к следующему способу ниже.
Метод 4: отключение «Отложить обновления» (если применимо)
Как оказалось, именно этот код ошибки (0x800700d8) также может произойти в тех случаях, когда ваш компьютер настроен на «Откладывать обновления» вместо их немедленной установки. Эта опция Центра обновления Windows дает вам возможность отложить некоторые обновления на несколько месяцев (исправления безопасности не попадают в эту категорию).
Но имейте в виду, что не все версии Windows включают эту опцию Windows Update. Если вы подозреваете, что эта опция может быть причиной данной конкретной проблемы, вы можете проверить Расширенные опции меню вашего Центра обновления Windows, чтобы узнать, так ли это.
Несколько пользователей WIndows 10 Enterprise, которые сталкивались с этой проблемой, сообщили, что она была полностью решена после того, как они сняли флажок с босса, связанного с отложенными обновлениями.
Вот краткое руководство по отключению отложенных обновлений в Windows 10:
- Нажмите Клавиша Windows + R открыть Бегать диалоговое окно. Затем введите ‘ms-настройки: windowsupdate‘И нажмите Войти открыть Центр обновления Windows вкладка Обновление и безопасность меню.

- Как только вы окажетесь на экране обновления WIndows, перейдите в правую часть и нажмите Расширенные опции.

- В следующем меню снимите флажок, связанный с «Отложить обновления‘.

- После отключения параметра перезагрузите компьютер и посмотрите, решена ли проблема.
Если та же проблема все еще возникает даже после прекращения возможности откладывания обновлений на вашем компьютере или этот метод был неприменим, перейдите к следующему способу ниже.
Метод 5: сбросить компоненты WU
Если ни один из вышеперечисленных методов не позволил вам исправить 0x800700d8 ошибка, вероятно, это связано с тем, что вы имеете дело с ошибкой WU, которая фактически лишила его возможности устанавливать новые обновления. В этом случае вы сможете решить проблему, сбросив все компоненты и зависимости, участвующие в этом процессе.
Несколько затронутых пользователей подтвердили, что им удалось решить эту проблему, сбросив все компоненты Центра обновления Windows вручную из командной строки с повышенными привилегиями. Вот краткое руководство, как это сделать:
- Нажмите Клавиша Windows + R , чтобы открыть диалоговое окно «Выполнить». Затем введите «Cmd» внутри текстового поля и нажмите Ctrl + Shift + Enter , чтобы открыть командную строку с повышенными привилегиями. Если вам будет предложено UAC (Контроль учетных записей пользователей)нажмите да чтобы предоставить доступ администратора.

- Как только вы окажетесь в окне командной строки с повышенными привилегиями, введите следующие команды по порядку и нажмите Войти после каждого:
net stop wuauserv net stop cryptSvc чистые стоповые биты net stop msiserver
Примечание: По завершении выполнения этих команд вы фактически остановите службы Windows Update, установщик MSI, службу криптографии и службы BITS.
- После того, как вам удастся отключить все службы, выполните следующие команды в том же окне CMD и нажмите Войти после каждого переименовать Программное обеспечение и Catroot2 папки:
ren C: Windows SoftwareDistribution SoftwareDistribution.old ren C: Windows System32 catroot2 Catroot2.old
Примечание: Эти две папки отвечают за хранение файлов обновлений, которые используются компонентом обновления Windows. Их переименование заставит вашу ОС создавать новые папки, которые займут их место.
- После завершения шага 3 введите эти последние команды по порядку и нажимайте Enter после каждой, чтобы запустить те же службы, которые ранее были отключены:
net start wuauserv net start cryptSvc чистые стартовые биты net start msiserver
- Установите обновление, которое ранее вызывало ошибку с кодом ошибки, и посмотрите, решена ли проблема.
Если вы все еще сталкиваетесь с 0x800700d8 ошибка, перейдите к следующему способу ниже.
Метод 6: Обновление BIOS до последней версии
Как сообщили несколько разных пользователей, эта конкретная проблема также может возникать в тех случаях, когда версия BIOS сильно устарела. Эта проблема почти всегда встречается с компьютерами Dell, но есть и другие производители с такими же проблемами.
Однако, прежде чем начинать процесс обновления версии BIOS, имейте в виду, что неосторожное выполнение этого может привести к другим проблемам, если шаги по обновлению не выполняются в точности.
Точный процесс обновления версии BIOS будет отличаться в зависимости от производителя вашей материнской платы. Официальная документация по обновлению BIOS для самых популярных производителей материнских плат:
- Dell
- ASUS
- Acer
- Lenovo
- Sony Vayo
Примечание: Следуйте инструкциям по обновлению версии BIOS на свой страх и риск!

- Remove From My Forums
-
Question
-
I have been attempting to deploy an app to workstations in a client’s network and am getting error code 0x800700D8 on all workstations in group selected. I cannot determine what this error code is intended to identify and have reviewed the app scripting
(CMD based) numerous times without finding what I am doing wrong. The small app I’m trying to deploy simply shuts down Windows 7 workstations at 11:00PM local time. Any help/suggesting greatly appreciated.
paraj77
- Edited by
Wednesday, July 1, 2015 3:46 PM
type
- Edited by
Answers
-
0x800700D8 = «This version of %1 is not compatible with the version of Windows you’re running. Check your computer’s system information and then contact the software publisher.»
Why aren’t you simply using the built-in shutdown.exe? No script or source files needed for that.
Jason | http://blog.configmgrftw.com | @jasonsandys
- Edited by
Jason Sandys [MSFT]MVP
Wednesday, July 1, 2015 5:08 PM - Proposed as answer by
Garth JonesMVP
Sunday, March 20, 2016 5:50 PM - Marked as answer by
Garth JonesMVP
Friday, April 1, 2016 4:38 PM
- Edited by
Several Windows users have been reaching us with questions after seeing the 0x800700d8 error code after being unable to install an update or upgrade to Windows 10 from an older Windows version. Most affected users are reporting that this issue occurs regardless of the type of Internet network they are connected to (Private or Public) As it turns out, this issue seems to be exclusive to Windows 10.

What’s causing the 0x800700d8 error on Windows 10?
We investigated this particular issue by looking at various user reports and the repair strategies that are commonly being used by affected users in a similar situation. As it turns out, there are several different scenarios in which this error code will be thrown:
- 3rd party AV interference – As it turns out, several different overprotective AV suites are known to cause this issue by effectively stopping WU from communicating with the updating servers. If this scenario is applicable, you will be able to resolve the issue by disabling the real-time protection or uninstalling the 3rd party suite.
- Generic glitch – You may be encountering the issue due to a generic glitch that is already covered by a repair strategy included with Windows 10. In this case, you will be able to resolve the issue by using the Windows Update troubleshooter to address the glitch automatically.
- WU can’t handle the update – Certain updates run into some roadblocks when the user tries to install them on a fresh build after an update from an older Windows version. In this case, you will be able to avoid the error code by relying on Update Assistant to bring your Windows 10 build to the latest.
- The machine is configured to ‘Defer upgrades’ – There are certain Windows versions on which include the ability to delay certain updates (other than security updates). As it turns out, you might encounter this error code if Defer upgrades are allowed on your computer. In this case, you can resolve the issue by disabling Defer upgrades.
- Glitch WU components – In some cases, the 0x800700d8error code can persist due to some inconsistencies with how Windows Update communicates with the rest of the components used during the updating procedure. In this case, you can fix the problem by resetting all components and dependencies involved in the updating process.
Method 1: Uninstall 3rd party Antivirus (if applicable)
As it turns out, one of the most common causes that will trigger the 0x800700d8 error code when trying to install a pending update is an overprotective AV suite. There are a few security suites that keep getting reported by affected users after they block the process of installing an update: Sophos, McAffee, AVAST, Comodo and a few others.
If you’re using a 3rd party antivirus and you’re suspecting that it might be responsible for your failed updates, you will be able to resolve the issue either by disabling the real-time protection while the update is installed or by removing the AV suite altogether and switching to the default security option (Windows Defender).
So, let’s start by disabling the real-time protection of the 3rd party AV that you currently have active. As you might expect, this procedure will be different depending on the security suite that you’re using, but with most suites, you will be able to do it directly from the taskbar context menu.

As soon as you disable the real-time protection, try to install the update that was previously failing once again and see if the process is complete.
If you’re still encountering the 0x800700d8 error code, let’s exclude the possibility of it being caused by your 3rd party antivirus by uninstalling the program altogether and following the steps necessary to ensure that you’re not leaving behind any leftover files.
In case you decide to go this route, we encourage you to follow this article (here) – it will walk you through the steps of installing your security program without leaving behind any leftover files that might still trigger the same problem.
Method 2: Running the Windows Update troubleshooter
If you’re certain that a 3rd party suite is not the one causing the issues, let’s take the appropriate steps to ensure that your operating system is not capable of resolving the issue automatically. On Windows 10, Microsoft heavily improved the troubleshooter module, and Windows Update troubleshooter is one of the most robust utilities of this kind.
Several affected users have reported that they managed to fix the 0x800700d8 error code and install the Windows update without issues after fixing the WU component automatically using the Windows Update troubleshooter.
This built-in utility includes a wide array of repair strategies capable of being applied automatically if a problem is identified. Here’s a short guide on running the Windows Update troubleshooter:
- Press Windows key + R to open up a Run dialog box. Next, type “ms-settings:troubleshoot” and press Enter to open up the Troubleshooting tab of the Settings tab.
Opening the Troubleshooting tab of the Settings app via a Run box - Once you’re inside the main Troubleshooting tab, move over to the right-hand section of the screen and navigate to the Get up and running section. Once you get there, click on Windows Update, then click on Run the troubleshooter.
Running Windows Update Troubleshooter - After you start the utility, wait until the initial scan is complete and the repair strategy is recommended. This procedure is key since it will determine whether any of the repair strategies included with the utility applicable in this scenario.
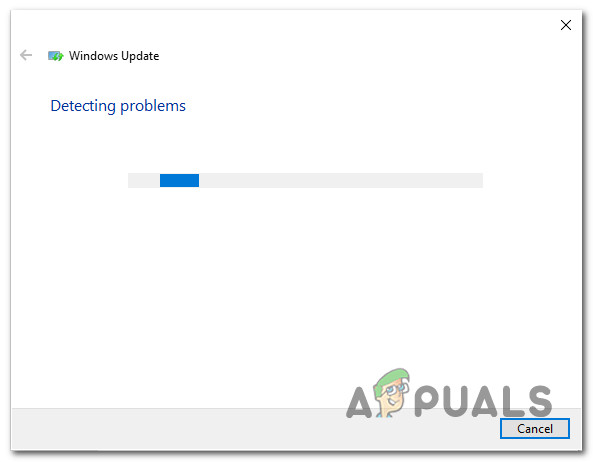
Detecting problem with Windows Update - If a suitable fix is identified, click on Apply this fix to apply the recommended repair strategy.

Apply this fix Note: Depending on the type of fix that gets recommended, you might need to follow several steps to enforce it.
- Once the fix is successfully applied, restart your computer and see if the issue is resolved once the next startup is complete.
If the same 0x800700d8 error code is still occurring, move down to the next potential repair strategy below.
Method 3: Update with the latest version manually
Some users that we’re encountering the 0x800700d8 error code every time they tried to install a pending update using the built-in WU component have reported that they successfully managed to circumvent the problem by installing the update manually.
This procedure is easier than it sounds – All you need to do is download and install the latest Windows build manually. Chances are that going this route will avoid the error code since manual updates are handled by the Upgrade Assistant rather than Windows Update.
Here’s a quick guide on installing the latest Windows 10 update manually using Upgrade assistant:
- Visit this link (here) from your default browser and click on Update Now to use the Update Assistant.

Initiating a manual update via Windows Update Assistant - Open the Windows10Upgrade.exe installation executable that you just downloaded and click on Update Now to initiate the updating process.
- A scan will commence, determining if your PC is ready to handle the update. If all is good, click on Update to make the Update assistant download the update.
- Wait until the process is complete (don’t close the window until the process is complete).

Updating Windows to the latest version using Update Assistant - Once the download is complete, the Update Assistant will automatically begin to install the file that it previously downloaded. Wait patiently until your WIndows build is updated to the latest version, then restart your computer.

Installing the latest Windows 10 build manually using Update Assistant - At the next system startup, you will have the latest Windows build, so there’s no need to use Windows Update to install the update that was previously failing.
If the Update Assistant didn’t allow you to circumvent the 0x800700d8 error code or you don’t want to use it to avoid the error code, move down to the next method below.
Method 4: Disabling ‘Defer upgrades’ (if applicable)
As it turns out, this particular error code (0x800700d8) can also occur in instances where your machine is configured to ‘Defer upgrades’ instead of installing them right away. This Windows Update option gives you the option to delay some upgrades for several months (security patches don’t fall into this category).
But keep in mind that not all Windows version includes this Windows Update option. If you’re suspecting that this option might be responsible for this particular issue, you can check the Advanced Options menu of your Windows Update to see if that’s the case.
Several WIndows 10 Enterprise users that were dealing with this problem have reported that it was resolved entirelly once they unchecked the boss associated with Defer upgrades.
Here’s a quick guide on disabling Defer upgrades on Windows 10:
- Press Windows key + R to open up a Run dialog box. Then, type ‘ms-settings:windowsupdate‘ and press Enter to open up the Windows Update tab of the Update & Security menu.
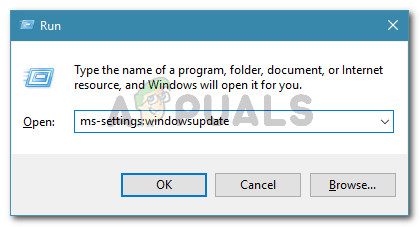
Run dialog: ms-settings:windowsupdate - Once you’re inside the WIndows update screen, move over to the right-hand side and click on Advanced options.

Accessing the Advanced Options menu of Windows Update - From the next menu, uncheck the checkbox associated with ‘Defer Upgrades‘.

Preventing the machines from deferring upgrades - Once the option has been disabled, restart your computer and see if the issue is resolved.
If the same issue is still occurring even after stopping your machine’s ability to defer upgrades or this method wasn’t applicable, move down to the next method below.
Method 5: Reset WU Components
If none of the methods above have allowed you to fix the 0x800700d8 error, it’s probably because you’re dealing with WU glitch that has effectively stopped its ability to install new updates. In this case, you should be able to resolve the issue by resetting all components and dependencies involved in this process.
Several affected users have confirmed that they were able to fix this problem by resetting all Windows Update components manually from an elevated Command Prompt. Here’s a quick guide on how to do this:
- Press Windows key + R to open up a Run dialog box. Then, type “cmd” inside the text box and press Ctrl + Shift + Enter to open up an elevated Command Prompt. If you’re prompted by the UAC (User Account Control), click Yes to grant admin access.

Running CMD as an administrator - Once you’re inside the elevated Command Prompt window, type the following commands in order and press Enter after each one:
net stop wuauserv
net stop cryptSvc
net stop bits
net stop msiserver
Note: After you are finished running these commands, you will have effectively stopped the Windows Update services, MSI Installer, Cryptographic service, and BITS services.
- After you manage to disable all services, run the following commands in the same CMD window and press Enter after each one to rename the SoftwareDistribution and Catroot2 folders:
ren C:WindowsSoftwareDistribution SoftwareDistribution.old
ren C:WindowsSystem32catroot2 Catroot2.old
Note: These two folders are responsible for storing the update files that are being used by the Windows updating component. Renaming them will force your OS to create new folders that will take their place.
- Once you complete step 3, type these final commands in order and press Enter after each one to start the same services that were previously disabled:
net start wuauserv
net start cryptSvc
net start bits
net start msiserver
- Install the update that was previously failing with the error code and see if the issue is now resolved.
If you’re still encountering the 0x800700d8 error, move down to the next method below.
Method 6: Updating BIOS to the latest version
As it’s been reported by several different users, this particular issue can also occur in instances where the BIOS version is severely outdated. This problem is almost always encountered with Dell computers, but there are other manufacturers with the same issues.
However, before you begin the process of updating your BIOS version, keep in mind that doing this recklessly can lead to other issues if the steps of updating are not followed to the letter.
The exact process of updating your BIOS version will be different depending on your motherboard manufacturer. Here’s the official documentation for BIOS updating for the most popular motherboard manufacturers:
- Dell
- ASUS
- Acer
- Lenovo
- Sony Vayo
Note: Follow the instructions of updating your BIOS version at your own risk!
Обновлено май 2023: перестаньте получать сообщения об ошибках и замедлите работу вашей системы с помощью нашего инструмента оптимизации. Получить сейчас в эту ссылку
- Скачайте и установите инструмент для ремонта здесь.
- Пусть он просканирует ваш компьютер.
- Затем инструмент почини свой компьютер.
Код ошибки 0x800700d8 используется операционными системами Windows, чтобы сообщать о проблеме программистам и системным пользователям. Есть тысячи разных коды ошибок это можно найти в сотнях мест на компьютере. Им часто требуются обширные компьютерные знания для декодирования и ремонта, но многие из них можно отремонтировать с помощью простых пошаговых решений, которые можно найти в Интернете или с помощью вспомогательного персонала.

Код ошибки отображается на экране компьютера в виде числа или комбинации цифр и букв, соответствующих ошибке или типу возникшей ошибки. Большинство наиболее распространенных ошибок Windows можно исправить с помощью быстрого поиска, но более сложные или неясные ошибки требуют помощи хорошо обученного пользователя в операционной системе Windows. Коды ошибок Windows не дают точной и полезной информации, но являются общими кодами, которые обеспечивают отправную точку для решения. При правильной проверке и проверке коды ошибок Windows передают обработчик ошибок в проблему.
Как исправить код ошибки 0x800700d8
Сбросить компоненты Windows Update
- Нажмите Windows + R, чтобы открыть диалоговое окно «Выполнить».
- Введите «cmd» в текстовое поле и нажмите Ctrl + Shift + Enter, чтобы открыть всплывающую подсказку.
- Нажмите Да, чтобы предоставить доступ администратору при запросе контроля учетных записей.
- Если вы находитесь в режиме высокой подсказки, введите следующие команды по порядку, а затем нажмите клавишу ВВОД после каждой команды:
net stop wuauserv
net stop cryptSvc
чистые стоповые бит
net stop msiserver - После успешного отключения всех служб выполните следующие команды в одном и том же окне CMD и нажмите Enter после каждой команды, чтобы переименовать папки SoftwareDistribution и Catroot2:
ren C: Windows SoftwareDistribution SoftwareDistribution.old
ren C: Windows System32 catroot2 Catroot2.old - Введите эти последние команды по порядку и нажмите Enter после каждой команды, чтобы запустить те же службы, которые были ранее отключены:
net start wuauserv
net start cryptSvc
чистые стартовые биты
net start msiserver - Введите Exit в командной строке, чтобы закрыть его.
Обновление за май 2023 года:
Теперь вы можете предотвратить проблемы с ПК с помощью этого инструмента, например, защитить вас от потери файлов и вредоносных программ. Кроме того, это отличный способ оптимизировать ваш компьютер для достижения максимальной производительности. Программа с легкостью исправляет типичные ошибки, которые могут возникнуть в системах Windows — нет необходимости часами искать и устранять неполадки, если у вас под рукой есть идеальное решение:
- Шаг 1: Скачать PC Repair & Optimizer Tool (Windows 10, 8, 7, XP, Vista — Microsoft Gold Certified).
- Шаг 2: Нажмите «Начать сканирование”, Чтобы найти проблемы реестра Windows, которые могут вызывать проблемы с ПК.
- Шаг 3: Нажмите «Починить все», Чтобы исправить все проблемы.

Запуск средства устранения неполадок Windows Update

- Нажмите Windows + R, чтобы открыть диалоговое окно «Выполнить».
- Введите «ms-settings: Устранение неполадок» и нажмите Enter, чтобы открыть вкладку «Устранение неполадок».
- Обратитесь к разделу «Ввод в эксплуатацию и эксплуатация» в правой части экрана.
- Когда вы увидите Центр обновления Windows, нажмите на него.
- Затем нажмите «Выполнить поиск и устранение неисправностей».
- После запуска этой утилиты подождите, пока не будет рекомендована стратегия восстановления.
- Как только вы нашли подходящий патч для решения этой проблемы, нажмите «Применить этот патч», чтобы успешно применить стратегию.
- После успешного применения патча перезагрузите компьютер.
Выполнить чистую загрузку

- Войдите в систему как администратор.
- В области поиска на панели задач введите msconfig и выберите System Configuration в результатах.
- На вкладке «Службы конфигурации системы» выберите «Скрыть все службы Microsoft», а затем выберите «Отключить все».
- На вкладке «Пуск» конфигурации системы выберите «Открыть диспетчер задач».
- В разделе «Запуск» диспетчера задач выберите элемент для каждого элемента запуска, а затем выберите «Отключить».
- Закройте диспетчер задач.
- На вкладке «Пуск» конфигурации системы выберите «ОК».
https://answers.microsoft.com/en-us/windows/forum/all/error-0x800700d8-windows-10/ffe571b4-d88f-429e-8cf5-1f6e459a4b12
Совет экспертов: Этот инструмент восстановления сканирует репозитории и заменяет поврежденные или отсутствующие файлы, если ни один из этих методов не сработал. Это хорошо работает в большинстве случаев, когда проблема связана с повреждением системы. Этот инструмент также оптимизирует вашу систему, чтобы максимизировать производительность. Его можно скачать по Щелчок Здесь

CCNA, веб-разработчик, ПК для устранения неполадок
Я компьютерный энтузиаст и практикующий ИТ-специалист. У меня за плечами многолетний опыт работы в области компьютерного программирования, устранения неисправностей и ремонта оборудования. Я специализируюсь на веб-разработке и дизайне баз данных. У меня также есть сертификат CCNA для проектирования сетей и устранения неполадок.
Сообщение Просмотров: 459
Several Windows users have been reaching us with questions after seeing the 0x800700d8 error code after being unable to install an update or upgrade to Windows 10 from an older Windows version. Most affected users are reporting that this issue occurs regardless of the type of Internet network they are connected to (Private or Public) As it turns out, this issue seems to be exclusive to Windows 10.
What’s causing the 0x800700d8 error on Windows 10?
We investigated this particular issue by looking at various user reports and the repair strategies that are commonly being used by affected users in a similar situation. As it turns out, there are several different scenarios in which this error code will be thrown:
- 3rd party AV interference – As it turns out, several different overprotective AV suites are known to cause this issue by effectively stopping WU from communicating with the updating servers. If this scenario is applicable, you will be able to resolve the issue by disabling the real-time protection or uninstalling the 3rd party suite.
- Generic glitch – You may be encountering the issue due to a generic glitch that is already covered by a repair strategy included with Windows 10. In this case, you will be able to resolve the issue by using the Windows Update troubleshooter to address the glitch automatically.
- WU can’t handle the update – Certain updates run into some roadblocks when the user tries to install them on a fresh build after an update from an older Windows version. In this case, you will be able to avoid the error code by relying on Update Assistant to bring your Windows 10 build to the latest.
- The machine is configured to ‘Defer upgrades’ – There are certain Windows versions on which include the ability to delay certain updates (other than security updates). As it turns out, you might encounter this error code if Defer upgrades are allowed on your computer. In this case, you can resolve the issue by disabling Defer upgrades.
- Glitch WU components – In some cases, the 0x800700d8error code can persist due to some inconsistencies with how Windows Update communicates with the rest of the components used during the updating procedure. In this case, you can fix the problem by resetting all components and dependencies involved in the updating process.
Method 1: Uninstall 3rd party Antivirus (if applicable)
As it turns out, one of the most common causes that will trigger the 0x800700d8 error code when trying to install a pending update is an overprotective AV suite. There are a few security suites that keep getting reported by affected users after they block the process of installing an update: Sophos, McAffee, AVAST, Comodo and a few others.
If you’re using a 3rd party antivirus and you’re suspecting that it might be responsible for your failed updates, you will be able to resolve the issue either by disabling the real-time protection while the update is installed or by removing the AV suite altogether and switching to the default security option (Windows Defender).
So, let’s start by disabling the real-time protection of the 3rd party AV that you currently have active. As you might expect, this procedure will be different depending on the security suite that you’re using, but with most suites, you will be able to do it directly from the taskbar context menu.
As soon as you disable the real-time protection, try to install the update that was previously failing once again and see if the process is complete.
If you’re still encountering the 0x800700d8 error code, let’s exclude the possibility of it being caused by your 3rd party antivirus by uninstalling the program altogether and following the steps necessary to ensure that you’re not leaving behind any leftover files.
In case you decide to go this route, we encourage you to follow this article (here) – it will walk you through the steps of installing your security program without leaving behind any leftover files that might still trigger the same problem.
Method 2: Running the Windows Update troubleshooter
If you’re certain that a 3rd party suite is not the one causing the issues, let’s take the appropriate steps to ensure that your operating system is not capable of resolving the issue automatically. On Windows 10, Microsoft heavily improved the troubleshooter module, and Windows Update troubleshooter is one of the most robust utilities of this kind.
Several affected users have reported that they managed to fix the 0x800700d8 error code and install the Windows update without issues after fixing the WU component automatically using the Windows Update troubleshooter.
This built-in utility includes a wide array of repair strategies capable of being applied automatically if a problem is identified. Here’s a short guide on running the Windows Update troubleshooter:
- Press Windows key + R to open up a Run dialog box. Next, type “ms-settings:troubleshoot” and press Enter to open up the Troubleshooting tab of the Settings tab.
Opening the Troubleshooting tab of the Settings app via a Run box - Once you’re inside the main Troubleshooting tab, move over to the right-hand section of the screen and navigate to the Get up and running section. Once you get there, click on Windows Update, then click on Run the troubleshooter.
Running Windows Update Troubleshooter - After you start the utility, wait until the initial scan is complete and the repair strategy is recommended. This procedure is key since it will determine whether any of the repair strategies included with the utility applicable in this scenario.
Detecting problem with Windows Update - If a suitable fix is identified, click on Apply this fix to apply the recommended repair strategy.
Apply this fix Note: Depending on the type of fix that gets recommended, you might need to follow several steps to enforce it.
- Once the fix is successfully applied, restart your computer and see if the issue is resolved once the next startup is complete.
If the same 0x800700d8 error code is still occurring, move down to the next potential repair strategy below.
Method 3: Update with the latest version manually
Some users that we’re encountering the 0x800700d8 error code every time they tried to install a pending update using the built-in WU component have reported that they successfully managed to circumvent the problem by installing the update manually.
This procedure is easier than it sounds – All you need to do is download and install the latest Windows build manually. Chances are that going this route will avoid the error code since manual updates are handled by the Upgrade Assistant rather than Windows Update.
Here’s a quick guide on installing the latest Windows 10 update manually using Upgrade assistant:
- Visit this link (here) from your default browser and click on Update Now to use the Update Assistant.
Initiating a manual update via Windows Update Assistant - Open the Windows10Upgrade.exe installation executable that you just downloaded and click on Update Now to initiate the updating process.
- A scan will commence, determining if your PC is ready to handle the update. If all is good, click on Update to make the Update assistant download the update.
- Wait until the process is complete (don’t close the window until the process is complete).
Updating Windows to the latest version using Update Assistant - Once the download is complete, the Update Assistant will automatically begin to install the file that it previously downloaded. Wait patiently until your WIndows build is updated to the latest version, then restart your computer.
Installing the latest Windows 10 build manually using Update Assistant - At the next system startup, you will have the latest Windows build, so there’s no need to use Windows Update to install the update that was previously failing.
If the Update Assistant didn’t allow you to circumvent the 0x800700d8 error code or you don’t want to use it to avoid the error code, move down to the next method below.
Method 4: Disabling ‘Defer upgrades’ (if applicable)
As it turns out, this particular error code (0x800700d8) can also occur in instances where your machine is configured to ‘Defer upgrades’ instead of installing them right away. This Windows Update option gives you the option to delay some upgrades for several months (security patches don’t fall into this category).
But keep in mind that not all Windows version includes this Windows Update option. If you’re suspecting that this option might be responsible for this particular issue, you can check the Advanced Options menu of your Windows Update to see if that’s the case.
Several WIndows 10 Enterprise users that were dealing with this problem have reported that it was resolved entirelly once they unchecked the boss associated with Defer upgrades.
Here’s a quick guide on disabling Defer upgrades on Windows 10:
- Press Windows key + R to open up a Run dialog box. Then, type ‘ms-settings:windowsupdate‘ and press Enter to open up the Windows Update tab of the Update & Security menu.
Run dialog: ms-settings:windowsupdate - Once you’re inside the WIndows update screen, move over to the right-hand side and click on Advanced options.
Accessing the Advanced Options menu of Windows Update - From the next menu, uncheck the checkbox associated with ‘Defer Upgrades‘.
Preventing the machines from deferring upgrades - Once the option has been disabled, restart your computer and see if the issue is resolved.
If the same issue is still occurring even after stopping your machine’s ability to defer upgrades or this method wasn’t applicable, move down to the next method below.
Method 5: Reset WU Components
If none of the methods above have allowed you to fix the 0x800700d8 error, it’s probably because you’re dealing with WU glitch that has effectively stopped its ability to install new updates. In this case, you should be able to resolve the issue by resetting all components and dependencies involved in this process.
Several affected users have confirmed that they were able to fix this problem by resetting all Windows Update components manually from an elevated Command Prompt. Here’s a quick guide on how to do this:
- Press Windows key + R to open up a Run dialog box. Then, type “cmd” inside the text box and press Ctrl + Shift + Enter to open up an elevated Command Prompt. If you’re prompted by the UAC (User Account Control), click Yes to grant admin access.
Running CMD as an administrator - Once you’re inside the elevated Command Prompt window, type the following commands in order and press Enter after each one:
net stop wuauserv
net stop cryptSvc
net stop bits
net stop msiserver
Note: After you are finished running these commands, you will have effectively stopped the Windows Update services, MSI Installer, Cryptographic service, and BITS services.
- After you manage to disable all services, run the following commands in the same CMD window and press Enter after each one to rename the SoftwareDistribution and Catroot2 folders:
ren C:WindowsSoftwareDistribution SoftwareDistribution.old
ren C:WindowsSystem32catroot2 Catroot2.old
Note: These two folders are responsible for storing the update files that are being used by the Windows updating component. Renaming them will force your OS to create new folders that will take their place.
- Once you complete step 3, type these final commands in order and press Enter after each one to start the same services that were previously disabled:
net start wuauserv
net start cryptSvc
net start bits
net start msiserver
- Install the update that was previously failing with the error code and see if the issue is now resolved.
If you’re still encountering the 0x800700d8 error, move down to the next method below.
Method 6: Updating BIOS to the latest version
As it’s been reported by several different users, this particular issue can also occur in instances where the BIOS version is severely outdated. This problem is almost always encountered with Dell computers, but there are other manufacturers with the same issues.
However, before you begin the process of updating your BIOS version, keep in mind that doing this recklessly can lead to other issues if the steps of updating are not followed to the letter.
The exact process of updating your BIOS version will be different depending on your motherboard manufacturer. Here’s the official documentation for BIOS updating for the most popular motherboard manufacturers:
- Dell
- ASUS
- Acer
- Lenovo
- Sony Vayo
Note: Follow the instructions of updating your BIOS version at your own risk!
I ported my project (working with Visual Studio 2022) which uses WebView2 , back to a previous version of the project that uses Visual Studio 2017 platform toolset (v141) and Windows SDK Version ‘10.0.17763.0’.
In the Debug x64 and Debug Win32 configurations, when I start the application I get the following error.

But the Release version is working properly.
Except the platform toolset the code is identical between my current version and previous version of the project.
If I change the platform toolset to Visual Studio 2019 (v142), the application launches fine with WebView2 embedded page in the previous version too.
So is there any known issue with the Visual Studio S 2017 platform toolset for Debug configurations? Am I missing something?
Please let me know if you need more details to understand the issue.
Reading time: 4 Minutes
Windows 10/11, despite its issues including the error code 0x800700d8, is often reported by users who struggle to install updates or upgrades.
If you encounter the Windows error code 0x800700d8 when installing Windows 10/11 updates or upgrading Windows 10/11, this post will help you.
Windows error code 0x800700d8 is an update error code exclusive to Windows 10/11. It is an error message normally experienced when trying to install a Windows 10/11 Update or upgrade.
What Causes Error Code 0x800700d8 on Windows 10/11?
Several reasons can prompt the update error code 0x800700d8, including:
- Interference of a third-party antivirus program – some overprotective AV software can stop Windows Update from communicating with the OS updating servers, which can result in the update error
- Slow network connectivity
- Corrupt Windows Update components
- Generic Windows update glitch
- Incompatible Windows Update components
- Inconsistencies within Windows Update dependencies and components
Regardless of what’s causing the problem, know that you can fix the error code 0x800700d8 on Windows 10/11.
How to Fix Error Code 0x800700d8 on Windows 10/11
Use the following solutions to fix the Windows 10/11 update error code 0x800700d8.
Solution #1: Run Windows Troubleshooter
Use the Windows 10/11 built-in Update Troubleshooter to solve the Windows Update error 0x800700d8 issue. The Troubleshooter is located in the Settings > Update & Security > Troubleshooter > Windows Update > Run the troubleshooter.
After running the troubleshooter, restart the PC and reinstall the updates to see if the error still occurs.
Solution #2: Disable/uninstall the third-party antivirus software
If you’re using a third-party anti-virus program on your PC, it could interfere with Windows 10/11 update and cause the Windows Update error 0x800700d8. Disabling it or uninstalling it completely can help resolve the problem.
If the error is fixed after disabling/removing the AV program, you can install/enable it again.
Solution #3: Use Windows 10/11 Update Assistant
A number of PC user reports indicate that the Windows Update error 0x800700d8 may occur if you install a pending update using the built-in Windows Update component. The reports also say that you can circumvent this error by manually installing the updates using the Windows 10/11 Update Assistant.
To use the Windows Update Assistant:
- Download the Windows Update manually from Microsoft official website.
- Double-click on the .exe (executable) setup file to initiate the installation.
- If the UAC scan prompt appears, click Yes.
- On the next wizard, click Update Now to begin the scanning for update compatibility.
- If there is a signal that everything is okay, click on Update for the Update Assistant to download the update.
- Allow the system to start updating automatically.
- Once the update is done, restart your PC for the changes to take effect.
The Update Assistant should be able to fix the error code 0x800700d8. If it doesn’t, try this next solution.
Solution #4: Disable ‘Defer upgrades/updates’ (only if applicable)
You may encounter the Windows Update error 0x800700d8 issue if your PC is set to pause or defer upgrades/updates, instead of installing them the right way. The ‘Defer Upgrades’ can delay Windows updates for several months.
Note that not all Windows versions have this Windows Update option. To know if it exists, check Windows Update and click the Advanced Options menu to see if the ‘Defer Upgrades’ option is enabled, then uncheck the checkbox and see if that resolves the error.
Solution #5: Reset (clear) Windows Update Components
The Windows Update error 0x800700d8 can be a result of some minor glitches inside Windows Update that stop the installation of the new updates. To solve this issue, manually reset the responsible Windows Update components and dependencies:
- Press Windows key + R together to launch the Run dialog.
- Type cmd and press the Ctrl + Shift + Enter keys simultaneously to open an elevated Command Prompt.
- Click Yes, if UAC prompts appear.
- On the elevated command prompt, type these codes one by one and press Enter after every code:
net stop wuauserv
net stop cryptSvc
net stop bits
net stop msiserver
These codes will stop several services such as Windows Update, MSI Installer, Cryptographic, and BITS.
- Next is to rename the Catroot2 and Software Distribution folders, which usually prevent Windows updates. You’ll need to run the following commands:
ren C:WindowsSoftwareDistribution SoftwareDistribution.old
ren C:WindowsSystem32catroot2 Catroot2.old
Renaming these two folders will force your Windows OS to create new folders to store update files and install updates.
- Once done, restart the basic services that you disabled in step 4:
net stop wuauserv
net stop cryptSvc
net stop bits
net stop msiserver
Now, restart your PC and check if you still encounter the Windows Update error 0x800700d8.
Solution #6: Update BIOS
Sometimes, when the BIOS and firmware are outdated, you may encounter the Windows Update error code 0x800700d8. If that is the case, just update your PCs Bios and firmware to the latest version or release from the official manufacturer’s website and see if it solves the issues. Ensure you follow the manufacturer’s guidelines.
Final Thoughts
For your PC to stay safe and in optimal functioning, you need to install any pending updates. The inability to install Windows updates, denoted by the error code 0x800700d8, can expose you to trouble. If this issue occurs, use one of these solutions to fix it.
Give us some love and rate our post!

Vicrey Makapagal
Vic is a tech enthusiast who loves to be up-to-date with the latest and greatest technology in the world. He creates content that educates and helps users with their tech-related questions. Vic manages our website to ensure that our readers have a seamless experience while browsing. He excels in troubleshooting errors and resolving Windows issues for gaming and work purposes.