 У многих принтеров HP Photosmart, DeskJet и OfficeJet случаются серьезные ошибки сбой системы чернил, ошибка системы чернил, а также неисправность системы чернил в зависимости от перевода. Разбираем причины и решение проблемы.
Ошибки системы чернил типа 0xc19a — это аппаратные ошибки принтера. Поэтому устраняются они ремонтом принтера. Самые тяжелые ошибки связаны с неисправностью печатающей головки, которые рассмотрим ниже.
Ошибки системы чернил типа 0xc18a — это проблемы, связанные с чернилами. Самое важное — эти проблемы решаемые.
Ошибка HP 0xc19a0013
Ошибка 0xc19a0013 наиболее часто встречается в струйных принтерах HP с сообщением «Сбой системы чернил 0xc19a0013» или «Ошибка системы чернил». Наиболее вероятно, что ошибка 0xc19a0013 — это перегрев головки. Она не страшная, обычно ее можно устранить. В случае ошибки 0xc19a0013 головку нужно хорошо почистить от чернил, промыть, а если не помогло, головку нужно менять.
Конкретный случай. Принесли в ремонт принтер HP Photosmart C6283 с полным отсутствием черного цвета. Чистка головки силами принтера ничего не давала. Чернила были оригинальными и не просроченными, проблема качества чернил не стояла.
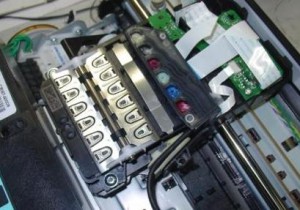 Сняв печатающую головку, я увидел, что ее плата залита чернилами. Вытер, но черный цвет не появился. После промывки головки при печати что-то появилось, но сразу после копии выскочила ошибка 0xc19a0013 Сбой системы чернил. Ошибка появлялась при печати с любым качеством (ч/б или цветной).
Удалось убрать эту ошибку, войдя в сервисное меню, выполнив сброс и сделав прочистку несколько раз. После этого ошибка исчезла, но качество печати было отвратительным, чернила проходили очень слабо, только в отдельных местах. Еще три прочистки. Получилось хорошее качество в половине дюз. Только снятие головки, отмачивание в растворе и длительная чистка помогли. Сначала качество было неважным, но через 4-5 прочисток все дюзы заработали. Т.о. ошибка была вызвана тем, что черные чернила не поступали в головку.
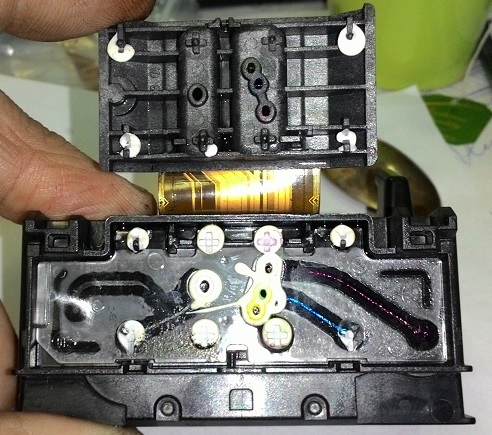
Вот фото разобранной головки HP B210B. На фото видно, что каналы чернил к дюзам имеют разную длину и форму. Цвета с длинным каналом чистить труднее и дольше. Белые кружки — это герметик вокруг выходов каналов. При его нарушении чернила разных цветов смешиваются. Вывод — нельзя прикладывать большое давление при чистке головки.
Очень неприятная ошибка 0xc18a0001 (несоответствие чернил в картридже оригинальным от HP), которая после сброса появляется вновь. Как убрать ее описано тут.
Коды ошибок системы чернил HP
Ошибки чернил и головки HP 0xc18a
В помощь страдающим от сбоя системы чернил на принтерах HP Photosmart, Deskjet и Officejet привожу коды ошибок.
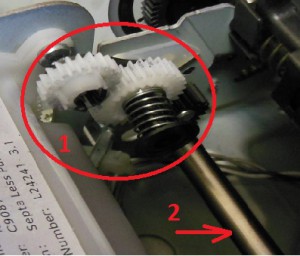
0xc05d0281 — ошибка когда не работает механизм управления клапанами при прокачке дюз головки. Связано с поломкой :
- шестеренок перекидного редуктора 1 (открывает, закрывает клапана );
- шестерней, расположенных далее на оси 2 глубоко внутри принтера;
- головки, сломан рычаг клапанов (клапаны не поднимаются);
- неправильной установкой головки
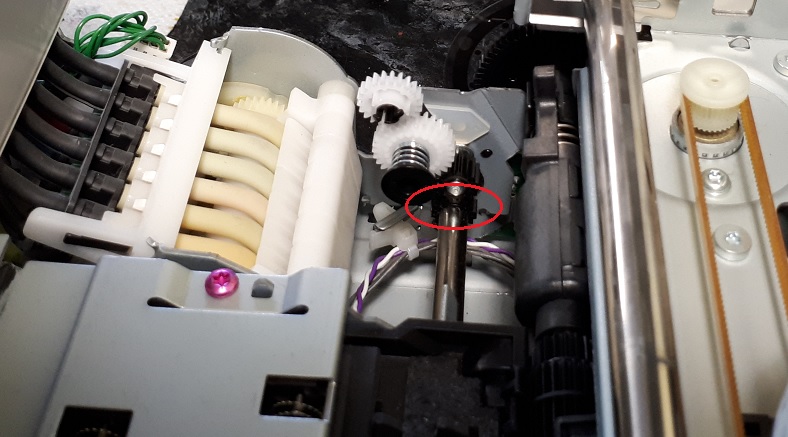
0xc05d1281 — ошибка, связанная с теми же клапанами головки HP Photosmart C7283, C5183 и подобных МФУ, когда сломана шестерня вала, приводящая перекидной редуктор.
0xc18a — Ошибки системы подачи чернил. Кстати, ошибки 0xc18a можно сбросить.
0xc18a0106 — отключен датчик проводимости чернил, отключена помпа; на принтере HP Photosmart С8256, например, сбрасывается снятием шлейфа головки, ближайшего к кардридеру.
Ошибки 0xc18a0007, 0xc18a0107, 0xc18a0207, 0xc18a0307, 0xc18a0407, 0xc18a0507 — проводимость чернил одного из 6 цветов вне диапазона. Датчики проводимости чернил находятся прямо в чернильном насосе.

Можно, в принципе, изменить показания датчиков путем подпайки дополнительных сопротивлений резисторам на плате. Таким образом можно добиться снятия ошибки. Но проще подобрать чернила.
0xc18a0206 — отключен насос, засохла головка. Обычно возникает при засохших дюзах печатающей головки. Для устранения нужно снять печатающую головку, тщательно прочистить ее до открытия всех дюз, проверить работу насоса, выполнить сброс принтера.
0xc18a0501 — возникла после использования совместимых чернил
Ошибки головки 0xc19a
0xc19a0002 — нет головки, например, отключен шлейф, сломана головка, плохие контакты в шлейфе
0xc19a0003 — критическая ошибка головки: неисправна или грязные контакты, часто после снятия ошибки сменяется ошибкой «нет печатающей головки»
0xc19a0005 — критическая ошибка головки или главной платы управления
0xc19a0013 — возможны ошибка картриджей, чернил, головки (например, из-за забитых дюз и перегрева головки). 0xc19a0013 не страшная ошибка, во многих случаях проблему можно решить
0xc19a0020, 0xc19a0023,0xc19a0024, 0xc19a0027 — ошибка, связанная с головкой, главной платой; ошибки 0xc19a0023 и 0xc19a0027 могут чередоваться, чаще всего после таких ошибок приходится менять головку, ошибка фатальная
0xc19a0034, 0xc19a0036 — критическая ошибка головки, скорее всего, поврежден шлейф или контакты, не вставлен шлейф головки
0xc19a0028, 0xc19a0035 — в головке неправильные чернила (отличаются по проводимости), залит датчик ширины бумаги справа снизу каретки — нужно промыть и высушить;
0xc19a0028 кто-то написал, что в головке вода вместо чернил — полная чушь. Датчики чернил находятся в насосе, а не в головке, к тому же, они измеряют только проводимость, причем в насосе. Более того, состав чернил датчики не определяют. Чернила в головке и в насосе могут отличаться, поскольку в головке 6 демпферных камер весьма существенного объема.
0xc19a0041 — грязная или неисправная головка
Обычно ошибки 0xc19a0002, 0xc19a0003, 0xc19a0020, 0xc19a0023,0xc19a0024, 0xc19a0027, 0xc19a0042 связаны с неисправностью печатающей головки. А также шлейфа.
Другие ошибки системы чернил струйных принтеров HP
0xc05d0281- неисправность рычага шестерни печатающей головки, отказ клапана, плохой маятник, неправильная регулировка высоты вала головки. Например, ошибка 0xc05d0281 возникает в HP С5183, С6183, С6283 и других 6-цветных принтерах с картриджами 177, когда не поднимается коромысло клапанов головки.
0x61011beb, 0x61011bed — общая ошибка принтера, связанная с узлом парковки, замятием каретки, бумаги, а также поломкой маятникового редуктора. Аналогичная ошибка 0x61011be5 связана с узлом обслуживания purge unit.
0x6100000b — ошибка принтера, связанная с невозможностью определить начальное положение каретки. Связана ошибка может с лентой энкодера, датчиком энкодера, двигателем. Для начала нужно почистить ленту.
Сброс ошибок 0xc19 и 0xc18
Варианты сброса ошибок.
Выдернуть шлейф головки, включить принтер и выключить после обнаружения новой ошибки 0xc19a0002 — нет головки. Эта ошибка сотрет предыдущую критическую ошибку. Затем вставить шлейф головки и включить принтер.
1. Общий сброс в HP Photosmart C5183.
Вынуть штекер питания. Нажать одновременно влево и справку, или ОК и справку, вставить питание, держать кнопки вплоть до выключения принтера.
Держать крест и стрелку вниз, включить принтер.
2. Рекалибровка — держать сразу 4 кнопки Cancel, OK, Black, Color и выключить принтер, вынуть питание, подождать минуту, включить принтер.
3. Вынуть батарейку, которая обычно располагается на или рядом с форматером. Подождать 15 минут. Включить принтер.
Некоторые ошибки можно сбросить через сервисное меню.
Вход в сервисное меню HP
1. нажать кнопку вкл. и держать 10 секунд
затем
лев. вверх
лев. вниз
2 раза лев. вверх
2. Нажать и отпустить кнопки кнопки «Печать фото» (“Print Photos”) и «Устранение красных глаз» (“Red Eye Removal”).
Появится экран с надписью Enter Special Key Combo. Нажать и отпустить «Устранение красных глаз», «Печать фото», «Устранение красных глаз»
В сервисном меню выбрать Resets, затем Semi/Full Reset.
Либо нажать и отпустить кнопки кнопки Настройка (ключ) и Стрелка влево, появится Enter Special Key Combo, затем ОК. System Configuration Menu.
3. Для Officejet 6500A для входа в сервисное меню использовать: выключить МФУ кнопкой, нажать вкл. и удерживать несколько секунд пока не загорится светодиод карты, затем нажать Q, отмена, 2 раза Q (home- back-home-home). Далее пользоваться навигацией по краям экрана.
4. Для Officejet Pro 8600 Plus нажать вкл. и удерживать несколько секунд, пока не потухнет экран, затем нажать слева вверху (home), отмена (X), 2 раза home. Далее использовать навигацию по краям экрана.
5. При включении держать # и 3, либо # и 6.
6. Для HP Photosmart 5520. Слева внизу (back, возврат), слева-вверху (home), Слева-внизу (back, возврат), справа-снизу (отмена, cross), Слева внизу (back, возврат).
7. Для Officejet Pro 8500A — в основном меню перейти вправо, появится подсветка стрелки «Возврат», 4 раза нажать на кнопку возврат, появится инженерное меню, в нем можно выбрать reset, partial reset и др.
8. Для HP Photosmart D7363 одновременно Вкл и Х, затем -, кнопка улучшения изображения с человечком и снова — .
Возврат к заводским установкам
В некоторых принтерах HP, например, в Photosmart C7283 ошибки чернил типа 0xc18a можно сбросить через возврат к начальному состоянию. Для сброса нужно зажать Справку и Ок, вставить шнур питания и держать до сброса.
Читать про ремонт струйных принтеров.
Задать вопрос, сделать заказ можно в чате. Мы ответим в любом случае.
Посетители также читают по этой теме:
Ремонт струйных принтеров
- Принтер не печатает
- Ремонт принтеров, МФУ
- Устройство печатающих головок HP
- Чистка печатающей головки
- Чистка головки Brother
- Ремонт принтеров Epson
Explore the easiest methods to fix it
by Srishti Sisodia
Srishti Sisodia is an electronics engineer and writer with a passion for technology. She has extensive experience exploring the latest technological advancements and sharing her insights through informative… read more
Updated on June 6, 2023
Reviewed by
Alex Serban

After moving away from the corporate work-style, Alex has found rewards in a lifestyle of constant analysis, team coordination and pestering his colleagues. Holding an MCSA Windows Server… read more
- The printer error 0xc19a0023 could occur due to outdated or corrupted firmware or printer drivers.
- To fix it, you can reset the printer, printer head, and update the printer firmware and PC drivers.
XINSTALL BY CLICKING THE DOWNLOAD FILE
This software will simplify the process by both searching and updating your drivers to prevent various malfunctions and enhance your PC stability. Check all your drivers now in 3 easy steps:
- Download Outbyte Driver Updater.
- Launch it on your PC to find all the problematic drivers.
- Afterward, Click Update & Apply Selected to get the latest driver versions.
- OutByte Driver Updater has been downloaded by 0 readers this month.
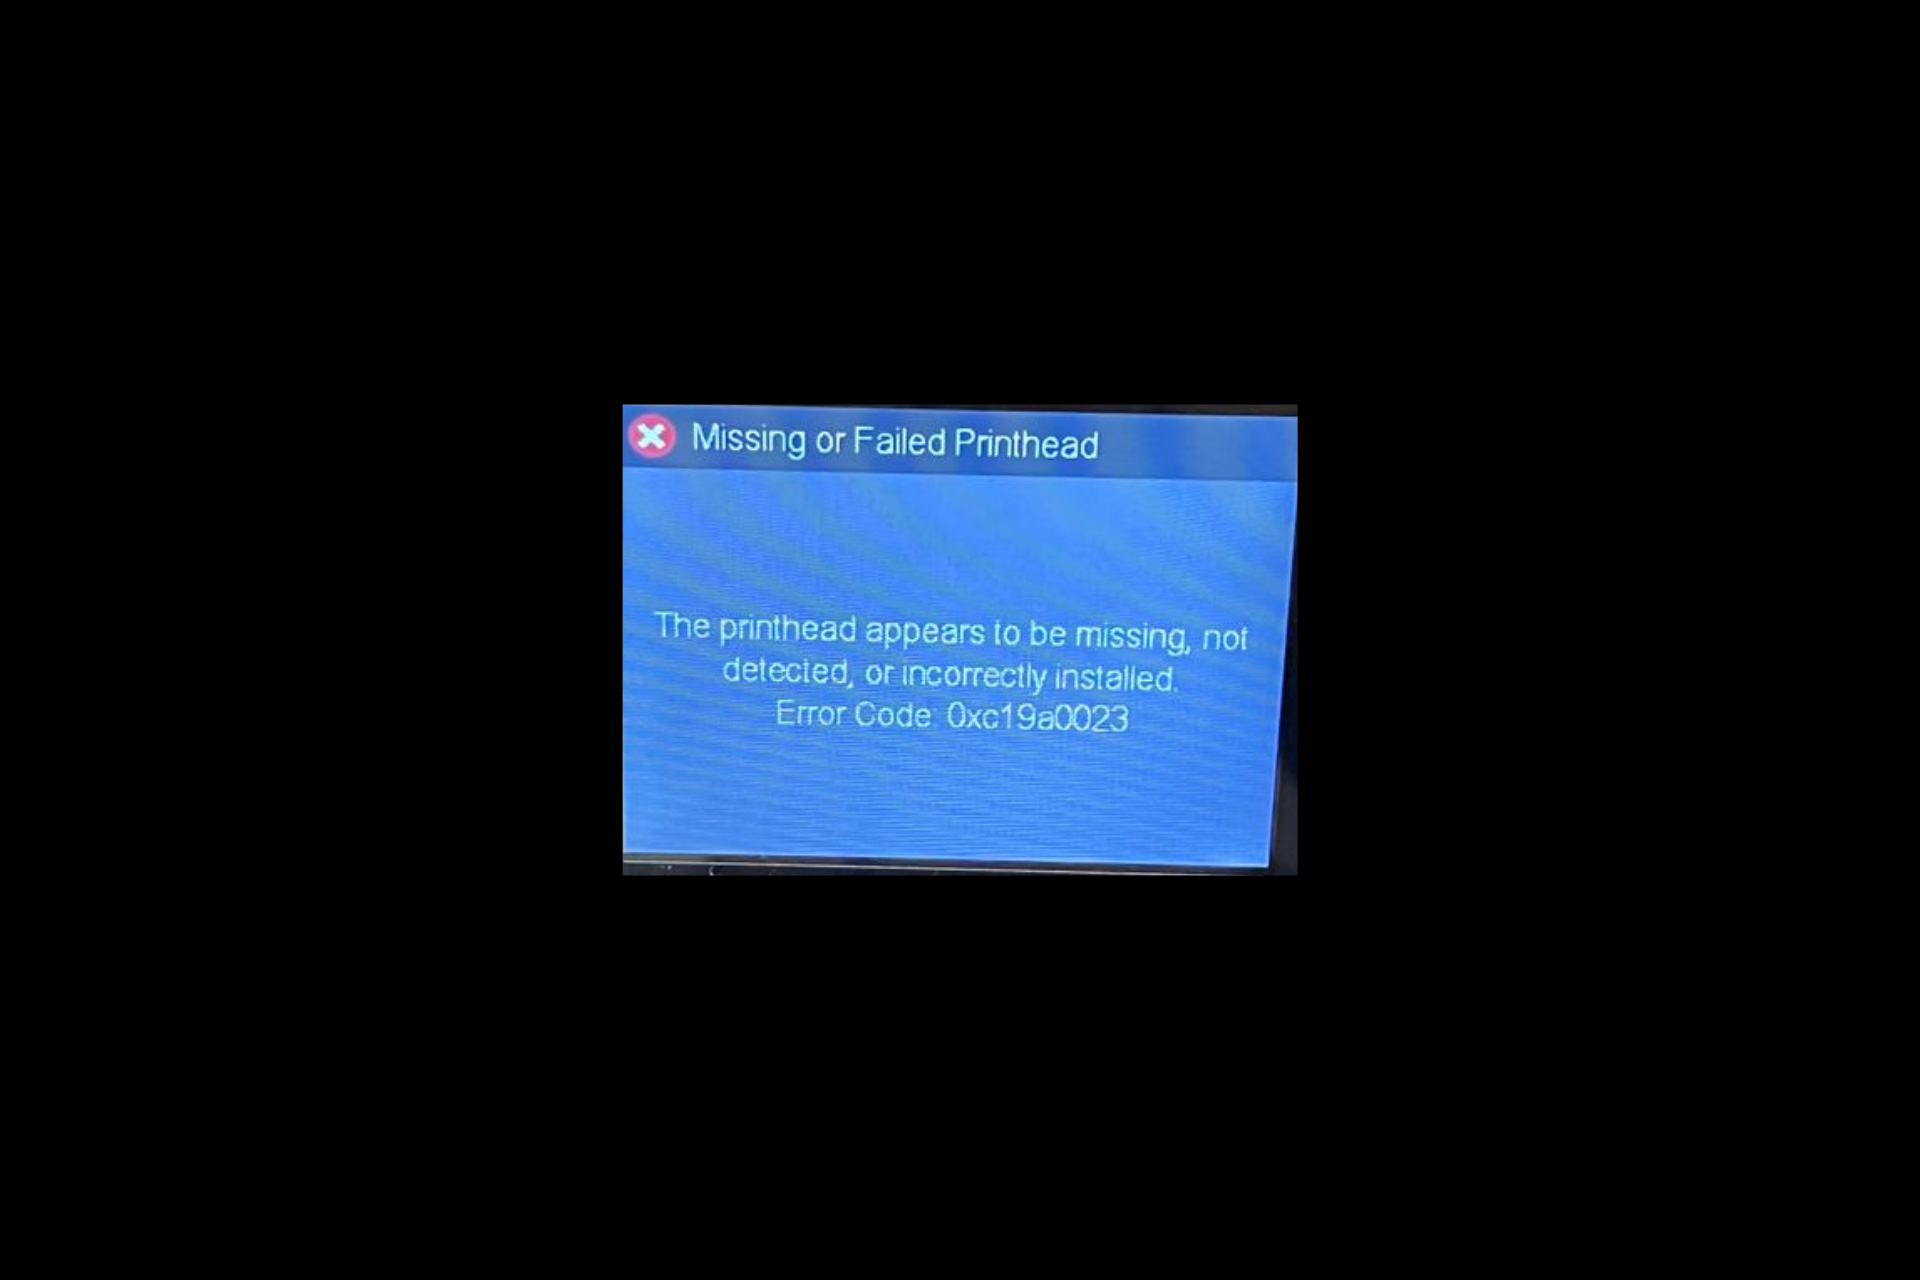
If you have encountered the error code: 0xc19a0023 Printer head appears missing or not detected; this guide can help!
In this guide, we will discuss some of the troubleshooting methods to fix the error right after explaining the causes.
What causes the error code 0xc19a0023?
The error code 0xc19a0023 is typically associated with an issue in HP printers, particularly models in the Photosmart, Officejet, and Deskjet series. There could be various reasons for it; some of the common ones are mentioned here:
- Printhead problem – The printhead, responsible for transferring ink onto the paper, might be clogged or malfunctioning, leading to this error. Try cleaning or replacing the printhead.
- Ink cartridge issue – The error may occur if the ink cartridges are not properly installed or if they are low on ink. Check the cartridges are correctly inserted and have sufficient ink levels.
- Firmware or driver issue –Outdated or corrupted firmware or printer drivers can cause various errors, including this one. Ensure the printer has the latest firmware installed & update the PC drivers.
- System or software conflict – Occasionally, conflicts between the printer software and other programs on your computer can trigger an error. Try restarting your computer and printer.
So, these are the causes of this error; let us dive into the solutions to fix the issue.
What can I do to fix the error code 0xc19a0023?
Before engaging in advanced troubleshooting steps, you should consider performing the following checks:
- Try restarting your computer.
- Check ink cartridges to ensure they are properly installed.
- Clean the ink cartridge contacts.
- Remove dust particles from the printer.
- Turn off the printer and unplug it from the power source. Wait for 30 seconds.
- Reinstall the cartridges and make sure they are properly seated.
Once done, move to the solutions mentioned below.
1. Resetting the printer
- Turn on the printer and wait for a couple of seconds until the printer gets idle and silent.
- Unplug the power cable from the printer while it is ON.
- Disconnect the power cord from the power outlet.
- Wait for a minute, then reconnect the power cable to the printer.
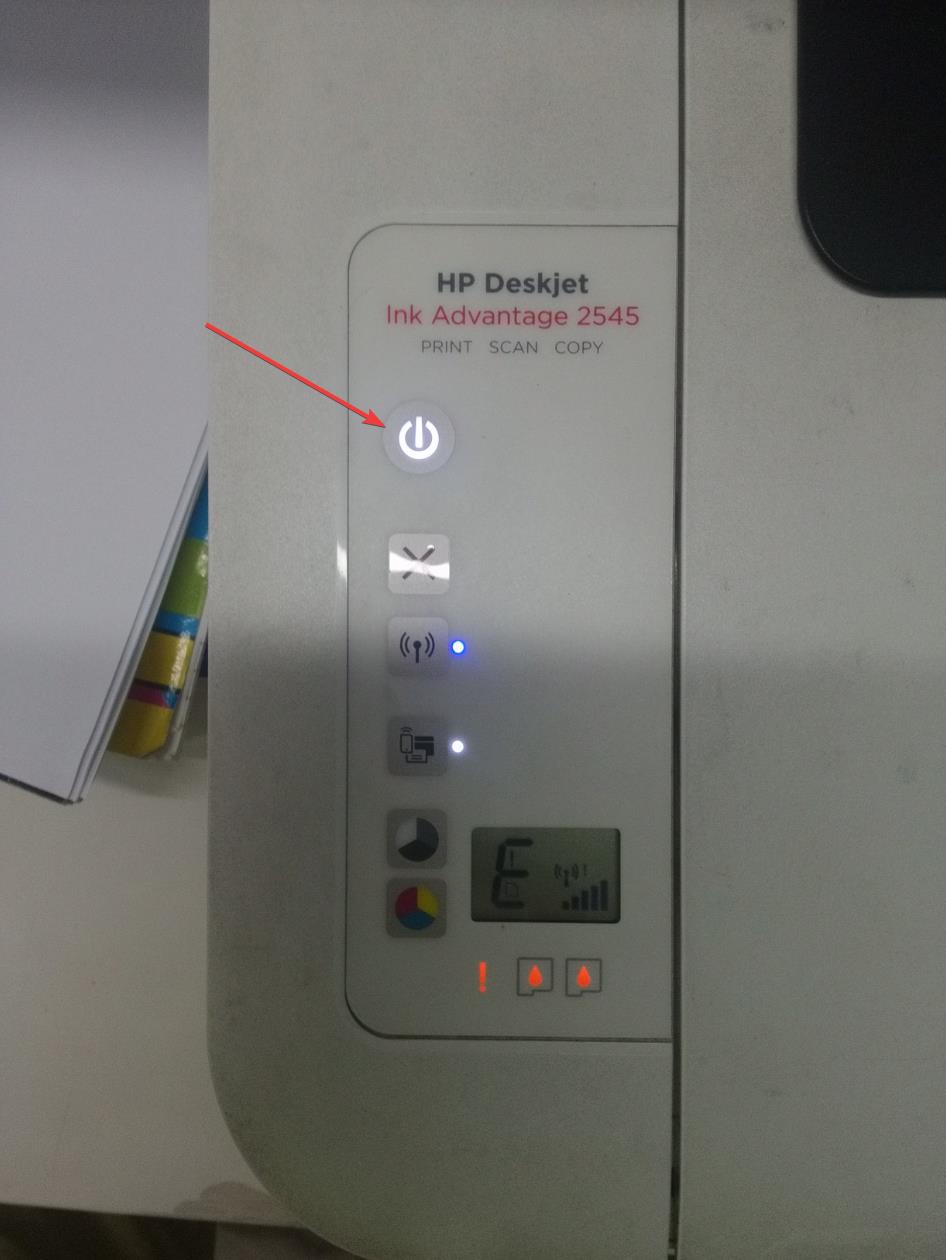
- If the printer doesn’t turn ON automatically, press the Power button on your printer to turn it on.
Now check if the issue is still there, and if it is, move to the next method.
2. Resetting the print head
- Remove the printer power cord so that you can stop the carriage movement.
- Now open the cartridge access door and wait for the carriage to become idle and silent.
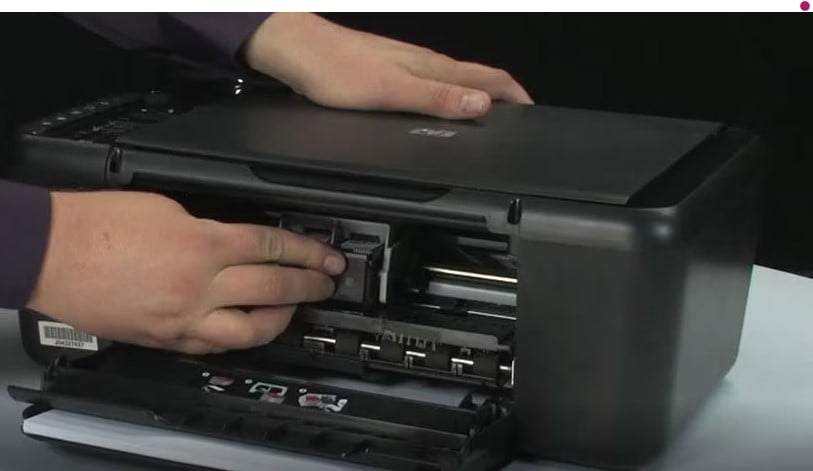
- Next, lift the carriage lever and then lift the print head from the carriage, but don’t remove the printer head fully.
- Reinsert the printer head; Verify that it is properly seated in the carriage by gently moving the print head from left to right.
- Next, lower the carriage lever and close the ink cartridge’s access door.
- Attach the power cable to the printer and turn it ON. Now wait for the printer to get idle and silent.
Check if the error is resolved; if not, reinsert the print head up to three times to fix it. If this doesn’t help, contact the printer manufacturer’s support team.
- 0x00000bbb Printer Error: How to Quickly Fix it
- WD SES Device USB: Device Driver not Found [Fix]
- Printer Status Unknown: 4 Ways to Fix This Error
3. Update your drivers
- Press Windows + R to open the Run window.
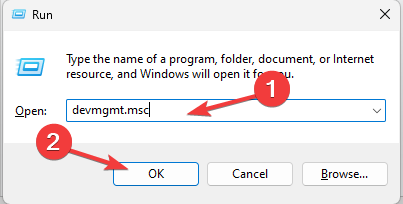
- Type devmgmt.msc and click OK to open the Device Manager.
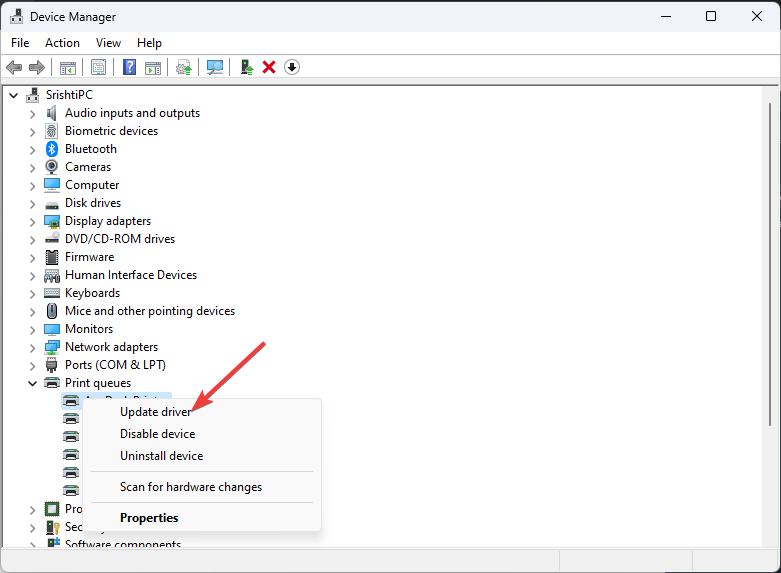
- Locate and expand Print queues. Right-click the printer driver associated and select Update driver.
- Click Search automatically for drivers.
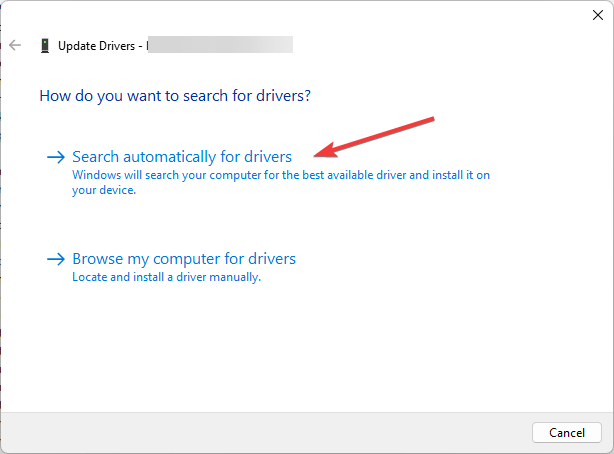
- Follow the onscreen instructions to complete the process.
This Device Manager task might not find the latest driver version for your Printer, so you would need an alternative.
Luckily, it’s possible to update or install the latest drivers on your PC using a dedicated driver tool with automatic and secure technology.
⇒ Get Outbyte Driver Updater
4. Update the printer firmware

NOTE
There are no firmware updates if you can’t see a firmware option for your printer.
- Make sure your printer is connected to your computer.
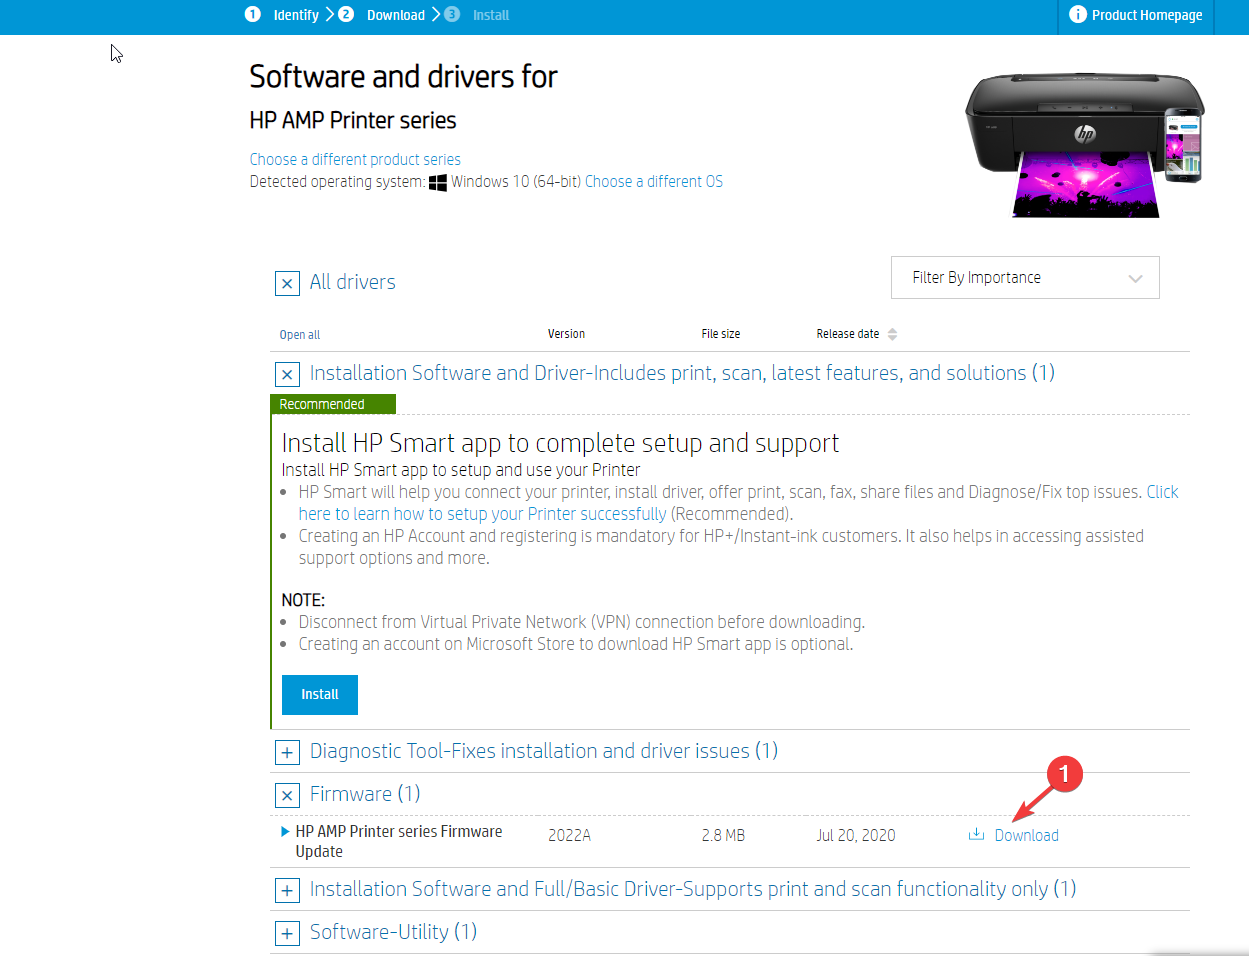
- Go to HP Software and Driver Downloads and click Printers.

- Enter your printer model and click Submit.

- Choose Firmware from the list of drivers, click Download next to the update, and then follow the onscreen prompts.
- On the HP Printer Update screen, check the status of your printer. If you can’t see the network printer, use a USB cable to connect your printer temporarily to the PC. Wait for 15-20 seconds, then click Refresh.
- Next, if the status says Ready, place a checkmark next to the serial number and select Update.
- Once the status is Up-to-Date, the firmware is updated.
So, these are the methods to fix error code 0xc19a0023 and make your printer up and running. If nothing works for you, the print head or cartridges might be damaged, and you need to replace them to eliminate the error once and for all.
If you are looking for solutions for other HP printer errors like 83C0000B, we suggest you check out this guide.
Please feel free to give us any information, tips, and your experience with the subject in the comments section below.
Still experiencing troubles? Fix them with this tool:
SPONSORED
Some driver-related issues can be solved faster by using a tailored driver solution. If you’re still having problems with your drivers, simply install OutByte Driver Updater and get it up and running immediately. Thus, let it update all drivers and fix other PC issues in no time!
![]()
Skip to content
The HP Printer Error 0XC19A0023 mostly appears in HP PhotoSmart Printers. If you are facing the same problem with your printer, then don’t take anymore tension. Here, we will guide you step by step to fix HP Printer Error 0XC19A0023. You can easily fix HP Printer Error 0XC19A0023 by applying the simple steps to your HP Printer.
Various Ways to Fix Error 0XC19A0023
The HP Printer Error 0XC19A0023 occurs when there is a problem with your print head, or there is any failure in the ink cartridges system. This error will also appear when you don’t update your computer regularly. When this HP Printer Error 0XC19A0023 displays, you may be wondering how to fix it. But you have no need to worry. You can resolve HP Printer Error 0XC19A0023 by following the steps given below:
How to Fix HP Printer Error 0XC19A0023?
Method 1: Resetting the Printer
- Switch ON the printer and wait for few seconds until the printer gets idle and silent.
- Now, unplug the power cable from the printer while it is ON position. Also, disconnect the power cord from the main power outlet.
- Wait for one minute and reconnect the power cable to the main outlet and to the printer.
- Now turn on your printer by pressing the power, if it doesn’t turn ON automatically.
- Before you proceed, ensure that the printer becomes idle and silent.
- If the problem is resolved with these steps, you have no need to continue the troubleshooting.
- Continue the method 2, if the error still persists.
Method 2: Resetting the Print Head
- Unplug the power cord of your printer so that you can prevent the movement of the carriage.
- Then, Open the cartridge access door and before you proceed to step next wait until the carriage becomes idle and silent.
- Now lift the carriage lever and slightly lift the print head from the carriage.
- Don’t remove the printer head fully.
- Reinsert the printer head carefully.
- Make sure that the printer head is seated in the carriage properly by gently moving the print head from left to right.
- Now lower the carriage lever and close the access door of the ink cartridges.
- Plug in the power cable to the printer and turn it ON.
- Now, wait until the printer gets idle and silent.
- If the error is still not resolved, reinsert the print head up to three times.
- Try the method 3, if the error still appears.
Method 3: Replace the Print Head
- If your print head or cartridges are damaged, then replace them with the new and genuine one.
- If the HP Printer Error 0XC19A0023 is not fixed, then perform method 4.
Method 4: Service your HP Printer
- If you can’t fix the HP Printer Error 0XC19A0023 even by following the above troubleshooting steps, then give your printer for servicing.
Fixing error 0xc19a0023 on HP printers
Ink system failure oxc19a0023 on Photosmart D7560, D5460, C5580, C5380, C6380 and more…
Solution 1:
- Turn the unit off,.
- Unplug the power cord and wait 30 seconds before reconnecting the power.
- Turn on the printer
Solution 2:
- Press and hold «left arrow» key
- Press the «setup» key and release both keys
- Press and release the «OK» button
- Press and release the right arrow button until the display says “System Configuration Menu”. 2. Press and release the “OK” button.
- Display should say “Hardware failure status”. If not there already, Arrow Key over to “Hardware failure status”,
- Press and release the “OK” button.
- Display should say “Hardware failure status: Clear. Press OK to clear”.
- Press and release the “OK” Button. Message changes to “Hardware failure status Cleared. Press Cancel to continue”.
- Press and release the “CANCEL” button as many times as necessary, so that, either the “Welcome to Photosmart Express” screen appears, or, the “Ink System Failure” screen appears. Do not print at this stage.
- Using the Power Button, turn the unit OFF and unplug the power cable from back of the printer and wall outlet.
- Wait 30 seconds for the power to get discharged and then plug the power cable into the wall outlet first and then into the back of the printer
- Turn the unit on. The printer may display message “USE POWER BUTTON TO SHUTDOWN THE PRINTER” followed by “PRESS OK TO CONTINUE”. Press OK.
- If the printer has already initialized, then go to the next step. If not, the printer will start the “ONE TIME INK INITIALIZATION PROCESS”. Allow this process to complete and do not interrupt. Once the initialization process is complete, the printer will print out a Diagnostic Page.
- To verify printer functionality print a SELF TEST PAGE. If SELF TEST prints, then printer is ready for use or Software Installation.
- If the error is still there, or reoccurs the printer is already defective.
Solution 3:
- Press the On button to turn the printer off.
- Unplug the power cord from the back of the printer.
- Remove all the ink cartridges.
- Wait two minutes.
- Plug the power cord into the back of the printer.
- Press the On button to turn the printer on.
- Install the ink cartridges when prompted.
Solution 4:
- Without turning off the product, disconnect the USB cable from the rear of the product.
- Remove the cartridges from the product.
- Wait for the ‘Insert Cartridges ‘ message to display on the control panel.
- Disconnect the power cord from the back of the product.
- Wait 60 seconds.
- Reconnect the power cord. If the product does not automatically turn on, press the Power button (
).
- Reinsert the cartridges, and then close any open doors on the product.
- If you receive a prompt to print a calibration page, do so.
- Reconnect the USB cable to the rear of the product, and then try printing again.
Solution 5:
- Buy a new Printhead
Popular posts from this blog
MAJ11/06/17 Error B200 means the printhead voltage or temperature is not normal. The Printhead could be defective…. but first, try these solutions below: Solution 1 : Disconnect the power cable from the printer. Wait 1 hour. Connect the power cable Solution 2 : Check and Clean Head contact pin condition of the carriage unit Check Cable connection especially the carriage FFC Solution 3 : Turn off the power Open the panel Turn on the power Wait for print carriage to start moving to the left. Let it go past half way Before print carriage reaches left hand side shut the cover. Leave the Printer turned on Solution 4 : Unplug the power cable. Open the printer Push the whole print head mechanic to the center While the printer still open, plug the power and turn it ON. When the printhead still moving and is going to the very LEFT, close the cover. Wait until its boot up. Solution 4a: Take out all of the ink cartridges Lift up the gr
The error B204 could happen after a cartridge replacement. First of all, when installing, remove the cartridges from the plastic package, but do not drill any plastic membranes, as this will cause this error when placing the cartridge. The error may also appear if you change a completely empty cartridge: when installing a full cartridge, the printer enters a cleaning cycle, but the printhead has not yet received ink from the newly inserted cartridge. Here are some tips to cancel this error B204:: Solution 1: Remove the cartridges Power the printer for 2 minutes Switch on the printer Install the cartrdiges Solution 2: Switch on the printer Unplug the power cable Open the cover Move the print head carriage manually to the usual place where it goes for the cartridge change (If the printhead carriage is not movable, reconnect and then turn on the printer, then unplug it again when the head carriage is in the moving position). Change the cartridges. Close the fr
MAJ 25/08/17 The Service Tool V3400 allow to reset the counter of some Canon printers. For the error code 006 , try this : Solution 1: Check your cartridges: an empty cartridge can lead to error 006 Solution 2 : After you avec clicked on «Main», wait a few minutes. If the error still here, restarts the Service Tool Solution 3 : Close the service tool Disconnect the USB cable from the printer After 10 seconds, plug back the cable to the printer On Windows, click next when appears «New device» Open the service tool
1.Запустите калибровку и автоочистку головок.
2.Вытащите все картриджи, протрите контакты картриджа и в каретке, вставьте обратно, проверьте.
3.Замените картриджи на новые, фирменные.
4.Если остались старые картриджи, попробуйте установить их, будет ли выводиться та же ошибка?
Если это не помогает, принтер нуждается в сервисном обслуживании.
Ответить