Follow these steps to perform a hard reset on printer.
1. Press the Power button to turn on the product.
2. With the product turned on, disconnect the power cord from the rear of the product.
3. Unplug the power cord from the wall outlet.
4. Wait at least 15 seconds.
5. Plug the power cord back into the wall outlet.
6. Reconnect the power cord to the rear of the product.
7. If the product does not turn on by itself, press the power button to turn it on.
Try that and let me know if it helps!
Best of luck,
Kyle
Let’s set up scan to email again-
Step 1 Set up Scan to Email —
1.) Click Start, and then click Programs.
2.) Click HP, click the name of the printer, and then click Scan to Email Wizard.
3.) In the Outgoing Email Profiles dialog, click the New button. The Scan to Email Setup dialog opens.
4.) On the 1. Start page, enter the sender’s email address in the Email Address field.
5.) In the Display Name field, enter the sender’s name. This is the name that will display on the printer control panel.
6.) To require a PIN to be entered on the printer control panel before the printer can send an email, enter a 4-digit PIN in the Security PIN field, and then re-enter the PIN in the Confirm Security PIN field, and then click Next.
7.) On the 2. Authenticate page, enter the SMTP Server and Port Number.
8.) If you are using Google™ Gmail for email service, select the Always use secure connection (SSL/TLS) check box.
9.) Select the Maximum Size of Email from the drop-down menu.
10.) If the SMTP server requires authentication to send an email, select the Email Log-in Authentication check box, and then enter the User ID and Password, and then click Next.
11.) On the 3. Configure page, to automatically copy the sender on email messages sent from the profile, select Include sender in all email messages sent out successfully from the printer, and then click Next.
12.) On the 4. Finish page, review the information and verify all the settings are correct. If there is an error, click the Back button to correct the error. If the settings are correct, click the Save and Test button to test the configuration.
13.) When the Congratulations message displays, click Finish to complete the configuration.
Step 2 Scan to Email —
1.) Load the document on the scanner glass according to the indicators on the printer.
2.) From the Home screen on the printer control panel, touch the Scan icon .
3.) Touch Scan to E-mail.
4.) Touch Send an E-mail.
5.) Select the From address that you want to use. This is also known as an «outgoing email profile.»
6.) Touch the To button and select the address or group to which you want to send the file. Touch the Done button when finished.
7.) Touch the Subject button to add a Subject line.
8.) Touch the Next button.
The scan settings will display on the printer control panel screen.
9.) To change any of the scan settings, touch the Settings button, and then select the desired settings.
After selecting the desired settings, continue to the next step.
10.) Touch the Scan button to start the scan job.
Keep me posted!
Принтер не подключается к веб-службам, и на принтере или компьютере отображается одно из следующих сообщений об ошибке.
-
Ошибка подключения к серверу. При подключении к серверу возникла проблема. Нажмите «Повторить попытку» или нажмите OK для
выхода. -
Проблема с веб-службами. При подключении к серверу веб-служб возникла проблема.
-
Ошибка подключения к серверу. Не удалось подключиться к веб-службам. Проверьте доступ к Интернету и повторите попытку.
Прим.:
Если вы пользуетесь принтером HP+, веб-службы активируются автоматически во время настройки принтера. Перейдите на сайт 123.hp.com, чтобы загрузить приложение HP Smart, а затем настройте принтер. Чтобы удалить веб-службы, выполните сброс принтера для восстановления
заводских значений параметров по умолчанию.
Выполните следующие процедуры в указанном порядке. Используйте принтер после каждой процедуры, чтобы проверить, удалось ли
устранить проблему.
Проверка поддержки веб-служб принтером
Проверьте наличие значка «Веб-службы» или ePrint, чтобы убедиться, что принтер поддерживает веб-службы.
-
Включите принтер.
-
Найдите значок «Веб-службы» или ePrint
на панели управления.
Если на панели управления нет значка или если вы не уверены, поддерживается ли ваш принтер, перейдите к документу Решения для мобильной печати для просмотра дополнительных сведений.
-
Если ваш принтер не поддерживается, рассмотрите возможность приобретения нового принтера с требуемыми функциями.
Проверка подключения
Убедитесь, что сеть работает и что принтер подключен.
Проверка подключения к сети Wi-Fi
Проверьте состояние беспроводной сети и подключения принтера.
-
Убедитесь, что принтер не подключен с помощью кабеля USB.
Прим.:
Когда к принтеру подключен кабель USB, подключение принтера к веб-службам невозможно.
-
Проверьте документацию по маршрутизатору или сайт службы поддержки, чтобы убедиться, что он соответствует следующим требованиям.
-
Проверьте полосу частот маршрутизатора. Многие маршрутизаторы могут работать в обеих полосах частот — 2,4 ГГц и 5,0 ГГц, но
не все принтеры HP поддерживают обе полосы. Убедитесь, что на маршрутизаторе включена и используется для широковещания полоса
частот 2,4 ГГц. Если маршрутизатор передает различные имена сетей (SSID) для каждой полосы частот, подключите принтер к SSID,
соответствующему полосе частот 2,4 ГГц. Если принтер поддерживает 5,0 ГГц, подключите его к SSID, соответствующему полосе
частот 5,0 ГГц. -
Поддержка Bonjour (Mac): HP рекомендует использовать маршрутизаторы, которые поддерживают Bonjour, программное обеспечение
Apple для обнаружения сети. Подключение с использованием Bonjour — это лучший способ поиска принтера и поддержки беспроводной
печати.
-
-
Убедитесь, что принтер не подключен к гостевой сети или сети с главным устройством, например к сетям в школах, отелях или
домашним сетям, позволяющим использовать гостевой вход. -
На принтере откройте меню «Беспроводная сеть» или «Параметры» и убедитесь, что функция беспроводной связи включена, затем
убедитесь, что индикатор «Беспроводная связь»непрерывно светится синим.
Если индикатор «Беспроводная связь» мигает синим, переместите компьютер и принтер ближе к маршрутизатору и расположите все
устройства вдали от крупных металлических предметов и устройств, излучающих радиосигналы, таких как микроволновые печи и беспроводные
телефоны. Если беспроводное подключение принтера часто разрывается, перейдите к документу Принтер не поддерживает беспроводное подключение, чтобы получить подробные инструкции по действиям для устранения неполадок. -
На компьютере нажмите значок сетевого подключения
или
на панели задач, чтобы посмотреть имя сети и состояние подключения.
-
Если для подключения выбрана не ваша сеть, отключитесь от нее и установите подключение к своей сети.
-
Если сигнал сети слабый
, переместите компьютер и принтер ближе к маршрутизатору и расположите все устройства вдали от крупных металлических предметов
и устройств, излучающих радиосигналы, таких как микроволновые печи и беспроводные телефоны. -
Если сетевое подключение отсутствует, установите подключение к своей сети, а затем снова проверьте состояние подключения сети.
Когда подключение установлено, рядом с именем сети отображается галочка или состояние «Подключено».
-
Проверка проводного подключения к сети (Ethernet)
Проверьте состояние проводной сети (Ethernet) и подключения принтера.
-
Убедитесь, что принтер не подключен с помощью кабеля USB.
Прим.:
Когда к принтеру подключен кабель USB, его подключение к веб-службам невозможно.
-
Убедитесь, что кабель подключен к порту Ethernet
на принтере и к свободному порту на маршрутизаторе. Когда кабель подключен правильно, непрерывно светится зеленый индикатор,
а оранжевый индикатор мигает. -
На компьютере нажмите значок сетевого подключения
-
Если для подключения выбрана не ваша сеть, отключитесь от нее и установите подключение к своей сети.
-
Если сигнал сети слабый
и устройств, излучающих радиосигналы, таких как микроволновые печи и беспроводные телефоны. -
Если сетевое подключение отсутствует, установите подключение к своей сети, а затем снова проверьте состояние подключения сети.
Когда подключение установлено, рядом с именем сети отображается галочка или состояние «Подключено».
-
Перезапуск принтера, маршрутизатора и компьютера
Устраните ошибки, перезапустив подключенные к сети устройства.
-
Выключите принтер.
-
Отсоедините от принтера все кабели USB или Ethernet. Эти типы подключений могут препятствовать подключению принтера к беспроводной
сети. -
Отсоедините кабель питания от маршрутизатора Wi-Fi, подождите пятнадцать секунд, снова подсоедините кабель питания и дождитесь,
когда индикаторы будут указывать, что подключение установлено. -
Перезапустите компьютер.
-
Включите принтер.
Включение веб-служб через EWS
Откройте дополнительные параметры в приложении HP Smart или подключитесь к домашней странице принтера, чтобы активировать
веб-службы.
-
Откройте Дополнительные параметры (EWS) в приложении HP Smart или введите IP-адрес принтера в адресной строке веб-браузера.
-
При отображении окна для входа в систему или окна с сертификатом заполните необходимые сведения, чтобы открыть встроенный
веб-сервер.-
При отображении сертификата безопасности сайта нажмите Продолжить, чтобы открыть главную страницу принтера.
-
Если открывается окно для входа в систему, введите admin в качестве имени пользователя, а затем введите PIN-код, который указан на этикетке, расположенной на нижней или задней панели
принтера, или пароль, заданный администратором принтера.
-
-
На домашней странице принтера или в разделе «Дополнительные параметры» выберите Веб-службы.
-
Выберите Продолжить, Включить или Активировать, затем следуйте всем инструкциям, чтобы включить веб-службы.
Проверка параметров прокси-сервера Интернета
Если в сети используется прокси-сервер, укажите информацию об этом прокси-сервере в параметрах веб-служб.
Проверка параметров прокси-сервера Интернета (Windows)
Обновите параметры веб-служб с помощью информации о прокси-сервере в ОС Windows.
-
В ОС Windows выполните поиск по запросу интернет, затем выберите Свойства обозревателя.
-
В окне Свойства обозревателя выберите вкладку Подключения.
-
При необходимости выберите свою сеть и нажмите Настройки для просмотра параметров прокси-сервера.
-
В разделе Прокси-сервер найдите и запишите значения, указанные в полях Адрес и Порт.
-
Откройте Дополнительные параметры (EWS) в приложении HP Smart или введите IP-адрес принтера в адресной строке веб-браузера.
-
В EWS выберите вкладку Веб-службы, затем выберите Параметры прокси-сервера.
-
Введите значения адреса и порта, затем нажмите Применить.
Проверка параметров прокси-сервера Интернета (Mac)
Обновите параметры веб-служб принтера с помощью информации о прокси-сервере в ОС macOS.
-
Откройте Системные настройки и выберите Сеть.
-
В окне «Сеть» выберите Дополнительно.
-
Выберите вкладку Прокси-серверы, а затем выберите нужный прокси-сервер.
-
Запишите значения адреса и порта для подключения к прокси-серверу.
-
Откройте Дополнительные параметры (EWS) в приложении HP Smart или введите IP-адрес принтера в адресной строке веб-браузера.
-
В EWS выберите вкладку Веб-службы, затем выберите Параметры прокси-сервера.
-
Введите значения адреса и порта для подключения к прокси-серверу, затем нажмите Применить.
Обновление микропрограммы принтера
HP регулярно выпускает новые версии микропрограмм, которые содержат улучшения или исправления для принтеров. Регулярно обновляйте
микропрограмму, чтобы максимально эффективно использовать возможности своего принтера.
-
Выполнение обновления с панели управления принтера: многие принтеры HP, оснащенные сенсорными экранами или меню, могут непосредственно
подключаться к HP для поиска и установки обновлений. Принтер должен быть подключен к сети с активным подключением к Интернету.
Если принтер подключен с помощью кабеля USB, воспользуйтесь одним из других способов.На принтере найдите меню Обновление устройства или Проверка обновлений, нажав значок или кнопку HP ePrint (
или
). Либо откройте меню Настройка, Обслуживание или Настройки, выберите Параметры, Обслуживание принтера или Сервис, затем выберите Веб-службы, Обновление принтера или Обновление LaserJet.
-
Загрузка обновлений с веб-сайта службы поддержки клиентов HP: включите принтер и подключите его к компьютеру или к сети, перейдите
на веб-страницу Загрузки ПО и драйверов HP, чтобы проверить наличие и установить доступные обновления, указанные в разделе Микропрограмма. -
Установка обновлений через приложение HP Smart: Откройте приложение HP Smart, затем создайте учетную запись или выполните вход. Если приложение HP Smart не установлено, загрузите
его со страницы 123.hp.com или из своего магазина приложений. после добавления принтера нажмите изображение принтера, выберите Главная страница принтера (EWS) или Дополнительные параметры, нажмите Сервис или Веб-службы, затем нажмите Обновления принтера.
Обновление микропрограммы маршрутизатора
Устаревшая микропрограмма маршрутизатора может негативно влиять на производительность, приводить к возникновению проблем обеспечения
безопасности или препятствовать доступу маршрутизатора к Интернету.
-
Откройте веб-браузер, введите IP-адрес для вашей марки маршрутизатора в адресную строку, затем нажмите клавишу ввода.
Прим.:
Следующие IP-адреса, имена и пароли предоставляются в справочных целях и могут работать не на всех моделях маршрутизаторов.
IP-адреса, имена пользователей и пароли для маршрутизаторов
Марка маршрутизатора
IP-адрес
Имя пользователя
Пароль
3Com
http://192.168.1.1
admin
пароль не требуется, либо admin
Belkin
http://192.168.2.1
имя пользователя не требуется или admin
пароль не требуется
D-Link
http://192.168.0.1
admin или user
пароль не требуется, либо admin
Linksys
http://192.168.1.1
admin, имя пользователя не требуется или Comcast
admin, пароль не требуется, либо 1234
NETGEAR
http://192.168.0.1
admin
password, 1234 или setup
-
Введите имя пользователя и пароль на домашней странице маршрутизатора.
-
Выберите меню Администрирование, Служебные программы, Инструменты или Обслуживание в зависимости от того, что отображается на экране, чтобы найти функцию обновления. Ознакомьтесь с документацией, которая
поставлялась с маршрутизатором, либо обратитесь к его производителю для получения дополнительных сведений.
Выполните сброс принтера, чтобы удалить все предыдущие настройки и предпочтения принтера.
Восстановление заводских значений по умолчанию (принтеры с сенсорным экраном)
Восстановите заводские значения по умолчанию для принтера с помощью меню параметров на сенсорном экране.
-
На панели управления принтера коснитесь значка Настройка
, затем коснитесь Обслуживание принтера.
-
Коснитесь Восстановить, затем коснитесь Восстановить заводские значения по умолчанию.
-
При отображении запроса на подтверждение коснитесь Продолжить, чтобы завершить восстановление заводских значений по умолчанию.
Восстановление заводских значений по умолчанию (принтеры без сенсорных экранов)
Восстановите заводские значения по умолчанию для принтера с помощью программного обеспечения HP.
-
Откройте Дополнительные параметры (EWS) в приложении HP Smart или введите IP-адрес принтера в адресной строке веб-браузера.
-
Выберите вкладку Параметры или Система. В случае вывода запроса введите пароль администратора принтера или PIN-код, указанный на этикетке принтера.
-
Найдите и откройте меню Восстановить значения по умолчанию или Службы, затем выберите Восстановить заводские значения по умолчанию для завершения восстановления.
Сервисное обслуживание принтера
Проведите сервисное обслуживание или замените устройство HP, если выполнение всех вышеуказанных действий не помогло устранить
проблему.
Перейдите на веб-страницу Обратиться в службу поддержки клиентов HP, чтобы запланировать ремонт или замену устройства. Если вы находитесь в Азиатско-Тихоокеанской стране/регионе, вы будете
направлены в местный сервисный центр в вашей стране/регионе.
Для проверки состояния гарантии перейдите на веб-страницу Проверка гарантии на устройство HP. За ремонт устройств после окончания гарантийного срока может взиматься плата.
Содержание
- Исправляем ошибку печати на принтере HP
- Способ 1: Проверка принтера
- Способ 2: Разблокирование процедуры печати
- Способ 3: Отключение брандмауэра Windows
- Способ 4: Переключение учетной записи пользователя
- Способ 5: Восстановление Windows
- Способ 6: Переустановка драйвера
- Вопросы и ответы
Обладатели печатной продукции от компании HP иногда сталкиваются с тем, что на экране появляется уведомление «Ошибка печати». Причин возникновения этой неполадки может быть несколько и каждая из них решается по-разному. Сегодня мы подготовили для вас разбор основных способов исправления рассматриваемой проблемы.
Каждый приведенный ниже метод имеет разную эффективность и будет наиболее подходящим в определенной ситуации. Мы по порядку рассмотрим все варианты, начиная от самого простого и действенного, а вы, следуя инструкциям, решите поставленную задачу. Однако сначала мы рекомендуем обратить внимание на эти советы:
- Перезапустите компьютер и переподключите устройство печати. Желательно, чтобы перед следующим подключением принтер находится в выключенном состоянии не менее одной минуты.
- Проверьте картридж. Иногда ошибка появляется в тех случаях, когда в чернильнице закончилась краска. О том, как заменить картридж вы можете прочитать в статье по ссылке ниже.
- Осмотрите провода на наличие физических повреждений. Кабель выполняет передачу данных между компьютером и принтером, поэтому важно, чтобы он не только был подключен, но и находился полностью в исправном состоянии.
- Кроме этого советуем проверить, не закончилась ли бумага или не зажевало ли ее внутри механизма оборудования. Вытащить лист А4 вам поможет инструкция, которая прилагается в комплекте с продукцией.
Подробнее: Замена картриджа в принтере
Если приведенные советы ничем не помогли, переходите к осуществлению следующих методов решения «Ошибка печати» при использовании периферии компании HP.
Способ 1: Проверка принтера
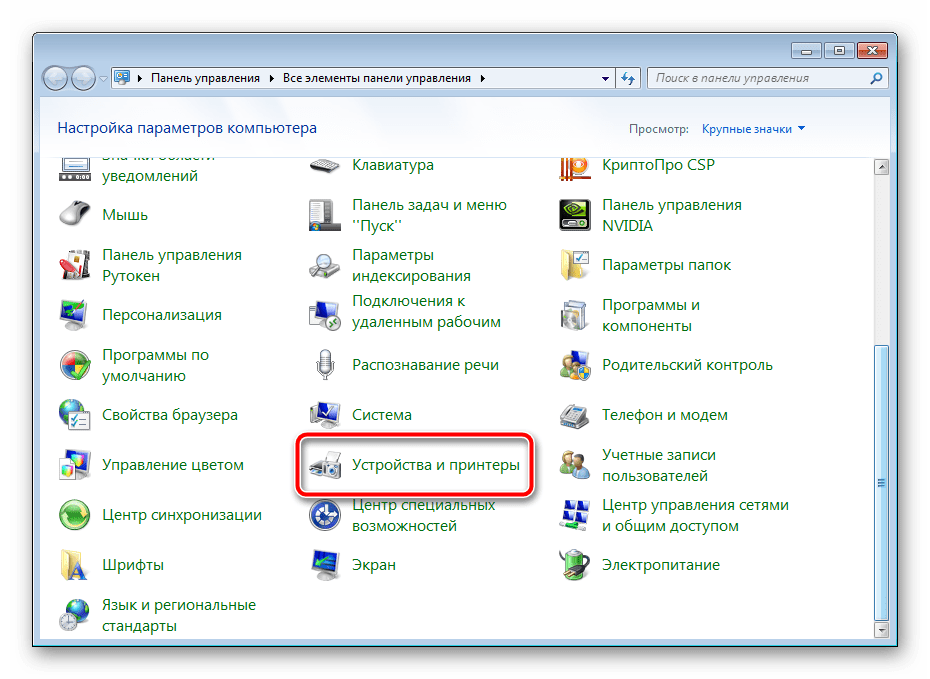
В первую очередь советуем проверить отображение и конфигурацию оборудования в меню «Устройства и принтеры». От вас потребуется произвести всего несколько действий:
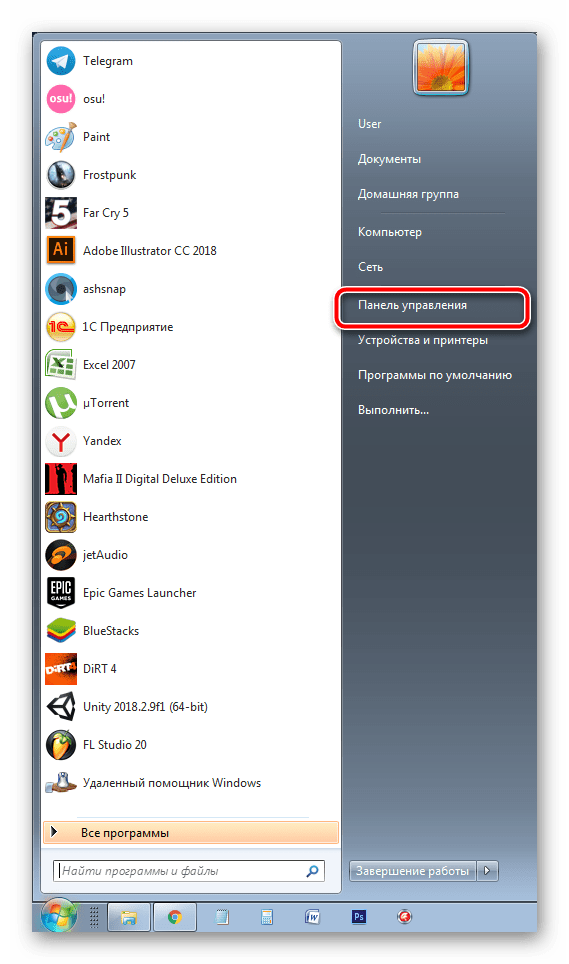
- Через меню «Панель управления» и переместитесь в «Устройства и принтеры».
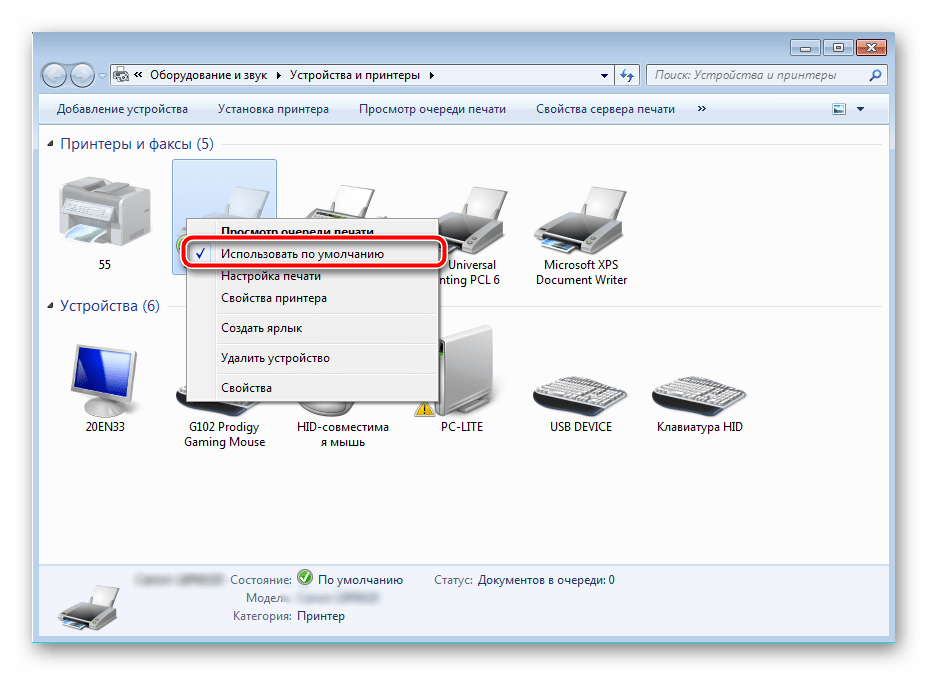
- Убедитесь, что устройство не подсвечивается серым цветом, после чего нажмите на нем ПКМ и кликните на пункт «Использовать по умолчанию».
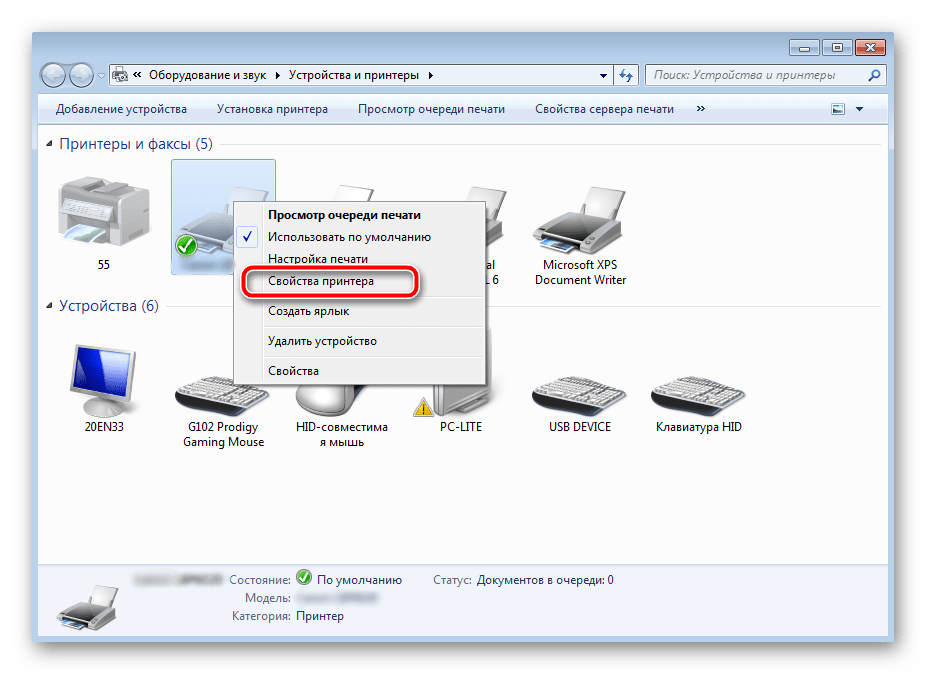
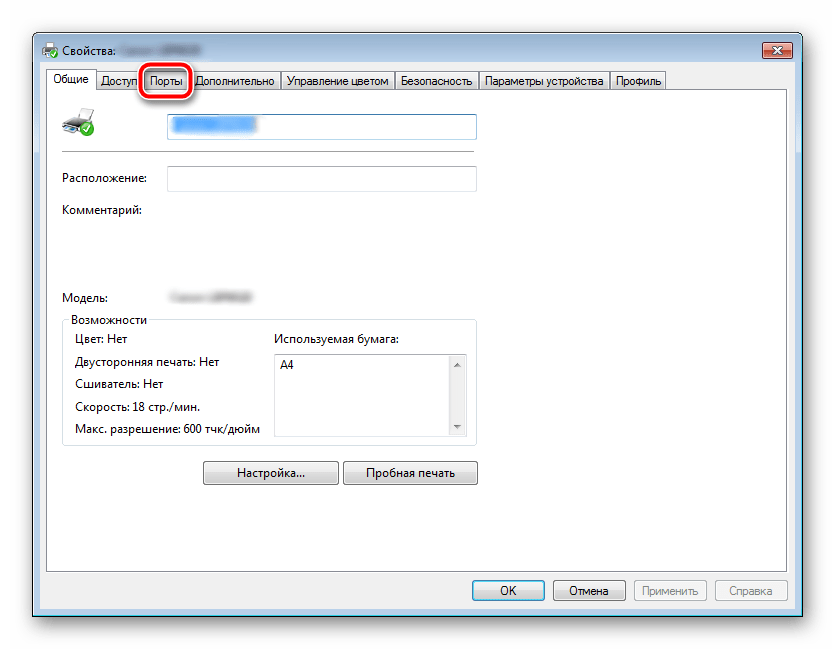
- Кроме этого рекомендуется проверить параметры передачи данных. Зайдите в меню «Свойства принтера».
- Здесь вас интересует вкладка «Порты».
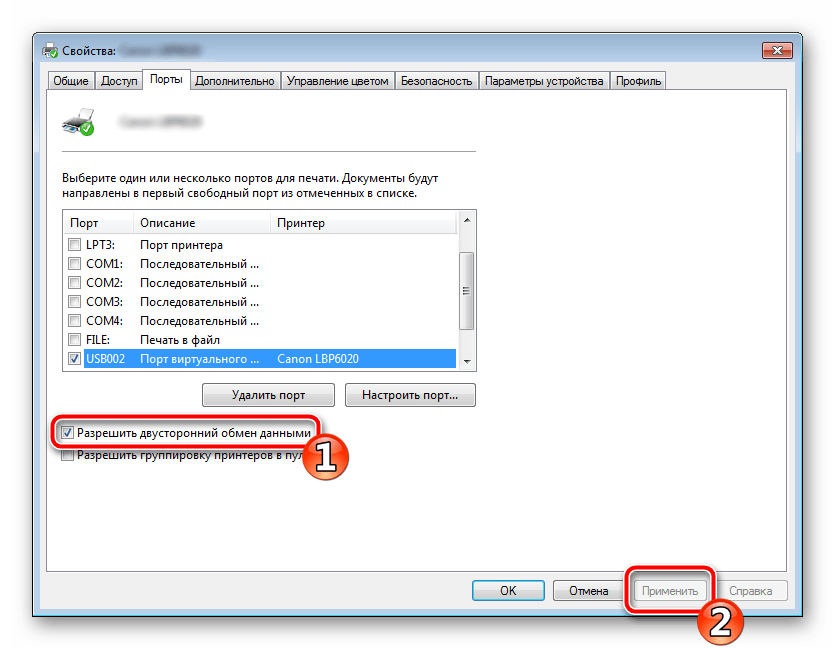
- Отметьте галочкой пункт «Разрешить двусторонний обмен данными» и не забудьте применить изменения.
По окончании процесса рекомендуется перезагрузить ПК и переподключить оборудование, чтобы все изменения точно стали активными.
Способ 2: Разблокирование процедуры печати
Иногда происходят скачки напряжения или различные системные сбои, вследствие чего периферия и ПК перестают нормально выполнять определенные функции. По таким причинам и может возникать ошибка печати. В таком случае вам следует проделать следующие манипуляции:
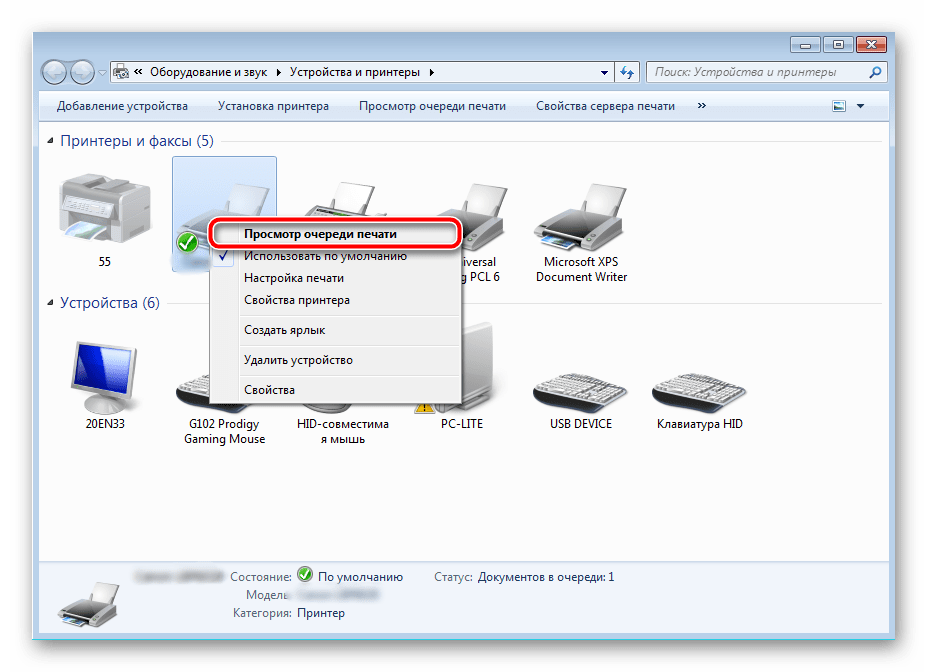
- Снова перейдите в «Устройства и принтеры», где правым кликом мыши на активном оборудовании выберите пункт «Просмотр очереди печати».
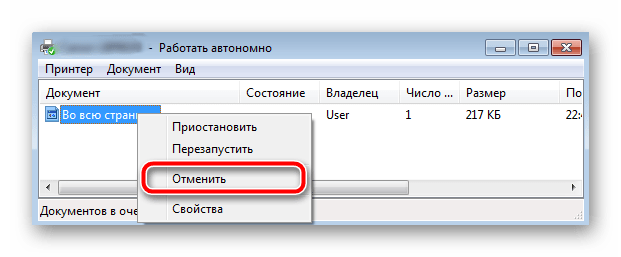
- Нажмите ПКМ на документ и укажите «Отменить». Повторите это со всеми присутствующими файлами. Если процесс по каким-либо причинам не отменяется, советуем ознакомиться с материалом по ссылке ниже, чтобы осуществить эту процедуру одним из других доступных методов.
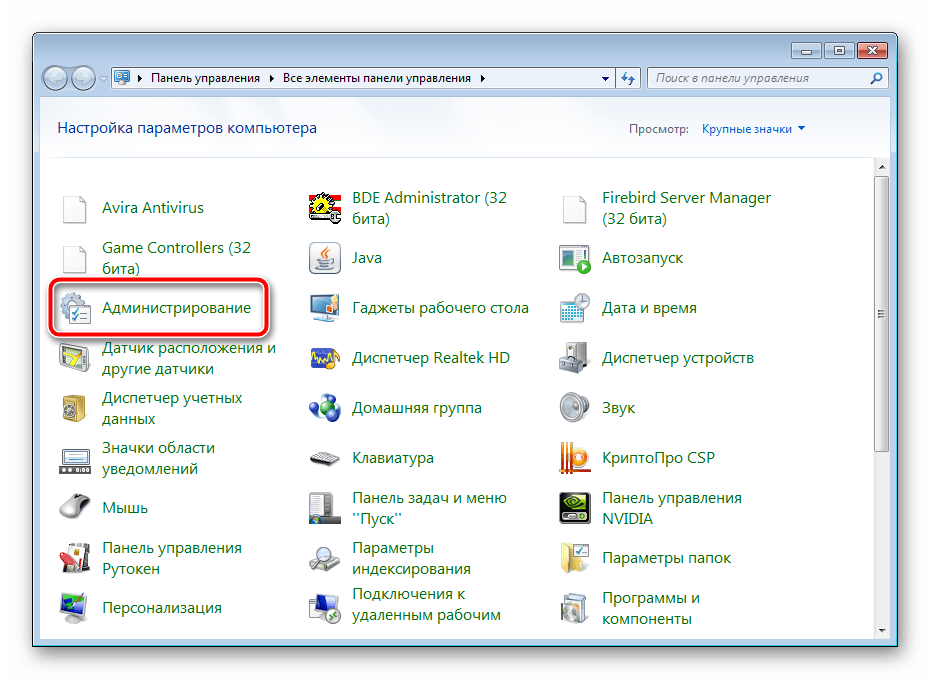
- Вернитесь в «Панель управления».
- В ней откройте категорию «Администрирование».
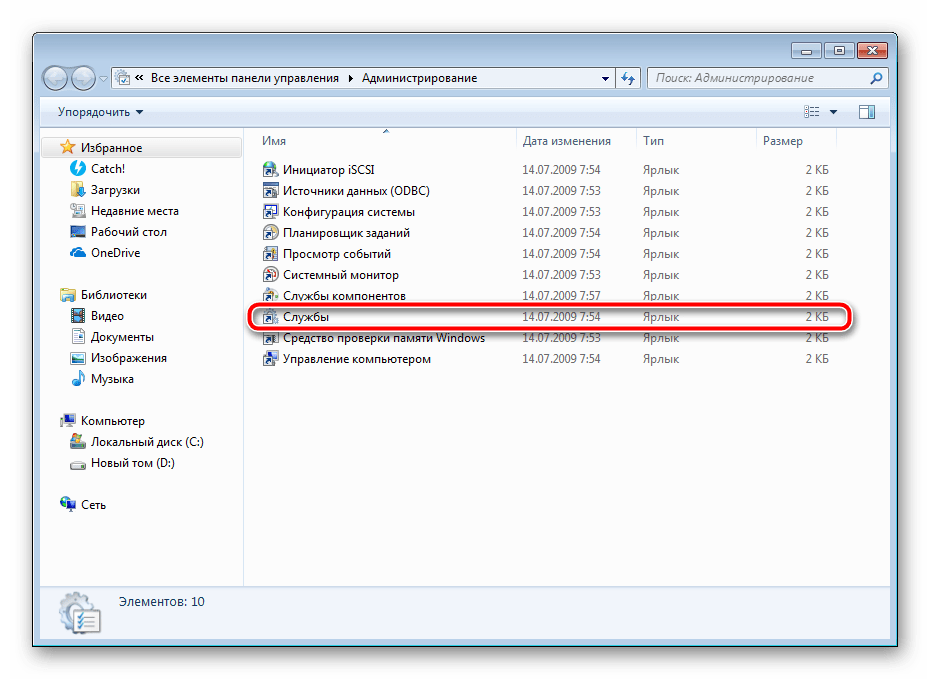
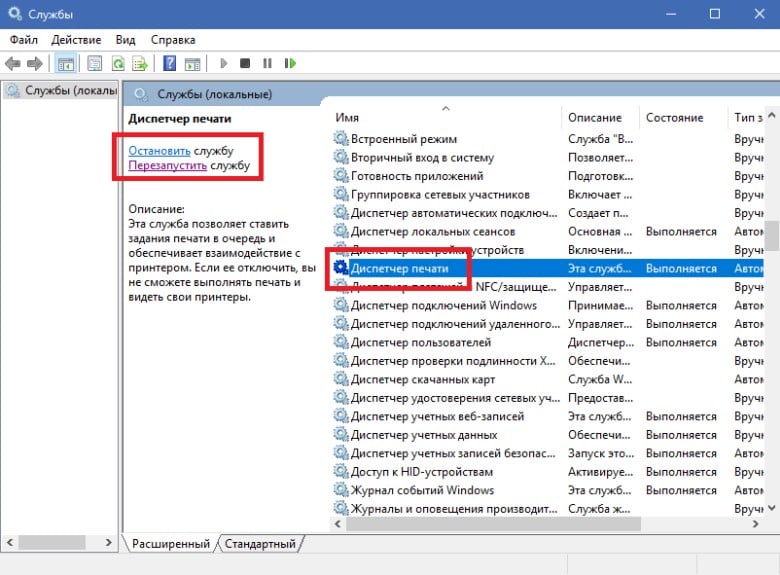
- Здесь вас интересует строка «Службы».
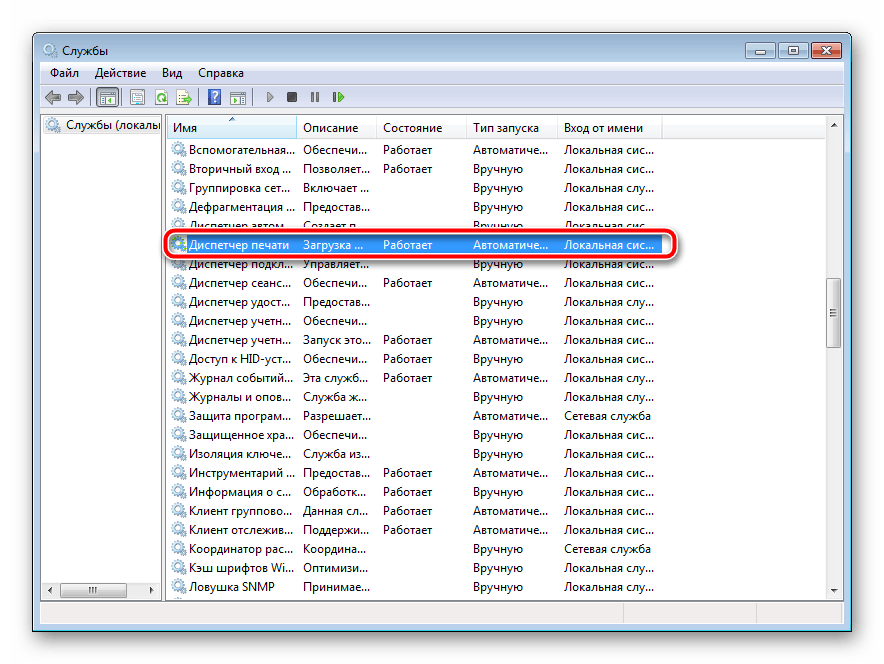
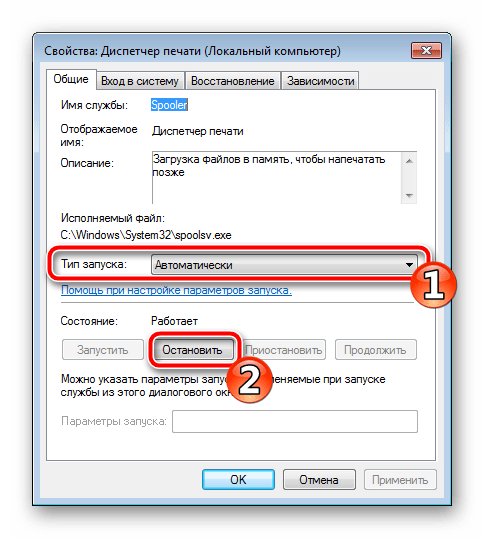
- В списке отыщите «Диспетчер печати» и дважды нажмите на нем ЛКМ.
- В «Свойства» обратите внимание на вкладку «Общие», где убедитесь, что тип запуска стоит «Автоматический», после чего следует остановить службу и применить настройки.
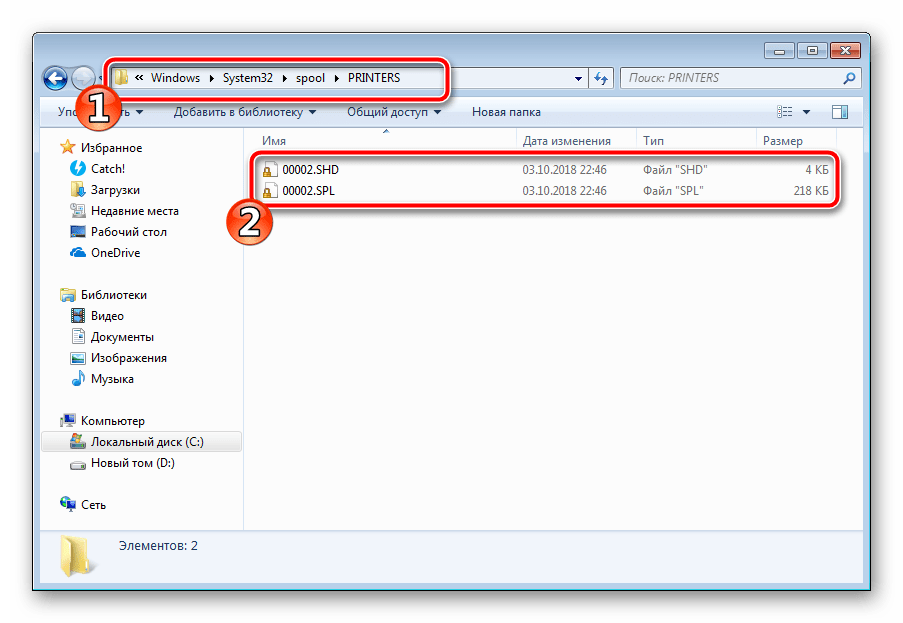
- Закройте окно, запустите «Мой компьютер», переместитесь по следующему адресу:
C:WindowsSystem32SpoolPRINTERS - Удалите все присутствующие файлы в папке.

Подробнее: Как очистить очередь печати на принтере HP
Осталось только выключить продукт компании HP, отключить его от питания, дать так постоять примерно минуту. После этого перезагрузите ПК, соедините оборудование и повторите процесс печати.
Способ 3: Отключение брандмауэра Windows
Иногда защитник Windows блокирует отправленные данных с компьютера на устройство. Связано это может быть с некорректной работой брандмауэра или различными системными сбоями. Мы советуем на время отключить защитник Виндовс и повторить попытку печати. Детальнее о деактивации этого инструмента читайте в другом нашем материале по следующим ссылкам:
Подробнее: Отключение брандмауэра в Windows XP, Windows 7, Windows 8
Способ 4: Переключение учетной записи пользователя
Рассматриваемая проблема порой возникает тогда, когда попытка отправки в печать производится не с той учетной записи пользователя Windows, с которой происходило добавление периферии. Дело в том, что каждый профиль имеет свои привилегии и ограничения, что приводит к появлению подобного рода неполадок. В таком случае нужно попробовать сменить запись юзера, если у вас их конечно добавлено больше, чем одна. Развернуто о том, как это сделать в разных версиях Виндовс читайте в статьях ниже.
Подробнее: Как сменить учетную запись пользователя в Windows 7, Windows 8, Windows 10
Способ 5: Восстановление Windows
Часто случается, что ошибки печати связаны с определенными изменениями в операционной системе. Самостоятельно обнаружить их достаточно сложно, однако состояние ОС можно вернуть, откатив все изменения. Осуществляется данная процедура с помощью встроенного компонента Виндовс, а детальное руководство по этой теме вы найдете в другом материале от нашего автора.
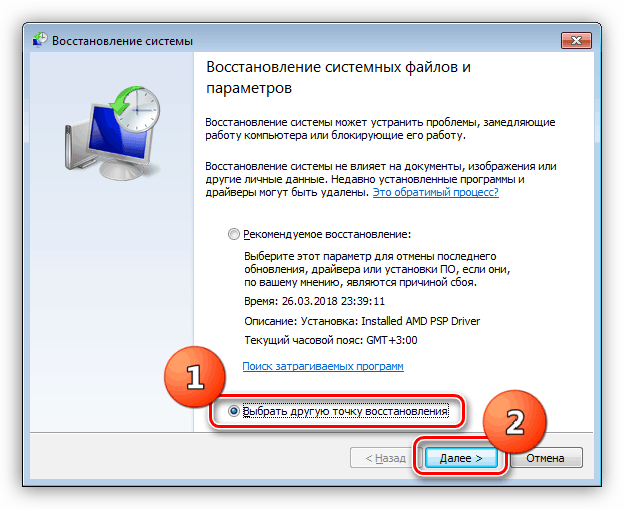
Подробнее: Варианты восстановления ОС Windows
Способ 6: Переустановка драйвера
Мы поставили этот способ последним, поскольку он требует от пользователя выполнения большого количества различных манипуляций, а также является достаточно сложным для новичков. Если никакие приведенные выше инструкции вам не помогли, значит остается только переустановить драйвер устройства. Для начала следует избавиться от старого. О том, как это сделать, читайте далее:
Читайте также: Удаление старого драйвера принтера
По завершении процедуры удаления задействуйте один из методов инсталляции программного обеспечения для периферии. Всего существует пять доступных способов. Развернуто с каждыми из них знакомьтесь в другой нашей статье.
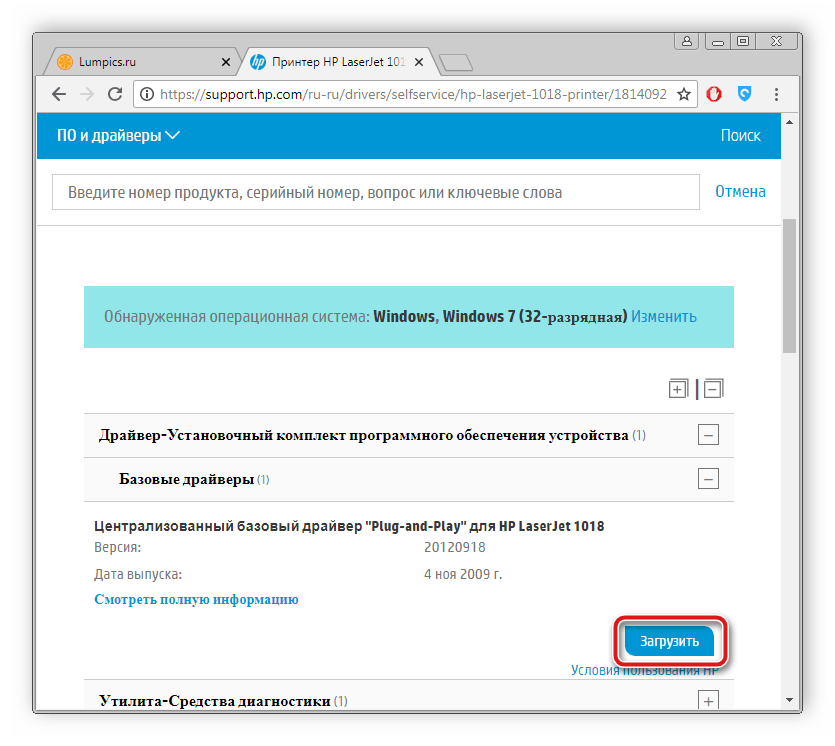
Подробнее: Установка драйверов для принтера
Как видите, методов исправления ошибки печати принтера HP существует достаточно большое количество, и каждый из них будет полезен в разных ситуациях. Надеемся, приведенные выше инструкции помогли вам без труда решить возникшую проблему, а продукт компании снова функционирует корректно.
Posted on 26 Apr 2022 | HP Printer Support
What Control Panel Type does Your Printer Have?
First of all, check what type of control panel you have in a printer. This will help in identifying the problem. Based on the printer model, we either have an LCD control panel display with either the icon or the text-based menu in the printer, or it only has buttons.
To continue troubleshooting, select your control panel type to continue troubleshooting. In the below content, you will find the solution on “hp printer Server connection errors 403 and 901”.
This Post is for HP Printers that Support Web-Connected Printing Services.
If Your HP Printer does not Connect to Web Services, and Your Printer or Computer Shows One of the Following Error Messages:
- Server Connection Errors 403 and 901. There was a problem connecting to the server. Press retry, or OK to exit.
- Server Connection Error 403 and 901. Unable to connect to Web Services. Confirm Internet access and try again.
- Web Services Problem. Problem connecting to the Web Services server.
The Process to Fix the HP Printer Server Connection Errors 403 and 901
Below you will find the steps to troubleshoot Web Services connection issues. Here we have given a step-by-step instruction to fix hp printer server connection errors 403 and 901.
Step 1: At first, you have to make sure that your HP printer supports Web Service by looking for an HP ePrint logo, button, or icon on the printer control panel. If the Printer supports the Web Services then move to forward.
Step 2: Now, examine the network and printer connection status. You will be sure by checking your wired (Ethernet) or wireless network. If it is working properly then the printer is connected.
You should ensure that the printer is not connected to a USB cable.
Note one thing: When a USB cable is attached to the printer then the printer cannot connect to Web Services.
If you are using a wireless router then check the router’s support online web portal to ensure the following requirements.
Check the Router Bandwidth
Bonjour support (Mac only): HP suggests routers that aid Bonjour, Apple’s network discovery software. Bonjour is one of the best way to print and support wireless printing.
Check to see the printer is connected to the network.
- Wireless network connection
- Wired (Ethernet) network connection
On the desktop, find the network icon or in the menu bar to view the network name and status of the connection.
- If the selected network is not yours then disconnect and connect to your own network.
- If the network signal strength is weak then connect to a closer router.
- If the network status is disconnected then confirm the network is working properly, and then check the status again.
- Try to turn on Web Services.
If the Issue is not Solved, Continue to the Next Step.
Step 3: Now, you need to check the Internet proxy server settings and update the Web Services settings in the printer EWS with the proxy information.
Step 4: HP send the notification for updating the HP printer firmware at regular interval.
Step 5: Please update the router firmware because it might be possible that the old version router firmware may affect performance, security, or prevent the router from the Internet.
We hope that the above step will help you to find the solution to “How to Fix hp printer Server connection errors 403 and 901”
Note: If you have any doubt regarding Server connection errors 403 and 901 then contact our expert via HP Printer Support Toll-Free Number “1-888-972-9103”. They will solve all your queries on time.
Posted on 26 Apr 2022 | HP Printer Support
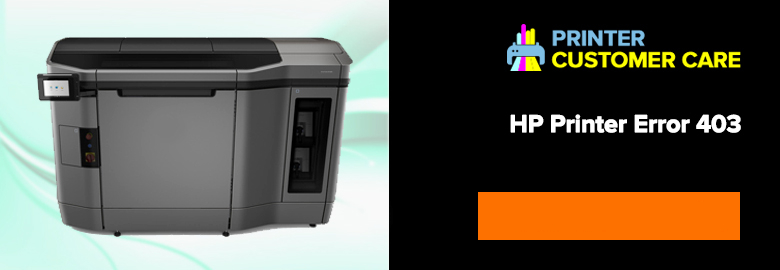
HP Printer Error 403 is commonly faced in all-in-one printer. It completely stops printing
Troubleshooting Steps HP Printer Error 403
The following troubleshoot ways can help solve the issue:
Method 1: Reinstall the print driver of the printer
- If the printer is connected to the computer by the USB cable, remove the USB cable
- Disable the power socket from the power switch
- Search on Windows for the ‘Devices and Printers’ option on the control panel.
- Click on the ‘Devices and Printers Tab’.
- Click on the Remove Device option, this will uninstall the printer software.
- Restart the computer device.
- Visit the HP support software and drivers. In this official website search for the printer software that matches the model of your printer
- Install the printer software following the on screen instructions
- Reconnect the USB port of the printer with computer
- Try to take a test document print and if it does not resolve the error it is recommended to continue the other troubleshooting process.
Method 2: Reboot the computer system and the printer
- Unplug the power socket of the printer and remove the USB port connected to the computer
- Save the work you have not saved on the computer and switch it off
- Wait for at least 30 seconds before you switch on the computer and printer
- Re-plug the power socket of the printer and connect the USB port to the computer
- Switch on the computer system
- Try to print a test document. If the issue does not resolve with rebooting then other troubleshooting methods needs to be employed
Method 3: IP address change
- Click on the option at the top of the screen of the printer and note the IP address.
- Enter the IP address in the address bar of a web browser press the enter key.
- The printer status will open. Lick on the ‘network’ option.
- Select the proxy settings
- The printer status page opens
- Make sure that all fields are empty. The proxy server authentication option must be unchecked. Click on the apply button. You will receive a success message
- Click on the IP address
- Check automatic IP address box
- Change the DNS address to manual DNS server configuration
- Enter the manual preferred DNS server 8.8.8.8 and 8.8.4.4 for auxiliary DNS
- Click on apply and success message will appear on screen
- Turn off the printer for at least 30 seconds
Restart the printer and print a test document. If the error still persists further troubleshooting is necessary
Method 4: Disable the firewall software
If the HP PRINTER ERROR persists the following simple actions may help to get the resolution
- Temporarily disable the firewall software
- Temporary disable the firewall software on your computer. It may be interfering with your print job.
- Right click on the small system tray icon
- Select ‘disable firewall’
- The setting is successfully applied
- Try to print a test document then, if the error still persists than other resolutions need to be tried
Scope of Services
If the aforesaid methods do not work out, or if you are unable to carry out the methods successfully you can
- Contact out technical expert team on our toll free number

- The HP Printer Technical Support is available throughout the year 24/7. It is known for its efficient and timely service
June 12, 2018April 11, 2021
Исправления ошибки 0x80040003 в Windows 11, 10
Довольно типичная ошибка с кодом 0x80040003 появляется при подключении принтера HP. По крайней мере, в большинстве случаев. Бывают упоминания, что кому-то сбой мешал обновить Windows, но скорее всего проблема тоже в драйверах внешнего устройства. Характерно, что ошибка 0x80040003 появляется только на Windows 10, 11, при этом другие аппараты (Android, iOS, Mac) отлично подключаются и работают с принтером. Ниже описаны процедуры, которые должны помочь.
Текст сообщения:
Проблема с конфигурацией на принтере. Код ошибки 0x80040003.
Негативная сторона ошибки в том, что она появляется по самым разнообразным причинам. Сегодня не существует какого-то универсального решения сбоя. Приходится перебирать методы, с большой вероятностью один из них поможет.
Что нужно сделать:
- Переустановить принтер. Удалите устройство из сохраненных на ПК и подключитесь к нему заново.
- Запустить сканирование. Фирменная утилита HP Print and Scan Doctor неплохо справляется с поиском и исправлением ошибок.
- Очистить очередь печати. Переходим в «Службы» Windows (Win + R и вводим services), находим «Диспетчер очереди печати» и останавливаем его. Далее в строку «Выполнить вводим %windir% и идем по пути – System 32 – Spool – PRINTERS и удаляем все содержимое папки. Не забываем запустить отключенную нами службу снова.
- Переустановить драйвера. Процедура удаления стандартная, ничего сложного. Брать драйвера следует с официального сайта HP, а не из хранилища Windows. Так больше шансов на успех. Вот ссылка на страницу.
Еще есть случай, когда ошибка 0x80040003 появлялась по причине того, что Windows была не активирована. Стоит ввести лицензионный ключ. Также проверьте, что качество связи с устройством по Wi-Fi достаточно для комфортной работы и на время отключите средства защиты.
Мы очень ценим ваши комментарии, так как они помогают нам лучше понимать эффективность процедур и сделать статью еще более точной. Независимо от результата, просим вас описать выполненные процедуры и полученный эффект или его отсутствие.
Posted on 15 Jan 2023 | HP Printer Support
What Control Panel Type Does Your Printer Have?
First of all, check what type of control panel you have in a printer. This will help in identifying the problem. Based on the printer model, we either have an LCD control panel display with either the icon or the text-based menu in the printer, or it only has buttons.
To continue troubleshooting, select your control panel type to continue troubleshooting. In the below content, you will find the solution on “hp printer Server connection error 901.
This Post is for HP Printers that Support Web-Connected Printing Services.
If Your HP Printer does not Connect to Web Services, and Your Printer or Computer Shows One of the Following Error Messages
-
Server Connection Errors 403 and 901. There was a problem connecting to the server. Press retry, or OK to exit.
- Server Connection Error 403 and 901. Unable to connect to Web Services. Confirm Internet access and try again.
- Web Services Problem. Problem connecting to the Web Services server.
Fix the HP Printer Server Connection Errors 403 and 901
Below you will find the steps to troubleshoot Web Services connection issues. Here we have given step-by-step instructions to fix hp printer server connection errors 403 and 901.
Step 1: At first, you have to make sure that your HP printer supports Web Service by looking for an HP ePrint logo, button, or icon on the printer control panel. If the Printer supports the Web Services then move to forward.
Step 2: Now, examine the network and printer connection status. You will be sure by checking your wired (Ethernet) or wireless network. If it is working properly then the printer is connected.
Step 3: You should ensure that the printer is not connected to a USB cable.
Note one thing: When a USB cable is attached to the printer then the printer cannot connect to Web Services.
If you are using a wireless router then check the router’s support online web portal to ensure the following requirements.
Check the Router Bandwidth
Bonjour support (Mac only): HP suggests routers that aid Bonjour, Apple’s network discovery software. Bonjour is one of the best ways to print and support wireless printing.
Check to see the printer is connected to the network.
- Wireless network connection
- Wired (Ethernet) network connection
On the desktop, find the network icon or the menu bar to view the network name and status of the connection.
- If the selected network is not yours, disconnect and connect to your own network.
- If the network signal strength is weak then connect to a closer router.
- If the network status is disconnected then confirm the network is working correctly, and then check the status again.
- Try to turn on Web Services.
If the issue is not Solved, Continue to the Next Step.
Step 3: Now, you need to check the Internet proxy server settings and update the Web Services settings in the printer EWS with the proxy information.
Step 4: HP sends the notification for updating the HP printer firmware at regular interval.
Step 5: Please update the router firmware because it might be possible that the old version of router firmware may affect performance, and security, or prevent the router from the Internet.
We hope that the above step will help you to find the solution to “How to Fix hp printer Server connection errors 403 and 901”
Posted on 15 Jan 2023 | HP Printer Support
- Sign up
- Sign in
- HP Community
- Printers
- Scanning, Faxing, and Copying
- 403 error when scanning to email
![]()

Create an account on the HP Community to personalize your profile and ask a question
Your account also allows you to connect with HP support faster, access a personal dashboard to manage all of your devices in one place, view warranty information, case status and more.
Common problems HP Solution Center not working : Adobe Flash Player Error and Unable to scan

10-26-2013
07:06 AM
— edited
10-26-2013
07:07 AM

HP Recommended
- Mark as New
- Bookmark
- Subscribe
- Permalink
- Flag Post
Hi,
I’ve seen others with this issue. We used to be able to scan to email for months now, but today we receive an error saying «Server Connection: 403». The printer is connected to the internet. We have a 6520 printer.
We tried re-booting and unplugging everything already. Please can someone help.
Thanks.
1 ACCEPTED SOLUTION
10-28-2013
12:25 PM
HP Recommended
- Mark as New
- Bookmark
- Subscribe
- Permalink
- Flag Post
Hi Nancy_AMS,
I would like to help you with the Server Connection error you are experiencing. It sounds like you are using a scan to email app from the front panel of the printer, if this is true follow the following to resolve the issue.
1. Obtain your printer’s IP address
a. This can be done by pressing the wireless icon on printer.
2. Enter the printer’s IP address in a browser.
3. Select the network tab at the top of the page.
4. On the left select networking.
5. Select Network Address (IP)
6. Select Manual DNS Server
a. Manual Preferred DNS should read 8.8.8.8
b. Alternate DNS Server should read. 8.8.4.4
7. Select apply you might get a warning just select okay.
Let me know if this resolves the issue.
The above information was found on the following Thread by garytech1
Sunshyn2005
I work on behalf of HP
If you found this post helpful, you can let others know by clicking the “Accept as Solution” button. You can also show your appreciation, with a kudos, by clicking the “thumbs up« button!
Was this reply helpful?
Yes
No
31 REPLIES 31
10-28-2013
12:25 PM
HP Recommended
- Mark as New
- Bookmark
- Subscribe
- Permalink
- Flag Post
Hi Nancy_AMS,
I would like to help you with the Server Connection error you are experiencing. It sounds like you are using a scan to email app from the front panel of the printer, if this is true follow the following to resolve the issue.
1. Obtain your printer’s IP address
a. This can be done by pressing the wireless icon on printer.
2. Enter the printer’s IP address in a browser.
3. Select the network tab at the top of the page.
4. On the left select networking.
5. Select Network Address (IP)
6. Select Manual DNS Server
a. Manual Preferred DNS should read 8.8.8.8
b. Alternate DNS Server should read. 8.8.4.4
7. Select apply you might get a warning just select okay.
Let me know if this resolves the issue.
The above information was found on the following Thread by garytech1
Sunshyn2005
I work on behalf of HP
If you found this post helpful, you can let others know by clicking the “Accept as Solution” button. You can also show your appreciation, with a kudos, by clicking the “thumbs up« button!
Was this reply helpful?
Yes
No
11-01-2013
06:37 AM
HP Recommended
- Mark as New
- Bookmark
- Subscribe
- Permalink
- Flag Post
Than you! This worked. I also had to restart the printer.
Thanks again!!
Was this reply helpful?
Yes
No
11-15-2013
11:21 AM
HP Recommended
- Mark as New
- Bookmark
- Subscribe
- Permalink
- Flag Post
I have tried the above, and resetting router, unplugging printer and adding a the app scan and email. I am still getting server connection error 403 when all I want is to scan to email. I have a 5520 Photosmart. Any other suggestions? It worked fine last month
Was this reply helpful?
Yes
No
11-19-2013
01:30 PM
HP Recommended
- Mark as New
- Bookmark
- Subscribe
- Permalink
- Flag Post
TwoPointOh
I work on behalf of HP
If you found this post helpful, you can let others know by clicking the “Accept as Solution” button. You can also show your appreciation, with a kudos, by clicking the “thumbs up« button!
Was this reply helpful?
Yes
No
11-26-2013
05:56 PM
— edited
11-26-2013
05:58 PM
HP Recommended
- Mark as New
- Bookmark
- Subscribe
- Permalink
- Flag Post
how do I open the internet browser to type in the IP address? not a geek..don’t have a clue what you mean?
Was this reply helpful?
Yes
No
01-05-2014
06:55 AM
HP Recommended
- Mark as New
- Bookmark
- Subscribe
- Permalink
- Flag Post
I use the Hp 5520. The abovedid not resove the issue,, thhe error persisits. Although I had to type iin the Manual DNS AND ALTERNATIVE SERVER NNUMBER. aNY MORE HELP PLEASE?
Was this reply helpful?
Yes
No
02-10-2014
07:27 PM
HP Recommended
- Mark as New
- Bookmark
- Subscribe
- Permalink
- Flag Post
Tried solution from Sunshyn2005. After step 5, got a screen requesting Authenification user name and password. Don’t know them. Help.
Was this reply helpful?
Yes
No

Trag14
1
0
0
52,991
New member
03-23-2014
01:08 PM
HP Recommended
- Mark as New
- Bookmark
- Subscribe
- Permalink
- Flag Post
I’m scanning to email (a document) from the front panel of the printer 6520. Never had problems in the past. Have reset all equipment (Wireless Router, Printer); still nothing.
Found a solution about changing the Manual Preferred DNS to 8.8.8.8. and Alternate DNS to 8.8.4.4; powered printer off/on and still getting the 403 connection error message.
Any help is appreciated.
Was this reply helpful?
Yes
No
04-09-2014
05:26 PM
HP Recommended
- Mark as New
- Bookmark
- Subscribe
- Permalink
- Flag Post
Hello — I have an HP Photosmart 6525 and am receiving the 403 error when trying to scan to email. It has worked in the past. I followed the instructions found on the support board to enter the IP address, etc. and it didn’t resolve the error. Thanks.
Was this reply helpful?
Yes
No
-
Previous
-
- 1
- 2
- 3
- 4
-
Next
![]()
Be alert for scammers posting fake support phone numbers and/or email addresses on the community.
If you think you have received a fake HP Support message, please report it to us by clicking on «Flag Post».
† The opinions expressed above are the personal opinions of the authors, not of HP. By using this site, you accept the Terms of Use and Rules of Participation.

-
English
Open Menu

HP Printer Error 403 is commonly faced in all-in-one printer. It completely stops printing
Troubleshooting Steps HP Printer Error 403
The following troubleshoot ways can help solve the issue:
Method 1: Reinstall the print driver of the printer
- If the printer is connected to the computer by the USB cable, remove the USB cable
- Disable the power socket from the power switch
- Search on Windows for the ‘Devices and Printers’ option on the control panel.
- Click on the ‘Devices and Printers Tab’.
- Click on the Remove Device option, this will uninstall the printer software.
- Restart the computer device.
- Visit the HP support software and drivers. In this official website search for the printer software that matches the model of your printer
- Install the printer software following the on screen instructions
- Reconnect the USB port of the printer with computer
- Try to take a test document print and if it does not resolve the error it is recommended to continue the other troubleshooting process.
Method 2: Reboot the computer system and the printer
- Unplug the power socket of the printer and remove the USB port connected to the computer
- Save the work you have not saved on the computer and switch it off
- Wait for at least 30 seconds before you switch on the computer and printer
- Re-plug the power socket of the printer and connect the USB port to the computer
- Switch on the computer system
- Try to print a test document. If the issue does not resolve with rebooting then other troubleshooting methods needs to be employed
Method 3: IP address change
- Click on the option at the top of the screen of the printer and note the IP address.
- Enter the IP address in the address bar of a web browser press the enter key.
- The printer status will open. Lick on the ‘network’ option.
- Select the proxy settings
- The printer status page opens
- Make sure that all fields are empty. The proxy server authentication option must be unchecked. Click on the apply button. You will receive a success message
- Click on the IP address
- Check automatic IP address box
- Change the DNS address to manual DNS server configuration
- Enter the manual preferred DNS server 8.8.8.8 and 8.8.4.4 for auxiliary DNS
- Click on apply and success message will appear on screen
- Turn off the printer for at least 30 seconds
Restart the printer and print a test document. If the error still persists further troubleshooting is necessary
Method 4: Disable the firewall software
If the HP PRINTER ERROR persists the following simple actions may help to get the resolution
- Temporarily disable the firewall software
- Temporary disable the firewall software on your computer. It may be interfering with your print job.
- Right click on the small system tray icon
- Select ‘disable firewall’
- The setting is successfully applied
- Try to print a test document then, if the error still persists than other resolutions need to be tried
Scope of Services
If the aforesaid methods do not work out, or if you are unable to carry out the methods successfully you can
- Contact out technical expert team on our toll free number
- The HP Printer Technical Support is available throughout the year 24/7. It is known for its efficient and timely service
June 12, 2018April 11, 2021