Привет.
Как проверить код LESS на ошибки? Полдела — правильный редактор кода?
Виталина
111 золотой знак2 серебряных знака8 бронзовых знаков
задан 22 сен 2014 в 18:46
Добавьте перед подключением less js такую строку:
<script type='text/javascript'>less = { env: 'development' };</script>
Виталина
111 золотой знак2 серебряных знака8 бронзовых знаков
ответ дан 22 сен 2014 в 19:31
ffeynmannffeynmann
3061 серебряный знак7 бронзовых знаков
1
Если использовать какой-либо компилятор, то он обычно тоже выводит все сообщения об ошибках — консольный (например, grunt-contrib-less), встроенный (webStorm, phpStorm) или программный (Crunch, Coala, WinLess).
К слову, все-таки лучше компилировать less локально при верстке.
ответ дан 1 мая 2018 в 15:34
![]()
Какие есть инструменты для автоматической проверки less/scss — кода?
Имеется в виду не проверка на валидность, а проверка на качество. Например, чтобы не было «магических» цифр, дублирования значений в различных местах, проверка на использование БЭМ, использование !important и т.п.
-
Вопрос заданболее трёх лет назад
-
584 просмотра
Пригласить эксперта
Самый простой метод: компилировать в CSS и прогнать через CSSLint. Если же вам хочется извращений, то можно прогнать через LessLint. Оба решения доступны, например, для Grunt. Лучше первый вариант, так как, например, недавно в Less добавили плагины и тот же импорт директорий или пользовательские функции (добавляются плагинами) могут вызывать ошибки.
-
Показать ещё
Загружается…
30 янв. 2023, в 23:32
5000 руб./за проект
30 янв. 2023, в 23:11
500 руб./за проект
30 янв. 2023, в 22:43
1500 руб./в час
Минуточку внимания
Что такое CSS?
CSS означает Каскадные таблицы стилей. CSS описывает, как элементы HTML должны отображаться на экране, бумаге или других носителях.
CSS — это язык стилей, который определяет макет документов HTML. Например, CSS охватывает шрифты, цвета, поля, линии, высоту, ширину, фоновые изображения, расширенные позиции и многое другое.
Об инструменте CSS Валидации
Этот инструмент был создан, чтобы помочь с отладкой. Используйте Онлайн CSS валидатор для проверки кода CSS и поиска ошибок и предупреждений, которые можно исправить, также вы можете персонализировать проверку CSS из опций. Сделайте красивее ваш код CSS после завершения кодинга.
Как это работает?
Просто вставьте свой CSS в текстовое поле выше и нажмите кнопку «Проверить», и вы получите результат проверки ниже в следующем div-блоке. Также вы можете нажать на кнопку «Форматирование», чтобы получить отформатированный CSS-код (Красивее).
Пример
/*
 Comments
*/
html, body {
	 height: 100%;
}
 .wrap {
	 min-height: 100%;
	 height: auto;
	 margin: 0 auto -60px;
	 padding: 0 0 60px;
}
- Главная»
- Онлайн Сервисы для web-мастеров»
- CSS»
- Онлайн сервис для проверки CSS кода
CSS Lint — онлайн сервис, который поможет найти ошибки и проблемные места в коде CSS.
Код CSS копируем в поле текстового ввода на странице сервера и жмем кнопку «LINT!». После проверки сервис загружает страницу со списком ошибок и предупреждений. В списке указаны номера строк, в которых были найдены проблемы, и описание.

Недостатком сервиса является полное отсутствие поддержки русского языка. Придется использовать переводчик от Google или Yandex.
Перейти к сервису
5 последних добавленных сервисов в рубрике»CSS»
-

Бесплатный онлайн-генератор графики для продающих сайтов
С помощью генератора вы за считанные секунды сможете сгенерировать красивые кнопки, заголовки, блоки специальных предложений, а также гарантии, и все это с любым текстом, который вы сами напишите.
-

Продвинутый Онлайн CSS3 Генератор
EnjoyCSS — это мощный генератор CSS3 кода. Данный сервис позволит вам без единой строчки кода создать прикольные стили для пользовательского интерфейса.
-

Онлайн сервис для проверки кода — jsFiddle
Онлайн сервис для проверки и демонстрации идей в программировании веб ресурсов. Можно подключать различные популярные библиотеки и делиться кодом с коллегами и мировым сообществом.
-

Онлайн-сервис для рефакторинга CSS кода
Проект для рефакторинга и генерации нового кода для работающего сайта. Основное назначение — устранение повторений, противоречий и создание основы для дальнейшего развития проекта.
-

Набор онлайн генераторов для подготовки элементов интерфейса — UIParade
Отличный набор из онлайн генераторов, которые облегчат труд веб мастера. В наборе имеется 4 инструмента — для кнопок, для форм, для иконок и для лент. Настраиваем внешний вид в визуальном редакторе и копируем код в свой проект.
Command Line Usage
Edit the markdown source for «command-line-usage»
Compile
.lessfiles to.cssusing the command line
Heads up! If the command line isn’t your thing, learn more about GUIs for Less.
Installing
Install with npm
npm install less -g
The -g option installs the lessc command available globally. For a specific version (or tag) you can add @VERSION after our package name, e.g. npm install less@2.7.1 -g.
Installing for Node Development
Alternatively, if you don’t want to use the compiler globally, you may be after
npm i less --save-dev
This will install the latest official version of lessc in your project folder, also adding it to the devDependencies in your project’s package.json.
Beta releases of lessc
Periodically, as new functionality is being developed, lessc builds will be published to npm, tagged as beta. These builds will not be published as a @latest official release, and will typically have beta in the version (use lessc -v to get current version).
Since patch releases are non-breaking we will publish patch releases immediately and alpha/beta/candidate versions will be published as minor or major version upgrades (we endeavour since 1.4.0 to follow semantic versioning).
Server-Side and Command Line Usage
The binary included in this repository, bin/lessc works with Node.js on *nix, OS X and Windows.
Usage: lessc [option option=parameter ...] <source> [destination]
Command Line Usage
lessc [option option=parameter ...] <source> [destination]
If source is set to `-‘ (dash or hyphen-minus), input is read from stdin.
Examples
Compile bootstrap.less to bootstrap.css
lessc bootstrap.less bootstrap.css
Options specific to lessc
For all other options, see Less Options.
Silent
lessc -s
lessc —silent
Stops any warnings from being shown.
Version
lessc -v
lessc --version
Help
lessc --help |
|
lessc -h |
Prints a help message with available options and exits.
Makefile
lessc -M
lessc --depends
Outputs a makefile import dependency list to stdout.
No Color
Deprecated.
lessc --no-color
Clean CSS
In v2 of less, Clean CSS is no longer included as a direct dependency. To use clean css with lessc, use the clean css plugin.
Browser Usage
Edit the markdown source for «using-less-in-the-browser»
Using Less.js in the browser is the easiest way to get started and convenient for developing with Less, but in production, when performance and reliability is important, we recommend pre-compiling using Node.js or one of the many third party tools available.
To start off, link your .less stylesheets with the rel attribute set to «stylesheet/less«:
<link rel="stylesheet/less" type="text/css" href="styles.less" />
Next, download less.js and include it in a <script></script> tag in the <head> element of your page:
<script src="less.js" type="text/javascript"></script>
Setting Options
You can set options either programmatically, by setting them on a less object before the script tag — this then affects all initial link tags and programmatic usage of less.
<script>
  less = {
    env: "development",
    async: false,
    fileAsync: false,
    poll: 1000,
    functions: {},
    dumpLineNumbers: "comments",
    relativeUrls: false,
    rootpath: ":/a.com/"
  };
</script>
<script src="less.js"></script>
The other way is to specify the options on the script tag, e.g.
<script>
  less = {
    env: "development"
  };
</script>
<script src="less.js" data-env="development"></script>
Or for brevity they can be set as attributes on the script and link tags:
<script src="less.js" data-poll="1000" data-relative-urls="false"></script>
<link data-dump-line-numbers="all" data-global-vars='{ "myvar": "#ddffee", "mystr": ""quoted"" }' rel="stylesheet/less" type="text/css" href="less/styles.less">
Browser Support
Less.js supports all modern browsers (recent versions of Chrome, Firefox, Safari, and Edge). While it is possible to use Less on the client side in production, please be aware that there are performance implications for doing so (although the latest releases of Less are quite a bit faster). Also, sometimes cosmetic issues can occur if a JavaScript error occurs. This is a trade off of flexibility vs. speed. For the fastest performance possible for a static web site, we recommend compiling Less on the server side.
There are reasons to use client-side less in production, such as if you want to allow users to tweak variables which will affect the theme and you want to show it to them in real-time — in this instance a user is not worried about waiting for a style to update before seeing it.
Tips
- Make sure you include your stylesheets before the script.
- When you link more than one
.lessstylesheet each of them is compiled independently. So any variables, mixins or namespaces you define in a stylesheet are not accessible in any other. - Due to the same origin policy of browsers, loading external resources requires enabling CORS
Watch Mode
To enable Watch mode, option env must be set to development. Then AFTER the less.js file is included, call less.watch(), like this:
<script>less = { env: 'development'};</script>
<script src="less.js"></script>
<script>less.watch();</script>
Alternatively, you can enable Watch mode temporarily by appending #!watch to the URL.
Modify Variables
Enables run-time modification of Less variables. When called with new values, the Less file is recompiled without reloading. Simple basic usage:
less.modifyVars({
  '@buttonFace': '#5B83AD',
  '@buttonText': '#D9EEF2'
});
Debugging
It is possible to output rules in your CSS which allow tools to locate the source of the rule.
Either specify the option dumpLineNumbers as above or add !dumpLineNumbers:mediaquery to the url.
You can use the mediaquery option with FireLESS (it is identical to the SCSS media query debugging format). Also see FireLess and Less v2. The comment option can be used to display file information and line numbers in the inline compiled CSS code.
Options
Set options in a global less object before loading the less.js script:
<!-- set options before less.js script -->
<script>
  less = {
    env: "development",
    logLevel: 2,
    async: false,
    fileAsync: false,
    poll: 1000,
    functions: {},
    dumpLineNumbers: "comments",
    relativeUrls: false,
    globalVars: {
      var1: '"quoted value"',
      var2: 'regular value'
    },
    rootpath: ":/a.com/"
  };
</script>
<script src="less.js"></script>
Options specific to Less.js in the browser
For all other options, see Less Options.
async
Type: Boolean
Default: false
Whether to request the import files with the async option or not. See fileAsync.
env
Type: String
Default: depends on page URL
Environment to run may be either development or production.
In production, your css is cached in local storage and information messages are not output to the console.
If the document’s URL starts with file:// or is on your local machine or has a non standard port, it will automatically be set to development.
e.g.
less = { env: 'production' };
errorReporting
Type: String
Options: html|console|function
Default: html
Set the method of error reporting when compilation fails.
fileAsync
Type: Boolean
Default: false
Whether to request the import asynchronously when in a page with a file protocol.
functions (Deprecated — use @plugin)
Type: object
User functions, keyed by name.
less = {
    functions: {
        myfunc: function() {
            return less.Dimension(1);
        }
    }
};
and it can be used like a native Less function e.g.
.my-class {
  border-width: unit(myfunc(), px);
}
logLevel
Type: Number
Default: 2
The amount of logging in the javascript console. Note: If you are in the production environment you will not get any logging.
2 - Information and errors
1 - Errors
0 - Nothing
poll
Type: Integer
Default: 1000
The amount of time (in milliseconds) between polls while in watch mode.
relativeUrls
Type: Boolean
Default: false
Optionally adjust URLs to be relative. When false, URLs are already relative to the entry less file.
useFileCache
Type: Boolean
Default: true (previously false in before v2)
Whether to use the per session file cache. This caches less files so that you can call modifyVars and it will not retrieve all the less files again.
If you use the watcher or call refresh with reload set to true, then the cache will be cleared before running.
Less.js Options
Edit the markdown source for «less-options»
Cross-Platform Options
Include Paths
lessc --include-path=PATH1;PATH2 |
{ paths: ['PATH1', 'PATH2'] } |
If the file in an @import rule does not exist at that exact location, Less will look for it at the location(s) passed to this option. You might use this for instance to specify a path to a library which you want to be referenced simply and relatively in the Less files.
Rootpath
lessc -rp=resources/lessc --rootpath=resources/ |
{ rootpath: 'resources/' } |
Allows you to add a path to every generated import and url in your css. This does not affect Less import statements that are processed, just ones that are left in the output css.
For instance, if all the images the css use are in a folder called resources, you can use this option to add this on to the URL’s and then have the name of that folder configurable.
Rewrite URLs
lessc -ru=offlessc --rewrite-urls=off |
{ rewriteUrls: 'off' } |
lessc -ru=alllessc --rewrite-urls=all |
{ rewriteUrls: 'all' } |
lessc -ru=locallessc --rewrite-urls=local |
{ rewriteUrls: 'local' } |
By default URLs are kept as-is (off), so if you import a file in a sub-directory that references an image, exactly the same URL will be output in the css. This option allows you to rewrite URLs in imported files so that the URL is always relative to the base file that has been passed to Less. E.g.
/* main.less */
@import "global/fonts.less";
/* global/fonts.less */
@font-face {
  font-family: 'MyFont';
  src: url('myfont/myfont.woff2') format('woff2');
}
With nothing set or with rewriteUrls: 'off', compiling main.less will output:
/* main.less */
/* global/fonts.less */
@font-face {
  font-family: 'MyFont';
  src: url('myfont/myfont.woff2') format('woff2');
}
With rewriteUrls: 'all', it will output:
/* main.less */
/* global/fonts.less */
@font-face {
  font-family: 'MyFont';
  src: url('./global/myfont/myfont.woff2') format('woff2');
}
With rewriteUrls: 'local', it will only rewrite URLs that are explicitly relative (those starting with a .):
url('./myfont/myfont.woff2') /* becomes */ url('./global/myfont/myfont.woff2')
url('myfont/myfont.woff2') /* stays */ url('myfont/myfont.woff2')
This can be useful in case you’re combining Less with CSS Modules which use similar resolving semantics like Node.js.
You may also want to consider using the data-uri function instead of this option, which will embed images into the css.
Math
Released v3.7.0
lessc -m=[option]lessc --math=[option] |
{ math: '[option]' } |
Less has re-built math options to offer an in-between feature between the previous strictMath setting, which required parentheses all the time, and the default, which performed math in all situations.
In order to cause fewer conflicts with CSS, which now liberally uses the / symbol between values, there is now a math mode that only requires parentheses for division. (This is now the default in Less 4.) «Strict math» has also been tweaked to operate more intuitively, although the legacy behavior is supported.
The four options available for math are:
always(3.x default) — Less does math eagerlyparens-division(4.0 default) — No division is performed outside of parens using/operator (but can be «forced» outside of parens with./operator —./is deprecated)parens|strict— Parens required for all math expressions.strict-legacy(removed in 4.0) — In some cases, math will not be evaluated if any part of the expression cannot be evaluated.
always
Example:
.math {
  a: 1 + 1;
  b: 2px / 2;
  c: 2px ./ 2;
  d: (2px / 2);
}
Outputs:
.math {
  a: 2;
  b: 1px;
  c: 1px;
  d: 1px;
}
parens-division
Example:
.math {
  a: 1 + 1;
  b: 2px / 2;
  c: 2px ./ 2;
  d: (2px / 2);
}
Outputs:
.math {
  a: 2;
  b: 2px / 2;
  c: 1px;
  d: 1px;
}
strict
.math {
  a: 1 + 1;
  b: 2px / 2;
  c: (2px / 2) + (3px / 1);
}
Output:
.math {
  a: 1 + 1;
  b: 2px / 2;
  c: 1px + 3px;
}
strict-legacy
In legacy strictMath mode, mixed expressions outside of parentheses means entire parentheses won’t evaluate. (Probably not what you want.)
.math {
  a: 1 + 1;
  b: 2px / 2;
  c: (2px / 2) + (3px / 1);
}
Output:
.math {
  a: 1 + 1;
  b: 2px / 2;
  c: (2px / 2) + (3px / 1);
}
Strict Math (Deprecated)
This has been replaced by the math option.
Relative URLs (deprecated)
lessc -rulessc --relative-urls |
{ relativeUrls: true } |
Has been replaced by rewriteUrls: "all"
Strict Units
lessc -su=onlessc --strict-units=on |
{ strictUnits: true } |
Defaults to off/false.
Without this option, Less attempts to guess at the output unit when it does maths. For instance
.class {
  property: 1px * 2px;
}
In this case, things are clearly not right — a length multiplied by a length gives an area, but css does not support specifying areas. So we assume that the user meant for one of the values to be a value, not a unit of length and we output 2px.
With strict units on, we assume this is a bug in the calculation and throw an error.
IE8 Compatibility (Deprecated)
lessc --ie-compat |
{ ieCompat: true } |
False by default starting in v3.0.0. Currently only used for the data-uri function to ensure that images aren’t created that are too large for the browser to handle.
Enable Inline JavaScript (Deprecated)
lessc --js |
{ javascriptEnabled: true } |
False by default starting in v3.0.0. Enables evaluation of JavaScript inline in .less files. This created a security problem for some developers who didn’t expect user input for style sheets to have executable code.
Replaced with the @plugin option.
Global Variables
lessc --global-var="color1=red" |
{ globalVars: { color1: 'red' } } |
This option defines a variable that can be referenced by the file. Effectively the declaration is put at the top of your base Less file, meaning it can be used but it also can be overridden if this variable is defined in the file.
Modify Variables
lessc --modify-var="color1=red" |
{ modifyVars: { color1: 'red' } } |
As opposed to the global variable option, this puts the declaration at the end of your base file, meaning it will override anything defined in your Less file.
URL Arguments
lessc --url-args="cache726357" |
{ urlArgs: 'cache726357' } |
This option allows you to specify a argument to go on to every URL. This may be used for cache-busting for instance.
Line Numbers (Deprecated)
lessc --line-numbers=commentslessc --line-numbers=mediaquerylessc --line-numbers=all |
{ dumpLineNumbers: 'comments' } |
Generates inline source-mapping. This was the only option before browsers started supporting sourcemaps.
Pre-Loaded Plugin
See: Pre-Loaded Plugins
Lint
lessc --lint -l |
{ lint: true } |
Runs the less parser and just reports errors without any output.
Compress (Deprecated)
lessc --compress -x |
{ compress: true } |
Compress using less built-in compression. This does an okay job but does not utilise all the tricks of dedicated css compression. In general, we recommend looking at third-party tools that clean and compress CSS after your Less has been transformed to CSS.
Allow Imports from Insecure HTTPS Hosts
lessc --insecure |
{ insecure: true } |
Source Map Options
Most of these options are not applicable to using Less.js in the browser, as you should generate a source map with your pre-compiled Less files.
Generate a Source Map
lessc --source-map |
{ sourceMap: {} } |
Tells less to generate a sourcemap.
Source Map Output Filename
lessc --source-map=file.map |
{ sourceMap: { outputFilename: 'file.map' } } |
Source Map Rootpath
lessc --source-map-rootpath=dev-files/ |
{ sourceMap: { sourceMapRootpath: 'dev-files/' } } |
Specifies a rootpath that should be prepended to each of the less file paths inside the sourcemap and also to the path to the map file specified in your output css.
Because the basepath defaults to the directory of the input less file, the rootpath defaults to the path from the sourcemap output file to the base directory of the input less file.
Use this option if for instance you have a css file generated in the root on your web server but have your source less/css/map files in a different folder. So for the option above you might have
output.css
dev-files/output.map
dev-files/main.less
Source Map Basepath
lessc --source-map-basepath=less-files/ |
{ sourceMap: { sourceMapBasepath: 'less-files/' } } |
This is the opposite of the rootpath option, it specifies a path which should be removed from the output paths. For instance if you are compiling a file in the less-files directory but the source files will be available on your web server in the root or current directory, you can specify this to remove the additional less-files part of the path.
It defaults to the path to the input less file.
Include Less Source in the Source Map
lessc --source-map-include-source |
{ sourceMap: { outputSourceFiles: true } } |
This option specifies that we should include all of the Less files in to the sourcemap. This means that you only need your map file to get to your original source.
This can be used in conjunction with the map inline option so that you do not need to have any additional external files at all.
Source Map Map Inline
lessc --source-map-inline |
{ sourceMap: { sourceMapFileInline: true } } |
This option specifies that the map file should be inline in the output CSS. This is not recommended for production, but for development it allows the compiler to produce a single output file which in browsers that support it, use the compiled css but show you the non-compiled less source.
Source Map URL
lessc --source-map-url=../my-map.json |
{ sourceMap: { sourceMapURL: '../my-map.json' } } |
Allows you to override the URL in the css that points at the map file. This is for cases when the rootpath and basepath options are not producing exactly what you need.
Pre-Loaded Plugins
Edit the markdown source for «plugins»
Loading plugins before parsing begins in Less.js
While the easiest way to use a plugin is using the @plugin at-rule, in a Node.js environment, you can pre-load a global Less.js plugin via the command line or by specifying it in the Less options.
Preprocessing
Pre-loading plugins is necessary if you want to add a Less.js Pre-processor. That is, a plugin that gets called and passed the raw Less source before parsing even starts. An example of this would be a Sass-To-Less Pre-processor plugin.
Note: pre-loading is not necessary for pre-evaluation plugins (after Less source is parsed, but before it is evaluated).
Node.js
Using the Command Line
If you are using lessc, the first thing you need to do is install that plugin. In registries like NPM, we recommend a Less.js plugin is registered with the «less-plugin-» prefix (for easier searching), though that isn’t required. So, for a custom plugin, you might install with:
npm install less-plugin-myplugin
To use the plugin, you can pass this on the command line by simply writing:
lessc --myplugin
Less.js will try to load either the «less-plugin-myplugin» and the «myplugin» modules as plugins whenever there’s an unknown Less option (like «myplugin»).
You can also explicitly specify the plugin with:
lessc --plugin=myplugin
To pass options to the plugin, you can write that in one of two ways.
lessc --myplugin="advanced"
lessc --plugin=myplugin=advanced
Loading a Plugin via Less.js
In Node, require the plugin and pass it to less in an array as an option plugins. E.g.
var LessPlugin = require('less-plugin-myplugin');
less.render(myCSS, { plugins: [LessPlugin] })
  .then(
    function(output) { },
    function(error) { }
  );
Programmatic Usage
Edit the markdown source for «programmatic-usage»
The main entry point into less is the less.render function. This takes the following format
less.render(lessInput, options)
    .then(function(output) {
        // output.css = string of css
        // output.map = string of sourcemap
        // output.imports = array of string filenames of the imports referenced
    },
    function(error) {
    });

// or...

less.render(css, options, function(error, output) {})
The options argument is optional. If you specify a callback then a promise will not be returned, where as if you do not specify a callback a promise will be given.
Under the hood, the callback version is used so that less can be used synchronously.
If you wanted to render a file, you would first read it into a string (to pass to less.render) and then set the filename field on options to be the filename of the main file. less will handle all the processing of the imports.
The sourceMap option is an object which enables you to set sub sourcemap options. Available sub options are: sourceMapURL,sourceMapBasepath,sourceMapRootpath,outputSourceFiles and sourceMapFileInline. Notice that the sourceMap option is not available for the less.js in browser compiler now.
less.render(lessInput)
    .then(function(output) {
        // output.css = string of css
        // output.map = undefined
}
//,
less.render(lessInput, {sourceMap: {}})
    .then(function(output) {
        // output.css = string of css
        // output.map = string of sourcemap
}
//or,
less.render(lessInput, {sourceMap: {sourceMapFileInline: true}})
    .then(function(output) {
        // output.css = string of css n /*# sourceMappingURL=data:application/json;base64,eyJ2ZXJ..= */
        // output.map = undefined
}
Getting Access to the Log
You can add a log listener with the following code
less.logger.addListener({
    debug: function(msg) {
    },
    info: function(msg) {
    },
    warn: function(msg) {
    },
    error: function(msg) {
    }
});
Note: all functions are optional. An error will not be logged, but instead is passed back to the callback or promise in less.render
API
Contributing to Less.js
Edit the markdown source for «developing-less»
Thanks for thinking about contributing! Please read the contributing instructions carefully to avoid wasted work.
- node — http://nodejs.org/
- phantomjs — http://phantomjs.org/download.html
make sure the paths are setup. If you start your favourite command line and type node -v you should see the node compiler. If you run phantomjs -v you should see the phantomjs version number.
- clone your less.js repository locally
- navigate to your local less.js repository and run
npm installthis installs less’ npm dependencies.
Usage
Grunt is used in order to run development commands such as tests, builds, and benchmarks. You can run them either with grunt [command_name] if you have grunt-cli installed globally or with npm run grunt -- [command_name].
If you go to the root of the Less repository you should be able to do npm test (a handy alias for npm run grunt -- test) — this should run all the tests. For the browser specific only, run npm run grunt -- browsertest If you want to try out the current version of less against a file, from here do node bin/lessc path/to/file.less
To debug the browser tests, run npm run grunt -- browsertest-server then go to http://localhost:8088/tmp/browser/ to see the test runner pages.
Optional: To get the current version of the Less compiler do npm -g install less — npm is the node package manager and «-g» installs it to be available globally.
You should now be able to do lessc file.less and if there is an appropriate file.less then it will be compiled and output to the stdout. You can then compare it to running locally (node bin/lessc file.less).
Other grunt commands
npm run grunt -- benchmark— run our benchmark tests to get some numbers on performancenpm run grunt -- stableto create a new releasenpm run grunt -- readmeto generate a new readme.md in the root directory (after each release)
How to Run Less in Other Environments
If you look in the libs folder you will see less, less-node, less-browser. The less folder is pure javascript with no environment
specifics. if you require less/libs/less, you get a function that takes an environment object and an array of file managers. The file
managers are the same file managers that can also be written as a plugin.
var createLess = require("less/libs/less"),
    myLess = createLess(environment, [myFileManager]);
The environment api is specified in less/libs/less/environment/environment-api.js
and the file manager api is specified in less/libs/less/environment/file-manager-api.js.
For file managers we highly recommend setting the prototype as a new AbstractFileManager — this allows you to override what is needed and allows us
to implement new functions without breaking existing file managers. For an example of file managers, see the 2 node implementations, the browser implementation or
the npm import plugin implementation.
Guide
If you look at http://www.gliffy.com/go/publish/4784259, This is an overview diagram of how less works. Warning! It needs updating with v2 changes.
Как проверить CSS и HTML-код на валидность и зачем это нужно.
В статье:
-
Что такое валидность кода
-
Чем ошибки в HTML грозят сайту
-
Как проверить код на валидность
-
HTML и CSS валидаторы — онлайн-сервисы для проверки кода
Разберем, насколько критическими для работы сайта и его продвижения могут быть ошибки в HTML-коде, и зачем нужны общие стандарты верстки.
Что такое валидность кода
После разработки дизайна программисты верстают страницы сайта — приводят их к единой структуре в формате HTML. Задача верстальщика — сделать так, чтобы страницы отображались корректно у всех пользователей на любых устройствах и браузерах. Такая верстка называется кроссплатформенной и кроссбраузерной — это обязательное требование при разработке любых сайтов.
Для этого есть специальные стандарты: если им следовать, страницу будут корректно распознавать все браузеры и гаджеты. Такой стандарт разработал Консорциумом всемирной паутины — W3C (The World Wide Web Consortium). HTML-код, который ему соответствует, называют валидным.
Валидность также касается файлов стилей — CSS. Если в CSS есть ошибки, визуальное отображение элементов может нарушиться.
Разработчикам рекомендуется следовать критериям этих стандартов при верстке — это поможет избежать ошибок в коде, которые могут навредить сайту.
Чем ошибки в HTML грозят сайту
Типичные ошибки кода — незакрытые или дублированные элементы, неправильные атрибуты или их отсутствие, отсутствие кодировки UTF-8 или указания типа документа.
Какие проблемы могут возникнуть из-за ошибок в HTML-коде
- страницы загружаются медленно;
- сайт некорректно отображается на разных устройствах или в браузерах;
- посетители видят не весь контент;
- программист не замечает скрытую рекламу и вредоносный код.
Как валидность кода влияет на SEO
Валидность не является фактором ранжирования в Яндекс или Google, так что напрямую она не влияет на позиции сайта в выдаче поисковых систем. Но она влияет на мобилопригодность сайта и на то, как поисковые боты воспринимают разметку, а от этого косвенно могут пострадать позиции или трафик.
Почитать по теме:
Главное о микроразметке: подборка знаний для веб-мастеров
Представитель Google Джон Мюллер говорил о валидности кода:
«Мы упомянули использование правильного HTML. Является ли фактором ранжирования валидность HTML стандарту W3C?
Это не прямой фактор ранжирования. Если ваш сайт использует HTML с ошибками, это не значит, что мы удалим его из индекса — я думаю, что тогда у нас будут пустые результаты поиска.
Но есть несколько важных аспектов:— Если у сайта действительно битый HTML, тогда нам будет очень сложно его отсканировать и проиндексировать.
— Иногда действительно трудно подобрать структурированную разметку, если HTML полностью нарушен, поэтому используйте валидатор разметки.
— Другой аспект касается мобильных устройств и поддержки кроссбраузерности: если вы сломали HTML, то сайт иногда очень трудно рендерить на новых устройствах».
Итак, критические ошибки в HTML мешают
- сканированию сайта поисковыми ботами;
- определению структурированной разметки на странице;
- рендерингу на мобильных устройствах и кроссбраузерности.
Даже если вы уверены в своем коде, лучше его проверить — ошибки могут возникать из-за установки тем, сторонних плагинов и других элементов, и быть незаметными. Не все программисты ориентируются на стандарт W3C, так что среди готовых решений могут быть продукты с ошибками, особенно среди бесплатных.
Как проверить код на валидность
Не нужно вычитывать код и считать символы — для этого есть сервисы и инструменты проверки валидности HTML онлайн.
Что они проверяют:
- Синтаксис
Синтаксические ошибки: пропущенные символы, ошибки в написании тегов. - Вложенность тэгов
Незакрытые и неправильно закрытые теги. По правилам теги закрываются также, как их открыли, но в обратном порядке. Частая ошибка — нарушенная вложенность.
- DTD (Document Type Definition)
Соответствие кода указанному DTD, правильность названий тегов, вложенности, атрибутов. Наличие пользовательских тегов и атрибутов — то, чего нет в DTD, но есть в коде.
Обычно сервисы делят результаты на ошибки и предупреждения. Ошибки — опечатки в коде, пропущенные или лишние символы, которые скорее всего создадут проблемы. Предупреждения — бессмысленная разметка, лишние символы, какие-то другие ошибки, которые скорее всего не навредят сайту, но идут вразрез с принятым стандартом.
Валидаторы не всегда правы — некоторые ошибки не мешают браузерам воспринимать код корректно, зато, к примеру, минификация сокращает длину кода, удаляя лишние пробелы, которые не влияют на его отображение.
Почитать по теме:
Уменьшить вес сайта с помощью gzip, brotli, минификации и других способов
Поэтому анализируйте предложения сервисов по исправлениям и ориентируйтесь на здравый смысл.
Перед исправлением ошибок не забудьте сделать резервное копирование. Если вы исправите код, но что-то пойдет не так и он перестанет отображаться, как должен, вы сможете откатить все назад.
HTML и CSS валидаторы — онлайн-сервисы для проверки кода
Есть довольно много валидаторов, выберите тот, в котором вам удобнее работать. Мы рекомендуем использовать известные сервисы от создателей стандартов. Если пояснения на английском воспринимать сложно, можно использовать автоматический перевод страницы.
Валидатор от W3C
Англоязычный сервис, онлайн проверяет соответствие HTML стандартам: можно проверить код по URL, залить файл или вставить код в окошко.
Инструмент покажет список ошибок и предупреждений с пояснениями — описанием ошибки и ее типом, а также укажет номер строки, в которой нужно что-то исправить. Цветом отмечены типы предупреждений и строчки с кодом.

Валидатор CSS от W3C
Инструмент от W3C для проверки CSS, есть русский язык. Работает по такому же принципу, анализирует стили на предмет ошибок и предупреждений. Первым идет блок ошибок, предупреждения собраны ниже отдельно.

Исправления ошибок и валидации HTML и CSS может быть недостаточно: всегда есть другие возможности испортить отображение сайта. Если что-то не работает, как надо, проведите полноценный аудит, чтобы найти ошибки.
С другой стороны, не зацикливайтесь на поиске недочетов в HTML — если код работает, а контент отображается корректно, лучше направить ресурсы на что-то другое — оптимизацию и ускорение загрузки, например.
Finally, I decided to use antlr4
Steps:
- install antlr in the computer or add to the deployment process
- get the grammar for your language (less is already done)
- get the npm package to process the grammar
- Use it in your app
The configuration is:
$ cd /usr/local/lib
$ sudo curl -O http://www.antlr.org/download/antlr-4.5-complete.jar
$ export CLASSPATH=".:/usr/local/lib/antlr-4.5-complete.jar:$CLASSPATH"
$ alias antlr4='java -jar /usr/local/lib/antlr-4.5-complete.jar'
$ alias grun='java org.antlr.v4.runtime.misc.TestRig
This info is directly from the web page.
Now you can get the grammar from https://github.com/antlr/grammars-v4
At this point you can generate the javascript version of your grammar
In my case, I created a directory, I downloaded the files and coded all my tests inside:
antlr4 -Dlanguage=JavaScript LessParser.g4
antlr4 -Dlanguage=JavaScript LessLexer.g4
This process generates a javascript file that you will use, but you need the antlr lib for use this files in your node program.
npm link antlr4
Ant now starts to code:
var antlr4 = require('antlr4/index');
var MyGrammarLexer = require('./LessLexer.js');
var MyGrammarParser = require('./LessParser.js');
var input = "html{ .hey(); color: @light-blue; background:#333}";
var chars = new antlr4.InputStream(input);
var lexer = new MyGrammarLexer.LessLexer(chars);
var tokens  = new antlr4.CommonTokenStream(lexer);
var parser = new MyGrammarParser.LessParser(tokens);
parser.buildParseTrees = true;


var ErrorListener = antlr4.error.ErrorListener;
function CustomErrorListener() {
   ErrorListener.call(this);
   return this;
}

CustomErrorListener.prototype = Object.create(ErrorListener.prototype);
CustomErrorListener.prototype.constructor = CustomErrorListener;
CustomErrorListener.prototype.syntaxError = function(recognizer, offendingSymbol, line, column, msg, e) {
    throw ('throw a simple exception');
};

parser.addErrorListener(new CustomErrorListener());

try{
  var tree = parser.stylesheet();
} catch (e){
  console.log('I catch you!!!')
}
The important parts in this code are the function lessLexer, lessParser, and parser.stylesheet(); This are different per grammar. The last one is difficult to know, but it is the point in the grammar that you want to validate. In my case, I get the file LessParser.g4, and you have the different node in the grammar in the definition:
parser grammar LessParser;

options { tokenVocab=LessLexer; }

stylesheet
  : statement*
  ;

statement
  : importDeclaration
  | ruleset
  | variableDeclaration ';'
  | mixinDefinition
  ;

variableName
  : AT variableName
  | AT Identifier
  ;

commandStatement
  : (expression+) mathStatement?
  ;

mathCharacter
  : TIMES | PLUS | DIV | MINUS | PERC
  ;
In this case, you can validate the string like a stylesheet, statement, variableName …
The last interesting point is the Error Validation, I use it to stop the validation in the first error, my case is very simple, but you can improve this point
Какие есть инструменты для автоматической проверки less/scss — кода?
Имеется в виду не проверка на валидность, а проверка на качество. Например, чтобы не было «магических» цифр, дублирования значений в различных местах, проверка на использование БЭМ, использование !important и т.п.
-
Вопрос заданболее трёх лет назад
-
597 просмотров
Пригласить эксперта
Самый простой метод: компилировать в CSS и прогнать через CSSLint. Если же вам хочется извращений, то можно прогнать через LessLint. Оба решения доступны, например, для Grunt. Лучше первый вариант, так как, например, недавно в Less добавили плагины и тот же импорт директорий или пользовательские функции (добавляются плагинами) могут вызывать ошибки.
-
Показать ещё
Загружается…
27 июн. 2023, в 15:23
3000 руб./за проект
27 июн. 2023, в 15:12
1000 руб./за проект
27 июн. 2023, в 14:31
2000 руб./за проект
Минуточку внимания
Решено: использовать WinLESS вместо SimpleLESS.
Я использую семантическую сеточную систему (которая великолепна), и я пытаюсь использовать SimpleLESS для предварительной компиляции моих таблиц стилей LESS в CSS (потому что PyroCMS 2.1 не позволит мне передать параметр для установки таблицы стилей ‘type=text/less»- Pyro требует, чтобы все ссылки на таблицы стилей стали»type=text/css»‘- и из-за этого я не могу включить файл»less.js»).
Я хочу добавить, что это работало с использованием less.js…
В любом случае, SimpleLESS, кажется, работает с простыми старыми файлами LESS, но что-то в этом дает «undefined on line undefined» и не скомпилируется:
@import '/addons/shared_addons/themes/base/css/less/reset.css';
@import '/addons/shared_addons/themes/base/css/less/grid.less';
@import '/addons/shared_addons/themes/base/css/less/site.less';

@import '/addons/shared_addons/themes/base/css/uomless.css';
@import '/addons/shared_addons/themes/base/css/%23fish/superfish.css';

//////////
// GRID //
//////////

// Specify the number of columns and set column and gutter widths
@basefont: 16;

@columns: 12;
@column-width: 60;
@gutter-width: 20;

// Comment the definition below for a pixel-based layout
@total-width: 100%;


html {

}

body {
    position: absolute;   /*top-most container absolute sections inherit for relative position of descendants */
}

// center the contents
div.center {
    width: 88%;  /* No pixel-width limit, but we want side margins  */
    margin: 0 auto;
    overflow: hidden;
}

header, section, aside, footer, nav, tickr, login, rads, gads {
    z-index: -1;        /*z-inex must be negative for plane breaking: http://www.vanseodesign.com/css/css-stack-z-index/ */
    padding-top: 3px;
    padding-bottom: 3px;
}

header {
    .column(6);
    margin-top: 12px;
    margin-bottom: 12px;
    height:auto !important;
    height: 130px;
    min-height: 130px;
    max-height: 130px;
    padding-bottom: 0px;
}

dashboard {
    .column(6);
    margin-top: 12px;
    height:auto !important;
    height: 100px;
    min-height: 100px;
    max-height: 100px;
    padding-bottom: 0px;
}

login {
    .column(3);
    margin-top: 12px;
    padding-bottom: 0px;
}


nav {
    .column(12);
    margin-top: 3px;
    margin-bottom: 12px;
}


footer {
    .column(12);
    margin-bottom: 0px;
}


section {
    .column(7);
    margin-bottom: 12px;
}

appspace {
    .column(12);
    margin-bottom: 12px;
}

aside {
    .column(3);
    margin-bottom: 12px;
}

rads {
    .column(2);
    margin-bottom: 12px;
}


tickr {
    .column(10);
    margin-bottom: 0px;
}

@media screen and (max-width: 720px) {
    header, section, aside, footer, nav
    {
        .column(12);
        margin-bottom: 1em;
    }
}
Кто-нибудь знает способ проверки LESS, чтобы найти синтаксические ошибки?
Любая помощь будет оценена.
бесстыдный
Спасибо за предложения; Я пробовал следующее без изменений в сообщении об ошибке SimpleLESS:
@import '/addons/shared_addons/themes/base/css/less/reset';
@import '/addons/shared_addons/themes/base/css/less/grid';
@import '/addons/shared_addons/themes/base/css/less/site';

@import '/addons/shared_addons/themes/base/css/uomless.css';
также:
@import 'less/reset';
@import 'less/grid';
@import 'less/site';

@import 'uomless.css';
а также:
@import 'grid';
2012-05-01 20:37
4
ответа
Причина в том, что ссылка на импорт CSS не изменилась, поэтому сервер будет получать их в обычном режиме. Импорт LESS пытается фактически извлечь этот файл и включить его непосредственно в документ, поэтому ваш путь должен быть относительно документа, который выполняет импорт, поскольку этот импорт фактически выполняется при компиляции LESS, а не при извлечении из сервер.
2012-06-13 18:20
Проблема, кажется, в этих двух строках
@import '/addons/shared_addons/themes/base/css/less/grid.less';
@import '/addons/shared_addons/themes/base/css/less/site.less';
(также у вас есть %23fish но я предполагаю, что это не в вашем исходном коде, так что пропустите это)
Единственные файлы, которые находятся в @include и заканчивается .less, но я не могу сказать вам, почему это происходит.
Попробуйте переименовать файлы и / или поэкспериментировать без расширения.less.
2012-05-02 05:17
Кто-нибудь знает способ проверки LESS, чтобы найти синтаксические ошибки?
Я вижу, что вы на Mac: я люблю Codekit за это — он проверяет и отображает ошибки, так как он предварительно компилирует файлы, которые вы настроили для просмотра.
http://incident57.com/codekit/
Если вы используете меньше с узлом, ошибки (я думаю, что это по умолчанию) выводятся на консоль.
2013-09-14 12:20
Другие вопросы по тегам
less

Линтеры для начинающих
Красивый код с самого начала.
Линтеры для начинающих
Красивый код с самого начала.
Недавно мы писали про линтеры: как они проверяют код на ошибки и делают его более красивым. Если коротко, то линтеры работают так:
- Берут ваш код
- Форматируют его по заданным правилам.
- Исправляют простейшие ошибки — ставят незакрытые фигурные скобки или пропущенные точки с запятой.
- Если умеют — проверяют код на более сложные ошибки и сообщают о них.
Всё это — чтобы исправлять неаккуратности за программистами.
В этой статье — примеры линтеров, которые можно подключить хоть сейчас и получить чистый код уже к концу прочтения.
👉 Линтеры из обзора мы проверяли в VS Code и Sublime text 3. Для запуска проверки и форматирования открытого кода в VS Code нажмите в пустом месте правой кнопкой мыши и выберите пункт «Форматировать документ с помощью…» или «Format Document With…»:

Beautify — линтер для HTML
Расширение для VS Code
HTML-линтер, который следит за внешним видом кода страницы и форматирует его по заданными правилам. Умеет разбивать по строкам несколько команд, если они написаны в одной строке друг за другом.


CSS
Если вы пишете не очень большой CSS-код, вам вполне хватит того же Beautify. Но если вы решили заняться стилями всерьёз и установили CSS-препроцессор, чтобы писать код ещё быстрее, посмотрите на Beautify css/sass/scss/less.
Уже по названию видно, что этот плагин работает не только с CSS, но и с форматами всех популярных препроцессоров. Устанавливается и работает точно так же, как и остальные, можно создать свои правила обработки кода или настроить под себя те, что есть.
JavaScript
JSLint — один из самых старых и самых строгих линтеров для JavaScript. Он проверяет вообще всё:
- мелкие ошибки типа точки с запятой,
- неиспользуемые переменные,
- взаимные зависимости в функциях,
- порядок параметров при вызове функций,
- выполнится ли этот фрагмент кода когда-нибудь или нет,
- бесконечные рекурсии,
- утечки памяти.
Если ваш код проверил JSLint и не нашёл ни одной ошибки — поздравляем, вы постигли JS-дзен.

JSHint работает почти точно так же, как и предыдущий линтер, но проверяет менее строго. Идеальный инструмент для тех, кто только начинает писать код — он покажет критичные ошибки и не будет требовать соблюдения всех канонов языка JavaScript.

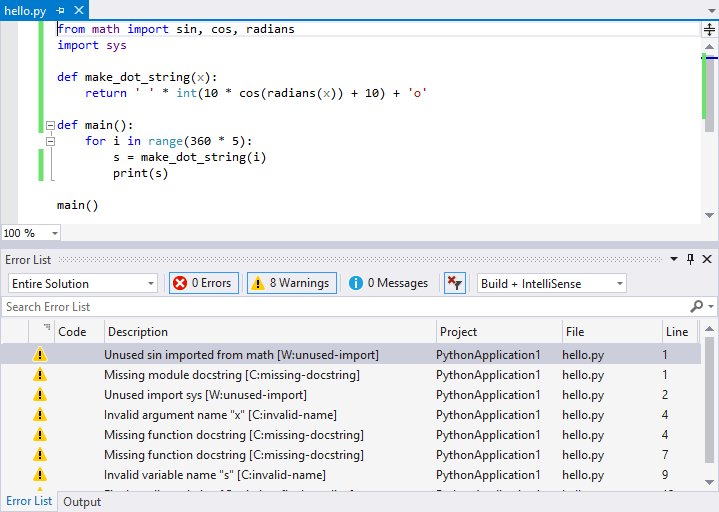
PyLint — линтер для Python
Pylint.org — самый популярный линтер для Python, который проверяет почти всё:
- используется ли модуль, который подключили в самом начале;
- длину строк;
- как объявляются переменные и функции;
- правильно ли используются аргументы при вызове;
- синтаксические ошибки;
- как используются типы данных;
- нет ли логических ошибок в коде, которые могут привести к непредсказуемому результату.
Если вам нужно что-то проверить в коде, скорее всего, PyLint сможет вам помочь.
Получите ИТ-профессию
В «Яндекс Практикуме» можно стать разработчиком, тестировщиком, аналитиком и менеджером цифровых продуктов. Первая часть обучения всегда бесплатная, чтобы попробовать и найти то, что вам по душе. Дальше — программы трудоустройства.
Начать карьеру в ИТ