Время на прочтение
13 мин
Количество просмотров 118K
Эта статья по сути будет подборкой «Best practiсe» для системных администраторов Samba. Основой статьи является глава Troubleshooting Techniques из книги Sam’s Teach Yourself Samba in 24 Hours. Мы постараемся рассмотреть наиболее распространенные ошибки при настройке Samba.
Согласитесь, ужасно поменять двигатель в машине, а потом выяснить, что не ехала она из-за отсутствия бензина! Может, это и не лучшая метафора, но многие системные администраторы тратят время зря, не проверив в первую очередь самые очевидные вещи. Посмотрите, как примерно должен выстраиваться процесс поиска и решения проблем с Samba:

Проблемы, представленные на нижних уровнях этой «пирамиды», являются «фундаментом» для более высоких уровней. Не удивительно, что Windows-клиент не может получить доступ к файловому северу на Samba, если сервер отключен от сети. Конечно, не стоит воспринимать этот рисунок буквально, как руководство к действию (скажем, лог-файлы можно посмотреть всегда), но начинать стоит все-таки с проблем нижних уровней. Чем выше мы поднимаемся, тем больше углубляемся в принципы работы Samba.
В поисках решения проблемы с Samba стоит в первую очередь обратиться к следующим ресурсам:
•HOWTO, опубликованные на сайте;
•тематические сайты и форумы, например: http://samba-doc.ru/, http://citforum.ru/operating_systems/linux/samba/;
•разделы документации по Samba для того или иного дистрибутива (например, http://help.ubuntu.ru/wiki/samba, http://www.centos.org/docs/5/html/Deployment_Guide-en-US/ch-samba.html или http://wiki.russianfedora.ru/index.php?title=Samba);
•http://stackoverflow.com/ — не забывайте про этот сайт, если у вас есть конкретный вопрос или проблема;
•вспомогательные утилиты, входящие в состав Samba, а также различные программы-анализаторы трафика (например, Wireshark).
Мы в первую очередь рассмотрим самостоятельное решение возникающих проблем, но не стоит забывать про возможную помощь сообщества. Это может серьезно сэкономить вам время и силы.
Описание тестовой среды
Для начала — несколько слов о тестовой среде. Условия следующие:
•Samba-сервер называется TROUBLE и имеет IP-адрес 192.168.7.75 и маску 255.255.255.0.
•smbd и nmbd запускаются как демоны.
•Windows-клиент называется win-client.
•Windows-клиент использует адрес 192.168.7.135 с сетевой маской 255.255.255.0.
•И win-client, и TROUBLE находятся в одной подсети, так что широковещательный запрос дойдет с одного хоста на другой.
•И win-client, и TROUBLE являются членами рабочей группы LAB.
•Samba-сервер использует следуюший smb.conf:
[global] netbios name = TROUBLE
workgroup = LAB security = user encrypt passwords = yes
[public] path = /tmp
read only = no
УРОВЕНЬ 1
Работоспособность сетевого соединения и файла конфигурации
Основание нашей «пирамиды» составляют три основных проблемы:
•корректно работающее TCP/IP подключение;
•соответствие маски и широковещательных адресов на серверах и клиентах;
•работоспособность файла smb.conf.
TCP/IP
Для проверки TCP/IP в первую очередь используется команда ping. Если описать протокол ICMP очень упрощенно, то хост отправляет запрос на сервер и спрашивает «Ты жив?». Если сервер не отвечает, хост приходит к выводу, что тот не подключен к сети и, следовательно, недоступен.
$ ping win-client
PING win-client (192.168.7.135) from 192.168.1.74 : 56(84) bytes of data.
64 bytes from win-client (192.168.7.135): icmp_seq=0 ttl=255 time=2.138 msec
64 bytes from win-client (192.168.7.135): icmp_seq=1 ttl=255 time=2.181 msec
64 bytes from win-client (192.168.7.135): icmp_seq=2 ttl=255 time=2.263 msec
--- ping statistics --- 3 packets transmitted, 3 packets received, 0% packet loss round-trip min/avg/max/mdev = 2.138/2.194/2.263/0.051 ms
Также очень важным является правильное функционирование DNS. Если не удастся разрешить имя, появится сообщение вроде этого:
$ ping win-client
ping: unknown host win-client
Если такое происходит, первое, что стоит сделать — это повторить команду ping, но используя уже не имя, а адрес:
$ ping 192.168.7.135
Если команда выполнится успешно, то стоит обратить внимание на конфигурацию DNS. Наиболее распространенные причины ошибки:
•неверное содержание файла конфигурации DNS /etc/resolv.conf;
•на сервере DNS нет записи, связанной с win-client;
•сервер DNS недоступен в данный момент.
Если же ping по IP-адресу успешно не выполняется, то стоит проверить работоспособность сетевого оборудования на сервере, клиенте и между ними.
Широковещательный адрес на сервере и клиенте
Возможно, ping выполнится и успешно, но при этом сетевая маска (netmask) и широковещательный адрес (broadcast address) будут сконфигурированы неверно.
В NetBIOS крайне важно для правильного разрешения имени и поиска машин в сетевом окружении, чтобы сервер и клиент находились в одной подсети, т.е. использовали одну маску подсети и широковещательный адрес.
В нашем случае сетевая маска должна быть 255.255.255.0, а широковещательный адрес — 192.168.7.255.
Если вы используете Linux, то можно проверить, какие используются широковещательный адрес и маска, при помощи команды ifconfig с именем интерфейса в качестве аргумента:
$ /sbin/ifconfig eth0
eth0 Link encap:Ethernet HWaddr 00:04:5A:0C:1C:19
inet addr:192.168.7.75 Bcast:192.168.255.255 Mask:255.255.255.0
inet6 addr: fe80::204:5aff:fe0c:1c19/10 Scope:Link
UP BROADCAST RUNNING MULTICAST MTU:1500 Metric:1
RX packets:68006 errors:0 dropped:0 overruns:0 frame:0
TX packets:100783 errors:0 dropped:0 overruns:0 carrier:0
collisions:0 txqueuelen:100
RX bytes:12186135 (11.6 Mb) TX bytes:121642120 (116.0 Mb)
Interrupt:3 Base address:0x100
1
Если в выводе этой команды вы увидите, что широковещательный адрес или сетевая маска заданы неверно, следует зайти под учетной записью root и установить верные значения, используя команду ifconfig:
root# ifconfig eth0 192.168.7.75 netmask 255.255.255.0 broadcast 192.168.7.255
В Windows аналогичную информацию можно получить информацию, выполнив команду ipconfig /all.
Проверка корректности файла smb.conf
Так как Samba использует огромное количество параметров из файла smb.conf, разработчики создали утилиту командной строки, которая проверяет синтаксис этого файла. Утилита называется testparm, она очень полезна при поиске ошибок в конфигурационном файле.
Можно использовать утилиту testparm с параметром -s для анализа конкретного конфигурационного файла. Эта опция очень хорошо подходит для проверки файла конфигурации перед его «боевым» использованием.
$ testparm -s /usr/local/samba/lib/smb.conf.new
Load smb config files from /usr/local/samba/lib/smb.conf.new
Processing section “[public]”
Loaded services file OK.
# Global parameters
[global]
coding system =
client code page = 850
code page directory = /usr/local/samba/lib/codepages
<...остальной вывод опущен...>
После анализа заданного конфигурационного файла testparm выводит все значения файла smb.conf, включая значения по умолчанию. Это помогает убедиться, что используются ожидаемые значения параметров конфигурации smbd и nmbd.
Стоит отметить, что значения по умолчанию меняются от версии к версии, так что необходимо использовать версию Samba, соответствующую версии testparm.
УРОВЕНЬ 2
Серверное и клиентское ПО
Второй уровень подразумевает проверку конфигурации клиентского и серверного ПО. Наша цель — убедиться, что и клиент, и сервер корректно отвечают на запросы NetBIOS и CIFS. Пока мы рассматриваем изолированно каждый из хостов. (На третьем уровне мы уже начнем рассматривать их взаимодействие.)
smbd
В первую очередь, smbd должен быть запущен. Проверить это можно, используя команду ps. Аргументы этой команды могут отличаться в зависимости от версии Linux.
$ ps -ef | grep smbd
 root 28592 1 0 12:37 ? 00:00:00 /usr/local/samba/bin/smbd -D
Убедившись, что smbd запущен (или, при необходимости, запустив его), используем утилиту smbclient для проверки работоспособности сервера. Параметр -L используется для вывода списка ресурсов сервера. Ключ -N используется для анонимного подключения к серверу, чтобы не создавать лишних проблем с авторизацией. Все эти действия должны выполняться локально на Samba-сервере.
smbclient -L TROUBLE -N added interface ip=192.168.7.75 bcast=192.168.1.255 nmask=255.255.255.0 Anonymous login successful Domain=[LAB] OS=[Unix] Server=[Samba 2.2.2]
Sharename Type --------- ---- public Disk IPC$ IPC
Comment -------
IPC Service (Samba 2.2.2)
smbclient -L TROUBLE -N added interface ip=192.168.7.75 bcast=192.168.1.255 nmask=255.255.255.0 Anonymous login successful Domain=[LAB] OS=[Unix] Server=[Samba 2.2.2]
Sharename Type --------- ---- public Disk IPC$ IPC
Comment -------
IPC Service (Samba 2.2.2)
ADMIN$
Server --------- TROUBLE
Workgroup --------- LAB
Disk
IPC Service (Samba 2.2.2)
Comment ------- Samba 2.2.2
Master ------- TROUBLE
Существуют две распространенные ошибки, которые могут возникнуть при выполнении этой проверки.
Первая ошибка выглядит следующим образом:
error connecting to 192.168.7.75:139 (Connection refused) Connection to <server> failed
Она возникает, если smbd не запущен или не может подключиться к порту 139. Причиной этому могут быть ранее установленные и некорректно удаленные компоненты Samba. Прежде всего следует убедиться, что smbd стартует как демон и не завершается тут же с ошибкой. Особенность в том, что nmbd не выводит ошибки в консольное окно, так что следует посмотреть последние несколько строк log-файла. Позже мы рассмотрим анализ логов более подробно.
Вторая часто встречающаяся ошибка выглядит так:
session request to <server> failed (Not listening for calling name)
Можно подумать, что причиной этой ошибки является неверное NetBIOS-имя, но это не так. Эта ошибка не может быть вызвана «битой» установкой nmbd, nmbd в данном случае даже не обязательно должен быть запущен.
Причиной возникновения этой ошибки при локальном подключении чаще всего являются неверно сконфигурированные параметры hosts allow или hosts deny в файле smb.conf. Сервер разрывает создающуюся NetBIOS-сессию.
Если нам удалось увидеть список общих ресурсов, мы можем проверить возможность Samba авторизовать пользователей. В этом тесте аккаунт с именем пользователя user1 и паролем secret подключается к общему ресурсу [public].
$ smbclient //TROUBLE/public -U user1%secret added interface ip=192.168.7.75 bcast=192.168.1.255 nmask=255.255.255.0 Domain=[LAB] OS=[Unix] Server=[Samba 2.2.2] smb: >
Если Samba не сможет авторизовать пользователя, вы увидите сообщение об ошибке:
session setup failed: ERRSRV - ERRbadpw (Bad password - name/password pair in a Tree Connect or Session Setup are invalid.)
Причин этой ошибки может быть много. Это может быть неверное имя или пароль, или отсутствующая запись smbpasswd для пользователя, если задан параметр encrypt password = yes, или недействительная учетная запись guest, если разрешен доступ без аутентификации.
Если пользователь корректно авторизовался, но не смог получить доступ к запрошенной службе, smbclient выведет следующее сообщение:
tree connect failed: ERRDOS - ERRnosuchshare (You specified an invalid share name)
Это может быть вызвано неверно написанным именем службы, настройками доступа к общему ресурсу или неверным выражением path в описании общего ресурса в файле smb.conf.
nmbd
Чтобы проверить, запущен ли nmbd, мы снова используем команду ps.
$ ps -ef | grep nmbd
root 29054 1 0 15:53 ? 00:00:00 /usr/local/samba/bin/bin/nmbd -D
Если ps покажет, что nmbd не запущен, стоит зайти под учетной записью root и запустить его (/usr/local/samba/bin/nmbd -D).
Для теста мы будем использовать утилиту Samba — nmblookup. У каждого Samba-сервера есть особое имя, _Samba_, на которое они откликаются всегда. Послав запрос по этому имени, мы можем проверить работоспособность nmbd. Ключ -U используется для того, чтобы отправить запрос на конкретный адрес.
$ ./nmblookup -U 127.0.0.1 __Samba__ querying __Samba__ on 127.0.0.1 192.168.7.75 __Samba__<00>
Если nmbd при этом не запущен, результатом будет ошибка:
name_query failed to find name __Samba__
Также причиной ошибки может быть тот факт, что loopback-интерфейс не включен в smb.conf при включенном параметре bind interfaces only = yes.
После этого мы проверим, может ли nmbd зарегистрировать имя TROUBLE.
$ nmblookup -U 127.0.0.1 TROUBLE querying TROUBLE on 127.0.0.1 192.168.7.75 TROUBLE<00>
Сообщения об ошибках, например, “name query failed”, скорее всего, вызваны неудачным запросом к имени _Samba_. Другой причиной может быть то, что сервер не может зарегистрировать имя NetBIOS. В этом случае стоит найти сервер, которому принадлежит данное имя, отправив широковещательный запрос.
$ nmblookup -B 192.168.1.255 TROUBLE querying TROUBLE on 192.168.1.255 192.168.1.98 TROUBLE<00> ошибка
Например, в данном случае это имя принадлежит сторонней машине, а не нашему Samba-серверу. Очевидно, решением данной проблемы является переименование этой машины или сервера.
NetBIOS-интерфейс Windows
Утилита, использующаяся в Windows для NetBIOS-запросов — nbtstat.exe — имеет еще несколько опций, которых нет в nmblookup. Одна из них (-n) позволяет «спросить» у NetBIOS-интерфейса, какие имена он успешно зарегистрировал:
C:WINDOWS> nbtstat -n
Node IpAddress: [192.168.7.135] Scope Id: [] NetBIOS Local Name Table
Name Type Status ---------------------------------------------
WIN-CLIENT LAB WIN-CLIENT
<00> UNIQUE <00> GROUP <03> UNIQUE
Registered Registered Registered
Если компонент “Client for Microsoft Networks” не был установлен, nbtstat.exe сообщит следующее:
Failed to access NBT driver 1
Более тонкая ошибка возникает, когда Windows-клиент сообщает что он зарегистрировал имя рабочей группы, хотя это должно быть уникальное имя рабочей станции.
Name Type Status --------------------------------------------- LAB <00> GROUP Registered
Часто причиной этого является наличие машины с таким же NetBIOS-именем. Windows-клиенту необходимо уникальное имя, чтобы установить NetBIOS-сессию с сервером. Пока клиент не сможет зарегистрировать имя рабочей станции, он будет неспособен, скажем, просматривать сетевое окружение или подключать сетевые диски.
УРОВЕНЬ 3
Удаленный доступ к общим ресурсам
Итак, мы уже выяснили, что и клиент, и сервер имеют доступ к сети, и локально ПО на них работает. На данном уровне мы переходим к диагностике работоспособности их взаимодействия.
Разрешение имен
Мы вновь будем использовать утилиты nmblookup и nbstat.exe, чтобы выяснить, может ли клиент разрешить имя сервера и наоборот. Тест будет состоять из двух фаз. В первой мы будем использовать широковещательный запрос, чтобы протестировать отклики сервера и клиента. Это делается путем задания широковещательного адреса (-B 192.168.7.255) в утилите nmblookup при запросе, что задействует сетевое взаимодействие между сервером и клиентом.
Сначала мы попробуем разрешить имя сервера:
$ nmblookup -B 192.168.1.255 TROUBLE querying TROUBLE on 192.168.1.255 192.168.7.75 TROUBLE<00>
После этого мы попробуем разрешить имя клиента, используя тот же широковещательный адрес.
$ nmblookup -B 192.168.1.255 win-client querying win-client on 192.168.1.255 192.168.7.135 win-client<00>
Если до сих пор все шло хорошо, этот тест, скорее всего, отработает корректно. Если же результатом будет ошибка, стоит еще раз поверить соответствие широковещательного адреса на всех машинах.
После этого мы выполним NetBIOS Node Status Lookup, проверим статус узла. На этом шаге делается прямое обращение к IP-адресу, в котором запрашивается список уникальных и групповых NeBIOS имен, зарегистрированных этим хостом. Начнем с запроса к Samba-серверу от Windows-клиента.
C:WINDOWS> nbtstat -A 192.168.7.75
NetBIOS Remote Machine Name Table
Name Type Status ---------------------------------------------
TROUBLE <00> UNIQUE TROUBLE <03> UNIQUE TROUBLE <20> UNIQUE ..__MSBROWSE__.<01> GROUP
Registered Registered Registered Registered Registered Registered Registered
LAB LAB LAB
<00> GROUP <1D> UNIQUE <1E> GROUP
MAC Address = 00-00-00-00-00-00
Можно выполнить те же действия на Samba-сервере, чтобы собрать информацию о клиенте. Опции для запроса через утилиту nmblookup, в целом, такие же как и в nbtstat.exe.
$ nmblookup -A 192.168.7.135 Looking up status of 192.168.7.135
WIN-CLIENT LAB WIN-CLIENT
<00> - B <ACTIVE> <00> - <GROUP> B <ACTIVE> <03> - B <ACTIVE>
Если какой-то из этих запросов не выполняется, следует еще раз провести проверки сетевого подключения и NetBIOS-интерфейсов, которые мы рассматривали раньше.
Просмотр общих ресурсов с Windows-клиента
Мы уже использовали smbclient для просмотра списка общих ресурсов. Здесь мы проделаем то же самое, только удаленно с Windows-клиента.
Утилита net.exe — это универсальная утилита для работы с CIFS. Эта утилита является эквивалентом Linux-команды smbclient -L. Опиция view позволяет просмотреть общие ресурсы рабочей группы, или, если указать конкретное имя сервера (например, \TROUBLE), покажет список общих ресурсов на нем.
Удаленное подключение к общим ресурсам
На самом деле, этот шаг является не столько тестом, сколько целью всего процесса. Если мы зашли в консоль с правильным именем и паролем, то следующая команда подключит диск P: локального клиента к общему ресурсу [public] на сервере TROUBLE.
C:WINDOWS> net use p: \TROUBLEpublic
The command completed successfully.
Чтобы определить, под каким именем подключаться, можно использовать опцию
/user::


C:WINNT>net use \TROUBLEpublic /user:user1
The password or user name is invalid for \TROUBLEpublic.
Type the password for \TROUBLEpublic:
The command completed successfully.
Существует огромное количество проблем, связанных с аутентификацией. Зачастую они могут быть обнаружены только путем анализа лог-файлов, что будет рассмотрено позже.
УРОВЕНЬ 4
Сетевое окружение
Решение проблем с корректной работой Сетевого окружения — очень сложная тема. Скорее всего, если вы добрались до этого уровня, а сетевое окружение не работает или работает некорректно, вам следует еще раз проверить маску подсети и широковещательный адрес, и снова повторить все тесты нижних уровней: ошибка вероятно кроется там.
УРОВЕНЬ 5
Лог-файлы и анализ трафика
Иногда корень проблемы сложно определить даже с помощью специализированных диагностических утилит. Тогда на помощь приходят логи. Первые четыре уровня нашей «пирамиды» можно использовать для подтверждения правильности начальной установки Samba и решения простых проблем. Начиная с пятого уровня, начинается решение серьезных проблем. Рано или поздно вы столкнетесь с проблемой, которая потребует работы с логами.
Лог-файлы Samba
Ниже приведена таблица, в которой описаны уровни детализации логов.
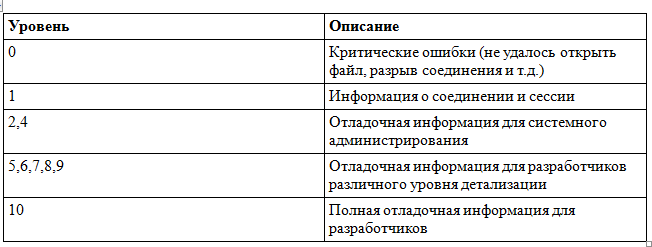
Чтобы узнать текущий уровень логирования smbd (например, с pid 1234), выполним следующую команду из-под учетной записи root:
root# smbcontrol 1234 debuglevel
Current debug level of PID 1234 is 0
Если мы хотим увеличить уровень логирования до 10, чтобы получить всю возможную информацию, используем следующую команду:
root# smbcontrol 1234 debug 10
root# smbcontrol 1234 debuglevel
Current debug level of PID 1234 is 10
Следующий вопрос: «Что же делать с логами?»
Вот пример, в котором логи помогли решению проблемы. Мы пробуем подключиться с Windows-клиента к общему дисковому ресурсу. Однако smbd не принимает пароль для соединения. Когда мы используем smbclient для теста, мы получаем ошибку:
$ smbclient //TROUBLE/public -U testuser%test
session setup failed: ERRSRV - ERRbadpw (Bad password - name/password pair in a Tree Connect or Session Setup are invalid.)
Мы совершенно уверены, что значение smbpasswd верно, и пароль — test. Попробуем подключиться еще раз, добавив
log level = 10 log file = /usr/local/samba/var/log.%m
в секцию [global] файла smb.conf, и мы увидим новые строчки в файле log.TROUBLE:
pdb_getsampwnam: search by name: testuser startsmbfilepwent_internal: opening file /usr/local/samba/private/smbpasswd getsmbfilepwent: returning passwd entry for user root, uid 0 getsmbfilepwent: returning passwd entry for user jerry, uid 786 getsmbfilepwent: returning passwd entry for user guest1, uid 782 getsmbfilepwent: returning passwd entry for user testuser, uid 791 endsmbfilepwent_internal: closed password file. pdb_getsampwnam: found by name: testuser build_sam_account: smbpasswd database is corrupt! username testuser
not in unix passwd database! Couldn’t find user ‘testuser’ in passdb.
Последняя строка и есть ответ на наш вопрос. Samba не смогла найти учетную запись testuser. А это произошло, так как кто-то закомментировал строку в файле /etc/passwd:
#testuser:x:791:100::/dev/null:/bin/false
После того, как мы уберем знак комментария (#) перед строкой с учетной записью, попробуем подключиться снова. И на этот раз успешно.
$ smbclient //TROUBLE/public -U testuser%test Domain=[LAB] OS=[Unix] Server=[Samba 2.2.2] smb: >
Это всего лишь один пример. Вывод в логах может быть запутанным, но можно использовать grep, чтобы находить следующие ключевые слова:
• fail
• error
• unsuccessful
• corrupt
• unknown
Мониторинг сетевого трафика
Еще один способ найти корень проблемы — это просматривать содержимое пакетов, ходящих по сети между сервером и клиентом. Для этого можно использовать такие программы-анализаторы, как Wireshark. С их помощью можно просмотреть и проанализировать в достаточно читаемом виде содержимое пакетов.
УРОВЕНЬ 6
Внутренние проблемы Samba
Если ничего из вышеприведенного не помогло — возможно, вы столкнулись с каким-либо багом Samba. Список известных можно посмотреть на официальном сайте. Чтобы свести к минимуму вероятность появления подобного рода проблем, используйте актуальную и стабильную версию Samba, а также следите за выходом исправлений: исправляются разведанные баги достаточно быстро.
Заключение
Итак, мы разобрали методологию поиска и решения проблем Samba. Проблемы были разнесены по уровням, и каждый уровень зависит от успешной работоспособности более низкого уровня. Еще раз взглянем на них:
•Уровень 1. Сетевое соединение и работоспособный smb.conf.
•Уровень 2. Серверное и клиентское ПО.
•Уровень 3. Удаленный доступ к ресурсам.
•Уровень 4. Сетевое окружение.
•Уровень 5. Логи и анализ трафика.
•Уровень 6. Внутренние проблемы Samba.
Не стоит забывать, что, возможно, с вашей проблемой уже кто-то сталкивался. В этом случае просмотр профильных форумов и других ресурсов может вам сэкономить драгоценное время. Не зацикливайтесь на единственно возможной по вашему мнению причине. Постарайтесь посмотреть на проблему с другой точки зрения. В конце концов решение любой проблемы может быть найдено!
check an smb.conf configuration file for internal correctness
Synopsis
testparm [-s|--suppress-prompt] [-v|--verbose] [-?|--help] [--usage] [-d|--debuglevel=DEBUGLEVEL] [--debug-stdout] {config filename} [hostname hostIP]
Description
This tool is part of the samba(7) suite.
testparm is a very simple test program to check an smbd(8) configuration file for internal correctness. If this program reports no problems, you can use the configuration file with confidence that smbd will successfully load the configuration file.
Note that this is NOT a guarantee that the services specified in the configuration file will be available or will operate as expected.
If the optional host name and host IP address are specified on the command line, this test program will run through the service entries reporting whether the specified host has access to each service.
If testparm finds an error in the smb.conf file it returns an exit code of 1 to the calling program, else it returns an exit code of 0. This allows shell scripts to test the output from testparm.
Options
- -s|—suppress-prompt
-
Without this option, testparm will prompt for a carriage return after printing the service names and before dumping the service definitions.
- -v|—verbose
-
If this option is specified, testparm will also output all options that were not used in smb.conf(5) and are thus set to their defaults.
- —parameter-name parametername
-
Dumps the named parameter. If no section-name is set the view is limited by default to the global section. It is also possible to dump a parametrical option. Therefore the option has to be separated by a colon from the parametername.
- —section-name sectionname
-
Dumps the named section.
- —show-all-parameters
-
Show the parameters, type, possible values.
- -l|—skip-logic-checks
-
Skip the global checks.
- -?|—help
-
Print a summary of command line options.
- —usage
-
Display brief usage message.
- -d|—debuglevel=DEBUGLEVEL
-
level is an integer from 0 to 10. The default value if this parameter is not specified is 1 for client applications.
The higher this value, the more detail will be logged to the log files about the activities of the server. At level 0, only critical errors and serious warnings will be logged. Level 1 is a reasonable level for day-to-day running — it generates a small amount of information about operations carried out.
Levels above 1 will generate considerable amounts of log data, and should only be used when investigating a problem. Levels above 3 are designed for use only by developers and generate HUGE amounts of log data, most of which is extremely cryptic.
Note that specifying this parameter here will override the log level parameter in the /etc/samba/smb.conf file.
- —debug-stdout
-
This will redirect debug output to STDOUT. By default all clients are logging to STDERR.
- —configfile=<configuration file>
-
The file specified contains the configuration details required by the client. The information in this file can be general for client and server or only provide client specific like options such as client smb encrypt. See /etc/samba/smb.conf for more information. The default configuration file name is determined at compile time.
- —option=<name>=<value>
-
Set the smb.conf(5) option «<name>» to value «<value>» from the command line. This overrides compiled-in defaults and options read from the configuration file. If a name or a value includes a space, wrap whole —option=name=value into quotes.
- -V|—version
-
Prints the program version number.
- configfilename
-
This is the name of the configuration file to check. If this parameter is not present then the default smb.conf(5) file will be checked.
- hostname
-
If this parameter and the following are specified, then testparm will examine the hosts allow and hosts deny parameters in the smb.conf(5) file to determine if the hostname with this IP address would be allowed access to the smbd server. If this parameter is supplied, the hostIP parameter must also be supplied.
- hostIP
-
This is the IP address of the host specified in the previous parameter. This address must be supplied if the hostname parameter is supplied.
Files
- smb.conf(5)
-
This is usually the name of the configuration file used by smbd(8).
Diagnostics
The program will issue a message saying whether the configuration file loaded OK or not. This message may be preceded by errors and warnings if the file did not load. If the file was loaded OK, the program then dumps all known service details to stdout.
For certain use cases, SMB protocol requires use of cryptographic algorithms which are known to be weak and already broken. DES and ARCFOUR (RC4) ciphers and the SHA1 and MD5 hash algorithms are considered weak but they are required for backward compatibility. The testparm utility shows whether the Samba tools will fall back to these weak crypto algorithms if it is not possible to use strong cryptography by default. In FIPS mode weak crypto cannot be enabled.
Version
This man page is part of version 4.18.3 of the Samba suite.
See Also
smb.conf(5), smbd(8)
Author
The original Samba software and related utilities were created by Andrew Tridgell. Samba is now developed by the Samba Team as an Open Source project similar to the way the Linux kernel is developed.
Referenced By
nmbd(8), samba(7), smb.conf(5), smbd(8).
06/23/2023 Samba 4.18.3
Эта статья по сути будет подборкой «Best practiсe» для системных администраторов Samba. Основой статьи является глава Troubleshooting Techniques из книги Sam’s Teach Yourself Samba in 24 Hours. Мы постараемся рассмотреть наиболее распространенные ошибки при настройке Samba.
Согласитесь, ужасно поменять двигатель в машине, а потом выяснить, что не ехала она из-за отсутствия бензина! Может, это и не лучшая метафора, но многие системные администраторы тратят время зря, не проверив в первую очередь самые очевидные вещи. Посмотрите, как примерно должен выстраиваться процесс поиска и решения проблем с Samba:
Проблемы, представленные на нижних уровнях этой «пирамиды», являются «фундаментом» для более высоких уровней. Не удивительно, что Windows-клиент не может получить доступ к файловому северу на Samba, если сервер отключен от сети. Конечно, не стоит воспринимать этот рисунок буквально, как руководство к действию (скажем, лог-файлы можно посмотреть всегда), но начинать стоит все-таки с проблем нижних уровней. Чем выше мы поднимаемся, тем больше углубляемся в принципы работы Samba.
В поисках решения проблемы с Samba стоит в первую очередь обратиться к следующим ресурсам:
•HOWTO, опубликованные на сайте;
•тематические сайты и форумы, например: http://samba-doc.ru/, http://citforum.ru/operating_systems/linux/samba/;
•разделы документации по Samba для того или иного дистрибутива (например, http://help.ubuntu.ru/wiki/samba, http://www.centos.org/docs/5/html/Deployment_Guide-en-US/ch-samba.html или http://wiki.russianfedora.ru/index.php?title=Samba);
•http://stackoverflow.com/ — не забывайте про этот сайт, если у вас есть конкретный вопрос или проблема;
•вспомогательные утилиты, входящие в состав Samba, а также различные программы-анализаторы трафика (например, Wireshark).
Мы в первую очередь рассмотрим самостоятельное решение возникающих проблем, но не стоит забывать про возможную помощь сообщества. Это может серьезно сэкономить вам время и силы.
Описание тестовой среды
Для начала — несколько слов о тестовой среде. Условия следующие:
•Samba-сервер называется TROUBLE и имеет IP-адрес 192.168.7.75 и маску 255.255.255.0.
•smbd и nmbd запускаются как демоны.
•Windows-клиент называется win-client.
•Windows-клиент использует адрес 192.168.7.135 с сетевой маской 255.255.255.0.
•И win-client, и TROUBLE находятся в одной подсети, так что широковещательный запрос дойдет с одного хоста на другой.
•И win-client, и TROUBLE являются членами рабочей группы LAB.
•Samba-сервер использует следуюший smb.conf:
[global] netbios name = TROUBLE
workgroup = LAB security = user encrypt passwords = yes
[public] path = /tmp
read only = no
УРОВЕНЬ 1
Работоспособность сетевого соединения и файла конфигурации
Основание нашей «пирамиды» составляют три основных проблемы:
•корректно работающее TCP/IP подключение;
•соответствие маски и широковещательных адресов на серверах и клиентах;
•работоспособность файла smb.conf.
TCP/IP
Для проверки TCP/IP в первую очередь используется команда ping. Если описать протокол ICMP очень упрощенно, то хост отправляет запрос на сервер и спрашивает «Ты жив?». Если сервер не отвечает, хост приходит к выводу, что тот не подключен к сети и, следовательно, недоступен.
$ ping win-client
PING win-client (192.168.7.135) from 192.168.1.74 : 56(84) bytes of data.
64 bytes from win-client (192.168.7.135): icmp_seq=0 ttl=255 time=2.138 msec
64 bytes from win-client (192.168.7.135): icmp_seq=1 ttl=255 time=2.181 msec
64 bytes from win-client (192.168.7.135): icmp_seq=2 ttl=255 time=2.263 msec
--- ping statistics --- 3 packets transmitted, 3 packets received, 0% packet loss round-trip min/avg/max/mdev = 2.138/2.194/2.263/0.051 ms
Также очень важным является правильное функционирование DNS. Если не удастся разрешить имя, появится сообщение вроде этого:
$ ping win-client
ping: unknown host win-client
Если такое происходит, первое, что стоит сделать — это повторить команду ping, но используя уже не имя, а адрес:
$ ping 192.168.7.135
Если команда выполнится успешно, то стоит обратить внимание на конфигурацию DNS. Наиболее распространенные причины ошибки:
•неверное содержание файла конфигурации DNS /etc/resolv.conf;
•на сервере DNS нет записи, связанной с win-client;
•сервер DNS недоступен в данный момент.
Если же ping по IP-адресу успешно не выполняется, то стоит проверить работоспособность сетевого оборудования на сервере, клиенте и между ними.
Широковещательный адрес на сервере и клиенте
Возможно, ping выполнится и успешно, но при этом сетевая маска (netmask) и широковещательный адрес (broadcast address) будут сконфигурированы неверно.
В NetBIOS крайне важно для правильного разрешения имени и поиска машин в сетевом окружении, чтобы сервер и клиент находились в одной подсети, т.е. использовали одну маску подсети и широковещательный адрес.
В нашем случае сетевая маска должна быть 255.255.255.0, а широковещательный адрес — 192.168.7.255.
Если вы используете Linux, то можно проверить, какие используются широковещательный адрес и маска, при помощи команды ifconfig с именем интерфейса в качестве аргумента:
$ /sbin/ifconfig eth0
eth0 Link encap:Ethernet HWaddr 00:04:5A:0C:1C:19
inet addr:192.168.7.75 Bcast:192.168.255.255 Mask:255.255.255.0
inet6 addr: fe80::204:5aff:fe0c:1c19/10 Scope:Link
UP BROADCAST RUNNING MULTICAST MTU:1500 Metric:1
RX packets:68006 errors:0 dropped:0 overruns:0 frame:0
TX packets:100783 errors:0 dropped:0 overruns:0 carrier:0
collisions:0 txqueuelen:100
RX bytes:12186135 (11.6 Mb) TX bytes:121642120 (116.0 Mb)
Interrupt:3 Base address:0x100
1
Если в выводе этой команды вы увидите, что широковещательный адрес или сетевая маска заданы неверно, следует зайти под учетной записью root и установить верные значения, используя команду ifconfig:
root# ifconfig eth0 192.168.7.75 netmask 255.255.255.0 broadcast 192.168.7.255
В Windows аналогичную информацию можно получить информацию, выполнив команду ipconfig /all.
Проверка корректности файла smb.conf
Так как Samba использует огромное количество параметров из файла smb.conf, разработчики создали утилиту командной строки, которая проверяет синтаксис этого файла. Утилита называется testparm, она очень полезна при поиске ошибок в конфигурационном файле.
Можно использовать утилиту testparm с параметром -s для анализа конкретного конфигурационного файла. Эта опция очень хорошо подходит для проверки файла конфигурации перед его «боевым» использованием.
$ testparm -s /usr/local/samba/lib/smb.conf.new
Load smb config files from /usr/local/samba/lib/smb.conf.new
Processing section “[public]”
Loaded services file OK.
# Global parameters
[global]
coding system =
client code page = 850
code page directory = /usr/local/samba/lib/codepages
<...остальной вывод опущен...>
После анализа заданного конфигурационного файла testparm выводит все значения файла smb.conf, включая значения по умолчанию. Это помогает убедиться, что используются ожидаемые значения параметров конфигурации smbd и nmbd.
Стоит отметить, что значения по умолчанию меняются от версии к версии, так что необходимо использовать версию Samba, соответствующую версии testparm.
УРОВЕНЬ 2
Серверное и клиентское ПО
Второй уровень подразумевает проверку конфигурации клиентского и серверного ПО. Наша цель — убедиться, что и клиент, и сервер корректно отвечают на запросы NetBIOS и CIFS. Пока мы рассматриваем изолированно каждый из хостов. (На третьем уровне мы уже начнем рассматривать их взаимодействие.)
smbd
В первую очередь, smbd должен быть запущен. Проверить это можно, используя команду ps. Аргументы этой команды могут отличаться в зависимости от версии Linux.
$ ps -ef | grep smbd
 root 28592 1 0 12:37 ? 00:00:00 /usr/local/samba/bin/smbd -D
Убедившись, что smbd запущен (или, при необходимости, запустив его), используем утилиту smbclient для проверки работоспособности сервера. Параметр -L используется для вывода списка ресурсов сервера. Ключ -N используется для анонимного подключения к серверу, чтобы не создавать лишних проблем с авторизацией. Все эти действия должны выполняться локально на Samba-сервере.
smbclient -L TROUBLE -N added interface ip=192.168.7.75 bcast=192.168.1.255 nmask=255.255.255.0 Anonymous login successful Domain=[LAB] OS=[Unix] Server=[Samba 2.2.2]
Sharename Type --------- ---- public Disk IPC$ IPC
Comment -------
IPC Service (Samba 2.2.2)
smbclient -L TROUBLE -N added interface ip=192.168.7.75 bcast=192.168.1.255 nmask=255.255.255.0 Anonymous login successful Domain=[LAB] OS=[Unix] Server=[Samba 2.2.2]
Sharename Type --------- ---- public Disk IPC$ IPC
Comment -------
IPC Service (Samba 2.2.2)
ADMIN$
Server --------- TROUBLE
Workgroup --------- LAB
Disk
IPC Service (Samba 2.2.2)
Comment ------- Samba 2.2.2
Master ------- TROUBLE
Существуют две распространенные ошибки, которые могут возникнуть при выполнении этой проверки.
Первая ошибка выглядит следующим образом:
error connecting to 192.168.7.75:139 (Connection refused) Connection to <server> failed
Она возникает, если smbd не запущен или не может подключиться к порту 139. Причиной этому могут быть ранее установленные и некорректно удаленные компоненты Samba. Прежде всего следует убедиться, что smbd стартует как демон и не завершается тут же с ошибкой. Особенность в том, что nmbd не выводит ошибки в консольное окно, так что следует посмотреть последние несколько строк log-файла. Позже мы рассмотрим анализ логов более подробно.
Вторая часто встречающаяся ошибка выглядит так:
session request to <server> failed (Not listening for calling name)
Можно подумать, что причиной этой ошибки является неверное NetBIOS-имя, но это не так. Эта ошибка не может быть вызвана «битой» установкой nmbd, nmbd в данном случае даже не обязательно должен быть запущен.
Причиной возникновения этой ошибки при локальном подключении чаще всего являются неверно сконфигурированные параметры hosts allow или hosts deny в файле smb.conf. Сервер разрывает создающуюся NetBIOS-сессию.
Если нам удалось увидеть список общих ресурсов, мы можем проверить возможность Samba авторизовать пользователей. В этом тесте аккаунт с именем пользователя user1 и паролем secret подключается к общему ресурсу [public].
$ smbclient //TROUBLE/public -U user1%secret added interface ip=192.168.7.75 bcast=192.168.1.255 nmask=255.255.255.0 Domain=[LAB] OS=[Unix] Server=[Samba 2.2.2] smb: >
Если Samba не сможет авторизовать пользователя, вы увидите сообщение об ошибке:
session setup failed: ERRSRV - ERRbadpw (Bad password - name/password pair in a Tree Connect or Session Setup are invalid.)
Причин этой ошибки может быть много. Это может быть неверное имя или пароль, или отсутствующая запись smbpasswd для пользователя, если задан параметр encrypt password = yes, или недействительная учетная запись guest, если разрешен доступ без аутентификации.
Если пользователь корректно авторизовался, но не смог получить доступ к запрошенной службе, smbclient выведет следующее сообщение:
tree connect failed: ERRDOS - ERRnosuchshare (You specified an invalid share name)
Это может быть вызвано неверно написанным именем службы, настройками доступа к общему ресурсу или неверным выражением path в описании общего ресурса в файле smb.conf.
nmbd
Чтобы проверить, запущен ли nmbd, мы снова используем команду ps.
$ ps -ef | grep nmbd
root 29054 1 0 15:53 ? 00:00:00 /usr/local/samba/bin/bin/nmbd -D
Если ps покажет, что nmbd не запущен, стоит зайти под учетной записью root и запустить его (/usr/local/samba/bin/nmbd -D).
Для теста мы будем использовать утилиту Samba — nmblookup. У каждого Samba-сервера есть особое имя, _Samba_, на которое они откликаются всегда. Послав запрос по этому имени, мы можем проверить работоспособность nmbd. Ключ -U используется для того, чтобы отправить запрос на конкретный адрес.
$ ./nmblookup -U 127.0.0.1 __Samba__ querying __Samba__ on 127.0.0.1 192.168.7.75 __Samba__<00>
Если nmbd при этом не запущен, результатом будет ошибка:
name_query failed to find name __Samba__
Также причиной ошибки может быть тот факт, что loopback-интерфейс не включен в smb.conf при включенном параметре bind interfaces only = yes.
После этого мы проверим, может ли nmbd зарегистрировать имя TROUBLE.
$ nmblookup -U 127.0.0.1 TROUBLE querying TROUBLE on 127.0.0.1 192.168.7.75 TROUBLE<00>
Сообщения об ошибках, например, “name query failed”, скорее всего, вызваны неудачным запросом к имени _Samba_. Другой причиной может быть то, что сервер не может зарегистрировать имя NetBIOS. В этом случае стоит найти сервер, которому принадлежит данное имя, отправив широковещательный запрос.
$ nmblookup -B 192.168.1.255 TROUBLE querying TROUBLE on 192.168.1.255 192.168.1.98 TROUBLE<00> ошибка
Например, в данном случае это имя принадлежит сторонней машине, а не нашему Samba-серверу. Очевидно, решением данной проблемы является переименование этой машины или сервера.
NetBIOS-интерфейс Windows
Утилита, использующаяся в Windows для NetBIOS-запросов — nbtstat.exe — имеет еще несколько опций, которых нет в nmblookup. Одна из них (-n) позволяет «спросить» у NetBIOS-интерфейса, какие имена он успешно зарегистрировал:
C:WINDOWS> nbtstat -n
Node IpAddress: [192.168.7.135] Scope Id: [] NetBIOS Local Name Table
Name Type Status ---------------------------------------------
WIN-CLIENT LAB WIN-CLIENT
<00> UNIQUE <00> GROUP <03> UNIQUE
Registered Registered Registered
Если компонент “Client for Microsoft Networks” не был установлен, nbtstat.exe сообщит следующее:
Failed to access NBT driver 1
Более тонкая ошибка возникает, когда Windows-клиент сообщает что он зарегистрировал имя рабочей группы, хотя это должно быть уникальное имя рабочей станции.
Name Type Status --------------------------------------------- LAB <00> GROUP Registered
Часто причиной этого является наличие машины с таким же NetBIOS-именем. Windows-клиенту необходимо уникальное имя, чтобы установить NetBIOS-сессию с сервером. Пока клиент не сможет зарегистрировать имя рабочей станции, он будет неспособен, скажем, просматривать сетевое окружение или подключать сетевые диски.
УРОВЕНЬ 3
Удаленный доступ к общим ресурсам
Итак, мы уже выяснили, что и клиент, и сервер имеют доступ к сети, и локально ПО на них работает. На данном уровне мы переходим к диагностике работоспособности их взаимодействия.
Разрешение имен
Мы вновь будем использовать утилиты nmblookup и nbstat.exe, чтобы выяснить, может ли клиент разрешить имя сервера и наоборот. Тест будет состоять из двух фаз. В первой мы будем использовать широковещательный запрос, чтобы протестировать отклики сервера и клиента. Это делается путем задания широковещательного адреса (-B 192.168.7.255) в утилите nmblookup при запросе, что задействует сетевое взаимодействие между сервером и клиентом.
Сначала мы попробуем разрешить имя сервера:
$ nmblookup -B 192.168.1.255 TROUBLE querying TROUBLE on 192.168.1.255 192.168.7.75 TROUBLE<00>
После этого мы попробуем разрешить имя клиента, используя тот же широковещательный адрес.
$ nmblookup -B 192.168.1.255 win-client querying win-client on 192.168.1.255 192.168.7.135 win-client<00>
Если до сих пор все шло хорошо, этот тест, скорее всего, отработает корректно. Если же результатом будет ошибка, стоит еще раз поверить соответствие широковещательного адреса на всех машинах.
После этого мы выполним NetBIOS Node Status Lookup, проверим статус узла. На этом шаге делается прямое обращение к IP-адресу, в котором запрашивается список уникальных и групповых NeBIOS имен, зарегистрированных этим хостом. Начнем с запроса к Samba-серверу от Windows-клиента.
C:WINDOWS> nbtstat -A 192.168.7.75
NetBIOS Remote Machine Name Table
Name Type Status ---------------------------------------------
TROUBLE <00> UNIQUE TROUBLE <03> UNIQUE TROUBLE <20> UNIQUE ..__MSBROWSE__.<01> GROUP
Registered Registered Registered Registered Registered Registered Registered
LAB LAB LAB
<00> GROUP <1D> UNIQUE <1E> GROUP
MAC Address = 00-00-00-00-00-00
Можно выполнить те же действия на Samba-сервере, чтобы собрать информацию о клиенте. Опции для запроса через утилиту nmblookup, в целом, такие же как и в nbtstat.exe.
$ nmblookup -A 192.168.7.135 Looking up status of 192.168.7.135
WIN-CLIENT LAB WIN-CLIENT
<00> - B <ACTIVE> <00> - <GROUP> B <ACTIVE> <03> - B <ACTIVE>
Если какой-то из этих запросов не выполняется, следует еще раз провести проверки сетевого подключения и NetBIOS-интерфейсов, которые мы рассматривали раньше.
Просмотр общих ресурсов с Windows-клиента
Мы уже использовали smbclient для просмотра списка общих ресурсов. Здесь мы проделаем то же самое, только удаленно с Windows-клиента.
Утилита net.exe — это универсальная утилита для работы с CIFS. Эта утилита является эквивалентом Linux-команды smbclient -L. Опиция view позволяет просмотреть общие ресурсы рабочей группы, или, если указать конкретное имя сервера (например, TROUBLE), покажет список общих ресурсов на нем.
Удаленное подключение к общим ресурсам
На самом деле, этот шаг является не столько тестом, сколько целью всего процесса. Если мы зашли в консоль с правильным именем и паролем, то следующая команда подключит диск P: локального клиента к общему ресурсу [public] на сервере TROUBLE.
C:WINDOWS> net use p: TROUBLEpublic
The command completed successfully.
Чтобы определить, под каким именем подключаться, можно использовать опцию
/user::


C:WINNT>net use TROUBLEpublic /user:user1
The password or user name is invalid for TROUBLEpublic.
Type the password for TROUBLEpublic:
The command completed successfully.
Существует огромное количество проблем, связанных с аутентификацией. Зачастую они могут быть обнаружены только путем анализа лог-файлов, что будет рассмотрено позже.
УРОВЕНЬ 4
Сетевое окружение
Решение проблем с корректной работой Сетевого окружения — очень сложная тема. Скорее всего, если вы добрались до этого уровня, а сетевое окружение не работает или работает некорректно, вам следует еще раз проверить маску подсети и широковещательный адрес, и снова повторить все тесты нижних уровней: ошибка вероятно кроется там.
УРОВЕНЬ 5
Лог-файлы и анализ трафика
Иногда корень проблемы сложно определить даже с помощью специализированных диагностических утилит. Тогда на помощь приходят логи. Первые четыре уровня нашей «пирамиды» можно использовать для подтверждения правильности начальной установки Samba и решения простых проблем. Начиная с пятого уровня, начинается решение серьезных проблем. Рано или поздно вы столкнетесь с проблемой, которая потребует работы с логами.
Лог-файлы Samba
Ниже приведена таблица, в которой описаны уровни детализации логов.
Чтобы узнать текущий уровень логирования smbd (например, с pid 1234), выполним следующую команду из-под учетной записи root:
root# smbcontrol 1234 debuglevel
Current debug level of PID 1234 is 0
Если мы хотим увеличить уровень логирования до 10, чтобы получить всю возможную информацию, используем следующую команду:
root# smbcontrol 1234 debug 10
root# smbcontrol 1234 debuglevel
Current debug level of PID 1234 is 10
Следующий вопрос: «Что же делать с логами?»
Вот пример, в котором логи помогли решению проблемы. Мы пробуем подключиться с Windows-клиента к общему дисковому ресурсу. Однако smbd не принимает пароль для соединения. Когда мы используем smbclient для теста, мы получаем ошибку:
$ smbclient //TROUBLE/public -U testuser%test
session setup failed: ERRSRV - ERRbadpw (Bad password - name/password pair in a Tree Connect or Session Setup are invalid.)
Мы совершенно уверены, что значение smbpasswd верно, и пароль — test. Попробуем подключиться еще раз, добавив
log level = 10 log file = /usr/local/samba/var/log.%m
в секцию [global] файла smb.conf, и мы увидим новые строчки в файле log.TROUBLE:
pdb_getsampwnam: search by name: testuser startsmbfilepwent_internal: opening file /usr/local/samba/private/smbpasswd getsmbfilepwent: returning passwd entry for user root, uid 0 getsmbfilepwent: returning passwd entry for user jerry, uid 786 getsmbfilepwent: returning passwd entry for user guest1, uid 782 getsmbfilepwent: returning passwd entry for user testuser, uid 791 endsmbfilepwent_internal: closed password file. pdb_getsampwnam: found by name: testuser build_sam_account: smbpasswd database is corrupt! username testuser
not in unix passwd database! Couldn’t find user ‘testuser’ in passdb.
Последняя строка и есть ответ на наш вопрос. Samba не смогла найти учетную запись testuser. А это произошло, так как кто-то закомментировал строку в файле /etc/passwd:
#testuser:x:791:100::/dev/null:/bin/false
После того, как мы уберем знак комментария (#) перед строкой с учетной записью, попробуем подключиться снова. И на этот раз успешно.
$ smbclient //TROUBLE/public -U testuser%test Domain=[LAB] OS=[Unix] Server=[Samba 2.2.2] smb: >
Это всего лишь один пример. Вывод в логах может быть запутанным, но можно использовать grep, чтобы находить следующие ключевые слова:
• fail
• error
• unsuccessful
• corrupt
• unknown
Мониторинг сетевого трафика
Еще один способ найти корень проблемы — это просматривать содержимое пакетов, ходящих по сети между сервером и клиентом. Для этого можно использовать такие программы-анализаторы, как Wireshark. С их помощью можно просмотреть и проанализировать в достаточно читаемом виде содержимое пакетов.
УРОВЕНЬ 6
Внутренние проблемы Samba
Если ничего из вышеприведенного не помогло — возможно, вы столкнулись с каким-либо багом Samba. Список известных можно посмотреть на официальном сайте. Чтобы свести к минимуму вероятность появления подобного рода проблем, используйте актуальную и стабильную версию Samba, а также следите за выходом исправлений: исправляются разведанные баги достаточно быстро.
Заключение
Итак, мы разобрали методологию поиска и решения проблем Samba. Проблемы были разнесены по уровням, и каждый уровень зависит от успешной работоспособности более низкого уровня. Еще раз взглянем на них:

•Уровень 1. Сетевое соединение и работоспособный smb.conf.

•Уровень 2. Серверное и клиентское ПО.

•Уровень 3. Удаленный доступ к ресурсам.

•Уровень 4. Сетевое окружение.

•Уровень 5. Логи и анализ трафика.

•Уровень 6. Внутренние проблемы Samba.

Не стоит забывать, что, возможно, с вашей проблемой уже кто-то сталкивался. В этом случае просмотр профильных форумов и других ресурсов может вам сэкономить драгоценное время. Не зацикливайтесь на единственно возможной по вашему мнению причине. Постарайтесь посмотреть на проблему с другой точки зрения. В конце концов решение любой проблемы может быть найдено!
Samba implements the Server Message Block (SMB) protocol in Red Hat Enterprise Linux. The SMB protocol is used to access resources on a server, such as file shares and shared printers. Additionally, Samba implements the Distributed Computing Environment Remote Procedure Call (DCE RPC) protocol used by Microsoft Windows.
You can run Samba as:
- An Active Directory (AD) or NT4 domain member
- A standalone server
-
An NT4 Primary Domain Controller (PDC) or Backup Domain Controller (BDC)
Red Hat supports the PDC and BDC modes only in existing installations with Windows versions which support NT4 domains. Red Hat recommends not setting up a new Samba NT4 domain, because Microsoft operating systems later than Windows 7 and Windows Server 2008 R2 do not support NT4 domains.
Red Hat does not support running Samba as an AD domain controller (DC).
Independently of the installation mode, you can optionally share directories and printers. This enables Samba to act as a file and print server.
3.1. Understanding the different Samba services and modes
This section describes the different services included in Samba and the different modes you can configure.
3.1.1. The Samba services
Samba provides the following services:
smbd-
This service provides file sharing and printing services using the SMB protocol. Additionally, the service is responsible for resource locking and for authenticating connecting users. For authenticating domain members,
smbdrequireswinbindd. Thesmbsystemdservice starts and stops thesmbddaemon.To use the
smbdservice, install thesambapackage. nmbd-
This service provides host name and IP resolution using the NetBIOS over IPv4 protocol. Additionally to the name resolution, the
nmbdservice enables browsing the SMB network to locate domains, work groups, hosts, file shares, and printers. For this, the service either reports this information directly to the broadcasting client or forwards it to a local or master browser. Thenmbsystemdservice starts and stops thenmbddaemon.Note that modern SMB networks use DNS to resolve clients and IP addresses. For Kerberos a working DNS setup is required.
To use the
nmbdservice, install thesambapackage. winbindd-
This service provides an interface for the Name Service Switch (NSS) to use AD or NT4 domain users and groups on the local system. This enables, for example, domain users to authenticate to services hosted on a Samba server or to other local services. The
winbindsystemdservice starts and stops thewinbindddaemon.If you set up Samba as a domain member,
winbinddmust be started before thesmbdservice. Otherwise, domain users and groups are not available to the local system..To use the
winbinddservice, install thesamba-winbindpackage.Red Hat only supports running Samba as a server with the
winbinddservice to provide domain users and groups to the local system. Due to certain limitations, such as missing Windows access control list (ACL) support and NT LAN Manager (NTLM) fallback, SSSD is not supported.
3.1.2. The Samba security services
The security parameter in the [global] section in the /etc/samba/smb.conf file manages how Samba authenticates users that are connecting to the service. Depending on the mode you install Samba in, the parameter must be set to different values:
- On an AD domain member, set
security = ads -
In this mode, Samba uses Kerberos to authenticate AD users.
For details about setting up Samba as a domain member, see Setting up Samba as an AD domain member server.
- On a standalone server, set
security = user -
In this mode, Samba uses a local database to authenticate connecting users.
For details about setting up Samba as a standalone server, see Setting up Samba as a standalone server.
- On an NT4 PDC or BDC, set
security = user - In this mode, Samba authenticates users to a local or LDAP database.
- On an NT4 domain member, set
security = domain -
In this mode, Samba authenticates connecting users to an NT4 PDC or BDC. You cannot use this mode on AD domain members.
For details about setting up Samba as a domain member, see Setting up Samba as an AD domain member server.
Additional resources
-
securityparameter in thesmb.conf(5)man page
3.1.3. Scenarios when Samba services and Samba client utilities load and reload their configuration
The following describes when Samba services and utilities load and reload their configuration:
-
Samba services reload their configuration:
- Automatically every 3 minutes
- On manual request, for example, when you run the
smbcontrol all reload-configcommand.
- Samba client utilities read their configuration only when you start them.
Note that certain parameters, such as security require a restart of the smb service to take effect and a reload is not sufficient.
Additional resources
- The
How configuration changes are appliedsection in thesmb.conf(5)man page - The
smbd(8),nmbd(8), andwinbindd(8)man pages
3.1.4. Editing the Samba configuration in a safe way
Samba services automatically reload their configuration every 3 minutes. This procedure describes how to edit the Samba configuration in a way that prevents the services reload the changes before you have verified the configuration using the testparm utility.
Prerequisites
- Samba is installed.
Procedure
-
Create a copy of the
/etc/samba/smb.conffile:# cp /etc/samba/smb.conf /etc/samba/samba.conf.copy - Edit the copied file and make the desired changes.
-
Verify the configuration in the
/etc/samba/samba.conf.copyfile:# testparm -s /etc/samba/samba.conf.copyIf
testparmreports errors, fix them and run the command again. -
Override the
/etc/samba/smb.conffile with the new configuration:# mv /etc/samba/samba.conf.copy /etc/samba/smb.conf -
Wait until the Samba services automatically reload their configuration or manually reload the configuration:
# smbcontrol all reload-config
3.2. Verifying the smb.conf file by using the testparm utility
The testparm utility verifies that the Samba configuration in the /etc/samba/smb.conf file is correct. The utility detects invalid parameters and values, but also incorrect settings, such as for ID mapping. If testparm reports no problem, the Samba services will successfully load the /etc/samba/smb.conf file. Note that testparm cannot verify that the configured services will be available or work as expected.
Red Hat recommends that you verify the /etc/samba/smb.conf file by using testparm after each modification of this file.
Prerequisites
- You installed Samba.
- The
/etc/samba/smb.conffile exits.
Procedure
-
Run the
testparmutility as therootuser:#
testparmLoad smb config files from /etc/samba/smb.conf rlimit_max: increasing rlimit_max (1024) to minimum Windows limit (16384) Unknown parameter encountered: "log levell" Processing section "[example_share]" Loaded services file OK. ERROR: The idmap range for the domain * (tdb) overlaps with the range of DOMAIN (ad)! Server role: ROLE_DOMAIN_MEMBER Press enter to see a dump of your service definitions # Global parameters [global] ... [example_share] ...The previous example output reports a non-existent parameter and an incorrect ID mapping configuration.
- If
testparmreports incorrect parameters, values, or other errors in the configuration, fix the problem and run the utility again.
3.3. Setting up Samba as a standalone server
You can set up Samba as a server that is not a member of a domain. In this installation mode, Samba authenticates users to a local database instead of to a central DC. Additionally, you can enable guest access to allow users to connect to one or multiple services without authentication.
3.3.1. Setting up the server configuration for the standalone server
This section describes how to set up the server configuration for a Samba standalone server.
Procedure
-
Install the
sambapackage:# yum install samba -
Edit the
/etc/samba/smb.conffile and set the following parameters:[global] workgroup = Example-WG netbios name = Server security = user log file = /var/log/samba/%m.log log level = 1
This configuration defines a standalone server named
Serverwithin theExample-WGwork group. Additionally, this configuration enables logging on a minimal level (1) and log files will be stored in the/var/log/samba/directory. Samba will expand the%mmacro in thelog fileparameter to the NetBIOS name of connecting clients. This enables individual log files for each client. -
Optionally, configure file or printer sharing. See:
- Setting up a share that uses POSIX ACLs
- Setting up a share that uses Windows ACLs
- Setting up Samba as a Print Server
-
Verify the
/etc/samba/smb.conffile:# testparm -
If you set up shares that require authentication, create the user accounts.
For details, see Creating and enabling local user accounts.
-
Open the required ports and reload the firewall configuration by using the
firewall-cmdutility:# firewall-cmd --permanent --add-service=samba # firewall-cmd --reload
-
Enable and start the
smbservice:# systemctl enable --now smb
Additional resources
-
smb.conf(5)man page
3.3.2. Creating and enabling local user accounts
To enable users to authenticate when they connect to a share, you must create the accounts on the Samba host both in the operating system and in the Samba database. Samba requires the operating system account to validate the Access Control Lists (ACL) on file system objects and the Samba account to authenticate connecting users.
If you use the passdb backend = tdbsam default setting, Samba stores user accounts in the /var/lib/samba/private/passdb.tdb database.
The procedure in this section describes how to create a local Samba user named example.
Prerequisites
- Samba is installed and configured as a standalone server.
Procedure
-
Create the operating system account:
# useradd -M -s /sbin/nologin exampleThis command adds the
exampleaccount without creating a home directory. If the account is only used to authenticate to Samba, assign the/sbin/nologincommand as shell to prevent the account from logging in locally. -
Set a password to the operating system account to enable it:
# passwd example Enter new UNIX password:
passwordRetype new UNIX password:passwordpasswd: password updated successfullySamba does not use the password set on the operating system account to authenticate. However, you need to set a password to enable the account. If an account is disabled, Samba denies access if this user connects.
-
Add the user to the Samba database and set a password to the account:
# smbpasswd -a example New SMB password:
passwordRetype new SMB password:passwordAdded user example.Use this password to authenticate when using this account to connect to a Samba share.
-
Enable the Samba account:
# smbpasswd -e example Enabled user example.
3.4. Understanding and configuring Samba ID mapping
Windows domains distinguish users and groups by unique Security Identifiers (SID). However, Linux requires unique UIDs and GIDs for each user and group. If you run Samba as a domain member, the winbindd service is responsible for providing information about domain users and groups to the operating system.
To enable the winbindd service to provide unique IDs for users and groups to Linux, you must configure ID mapping in the /etc/samba/smb.conf file for:
- The local database (default domain)
- The AD or NT4 domain the Samba server is a member of
- Each trusted domain from which users must be able to access resources on this Samba server
Samba provides different ID mapping back ends for specific configurations. The most frequently used back ends are:
| Back end | Use case |
|---|---|
|
|
The |
|
|
AD domains only |
|
|
AD and NT4 domains |
|
|
AD, NT4, and the |
3.4.1. Planning Samba ID ranges
Regardless of whether you store the Linux UIDs and GIDs in AD or if you configure Samba to generate them, each domain configuration requires a unique ID range that must not overlap with any of the other domains.
If you set overlapping ID ranges, Samba fails to work correctly.
Example 3.1. Unique ID Ranges
The following shows non-overlapping ID mapping ranges for the default (*), AD-DOM, and the TRUST-DOM domains.
[global] ... idmap config * : backend = tdb idmap config * : range = 10000-999999 idmap config AD-DOM:backend = rid idmap config AD-DOM:range = 2000000-2999999 idmap config TRUST-DOM:backend = rid idmap config TRUST-DOM:range = 4000000-4999999
You can only assign one range per domain. Therefore, leave enough space between the domains ranges. This enables you to extend the range later if your domain grows.
If you later assign a different range to a domain, the ownership of files and directories previously created by these users and groups will be lost.
3.4.2. The * default domain
In a domain environment, you add one ID mapping configuration for each of the following:
- The domain the Samba server is a member of
- Each trusted domain that should be able to access the Samba server
However, for all other objects, Samba assigns IDs from the default domain. This includes:
- Local Samba users and groups
- Samba built-in accounts and groups, such as
BUILTINAdministrators
You must configure the default domain as described in this section to enable Samba to operate correctly.
The default domain back end must be writable to permanently store the assigned IDs.
For the default domain, you can use one of the following back ends:
tdb-
When you configure the default domain to use the
tdbback end, set an ID range that is big enough to include objects that will be created in the future and that are not part of a defined domain ID mapping configuration.For example, set the following in the
[global]section in the/etc/samba/smb.conffile:idmap config * : backend = tdb idmap config * : range = 10000-999999
For further details, see Using the TDB ID mapping back end.
autorid-
When you configure the default domain to use the
autoridback end, adding additional ID mapping configurations for domains is optional.For example, set the following in the
[global]section in the/etc/samba/smb.conffile:idmap config * : backend = autorid idmap config * : range = 10000-999999
For further details, see Using the autorid ID mapping back end.
3.4.3. Using the tdb ID mapping back end
The winbindd service uses the writable tdb ID mapping back end by default to store Security Identifier (SID), UID, and GID mapping tables. This includes local users, groups, and built-in principals.
Use this back end only for the * default domain. For example:
idmap config * : backend = tdb idmap config * : range = 10000-999999
3.4.4. Using the ad ID mapping back end
This section describes how to configure a Samba AD member to use the ad ID mapping back end.
The ad ID mapping back end implements a read-only API to read account and group information from AD. This provides the following benefits:
- All user and group settings are stored centrally in AD.
- User and group IDs are consistent on all Samba servers that use this back end.
- The IDs are not stored in a local database which can corrupt, and therefore file ownerships cannot be lost.
The ad ID mapping back end does not support Active Directory domains with one-way trusts. If you configure a domain member in an Active Directory with one-way trusts, use instead one of the following ID mapping back ends: tdb, rid, or autorid.
The ad back end reads the following attributes from AD:
Prerequisites
- Both users and groups must have unique IDs set in AD, and the IDs must be within the range configured in the
/etc/samba/smb.conffile. Objects whose IDs are outside of the range will not be available on the Samba server. - Users and groups must have all required attributes set in AD. If required attributes are missing, the user or group will not be available on the Samba server. The required attributes depend on your configuration. .Prerequisites
- You installed Samba.
- The Samba configuration, except ID mapping, exists in the
/etc/samba/smb.conffile.
Procedure
-
Edit the
[global]section in the/etc/samba/smb.conffile:-
Add an ID mapping configuration for the default domain (
*) if it does not exist. For example:idmap config * : backend = tdb idmap config * : range = 10000-999999 -
Enable the
adID mapping back end for the AD domain:idmap config DOMAIN : backend = ad -
Set the range of IDs that is assigned to users and groups in the AD domain. For example:
idmap config DOMAIN : range = 2000000-2999999
The range must not overlap with any other domain configuration on this server. Additionally, the range must be set big enough to include all IDs assigned in the future. For further details, see Planning Samba ID ranges.
-
Set that Samba uses the RFC 2307 schema when reading attributes from AD:
idmap config DOMAIN : schema_mode = rfc2307 -
To enable Samba to read the login shell and the path to the users home directory from the corresponding AD attribute, set:
idmap config DOMAIN : unix_nss_info = yesAlternatively, you can set a uniform domain-wide home directory path and login shell that is applied to all users. For example:
template shell = /bin/bash template homedir = /home/%U
-
By default, Samba uses the
primaryGroupIDattribute of a user object as the user’s primary group on Linux. Alternatively, you can configure Samba to use the value set in thegidNumberattribute instead:idmap config DOMAIN : unix_primary_group = yes
-
-
Verify the
/etc/samba/smb.conffile:# testparm -
Reload the Samba configuration:
# smbcontrol all reload-config
Additional resources
- The * default domain
-
smb.conf(5)andidmap_ad(8)man pages -
VARIABLE SUBSTITUTIONSsection in thesmb.conf(5)man page
3.4.5. Using the rid ID mapping back end
This section describes how to configure a Samba domain member to use the rid ID mapping back end.
Samba can use the relative identifier (RID) of a Windows SID to generate an ID on Red Hat Enterprise Linux.
The RID is the last part of a SID. For example, if the SID of a user is S-1-5-21-5421822485-1151247151-421485315-30014, then 30014 is the corresponding RID.
The rid ID mapping back end implements a read-only API to calculate account and group information based on an algorithmic mapping scheme for AD and NT4 domains. When you configure the back end, you must set the lowest and highest RID in the idmap config DOMAIN : range parameter. Samba will not map users or groups with a lower or higher RID than set in this parameter.
As a read-only back end, rid cannot assign new IDs, such as for BUILTIN groups. Therefore, do not use this back end for the * default domain.
Benefits of using the rid back end
- All domain users and groups that have an RID within the configured range are automatically available on the domain member.
- You do not need to manually assign IDs, home directories, and login shells.
Drawbacks of using the rid back end
- All domain users get the same login shell and home directory assigned. However, you can use variables.
- User and group IDs are only the same across Samba domain members if all use the
ridback end with the same ID range settings. - You cannot exclude individual users or groups from being available on the domain member. Only users and groups outside of the configured range are excluded.
- Based on the formulas the
winbinddservice uses to calculate the IDs, duplicate IDs can occur in multi-domain environments if objects in different domains have the same RID.
Prerequisites
- You installed Samba.
- The Samba configuration, except ID mapping, exists in the
/etc/samba/smb.conffile.
Procedure
-
Edit the
[global]section in the/etc/samba/smb.conffile:-
Add an ID mapping configuration for the default domain (
*) if it does not exist. For example:idmap config * : backend = tdb idmap config * : range = 10000-999999 -
Enable the
ridID mapping back end for the domain:idmap config DOMAIN : backend = rid -
Set a range that is big enough to include all RIDs that will be assigned in the future. For example:
idmap config DOMAIN : range = 2000000-2999999
Samba ignores users and groups whose RIDs in this domain are not within the range.
The range must not overlap with any other domain configuration on this server. Additionally, the range must be set big enough to include all IDs assigned in the future. For further details, see Planning Samba ID ranges.
-
Set a shell and home directory path that will be assigned to all mapped users. For example:
template shell = /bin/bash template homedir = /home/%U
-
-
Verify the
/etc/samba/smb.conffile:# testparm -
Reload the Samba configuration:
# smbcontrol all reload-config
Additional resources
- The * default domain
-
VARIABLE SUBSTITUTIONSsection in thesmb.conf(5)man page - Calculation of the local ID from a RID, see the
idmap_rid(8)man page
3.4.6. Using the autorid ID mapping back end
This section describes how to configure a Samba domain member to use the autorid ID mapping back end.
The autorid back end works similar to the rid ID mapping back end, but can automatically assign IDs for different domains. This enables you to use the autorid back end in the following situations:
- Only for the
*default domain - For the
*default domain and additional domains, without the need to create ID mapping configurations for each of the additional domains - Only for specific domains
If you use autorid for the default domain, adding additional ID mapping configuration for domains is optional.
Parts of this section were adopted from the idmap config autorid documentation published in the Samba Wiki. License: CC BY 4.0. Authors and contributors: See the history tab on the Wiki page.
Benefits of using the autorid back end
- All domain users and groups whose calculated UID and GID is within the configured range are automatically available on the domain member.
- You do not need to manually assign IDs, home directories, and login shells.
- No duplicate IDs, even if multiple objects in a multi-domain environment have the same RID.
Drawbacks
- User and group IDs are not the same across Samba domain members.
- All domain users get the same login shell and home directory assigned. However, you can use variables.
- You cannot exclude individual users or groups from being available on the domain member. Only users and groups whose calculated UID or GID is outside of the configured range are excluded.
Prerequisites
- You installed Samba.
- The Samba configuration, except ID mapping, exists in the
/etc/samba/smb.conffile.
Procedure
-
Edit the
[global]section in the/etc/samba/smb.conffile:-
Enable the
autoridID mapping back end for the*default domain:idmap config * : backend = autorid
-
Set a range that is big enough to assign IDs for all existing and future objects. For example:
idmap config * : range = 10000-999999Samba ignores users and groups whose calculated IDs in this domain are not within the range.
After you set the range and Samba starts using it, you can only increase the upper limit of the range. Any other change to the range can result in new ID assignments, and thus in losing file ownerships.
-
Optionally, set a range size. For example:
idmap config * : rangesize = 200000Samba assigns this number of continuous IDs for each domain’s object until all IDs from the range set in the
idmap config * : rangeparameter are taken.If you set a rangesize, you need to adapt the range accordingly. The range needs to be a multiple of the rangesize.
-
Set a shell and home directory path that will be assigned to all mapped users. For example:
template shell = /bin/bash template homedir = /home/%U
-
Optionally, add additional ID mapping configuration for domains. If no configuration for an individual domain is available, Samba calculates the ID using the
autoridback end settings in the previously configured*default domain.The range must not overlap with any other domain configuration on this server. Additionally, the range must be set big enough to include all IDs assigned in the future. For further details, see Planning Samba ID ranges.
-
-
Verify the
/etc/samba/smb.conffile:# testparm -
Reload the Samba configuration:
# smbcontrol all reload-config
Additional resources
-
THE MAPPING FORMULASsection in theidmap_autorid(8)man page -
rangesizeparameter description in theidmap_autorid(8)man page -
VARIABLE SUBSTITUTIONSsection in thesmb.conf(5)man page
3.5. Setting up Samba as an AD domain member server
If you are running an AD or NT4 domain, use Samba to add your Red Hat Enterprise Linux server as a member to the domain to gain the following:
- Access domain resources on other domain members
- Authenticate domain users to local services, such as
sshd - Share directories and printers hosted on the server to act as a file and print server
3.5.1. Joining a RHEL system to an AD domain
Samba Winbind is an alternative to the System Security Services Daemon (SSSD) for connecting a Red Hat Enterprise Linux (RHEL) system with Active Directory (AD). This section describes how to join a RHEL system to an AD domain by using realmd to configure Samba Winbind.
Procedure
-
If your AD requires the deprecated RC4 encryption type for Kerberos authentication, enable support for these ciphers in RHEL:
# update-crypto-policies --set DEFAULT:AD-SUPPORT -
Install the following packages:
# yum install realmd oddjob-mkhomedir oddjob samba-winbind-clients samba-winbind samba-common-tools samba-winbind-krb5-locator
-
To share directories or printers on the domain member, install the
sambapackage:# yum install samba -
Backup the existing
/etc/samba/smb.confSamba configuration file:# mv /etc/samba/smb.conf /etc/samba/smb.conf.bak -
Join the domain. For example, to join a domain named
ad.example.com:# realm join --membership-software=samba --client-software=winbind ad.example.comUsing the previous command, the
realmutility automatically:- Creates a
/etc/samba/smb.conffile for a membership in thead.example.comdomain - Adds the
winbindmodule for user and group lookups to the/etc/nsswitch.conffile - Updates the Pluggable Authentication Module (PAM) configuration files in the
/etc/pam.d/directory - Starts the
winbindservice and enables the service to start when the system boots
- Creates a
- Optionally, set an alternative ID mapping back end or customized ID mapping settings in the
/etc/samba/smb.conffile. For details, see Understanding and configuring Samba ID mapping. -
Verify that the
winbindservice is running:# systemctl status winbind ... Active: active (running) since Tue 2018-11-06 19:10:40 CET; 15s agoTo enable Samba to query domain user and group information, the
winbindservice must be running before you startsmb. -
If you installed the
sambapackage to share directories and printers, enable and start thesmbservice:# systemctl enable --now smb - Optionally, if you are authenticating local logins to Active Directory, enable the
winbind_krb5_localauthplug-in. See Using the local authorization plug-in for MIT Kerberos.
Verification steps
-
Display an AD user’s details, such as the AD administrator account in the AD domain:
# getent passwd "ADadministrator" ADadministrator:*:10000:10000::/home/administrator@AD:/bin/bash -
Query the members of the domain users group in the AD domain:
# getent group "ADDomain Users" ADdomain users:x:10000:user1,user2 -
Optionally, verify that you can use domain users and groups when you set permissions on files and directories. For example, to set the owner of the
/srv/samba/example.txtfile toADadministratorand the group toADDomain Users:# chown "ADadministrator":"ADDomain Users" /srv/samba/example.txt -
Verify that Kerberos authentication works as expected:
-
On the AD domain member, obtain a ticket for the
administrator@AD.EXAMPLE.COMprincipal:# kinit administrator@AD.EXAMPLE.COM -
Display the cached Kerberos ticket:
# klist Ticket cache: KCM:0 Default principal: administrator@AD.EXAMPLE.COM Valid starting Expires Service principal 01.11.2018 10:00:00 01.11.2018 20:00:00 krbtgt/AD.EXAMPLE.COM@AD.EXAMPLE.COM renew until 08.11.2018 05:00:00
-
-
Display the available domains:
# wbinfo --all-domains BUILTIN SAMBA-SERVER AD
Additional resources
- If you do not want to use the deprecated RC4 ciphers, you can enable the AES encryption type in AD. See
- Enabling the AES encryption type in Active Directory using a GPO. Note that this can have an impact on other services in your AD.
-
realm(8)man page
3.5.2. Using the local authorization plug-in for MIT Kerberos
The winbind service provides Active Directory users to the domain member. In certain situations, administrators want to enable domain users to authenticate to local services, such as an SSH server, which are running on the domain member. When using Kerberos to authenticate the domain users, enable the winbind_krb5_localauth plug-in to correctly map Kerberos principals to Active Directory accounts through the winbind service.
For example, if the sAMAccountName attribute of an Active Directory user is set to EXAMPLE and the user tries to log with the user name lowercase, Kerberos returns the user name in upper case. As a consequence, the entries do not match and authentication fails.
Using the winbind_krb5_localauth plug-in, the account names are mapped correctly. Note that this only applies to GSSAPI authentication and not for getting the initial ticket granting ticket (TGT).
Prerequisites
- Samba is configured as a member of an Active Directory.
- Red Hat Enterprise Linux authenticates log in attempts against Active Directory.
- The
winbindservice is running.
Procedure
Edit the /etc/krb5.conf file and add the following section:
[plugins]
localauth = {
module = winbind:/usr/lib64/samba/krb5/winbind_krb5_localauth.so
enable_only = winbind
}
Additional resources
-
winbind_krb5_localauth(8)man page.
3.6. Setting up Samba on an IdM domain member
This section describes how to set up Samba on a host that is joined to a Red Hat Identity Management (IdM) domain. Users from IdM and also, if available, from trusted Active Directory (AD) domains, can access shares and printer services provided by Samba.
Using Samba on an IdM domain member is an unsupported Technology Preview feature and contains certain limitations. For example, IdM trust controllers do not support the Active Directory Global Catalog service, and they do not support resolving IdM groups using the Distributed Computing Environment / Remote Procedure Calls (DCE/RPC) protocols. As a consequence, AD users can only access Samba shares and printers hosted on IdM clients when logged in to other IdM clients; AD users logged into a Windows machine can not access Samba shares hosted on an IdM domain member.
Customers deploying Samba on IdM domain members are encouraged to provide feedback to Red Hat.
Prerequisites
- The host is joined as a client to the IdM domain.
- Both the IdM servers and the client must run on RHEL 8.1 or later.
3.6.1. Preparing the IdM domain for installing Samba on domain members
Before you can set up Samba on an IdM client, you must prepare the IdM domain using the ipa-adtrust-install utility on an IdM server.
Any system where you run the ipa-adtrust-install command automatically becomes an AD trust controller. However, you must run ipa-adtrust-install only once on an IdM server.
Prerequisites
- IdM server is installed.
- You need root privileges to install packages and restart IdM services.
Procedure
-
Install the required packages:
[root@ipaserver ~]# yum install ipa-server-trust-ad samba-client -
Authenticate as the IdM administrative user:
[root@ipaserver ~]# kinit admin -
Run the
ipa-adtrust-installutility:[root@ipaserver ~]# ipa-adtrust-installThe DNS service records are created automatically if IdM was installed with an integrated DNS server.
If you installed IdM without an integrated DNS server,
ipa-adtrust-installprints a list of service records that you must manually add to DNS before you can continue. -
The script prompts you that the
/etc/samba/smb.confalready exists and will be rewritten:WARNING: The smb.conf already exists. Running ipa-adtrust-install will break your existing Samba configuration. Do you wish to continue? [no]:
yes -
The script prompts you to configure the
slapi-nisplug-in, a compatibility plug-in that allows older Linux clients to work with trusted users:Do you want to enable support for trusted domains in Schema Compatibility plugin? This will allow clients older than SSSD 1.9 and non-Linux clients to work with trusted users. Enable trusted domains support in slapi-nis? [no]:
yes -
When prompted, enter the NetBIOS name for the IdM domain or press Enter to accept the name suggested:
Trust is configured but no NetBIOS domain name found, setting it now. Enter the NetBIOS name for the IPA domain. Only up to 15 uppercase ASCII letters, digits and dashes are allowed. Example: EXAMPLE. NetBIOS domain name [IDM]:
-
You are prompted to run the SID generation task to create a SID for any existing users:
Do you want to run the ipa-sidgen task? [no]:
yesThis is a resource-intensive task, so if you have a high number of users, you can run this at another time.
-
(Optional) By default, the Dynamic RPC port range is defined as
49152-65535for Windows Server 2008 and later. If you need to define a different Dynamic RPC port range for your environment, configure Samba to use different ports and open those ports in your firewall settings. The following example sets the port range to55000-65000.[root@ipaserver ~]# net conf setparm global 'rpc server dynamic port range' 55000-65000 [root@ipaserver ~]# firewall-cmd --add-port=55000-65000/tcp [root@ipaserver ~]# firewall-cmd --runtime-to-permanent
-
Restart the
ipaservice:[root@ipaserver ~]# ipactl restart -
Use the
smbclientutility to verify that Samba responds to Kerberos authentication from the IdM side:[root@ipaserver ~]#
smbclient -L server.idm.example.com -U user_name --use-kerberos=requiredlp_load_ex: changing to config backend registry Sharename Type Comment --------- ---- ------- IPC$ IPC IPC Service (Samba 4.15.2) ...
3.6.2. Enabling the AES encryption type in Active Directory using a GPO
This section describes how to enable the AES encryption type in Active Directory (AD) using a group policy object (GPO). Certain features on RHEL, such as running a Samba server on an IdM client, require this encryption type.
Note that RHEL no longer supports the weak DES and RC4 encryption types.
Prerequisites
- You are logged into AD as a user who can edit group policies.
- The
Group Policy Management Consoleis installed on the computer.
Procedure
- Open the
Group Policy Management Console. - Right-click
Default Domain Policy, and selectEdit. TheGroup Policy Management Editoropens. - Navigate to
Computer Configuration→Policies→Windows Settings→Security Settings→Local Policies→Security Options. - Double-click the
Network security: Configure encryption types allowed for Kerberospolicy. - Select
AES256_HMAC_SHA1and, optionally,Future encryption types. - Click OK.
- Close the
Group Policy Management Editor. - Repeat the steps for the
Default Domain Controller Policy. -
Wait until the Windows domain controllers (DC) applied the group policy automatically. Alternatively, to apply the GPO manually on a DC, enter the following command using an account that has administrator permissions:
C:> gpupdate /force /target:computer
3.6.3. Installing and configuring a Samba server on an IdM client
This section describes how to install and configure Samba on a client enrolled in an IdM domain.
Prerequisites
- Both the IdM servers and the client must run on RHEL 8.1 or later.
- The IdM domain is prepared as described in Preparing the IdM domain for installing Samba on domain members.
- If IdM has a trust configured with AD, enable the AES encryption type for Kerberos. For example, use a group policy object (GPO) to enable the AES encryption type. For details, see Enabling AES encryption in Active Directory using a GPO.
Procedure
-
Install the
ipa-client-sambapackage:[root@idm_client]# yum install ipa-client-samba -
Use the
ipa-client-sambautility to prepare the client and create an initial Samba configuration:[root@idm_client]# ipa-client-samba Searching for IPA server... IPA server: DNS discovery Chosen IPA master: idm_server.idm.example.com SMB principal to be created: cifs/idm_client.idm.example.com@IDM.EXAMPLE.COM NetBIOS name to be used: IDM_CLIENT Discovered domains to use: Domain name: idm.example.com NetBIOS name: IDM SID: S-1-5-21-525930803-952335037-206501584 ID range: 212000000 - 212199999 Domain name: ad.example.com NetBIOS name: AD SID: None ID range: 1918400000 - 1918599999 Continue to configure the system with these values? [no]: yes Samba domain member is configured. Please check configuration at /etc/samba/smb.conf and start smb and winbind services
-
By default,
ipa-client-sambaautomatically adds the[homes]section to the/etc/samba/smb.conffile that dynamically shares a user’s home directory when the user connects. If users do not have home directories on this server, or if you do not want to share them, remove the following lines from/etc/samba/smb.conf:[homes] read only = no -
Share directories and printers. For details, see:
- Setting up a Samba file share that uses POSIX ACLs
- Setting up a share that uses Windows ACLs
- Setting up Samba as a print server
-
Open the ports required for a Samba client in the local firewall:
[root@idm_client]# firewall-cmd --permanent --add-service=samba-client [root@idm_client]# firewall-cmd --reload
-
Enable and start the
smbandwinbindservices:[root@idm_client]# systemctl enable --now smb winbind
Verification steps
Run the following verification step on a different IdM domain member that has the samba-client package installed:
-
List the shares on the Samba server using Kerberos authentication:
$
smbclient -L idm_client.idm.example.com -U user_name --use-kerberos=requiredlp_load_ex: changing to config backend registry Sharename Type Comment --------- ---- ------- example Disk IPC$ IPC IPC Service (Samba 4.15.2) ...
Additional resources
-
ipa-client-samba(1)man page
3.6.4. Manually adding an ID mapping configuration if IdM trusts a new domain
Samba requires an ID mapping configuration for each domain from which users access resources. On an existing Samba server running on an IdM client, you must manually add an ID mapping configuration after the administrator added a new trust to an Active Directory (AD) domain.
Prerequisites
- You configured Samba on an IdM client. Afterward, a new trust was added to IdM.
- The DES and RC4 encryption types for Kerberos must be disabled in the trusted AD domain. For security reasons, RHEL 8 does not support these weak encryption types.
Procedure
-
Authenticate using the host’s keytab:
[root@idm_client]# kinit -k -
Use the
ipa idrange-findcommand to display both the base ID and the ID range size of the new domain. For example, the following command displays the values for thead.example.comdomain:[root@idm_client]# ipa idrange-find --name="AD.EXAMPLE.COM_id_range" --raw --------------- 1 range matched --------------- cn: AD.EXAMPLE.COM_id_range ipabaseid: 1918400000 ipaidrangesize: 200000 ipabaserid: 0 ipanttrusteddomainsid: S-1-5-21-968346183-862388825-1738313271 iparangetype: ipa-ad-trust ---------------------------- Number of entries returned 1 ----------------------------
You need the values from the
ipabaseidandipaidrangesizeattributes in the next steps. -
To calculate the highest usable ID, use the following formula:
maximum_range = ipabaseid + ipaidrangesize - 1
With the values from the previous step, the highest usable ID for the
ad.example.comdomain is1918599999(1918400000 + 200000 — 1). -
Edit the
/etc/samba/smb.conffile, and add the ID mapping configuration for the domain to the[global]section:idmap config AD : range = 1918400000 - 1918599999 idmap config AD : backend = sss
Specify the value from
ipabaseidattribute as the lowest and the computed value from the previous step as the highest value of the range. -
Restart the
smbandwinbindservices:[root@idm_client]# systemctl restart smb winbind
Verification steps
-
List the shares on the Samba server using Kerberos authentication:
$
smbclient -L idm_client.idm.example.com -U user_name --use-kerberos=requiredlp_load_ex: changing to config backend registry Sharename Type Comment --------- ---- ------- example Disk IPC$ IPC IPC Service (Samba 4.15.2) ...
3.6.5. Additional resources
- Installing an Identity Management client
3.7. Setting up a Samba file share that uses POSIX ACLs
As a Linux service, Samba supports shares with POSIX ACLs. They enable you to manage permissions locally on the Samba server using utilities, such as chmod. If the share is stored on a file system that supports extended attributes, you can define ACLs with multiple users and groups.
Parts of this section were adopted from the Setting up a Share Using POSIX ACLs documentation published in the Samba Wiki. License: CC BY 4.0. Authors and contributors: See the history tab on the Wiki page.
3.7.1. Adding a share that uses POSIX ACLs
This section describes how to create a share named example that provides the content of the /srv/samba/example/ directory, and uses POSIX ACLs.
Prerequisites
Samba has been set up in one of the following modes:
- Standalone server
- Domain member
Procedure
-
Create the folder if it does not exist. For example:
# mkdir -p /srv/samba/example/ -
If you run SELinux in
enforcingmode, set thesamba_share_tcontext on the directory:# semanage fcontext -a -t samba_share_t "/srv/samba/example(/.*)?" # restorecon -Rv /srv/samba/example/
-
Set file system ACLs on the directory. For details, see:
- Setting standard ACLs on a Samba Share that uses POSIX ACLs
- Setting extended ACLs on a share that uses POSIX ACLs.
-
Add the example share to the
/etc/samba/smb.conffile. For example, to add the share write-enabled:[example] path = /srv/samba/example/ read only = no
Regardless of the file system ACLs; if you do not set
read only = no, Samba shares the directory in read-only mode. -
Verify the
/etc/samba/smb.conffile:# testparm -
Open the required ports and reload the firewall configuration using the
firewall-cmdutility:# firewall-cmd --permanent --add-service=samba # firewall-cmd --reload
-
Restart the
smbservice:# systemctl restart smb
3.7.2. Setting standard Linux ACLs on a Samba share that uses POSIX ACLs
The standard ACLs on Linux support setting permissions for one owner, one group, and for all other undefined users. You can use the chown, chgrp, and chmod utility to update the ACLs. If you require precise control, then you use the more complex POSIX ACLs, see
Setting extended ACLs on a Samba share that uses POSIX ACLs.
The following procedure sets the owner of the /srv/samba/example/ directory to the root user, grants read and write permissions to the Domain Users group, and denies access to all other users.
Prerequisites
- The Samba share on which you want to set the ACLs exists.
Procedure
# chown root:"Domain Users" /srv/samba/example/ # chmod 2770 /srv/samba/example/
Enabling the set-group-ID (SGID) bit on a directory automatically sets the default group for all new files and subdirectories to that of the directory group, instead of the usual behavior of setting it to the primary group of the user who created the new directory entry.
Additional resources
-
chown(1)andchmod(1)man pages
3.7.3. Setting extended ACLs on a Samba share that uses POSIX ACLs
If the file system the shared directory is stored on supports extended ACLs, you can use them to set complex permissions. Extended ACLs can contain permissions for multiple users and groups.
Extended POSIX ACLs enable you to configure complex ACLs with multiple users and groups. However, you can only set the following permissions:
- No access
- Read access
- Write access
- Full control
If you require the fine-granular Windows permissions, such as Create folder / append data, configure the share to use Windows ACLs. See Setting up a share that uses Windows ACLs.
The following procedure shows how to enable extended ACLs on a share. Additionally, it contains an example about setting extended ACLs.
Prerequisites
- The Samba share on which you want to set the ACLs exists.
Procedure
-
Enable the following parameter in the share’s section in the
/etc/samba/smb.conffile to enable ACL inheritance of extended ACLs:inherit acls = yes
For details, see the parameter description in the
smb.conf(5) man page. -
Restart the
smbservice:# systemctl restart smb -
Set the ACLs on the directory. For example:
3.8. Setting permissions on a share that uses POSIX ACLs
Optionally, to limit or grant access to a Samba share, you can set certain parameters in the share’s section in the /etc/samba/smb.conf file.
Share-based permissions manage if a user, group, or host is able to access a share. These settings do not affect file system ACLs.
Use share-based settings to restrict access to shares, for example, to deny access from specific hosts.
Prerequisites
- A share with POSIX ACLs has been set up.
3.8.1. Configuring user and group-based share access
User and group-based access control enables you to grant or deny access to a share for certain users and groups.
Prerequisites
- The Samba share on which you want to set user or group-based access exists.
Procedure
-
For example, to enable all members of the
Domain Usersgroup to access a share while access is denied for theuseraccount, add the following parameters to the share’s configuration:valid users = +DOMAIN"Domain Users" invalid users = DOMAINuser
The
invalid usersparameter has a higher priority than thevalid usersparameter. For example, if theuseraccount is a member of theDomain Usersgroup, access is denied to this account when you use the previous example. -
Reload the Samba configuration:
# smbcontrol all reload-config
Additional resources
-
smb.conf(5)man page
3.8.2. Configuring host-based share access
Host-based access control enables you to grant or deny access to a share based on client’s host names, IP addresses, or IP range.
The following procedure explains how to enable the 127.0.0.1 IP address, the 192.0.2.0/24 IP range, and the client1.example.com host to access a share, and additionally deny access for the client2.example.com host:
Prerequisites
- The Samba share on which you want to set host-based access exists.
Procedure
-
Add the following parameters to the configuration of the share in the
/etc/samba/smb.conffile:hosts allow = 127.0.0.1 192.0.2.0/24 client1.example.com hosts deny = client2.example.com
The
hosts denyparameter has a higher priority thanhosts allow. For example, ifclient1.example.comresolves to an IP address that is listed in thehosts allowparameter, access for this host is denied. -
Reload the Samba configuration:
# smbcontrol all reload-config
Additional resources
-
smb.conf(5)man page
3.9. Setting up a share that uses Windows ACLs
Samba supports setting Windows ACLs on shares and file system object. This enables you to:
- Use the fine-granular Windows ACLs
- Manage share permissions and file system ACLs using Windows
Alternatively, you can configure a share to use POSIX ACLs. For details, see Setting up a Samba file share that uses POSIX ACLs.
Parts of this section were adopted from the Setting up a Share Using Windows ACLs documentation published in the Samba Wiki. License: CC BY 4.0. Authors and contributors: See the history tab on the Wiki page.
3.9.1. Granting the SeDiskOperatorPrivilege privilege
Only users and groups having the SeDiskOperatorPrivilege privilege granted can configure permissions on shares that use Windows ACLs.
Procedure
-
For example, to grant the
SeDiskOperatorPrivilegeprivilege to theDOMAINDomain Adminsgroup:#
net rpc rights grant "DOMAINDomain Admins" SeDiskOperatorPrivilege -U "DOMAINadministrator"Enter DOMAINadministrator's password: Successfully granted rights.In a domain environment, grant
SeDiskOperatorPrivilegeto a domain group. This enables you to centrally manage the privilege by updating a user’s group membership. -
To list all users and groups having
SeDiskOperatorPrivilegegranted:#
net rpc rights list privileges SeDiskOperatorPrivilege -U "DOMAINadministrator"Enter administrator's password: SeDiskOperatorPrivilege: BUILTINAdministrators DOMAINDomain Admins
3.9.2. Enabling Windows ACL support
To configure shares that support Windows ACLs, you must enable this feature in Samba.
Prerequisites
- A user share is configured on the Samba server.
Procedure
-
To enable it globally for all shares, add the following settings to the
[global]section of the/etc/samba/smb.conffile:vfs objects = acl_xattr map acl inherit = yes store dos attributes = yes
Alternatively, you can enable Windows ACL support for individual shares, by adding the same parameters to a share’s section instead.
-
Restart the
smbservice:#
systemctl restart smb
3.9.3. Adding a share that uses Windows ACLs
This section describes how to create a share named example, that shares the content of the /srv/samba/example/ directory, and uses Windows ACLs.
Procedure
-
Create the folder if it does not exists. For example:
#
mkdir -p /srv/samba/example/ -
If you run SELinux in
enforcingmode, set thesamba_share_tcontext on the directory:#
semanage fcontext -a -t samba_share_t "/srv/samba/example(/.*)?"#restorecon -Rv /srv/samba/example/ -
Add the example share to the
/etc/samba/smb.conffile. For example, to add the share write-enabled:[example] path = /srv/samba/example/ read only = no
Regardless of the file system ACLs; if you do not set
read only = no, Samba shares the directory in read-only mode. -
If you have not enabled Windows ACL support in the
[global]section for all shares, add the following parameters to the[example]section to enable this feature for this share:vfs objects = acl_xattr map acl inherit = yes store dos attributes = yes
-
Verify the
/etc/samba/smb.conffile:#
testparm -
Open the required ports and reload the firewall configuration using the
firewall-cmdutility:#
firewall-cmd --permanent --add-service=samba#firewall-cmd --reload -
Restart the
smbservice:#
systemctl restart smb
3.9.4. Managing share permissions and file system ACLs of a share that uses Windows ACLs
To manage share permissions and file system ACLs on a Samba share that uses Windows ACLs, use a Windows applications, such as Computer Management. For details, see the Windows documentation. Alternatively, use the smbcacls utility to manage ACLs.
To modify the file system permissions from Windows, you must use an account that has the SeDiskOperatorPrivilege privilege granted.
3.10. Managing ACLs on an SMB share using smbcacls
The smbcacls utility can list, set, and delete ACLs of files and directories stored on an SMB share. You can use smbcacls to manage file system ACLs:
- On a local or remote Samba server that uses advanced Windows ACLs or POSIX ACLs
- On Red Hat Enterprise Linux to remotely manage ACLs on a share hosted on Windows
3.10.1. Access control entries
Each ACL entry of a file system object contains Access Control Entries (ACE) in the following format:
security_principal:access_right/inheritance_information/permissions
Example 3.3. Access control entries
If the ADDomain Users group has Modify permissions that apply to This folder, subfolders, and files on Windows, the ACL contains the following ACE:
ADDomain Users:ALLOWED/OI|CI/CHANGE
An ACE contains the following parts:
- Security principal
- The security principal is the user, group, or SID the permissions in the ACL are applied to.
- Access right
-
Defines if access to an object is granted or denied. The value can be
ALLOWEDorDENIED. - Inheritance information
-
The following values exist:
Table 3.1. Inheritance settings
Value Description Maps to OIObject Inherit
This folder and files
CIContainer Inherit
This folder and subfolders
IOInherit Only
The ACE does not apply to the current file or directory
IDInherited
The ACE was inherited from the parent directory
Additionally, the values can be combined as follows:
Table 3.2. Inheritance settings combinations
Value combinations Maps to the Windows Applies tosettingOI|CIThis folder, subfolders, and files
OI|CI|IOSubfolders and files only
CI|IOSubfolders only
OI|IOFiles only
- Permissions
-
This value can be either a hex value that represents one or more Windows permissions or an
smbcaclsalias:-
A hex value that represents one or more Windows permissions.
The following table displays the advanced Windows permissions and their corresponding value in hex format:
Multiple permissions can be combined as a single hex value using the bit-wise
ORoperation. For details, see ACE mask calculation. -
An
smbcaclsalias. The following table displays the available aliases:You can combine single-letter aliases when you set permissions. For example, you can set
RDto apply the Windows permissionReadandDelete. However, you can neither combine multiple non-single-letter aliases nor combine aliases and hex values.
-
3.10.2. Displaying ACLs using smbcacls
To display ACLs on an SMB share, use the smbcacls utility. If you run smbcacls without any operation parameter, such as --add, the utility displays the ACLs of a file system object.
Procedure
For example, to list the ACLs of the root directory of the //server/example share:
# smbcacls //server/example / -U "DOMAINadministrator"
Enter DOMAINadministrator's password:
REVISION:1
CONTROL:SR|PD|DI|DP
OWNER:ADAdministrators
GROUP:ADDomain Users
ACL:ADAdministrator:ALLOWED/OI|CI/FULL
ACL:ADDomain Users:ALLOWED/OI|CI/CHANGE
ACL:ADDomain Guests:ALLOWED/OI|CI/0x00100021
The output of the command displays:
-
REVISION: The internal Windows NT ACL revision of the security descriptor -
CONTROL: Security descriptor control -
OWNER: Name or SID of the security descriptor’s owner -
GROUP: Name or SID of the security descriptor’s group -
ACLentries. For details, see Access control entries.
3.10.3. ACE mask calculation
In most situations, when you add or update an ACE, you use the smbcacls aliases listed in Existing smbcacls aliases and their corresponding Windows permission.
However, if you want to set advanced Windows permissions as listed in Windows permissions and their corresponding smbcacls value in hex format, you must use the bit-wise OR operation to calculate the correct value. You can use the following shell command to calculate the value:
# echo $(printf '0x%X' $(( hex_value_1 | hex_value_2 | ... )))
Example 3.4. Calculating an ACE Mask
You want to set the following permissions:
- Traverse folder / execute file (0x00100020)
- List folder / read data (0x00100001)
- Read attributes (0x00100080)
To calculate the hex value for the previous permissions, enter:
# echo $(printf '0x%X' $(( 0x00100020 | 0x00100001 | 0x00100080 )))
0x1000A1
Use the returned value when you set or update an ACE.
3.10.4. Adding, updating, and removing an ACL using smbcacls
Depending on the parameter you pass to the smbcacls utility, you can add, update, and remove ACLs from a file or directory.
Adding an ACL
To add an ACL to the root of the //server/example share that grants CHANGE permissions for This folder, subfolders, and files to the ADDomain Users group:
# smbcacls //server/example / -U "DOMAINadministrator --add ACL:"ADDomain Users":ALLOWED/OI|CI/CHANGE
Updating an ACL
Updating an ACL is similar to adding a new ACL. You update an ACL by overriding the ACL using the --modify parameter with an existing security principal. If smbcacls finds the security principal in the ACL list, the utility updates the permissions. Otherwise the command fails with an error:
ACL for SID principal_name not found
For example, to update the permissions of the ADDomain Users group and set them to READ for This folder, subfolders, and files:
# smbcacls //server/example / -U "DOMAINadministrator --modify ACL:"ADDomain Users":ALLOWED/OI|CI/READ
Deleting an ACL
To delete an ACL, pass the --delete parameter with the exact ACL to the smbcacls utility. For example:
# smbcacls //server/example / -U "DOMAINadministrator --delete ACL:"ADDomain Users":ALLOWED/OI|CI/READ
3.11. Enabling users to share directories on a Samba server
On a Samba server, you can configure that users can share directories without root permissions.
3.11.1. Enabling the user shares feature
Before users can share directories, the administrator must enable user shares in Samba.
For example, to enable only members of the local example group to create user shares.
Procedure
-
Create the local
examplegroup, if it does not exist:# groupadd example -
Prepare the directory for Samba to store the user share definitions and set its permissions properly. For example:
-
Create the directory:
# mkdir -p /var/lib/samba/usershares/ -
Set write permissions for the
examplegroup:# chgrp example /var/lib/samba/usershares/ # chmod 1770 /var/lib/samba/usershares/
- Set the sticky bit to prevent users to rename or delete files stored by other users in this directory.
-
-
Edit the
/etc/samba/smb.conffile and add the following to the[global]section:-
Set the path to the directory you configured to store the user share definitions. For example:
usershare path = /var/lib/samba/usershares/
-
Set how many user shares Samba allows to be created on this server. For example:
usershare max shares = 100
If you use the default of
0for theusershare max sharesparameter, user shares are disabled. -
Optionally, set a list of absolute directory paths. For example, to configure that Samba only allows to share subdirectories of the
/dataand/srvdirectory to be shared, set:usershare prefix allow list = /data /srv
For a list of further user share-related parameters you can set, see the
USERSHARESsection in thesmb.conf(5)man page. -
-
Verify the
/etc/samba/smb.conffile:# testparm -
Reload the Samba configuration:
# smbcontrol all reload-configUsers are now able to create user shares.
3.11.2. Adding a user share
After you enabled the user share feature in Samba, users can share directories on the Samba server without root permissions by running the net usershare add command.
Synopsis of the net usershare add command:
net usershare add share_name path [[ comment ] | [ ACLs ]] [ guest_ok=y|n ]
If you set ACLs when you create a user share, you must specify the comment parameter prior to the ACLs. To set an empty comment, use an empty string in double quotes.
Note that users can only enable guest access on a user share, if the administrator set usershare allow guests = yes in the [global] section in the /etc/samba/smb.conf file.
Example 3.5. Adding a user share
A user wants to share the /srv/samba/ directory on a Samba server. The share should be named example, have no comment set, and should be accessible by guest users. Additionally, the share permissions should be set to full access for the ADDomain Users group and read permissions for other users. To add this share, run as the user:
$ net usershare add example /srv/samba/ "" "ADDomain Users":F,Everyone:R guest_ok=yes
3.11.4. Displaying information about existing user shares
Users can enter the net usershare info command on a Samba server to display user shares and their settings.
Prerequisites
- A user share is configured on the Samba server.
Procedure
-
To display all user shares created by any user:
$ net usershare info -l [share_1] path=/srv/samba/ comment= usershare_acl=Everyone:R,host_nameuser:F, guest_ok=y ...
To list only shares created by the user who runs the command, omit the
-lparameter. -
To display only the information about specific shares, pass the share name or wild cards to the command. For example, to display the information about shares whose name starts with
share_:$ net usershare info -l share_*
3.11.5. Listing user shares
If you want to list only the available user shares without their settings on a Samba server, use the net usershare list command.
Prerequisites
- A user share is configured on the Samba server.
Procedure
-
To list the shares created by any user:
$ net usershare list -l share_1 share_2 ...
To list only shares created by the user who runs the command, omit the
-lparameter. -
To list only specific shares, pass the share name or wild cards to the command. For example, to list only shares whose name starts with
share_:$ net usershare list -l share_*
3.12. Configuring a share to allow access without authentication
In certain situations, you want to share a directory to which users can connect without authentication. To configure this, enable guest access on a share.
Shares that do not require authentication can be a security risk.
3.12.1. Enabling guest access to a share
If guest access is enabled on a share, Samba maps guest connections to the operating system account set in the guest account parameter. Guest users can access files on this share if at least one of the following conditions is satisfied:
- The account is listed in file system ACLs
- The POSIX permissions for
otherusers allow it
Example 3.6. Guest share permissions
If you configured Samba to map the guest account to nobody, which is the default, the ACLs in the following example:
- Allow guest users to read
file1.txt - Allow guest users to read and modify
file2.txt - Prevent guest users to read or modify
file3.txt
-rw-r--r--. 1 root root 1024 1. Sep 10:00 file1.txt -rw-r-----. 1 nobody root 1024 1. Sep 10:00 file2.txt -rw-r-----. 1 root root 1024 1. Sep 10:00 file3.txt
Procedure
-
Edit the
/etc/samba/smb.conffile:-
If this is the first guest share you set up on this server:
-
Set
map to guest = Bad Userin the[global]section:[global] ... map to guest = Bad UserWith this setting, Samba rejects login attempts that use an incorrect password unless the user name does not exist. If the specified user name does not exist and guest access is enabled on a share, Samba treats the connection as a guest log in.
-
By default, Samba maps the guest account to the
nobodyaccount on Red Hat Enterprise Linux. Alternatively, you can set a different account. For example:[global] ... guest account = user_nameThe account set in this parameter must exist locally on the Samba server. For security reasons, Red Hat recommends using an account that does not have a valid shell assigned.
-
-
Add the
guest ok = yessetting to the[example]share section:[example] ... guest ok = yes
-
-
Verify the
/etc/samba/smb.conffile:# testparm -
Reload the Samba configuration:
# smbcontrol all reload-config
3.13. Configuring Samba for macOS clients
The fruit virtual file system (VFS) Samba module provides enhanced compatibility with Apple server message block (SMB) clients.
3.13.1. Optimizing the Samba configuration for providing file shares for macOS clients
This section describes how to configure the fruit module for all Samba shares hosted on the server to optimize Samba file shares for macOS clients.
Red Hat recommends enabling the fruit module globally. Clients using macOS negotiate the server server message block version 2 (SMB2) Apple (AAPL) protocol extensions when the client establishes the first connection to the server. If the client first connects to a share without AAPL extensions enabled, the client does not use the extensions for any share of the server.
Prerequisites
- Samba is configured as a file server.
Procedure
-
Edit the
/etc/samba/smb.conffile, and enable thefruitandstreams_xattrVFS modules in the[global]section:vfs objects = fruit streams_xattr
You must enable the
fruitmodule before enablingstreams_xattr. Thefruitmodule uses alternate data streams (ADS). For this reason, you must also enable thestreams_xattrmodule. -
Optionally, to provide macOS Time Machine support on a share, add the following setting to the share configuration in the
/etc/samba/smb.conffile:fruit:time machine = yes
-
Verify the
/etc/samba/smb.conffile:# testparm -
Reload the Samba configuration:
# smbcontrol all reload-config
Additional resources
-
vfs_fruit(8)man page. -
Configuring file shares:
- Setting up a Samba file share that uses POSIX ACLs
- Setting up a share that uses Windows ACLs.
3.14. Using the smbclient utility to access an SMB share
The smbclient utility enables you to access file shares on an SMB server, similarly to a command-line FTP client. You can use it, for example, to upload and download files to and from a share.
Prerequisites
- The
samba-clientpackage is installed.
3.14.1. How the smbclient interactive mode works
For example, to authenticate to the example share hosted on server using the DOMAINuser account:
# smbclient -U "DOMAINuser" //server/example Enter domainuser's password: Try "help" to get a list of possible commands. smb: >
After smbclient connected successfully to the share, the utility enters the interactive mode and shows the following prompt:
smb: >
To display all available commands in the interactive shell, enter:
smb: > help
To display the help for a specific command, enter:
smb: > help command_name
Additional resources
-
smbclient(1)man page
3.14.2. Using smbclient in interactive mode
If you use smbclient without the -c parameter, the utility enters the interactive mode. The following procedure shows how to connect to an SMB share and download a file from a subdirectory.
Procedure
-
Connect to the share:
# smbclient -U "DOMAINuser_name" //server_name/share_name -
Change into the
/example/directory:smb: >
d /example/ -
List the files in the directory:
smb: example>
ls. D 0 Thu Nov 1 10:00:00 2018 .. D 0 Thu Nov 1 10:00:00 2018 example.txt N 1048576 Thu Nov 1 10:00:00 2018 9950208 blocks of size 1024. 8247144 blocks available -
Download the
example.txtfile:smb: example>
get example.txtgetting file directorysubdirectoryexample.txt of size 1048576 as example.txt (511975,0 KiloBytes/sec) (average 170666,7 KiloBytes/sec) -
Disconnect from the share:
smb: example>
exit
3.14.3. Using smbclient in scripting mode
If you pass the -c parameter to smbclient, you can automatically execute the commands on the remote SMB share. This enables you to use smbclient in scripts.
The following procedure shows how to connect to an SMB share and download a file from a subdirectory.
Procedure
- Use the following command to connect to the share, change into the
exampledirectory, download theexample.txtfile:
# smbclient -U DOMAINuser_name //server_name/share_name -c "cd /example/ ; get example.txt ; exit"
3.15. Setting up Samba as a print server
If you set up Samba as a print server, clients in your network can use Samba to print. Additionally, Windows clients can, if configured, download the driver from the Samba server.
Parts of this section were adopted from the Setting up Samba as a Print Server documentation published in the Samba Wiki. License: CC BY 4.0. Authors and contributors: See the history tab on the Wiki page.
Prerequisites
Samba has been set up in one of the following modes:
- Standalone server
- Domain member
3.15.1. Enabling print server support in Samba
By default, print server support is not enabled in Samba. To use Samba as a print server, you must configure Samba accordingly.
Print jobs and printer operations require remote procedure calls (RPCs). By default, Samba starts the rpcd_spoolss service on demand to manage RPCs. During the first RPC call, or when you update the printer list in CUPS, Samba retrieves the printer information from CUPS. This can require approximately 1 second per printer. Therefore, if you have more than 50 printers, tune the rpcd_spoolss settings.
Prerequisites
-
The printers are configured in a CUPS server.
For details about configuring printers in CUPS, see the documentation provided in the CUPS web console (https://printserver:631/help) on the print server.
Procedure
-
Edit the
/etc/samba/smb.conffile:-
Add the
[printers]section to enable the printing backend in Samba:[printers] comment = All Printers path = /var/tmp/ printable = yes create mask = 0600
The
[printers]share name is hard-coded and cannot be changed. -
If the CUPS server runs on a different host or port, specify the setting in the
[printers]section:cups server = printserver.example.com:631 -
If you have many printers, set the number of idle seconds to a higher value than the numbers of printers connected to CUPS. For example, if you have 100 printers, set in the
[global]section:rpcd_spoolss:idle_seconds = 200If this setting does not scale in your environment, also increase the number of
rpcd_spoolssworkers in the[global]section:rpcd_spoolss:num_workers = 10By default,
rpcd_spoolssstarts 5 workers.
-
-
Verify the
/etc/samba/smb.conffile:# testparm -
Open the required ports and reload the firewall configuration using the
firewall-cmdutility:# firewall-cmd --permanent --add-service=samba # firewall-cmd --reload
-
Restart the
smbservice:# systemctl restart smbAfter restarting the service, Samba automatically shares all printers that are configured in the CUPS back end. If you want to manually share only specific printers, see Manually sharing specific printers.
Verification
-
Submit a print job. For example, to print a PDF file, enter:
# smbclient -Uuser //sambaserver.example.com/printer_name -c "print example.pdf"
3.15.2. Manually sharing specific printers
If you configured Samba as a print server, by default, Samba shares all printers that are configured in the CUPS back end. The following procedure explains how to share only specific printers.
Prerequisites
- Samba is set up as a print server
Procedure
-
Edit the
/etc/samba/smb.conffile:-
In the
[global]section, disable automatic printer sharing by setting:load printers = no
-
Add a section for each printer you want to share. For example, to share the printer named
examplein the CUPS back end asExample-Printerin Samba, add the following section:[Example-Printer] path = /var/tmp/ printable = yes printer name = exampleYou do not need individual spool directories for each printer. You can set the same spool directory in the
pathparameter for the printer as you set in the[printers]section.
-
-
Verify the
/etc/samba/smb.conffile:# testparm -
Reload the Samba configuration:
# smbcontrol all reload-config
3.16. Setting up automatic printer driver downloads for Windows clients on Samba print servers
If you are running a Samba print server for Windows clients, you can upload drivers and preconfigure printers. If a user connects to a printer, Windows automatically downloads and installs the driver locally on the client. The user does not require local administrator permissions for the installation. Additionally, Windows applies preconfigured driver settings, such as the number of trays.
Parts of this section were adopted from the Setting up Automatic Printer Driver Downloads for Windows Clients documentation published in the Samba Wiki. License: CC BY 4.0. Authors and contributors: See the history tab on the Wiki page.
Prerequisites
- Samba is set up as a print server
3.16.1. Basic information about printer drivers
This section provides general information about printer drivers.
Supported driver model version
Samba only supports the printer driver model version 3 which is supported in Windows 2000 and later, and Windows Server 2000 and later. Samba does not support the driver model version 4, introduced in Windows 8 and Windows Server 2012. However, these and later Windows versions also support version 3 drivers.
Package-aware drivers
Samba does not support package-aware drivers.
Preparing a printer driver for being uploaded
Before you can upload a driver to a Samba print server:
- Unpack the driver if it is provided in a compressed format.
-
Some drivers require to start a setup application that installs the driver locally on a Windows host. In certain situations, the installer extracts the individual files into the operating system’s temporary folder during the setup runs. To use the driver files for uploading:
- Start the installer.
- Copy the files from the temporary folder to a new location.
- Cancel the installation.
Ask your printer manufacturer for drivers that support uploading to a print server.
Providing 32-bit and 64-bit drivers for a printer to a client
To provide the driver for a printer for both 32-bit and 64-bit Windows clients, you must upload a driver with exactly the same name for both architectures. For example, if you are uploading the 32-bit driver named Example PostScript and the 64-bit driver named Example PostScript (v1.0), the names do not match. Consequently, you can only assign one of the drivers to a printer and the driver will not be available for both architectures.
3.16.2. Enabling users to upload and preconfigure drivers
To be able to upload and preconfigure printer drivers, a user or a group needs to have the SePrintOperatorPrivilege privilege granted. A user must be added into the printadmin group. Red Hat Enterprise Linux automatically creates this group when you install the samba package. The printadmin group gets assigned the lowest available dynamic system GID that is lower than 1000.
Procedure
-
For example, to grant the
SePrintOperatorPrivilegeprivilege to theprintadmingroup:# net rpc rights grant "printadmin" SePrintOperatorPrivilege -U "DOMAINadministrator" Enter DOMAINadministrator's password: Successfully granted rights.
In a domain environment, grant
SePrintOperatorPrivilegeto a domain group. This enables you to centrally manage the privilege by updating a user’s group membership. -
To list all users and groups having
SePrintOperatorPrivilegegranted:# net rpc rights list privileges SePrintOperatorPrivilege -U "DOMAINadministrator" Enter administrator's password: SePrintOperatorPrivilege: BUILTINAdministrators DOMAINprintadmin
3.16.3. Setting up the print$ share
Windows operating systems download printer drivers from a share named print$ from a print server. This share name is hard-coded in Windows and cannot be changed.
The following procedure explains how to share the /var/lib/samba/drivers/ directory as print$, and enable members of the local printadmin group to upload printer drivers.
Procedure
-
Add the
[print$]section to the/etc/samba/smb.conffile:[print$] path = /var/lib/samba/drivers/ read only = no write list = @printadmin force group = @printadmin create mask = 0664 directory mask = 2775Using these settings:
- Only members of the
printadmingroup can upload printer drivers to the share. - The group of new created files and directories will be set to
printadmin. - The permissions of new files will be set to
664. - The permissions of new directories will be set to
2775.
- Only members of the
-
To upload only 64-bit drivers for all printers, include this setting in the
[global]section in the/etc/samba/smb.conffile:spoolss: architecture = Windows x64
Without this setting, Windows only displays drivers for which you have uploaded at least the 32-bit version.
-
Verify the
/etc/samba/smb.conffile:# testparm -
Reload the Samba configuration
# smbcontrol all reload-config -
Create the
printadmingroup if it does not exists:# groupadd printadmin -
Grant the
SePrintOperatorPrivilegeprivilege to theprintadmingroup.# net rpc rights grant "printadmin" SePrintOperatorPrivilege -U "DOMAINadministrator" Enter DOMAINadministrator's password: Successfully granted rights.
-
If you run SELinux in
enforcingmode, set thesamba_share_tcontext on the directory:# semanage fcontext -a -t samba_share_t "/var/lib/samba/drivers(/.)?" # *restorecon -Rv /var/lib/samba/drivers/ -
Set the permissions on the
/var/lib/samba/drivers/directory:-
If you use POSIX ACLs, set:
# chgrp -R "printadmin" /var/lib/samba/drivers/ # chmod -R 2775 /var/lib/samba/drivers/
-
If you use Windows ACLs, set:
Principal Access Apply to CREATOR OWNERFull control
Subfolders and files only
Authenticated UsersRead & execute, List folder contents, Read
This folder, subfolders, and files
printadminFull control
This folder, subfolders, and files
For details about setting ACLs on Windows, see the Windows documentation.
-
3.16.4. Creating a GPO to enable clients to trust the Samba print server
For security reasons, recent Windows operating systems prevent clients from downloading non-package-aware printer drivers from an untrusted server. If your print server is a member in an AD, you can create a Group Policy Object (GPO) in your domain to trust the Samba server.
Prerequisites
- The Samba print server is a member of an AD domain.
- The Windows computer you are using to create the GPO must have the Windows Remote Server Administration Tools (RSAT) installed. For details, see the Windows documentation.
Procedure
- Log into a Windows computer using an account that is allowed to edit group policies, such as the AD domain
Administratoruser. - Open the
Group Policy Management Console. -
Right-click to your AD domain and select
Create a GPO in this domain, and Link it here.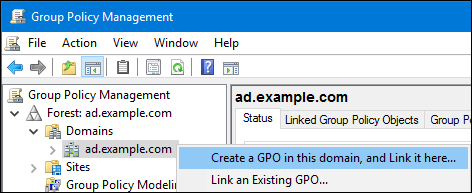
- Enter a name for the GPO, such as
Legacy Printer Driver Policyand clickOK. The new GPO will be displayed under the domain entry. - Right-click to the newly-created GPO and select
Editto open theGroup Policy Management Editor. -
Navigate to → → → .

-
On the right side of the window, double-click
Point and Print Restrictionto edit the policy:-
Enable the policy and set the following options:
- Select
Users can only point and print to these serversand enter the fully-qualified domain name (FQDN) of the Samba print server to the field next to this option. -
In both check boxes under
Security Prompts, selectDo not show warning or elevation prompt.
- Select
- Click OK.
-
-
Double-click
Package Point and Print - Approved serversto edit the policy:- Enable the policy and click the
Showbutton. -
Enter the FQDN of the Samba print server.

- Close both the
Show Contentsand the policy’s properties window by clickingOK.
- Enable the policy and click the
- Close the
Group Policy Management Editor. - Close the
Group Policy Management Console.
After the Windows domain members applied the group policy, printer drivers are automatically downloaded from the Samba server when a user connects to a printer.
Additional resources
- For using group policies, see the Windows documentation.
3.16.5. Uploading drivers and preconfiguring printers
Use the Print Management application on a Windows client to upload drivers and preconfigure printers hosted on the Samba print server. For further details, see the Windows documentation.
3.17. Running Samba on a server with FIPS mode enabled
This section provides an overview of the limitations of running Samba with FIPS mode enabled. It also provides the procedure for enabling FIPS mode on a Red Hat Enterprise Linux host running Samba.
3.17.1. Limitations of using Samba in FIPS mode
The following Samba modes and features work in FIPS mode under the indicated conditions:
- Samba as a domain member only in Active Directory (AD) or Red Hat Identity Management (IdM) environments with Kerberos authentication that uses AES ciphers.
- Samba as a file server on an Active Directory domain member. However, this requires that clients use Kerberos to authenticate to the server.
Due to the increased security of FIPS, the following Samba features and modes do not work if FIPS mode is enabled:
- NT LAN Manager (NTLM) authentication because RC4 ciphers are blocked
- The server message block version 1 (SMB1) protocol
- The stand-alone file server mode because it uses NTLM authentication
- NT4-style domain controllers
- NT4-style domain members. Note that Red Hat continues supporting the primary domain controller (PDC) functionality IdM uses in the background.
- Password changes against the Samba server. You can only perform password changes using Kerberos against an Active Directory domain controller.
The following feature is not tested in FIPS mode and, therefore, is not supported by Red Hat:
- Running Samba as a print server
3.17.2. Using Samba in FIPS mode
This section describes how to enable the FIPS mode on a RHEL host that runs Samba.
Prerequisites
- Samba is configured on the Red Hat Enterprise Linux host.
- Samba runs in a mode that is supported in FIPS mode.
Procedure
-
Enable the FIPS mode on RHEL:
# fips-mode-setup --enable -
Reboot the server:
# reboot -
Use the
testparmutility to verify the configuration:# testparm -sIf the command displays any errors or incompatibilities, fix them to ensure that Samba works correctly.
3.18. Tuning the performance of a Samba server
This chapter describes what settings can improve the performance of Samba in certain situations, and which settings can have a negative performance impact.
Parts of this section were adopted from the Performance Tuning documentation published in the Samba Wiki. License: CC BY 4.0. Authors and contributors: See the history tab on the Wiki page.
Prerequisites
- Samba is set up as a file or print server
3.18.1. Setting the SMB protocol version
Each new SMB version adds features and improves the performance of the protocol. The recent Windows and Windows Server operating systems always supports the latest protocol version. If Samba also uses the latest protocol version, Windows clients connecting to Samba benefit from the performance improvements. In Samba, the default value of the server max protocol is set to the latest supported stable SMB protocol version.
To always have the latest stable SMB protocol version enabled, do not set the server max protocol parameter. If you set the parameter manually, you will need to modify the setting with each new version of the SMB protocol, to have the latest protocol version enabled.
The following procedure explains how to use the default value in the server max protocol parameter.
Procedure
- Remove the
server max protocolparameter from the[global]section in the/etc/samba/smb.conffile. -
Reload the Samba configuration
# smbcontrol all reload-config
3.18.2. Tuning shares with directories that contain a large number of files
Linux supports case-sensitive file names. For this reason, Samba needs to scan directories for uppercase and lowercase file names when searching or accessing a file. You can configure a share to create new files only in lowercase or uppercase, which improves the performance.
Prerequisites
- Samba is configured as a file server
Procedure
-
Rename all files on the share to lowercase.
Using the settings in this procedure, files with names other than in lowercase will no longer be displayed.
-
Set the following parameters in the share’s section:
case sensitive = true default case = lower preserve case = no short preserve case = no
For details about the parameters, see their descriptions in the
smb.conf(5)man page. -
Verify the
/etc/samba/smb.conffile:# testparm -
Reload the Samba configuration:
# smbcontrol all reload-config
After you applied these settings, the names of all newly created files on this share use lowercase. Because of these settings, Samba no longer needs to scan the directory for uppercase and lowercase, which improves the performance.
3.18.3. Settings that can have a negative performance impact
By default, the kernel in Red Hat Enterprise Linux is tuned for high network performance. For example, the kernel uses an auto-tuning mechanism for buffer sizes. Setting the socket options parameter in the /etc/samba/smb.conf file overrides these kernel settings. As a result, setting this parameter decreases the Samba network performance in most cases.
To use the optimized settings from the Kernel, remove the socket options parameter from the [global] section in the /etc/samba/smb.conf.
3.19. Configuring Samba to be compatible with clients that require an SMB version lower than the default
Samba uses a reasonable and secure default value for the minimum server message block (SMB) version it supports. However, if you have clients that require an older SMB version, you can configure Samba to support it.
3.19.1. Setting the minimum SMB protocol version supported by a Samba server
In Samba, the server min protocol parameter in the /etc/samba/smb.conf file defines the minimum server message block (SMB) protocol version the Samba server supports. This section describes how to change the minimum SMB protocol version.
By default, Samba on RHEL 8.2 and later supports only SMB2 and newer protocol versions. Red Hat recommends to not use the deprecated SMB1 protocol. However, if your environment requires SMB1, you can manually set the server min protocol parameter to NT1 to re-enable SMB1.
Prerequisites
- Samba is installed and configured.
Procedure
-
Edit the
/etc/samba/smb.conffile, add theserver min protocolparameter, and set the parameter to the minimum SMB protocol version the server should support. For example, to set the minimum SMB protocol version toSMB3, add:server min protocol = SMB3
-
Restart the
smbservice:# systemctl restart smb
Additional resources
-
smb.conf(5)man page
3.20. Frequently used Samba command-line utilities
This chapter describes frequently used commands when working with a Samba server.
3.20.1. Using the net ads join and net rpc join commands
Using the join subcommand of the net utility, you can join Samba to an AD or NT4 domain. To join the domain, you must create the /etc/samba/smb.conf file manually, and optionally update additional configurations, such as PAM.
Red Hat recommends using the realm utility to join a domain. The realm utility automatically updates all involved configuration files.
Procedure
-
Manually create the
/etc/samba/smb.conffile with the following settings:-
For an AD domain member:
[global] workgroup = domain_name security = ads passdb backend = tdbsam realm = AD_REALM
-
For an NT4 domain member:
[global] workgroup = domain_name security = user passdb backend = tdbsam
-
- Add an ID mapping configuration for the
*default domain and for the domain you want to join to the[global] section in the/etc/samba/smb.conffile. -
Verify the
/etc/samba/smb.conffile:# testparm -
Join the domain as the domain administrator:
-
To join an AD domain:
# net ads join -U "DOMAINadministrator" -
To join an NT4 domain:
# net rpc join -U "DOMAINadministrator"
-
-
Append the
winbindsource to thepasswdandgroupdatabase entry in the/etc/nsswitch.conffile:passwd: files
winbindgroup: fileswinbind -
Enable and start the
winbindservice:# systemctl enable --now winbind -
Optionally, configure PAM using the
authselectutility.For details, see the
authselect(8)man page. -
Optionally for AD environments, configure the Kerberos client.
For details, see the documentation of your Kerberos client.
3.20.2. Using the net rpc rights command
In Windows, you can assign privileges to accounts and groups to perform special operations, such as setting ACLs on a share or upload printer drivers. On a Samba server, you can use the net rpc rights command to manage privileges.
Listing privileges you can set
To list all available privileges and their owners, use the net rpc rights list command. For example:
# net rpc rights list -U "DOMAINadministrator" Enter DOMAINadministrator's password: SeMachineAccountPrivilege Add machines to domain SeTakeOwnershipPrivilege Take ownership of files or other objects SeBackupPrivilege Back up files and directories SeRestorePrivilege Restore files and directories SeRemoteShutdownPrivilege Force shutdown from a remote system SePrintOperatorPrivilege Manage printers SeAddUsersPrivilege Add users and groups to the domain SeDiskOperatorPrivilege Manage disk shares SeSecurityPrivilege System security
Granting privileges
To grant a privilege to an account or group, use the net rpc rights grant command.
For example, grant the SePrintOperatorPrivilege privilege to the DOMAINprintadmin group:
# net rpc rights grant "DOMAINprintadmin" SePrintOperatorPrivilege -U "DOMAINadministrator" Enter DOMAINadministrator's password: Successfully granted rights.
Revoking privileges
To revoke a privilege from an account or group, use the net rpc rights revoke command.
For example, to revoke the SePrintOperatorPrivilege privilege from the DOMAINprintadmin group:
# net rpc rights remoke "DOMAINprintadmin" SePrintOperatorPrivilege -U "DOMAINadministrator" Enter DOMAINadministrator's password: Successfully revoked rights.
3.20.3. Using the net rpc share command
The net rpc share command provides the capability to list, add, and remove shares on a local or remote Samba or Windows server.
Listing shares
To list the shares on an SMB server, use the net rpc share list command. Optionally, pass the -S server_name parameter to the command to list the shares of a remote server. For example:
# net rpc share list -U "DOMAINadministrator" -S server_name Enter DOMAINadministrator's password: IPC$ share_1 share_2 ...
Shares hosted on a Samba server that have browseable = no set in their section in the /etc/samba/smb.conf file are not displayed in the output.
The net rpc share add command enables you to add a share to an SMB server.
For example, to add a share named example on a remote Windows server that shares the C:example directory:
# net rpc share add example="C:example" -U "DOMAINadministrator" -S server_name
You must omit the trailing backslash in the path when specifying a Windows directory name.
To use the command to add a share to a Samba server:
- The user specified in the
-Uparameter must have theSeDiskOperatorPrivilegeprivilege granted on the destination server. - You must write a script that adds a share section to the
/etc/samba/smb.conffile and reloads Samba. The script must be set in theadd share commandparameter in the[global]section in/etc/samba/smb.conf. For further details, see theadd share commanddescription in thesmb.conf(5)man page.
The net rpc share delete command enables you to remove a share from an SMB server.
For example, to remove the share named example from a remote Windows server:
# net rpc share delete example -U "DOMAINadministrator" -S server_name
To use the command to remove a share from a Samba server:
- The user specified in the
-Uparameter must have theSeDiskOperatorPrivilegeprivilege granted. - You must write a script that removes the share’s section from the
/etc/samba/smb.conffile and reloads Samba. The script must be set in thedelete share commandparameter in the[global]section in/etc/samba/smb.conf. For further details, see thedelete share commanddescription in thesmb.conf(5)man page.
3.20.4. Using the net user command
The net user command enables you to perform the following actions on an AD DC or NT4 PDC:
- List all user accounts
- Add users
- Remove Users
Specifying a connection method, such as ads for AD domains or rpc for NT4 domains, is only required when you list domain user accounts. Other user-related subcommands can auto-detect the connection method.
Pass the -U user_name parameter to the command to specify a user that is allowed to perform the requested action.
Listing domain user accounts
To list all users in an AD domain:
# net ads user -U "DOMAINadministrator"
To list all users in an NT4 domain:
# net rpc user -U "DOMAINadministrator"
Adding a user account to the domain
On a Samba domain member, you can use the net user add command to add a user account to the domain.
For example, add the user account to the domain:
-
Add the account:
# net user add user password -U "DOMAINadministrator" User user added
-
Optionally, use the remote procedure call (RPC) shell to enable the account on the AD DC or NT4 PDC. For example:
# net rpc shell -U DOMAINadministrator -S DC_or_PDC_name Talking to domain DOMAIN (S-1-5-21-1424831554-512457234-5642315751) net rpc>
user edit disabled user: noSet user's disabled flag from [yes] to [no] net rpc>exit
Deleting a user account from the domain
On a Samba domain member, you can use the net user delete command to remove a user account from the domain.
For example, to remove the user account from the domain:
# net user delete user -U "DOMAINadministrator" User user deleted
3.20.5. Using the rpcclient utility
The rpcclient utility enables you to manually execute client-side Microsoft Remote Procedure Call (MS-RPC) functions on a local or remote SMB server. However, most of the features are integrated into separate utilities provided by Samba. Use rpcclient only for testing MS-PRC functions.
Prerequisites
- The
samba-clientpackage is installed.
Examples
For example, you can use the rpcclient utility to:
-
Manage the printer Spool Subsystem (SPOOLSS).
Example 3.7. Assigning a Driver to a Printer
# rpcclient server_name -U "DOMAINadministrator" -c 'setdriver "printer_name" "driver_name"' Enter DOMAINadministrators password: Successfully set printer_name to driver driver_name.
-
Retrieve information about an SMB server.
Example 3.8. Listing all File Shares and Shared Printers
# rpcclient server_name -U "DOMAINadministrator" -c 'netshareenum' Enter DOMAINadministrators password: netname: Example_Share remark: path: C:srvsambaexample_share password: netname: Example_Printer remark: path: C:varspoolsamba password:
-
Perform actions using the Security Account Manager Remote (SAMR) protocol.
Example 3.9. Listing Users on an SMB Server
# rpcclient server_name -U "DOMAINadministrator" -c 'enumdomusers' Enter DOMAINadministrators password: user:[user1] rid:[0x3e8] user:[user2] rid:[0x3e9]
If you run the command against a standalone server or a domain member, it lists the users in the local database. Running the command against an AD DC or NT4 PDC lists the domain users.
Additional resources
-
rpcclient(1)man page
3.20.6. Using the samba-regedit application
Certain settings, such as printer configurations, are stored in the registry on the Samba server. You can use the ncurses-based samba-regedit application to edit the registry of a Samba server.

Prerequisites
- The
samba-clientpackage is installed.
Procedure
To start the application, enter:
# samba-regedit
Use the following keys:
- Cursor up and cursor down: Navigate through the registry tree and the values.
- Enter: Opens a key or edits a value.
- Tab: Switches between the
KeyandValuepane. - Ctrl+C: Closes the application.
3.20.7. Using the smbcontrol utility
The smbcontrol utility enables you to send command messages to the smbd, nmbd, winbindd, or all of these services. These control messages instruct the service, for example, to reload its configuration.
The procedure in this section shows how to to reload the configuration of the smbd, nmbd, winbindd services by sending the reload-config message type to the all destination.
Prerequisites
- The
samba-common-toolspackage is installed.
Procedure
# smbcontrol all reload-config
Additional resources
-
smbcontrol(1)man page
3.20.8. Using the smbpasswd utility
The smbpasswd utility manages user accounts and passwords in the local Samba database.
Prerequisites
- The
samba-common-toolspackage is installed.
Procedure
-
If you run the command as a user,
smbpasswdchanges the Samba password of the user who run the command. For example:[user@server ~]$ smbpasswd New SMB password: password Retype new SMB password: password
-
If you run
smbpasswdas therootuser, you can use the utility, for example, to:-
Create a new user:
[root@server ~]# smbpasswd -a user_name New SMB password:
passwordRetype new SMB password:passwordAdded user user_name.Before you can add a user to the Samba database, you must create the account in the local operating system. See the Adding a new user from the command line section in the Configuring basic system settings guide.
-
Enable a Samba user:
[root@server ~]# smbpasswd -e user_name Enabled user user_name.
-
Disable a Samba user:
[root@server ~]# smbpasswd -x user_name Disabled user user_name
-
Delete a user:
[root@server ~]# smbpasswd -x user_name Deleted user user_name.
-
Additional resources
-
smbpasswd(8)man page
3.20.9. Using the smbstatus utility
The smbstatus utility reports on:
- Connections per PID of each
smbddaemon to the Samba server. This report includes the user name, primary group, SMB protocol version, encryption, and signing information. - Connections per Samba share. This report includes the PID of the
smbddaemon, the IP of the connecting machine, the time stamp when the connection was established, encryption, and signing information. - A list of locked files. The report entries include further details, such as opportunistic lock (oplock) types
Prerequisites
- The
sambapackage is installed. - The
smbdservice is running.
Procedure
# smbstatus Samba version 4.15.2 PID Username Group Machine Protocol Version Encryption Signing ....------------------------------------------------------------------------------------------------------------------------- 963 DOMAINadministrator DOMAINdomain users client-pc (ipv4:192.0.2.1:57786) SMB3_02 - AES-128-CMAC Service pid Machine Connected at Encryption Signing: ....--------------------------------------------------------------------------- example 969 192.0.2.1 Thu Nov 1 10:00:00 2018 CEST - AES-128-CMAC Locked files: Pid Uid DenyMode Access R/W Oplock SharePath Name Time ....-------------------------------------------------------------------------------------------------------- 969 10000 DENY_WRITE 0x120089 RDONLY LEASE(RWH) /srv/samba/example file.txt Thu Nov 1 10:00:00 2018
Additional resources
-
smbstatus(1)man page
3.20.10. Using the smbtar utility
The smbtar utility backs up the content of an SMB share or a subdirectory of it and stores the content in a tar archive. Alternatively, you can write the content to a tape device.
Prerequisites
- The
samba-clientpackage is installed.
Procedure
-
Use the following command to back up the content of the
demodirectory on the//server/example/share and store the content in the/root/example.tararchive:# smbtar -s server -x example -u user_name -p password -t /root/example.tar
Additional resources
-
smbtar(1)man page
3.20.11. Using the wbinfo utility
The wbinfo utility queries and returns information created and used by the winbindd service.
Prerequisites
- The
samba-winbind-clientspackage is installed.
Procedure
You can use wbinfo, for example, to:
-
List domain users:
# wbinfo -u ADadministrator ADguest ... -
List domain groups:
# wbinfo -g ADdomain computers ADdomain admins ADdomain users ... -
Display the SID of a user:
# wbinfo --name-to-sid="ADadministrator" S-1-5-21-1762709870-351891212-3141221786-500 SID_USER (1)
-
Display information about domains and trusts:
# wbinfo --trusted-domains --verbose Domain Name DNS Domain Trust Type Transitive In Out BUILTIN None Yes Yes Yes server None Yes Yes Yes DOMAIN1 domain1.example.com None Yes Yes Yes DOMAIN2 domain2.example.com External No Yes Yes
Additional resources
-
wbinfo(1)man page
3.21. Additional resources
-
smb.conf(5)man page -
/usr/share/docs/samba-version/directory contains general documentation, example scripts, and LDAP schema files, provided by the Samba project - Setting up Samba and the Clustered Trivial Database (CDTB) to share directories stored on an GlusterFS volume
- Mounting an SMB Share on Red Hat Enterprise Linux
Linux Samba ������
������� �����
������� ����������� ����� ���������� ����� ������ ������������ ������, �
�� ����� ���������� �� � ���� ��� ����������� ������������� ������ �
���������. ��������� ����� �������� �� ������� �������� Linux, Microsoft
Windows 95/98/NT, OS/2 ��� Novel � �� ��������� ������ � �������� ���
������������ ������. Linux ������ � ���������� Samba ����� ����
����������� ��� ���� �����.
Samba ��� �������� ������� ������ ��� ����������� �����������
������������� ������ � ���������, ������� �������� �� �����������
������������ ������ ��������� �������. ����� �� ������ ��������
���������������, ��� ����� ������� � ���������� �������� ������, ���
«������» ���������� �� ������� Microsoft Windows.
��� ������� � ����� README ��� Samba:
Samba — ��� ��������, ��� ������ �������� �� ����������� PC-�������
��������� ������������ �����, �������� � ������ ����������, ����� ���
������ ��������� ������ � ���������. ���������� ��������� �����
��������� ����� Windows 95/98/NT, OS/2 � Linux, � � �������
��������������� ������ DOS, Windows, VMS, Unix ���� ������ �����, MVS �
������ ������. Apple Macs � ��������� ��� �������� ����� �������� ���.
������������ SMB ���������� Netware, NFS, AppleTalk, Banyan Vines, Decnet �
��.; ������ �� ��� ����� ������� �����������, �� �� ���� �� �����
������������� ������������ � ������� ���������� �� ���������� �������.
����������� ����������� Samba �������� SMB ������, ���������������
�������� � ���������� ������ � ����� Windows NT � LAN Manager SMB
�������� (Windows 95, Warp Server, smbfs � ��), NetBIOS (rfc1001/1002) ������
����, ������� ����� ������ ������ �����, ���� ����������� ftp-���������
��������� �������� (������ � ���������) �� Unix, Netware � ������ ��, �
���������� tar ��� �������� ��� ���������� ����������� PC.

��� ���������� ������������.
Unix-����������� �������.
���� � �������� ����� «/var/tmp» (�������� ������ ��������).
����������� ���� ��������� �� Red Hat Linux 6.1 � 6.2.
��� ���� ����������� �������������� ������������������ «root».
Samba ������ 2.0.7
������.
�������� �������� Samba: http://us1.samba.org/samba/samba.html
FTP ������ Samba: 63.238.153.11
�� ������ �������: samba-2.0.7.tar.gz
�������.
������� ����� ����� ������� ������ ������ ������������� � ����� ������� ��
����������� Samba � �����, � ����������, � ������� ������� diff �� �������
������ ����� ����� ���� �����������. ��������,
�� �����������:
find /* > Samba1
����� �����������:
find /* > Samba2
��� ��������� ������ ������������� ������:
diff Samba1 Samba2 > Samba-Installed
��������� ������:
[root@deep /]# cp samba-version.tar.gz /var/tmp
[root@deep /]# cd /var/tmp
[root@deep tmp]# tar xzpf samba-version.tar.gz
����������������
��������� � ������� Samba, � ����� � ���������� «source».
��� 1
������������ ���� smbsh.in (vi +3 smbwrapper/smbsh.in) � �������� ������:
SMBW_LIBDIR=${SMBW_LIBDIR-@builddir@/smbwrapper}
��:
SMBW_LIBDIR=${SMBW_LIBDIR-/usr/bin}
��� ������� ����������������� �������� «lib» Samba ��� ������� «/usr/bin».
��� 2
������������ ���� Makefile.in (vi +28 Makefile.in) � �������� ������:
SBINDIR = @bindir@
��:
SBINDIR = @sbindir@
VARDIR = @localstadir@
��:
VARDIR = /var/log/samba
��� ��������� ���������� ������� «/usr/sbin» ��� �������� ������ Samba, �
������� «/var» ��� ������ ����������� Samba («/var/log/samba»).
��� 3
������������ ���� convert_smbpasswd (vi +10 script/convert_smbpasswd) �
�������� ������:
nawk ‘BEGIN {FS=»:»}
��:
gawk ‘BEGIN {FS=»:»}
��� ��������� ��������� ������������� ������ GNU Linux ������� ���������
������ awk, ���������� �� Bell Labs research ������ ��������� awk ���
��������� «smbpasswd».
��� 4
������������ ���� smbmount.c file (vi +98 client/smbmount.c) � ��������
������:
static void close_our_files(int client_fd)
{
int i;
for (i = 0; i < 256; i++) {
if (i == client_fd) continue;
close(i);
}
��:
static void close_our_files(int client_fd)
{
struct rlimit limits;
int i;
getrlimit(RLIMIT_NOFILE,&limits);
for (i = 0; i < limits.rlim_max; i++) {
if (i == client_fd) continue;
close(i);
}
���� ��� ������� ���� smbmount.c ����������� � ����������� Red Hat’s glibc
2.1.
���������� � �����������
��� 1
������� ��������� ������� �� ����� ���������:
CC=»egcs»
./configure
—prefix=/usr
—libdir=/etc
—with-lockdir=/var/lock/samba
—with-privatedir=/etc
—with-swatdir=/usr/share/swat
—with-pam
—with-mmap
—without-sambabook
��������� ����� «—with-mmap» ����� �������� ������������������ ��
��������� �������, �� ������ ������ �� ���������, �� � �� ������� ��� �����
������.
��� ����� ������� Samba:
- �������� ��������� ���� ������ PAM �������, �������������� ��� ������ ������������.
- �������� ����������������� ��������� MMAP ��� ��������� ������������������ Samba.
- �� ������������� �����, ������������ � ������������� Samba.
��� 2
������ �� ������ �������������� Samba �� ����� Linux �������:
[root@deep source]# make all
[root@deep source]# make install
[root@deep source]# install -m 755 script/mksmbpasswd.sh /usr/bin/
[root@deep source]# rm -rf /usr/share/swat/ (���� �� ��� ��������� �����, ��
���������� ������������� ����������� Samba ����� �������).
[root@deep source]# rm -f /usr/sbin/swat
[root@deep source]# rm -f /usr/man/man8/swat.8
[root@deep source]# mkdir -p /var/lock/samba
[root@deep source]# mkdir -p /var/spool/samba (��������� ������ ���� ��
���������� ���������� ������������� ��������).
[root@deep source]# chmod 1777 /var/spool/samba/ (��������� ������ ���� ��
���������� ���������� ������������� ��������).
������� «install» ������������ ������ «mksmbpasswd.sh» � ������� «/usr/bin/».
���� ������ �����, ����� ������������ Samba ����� ������������ � �������,
��������� ���� «smbpasswd». � ��� ��� ������������ ������ Samba �������
������ � ���� �����.
������� «rm» ������ ������� «/usr/share/swat» � ��� ����� � ���, ����� ���
������ ����������� ���� «swat» �� �������� «/usr/sbin/». SWAT — ���
���������������� ������� ������� ��� ���������, ������� ���������
����������� ���� «smb.conf» �� ��� ��������. ��� ����� ������� ����� �
������������ ������ �������, ������� � ���������� ������� ��.
������� «mkdir» ������� ������� «/var/spool/samba/», ������� ������������ ���
������ �� ��������. �������, �� ���������, ���� �� ���������� ������������
Samba ��� �������������� �������� � ���������� �������������. ��� ��� �� ��
����������� ��� ������ Samba �� �������������� ������� ������, ��� �� �����
���� ������� («/var/spool/samba/»), � �������������� ��� ������������� �
������� «chmod», ��������������� «sticky» ��� � «/var/spool/samba», �����
������ �������� ����� ��� ������� ��� �� ��������.
������� ����� ������.
[root@deep /]# cd /var/tmp
[root@deep tmp]# rm -rf samba-version/ samba-version.tar.gz
������� «rm» ����� ������� ��� ����� � ��������� ������, ������� ��
������������ ��� ���������� � ����������� Samba. ����� ����� ������
������ ����� Samba �� �������� «/var/tmp».
������������.
���������������� ���� ��� ������ �������� ����� ���������� � ������
������� �� ����, ��� ��� �����. ��������� ����� �������������� ������ Samba,
����������� �� ���� ���������� ����������, � ��������� �� ������.
��� ����������� �����������, ��������� � �����, ����� ������������ �������
� ���������� � ������ «floppy.tgz», ���������� ��� ���������������� �����
��� ���� ��������. ���� �� �������� ���� ����, �� ��� �� ����� ����� �������
�������������� ����� �� �����, ����� ������� ���� ����� ������������.
���������� ����� ��������� � Samba �� ������, �������� �� ��� ����
���������� � ��������� � ������ ����� ���, ��� ��� ������� ����. ���� �
�������������� �� ������ ������� � ������:
http://www.openna.com/books/floppy.tgz
��� ������� ��� ������� Apache ��������� ����� ������ ���� ������� ���
����������� �� ��� ������.
��������� ����� smb.conf � lmhosts � ������� «/etc/».
��������� smb � ������� «/etc/rc.d/init.d/».
��������� samba � ������� «/etc/logrotate.d/».
��������� samba � ������� «/etc/pam.d/».
�� ������ ����� ��� ����� �� ������ ������ floppy.tgz.
���������������� ���� «/etc/smb.conf»
���� «/etc/smb.conf» — ��� �������� ���������������� ���� ������� Samba, �
������� �� ������ ���������� �������� � ������� �������������� ������, �
����� IP ������� �������� ������ � ��. ������ ��������� ����� � ������
[global] �������� ���������� ���������������� ���������, ������� ��������
������ ��� ���� ����������� �������� (���� ��� �� ���������� � ����������
������� ��� ������� �������), ����� ���� ������, ���������� �� ����������
�������. ���������� ��������� �����, � ����� ����������� ���������
������������, ������������ ������ � Samba, ����� �������� ���������� �
������ �� ���.
��������� ������ ������������ �� ���� ����������� �������
������������ ��� Samba � ���������� ����������� �������. �����, ������,
��� �� ��������������� ������ �� ���������, ������� ������� �
������������� � ������������, � ��������� ������� ��� ������ ������������
��������.
� ����� �������, �� ������� ������ ���� �������, «[tmp]», � ��������� ������
������ ������� � IP �������� ��������� ������ C. ����� �� �� ����������
������ ������.
������������ ���� smb.conf (vi /etc/smb.conf) � ��������/�������� ���������
���������:
[global] workgroup = OPENNA server string = R&D of Open Network Architecture Samba Server encrypt passwords = True security = user smb passwd file = /etc/smbpasswd log file = /var/log/samba/log.%m socket options = IPTOS_LOWDELAY TCP_NODELAY domain master = Yes local master = Yes preferred master = Yes os level = 65 dns proxy = No name resolve order = lmhosts host bcast bind interfaces only = True interfaces = eth0 192.168.1.1 hosts deny = ALL hosts allow = 192.168.1.4 127.0.0.1 debug level = 1 create mask = 0644 directory mask = 0755 level2 oplocks = True read raw = no write cache size = 262144 [homes] comment = Home Directories browseable = no read only = no invalid users = root bin daemon nobody named sys tty disk mem kmem users [tmp] comment = Temporary File Space path = /tmp read only = No valid users = admin invalid users = root bin daemon nobody named sys tty disk mem kmem users
��� ����� ������� Samba ���������:
[global]
workgroup = OPENNA
����� «workgroup» ���������� ������� ������ � ������� ������ ��� ������.
�����, ����� ������� � ������ ������� � ���� � ���� ������.
server string = R&D of Open Network Architecture Samba Server
����� «server string» ���������� ������, ������� ������� ������������ � �����
����������� � �������� � ��������� ���������, ��� ��� IPC ���������� ��
������� «net view» �� Windows �������.
encrypt passwords = True
����� «encrypt passwords» ���� ����������� � «True» ������������� Samba
������������ ����������� ������ ������ ������� � �������� �������.
�������� �������� ���������� ��� ������, ����
�� ����������. ��� ����� �� ����������� ������������ ����� ���������� �
«True».
security = user
����� «security», ���� ����������� � «user», ����������, ��� ������ ������
������� ������ �������������� �� ����������� ����� � ������, ���
���������� ����� ���������. ��� ���� ������� ��� ������������ � ������
������ ������������ � ����� «/etc/passwd» Linux ������� � � �����
«/etc/smbpasswd» Samba �������, ��� ���������� � �������� �� ���������.
�������� «������������ samba» � ���� ����� ��� ��������� �������
���������� � ����� «smbpasswd».
smb passwd file = /etc/smbpasswd
����� «smb passwd file» ���������� ���� � ����� � ������������ ��������
«smbpasswd». ���� «smbpasswd» ��� ����� ����� «/etc/passwd» Linux �������
���������� ����������� ����� � ������ ��������, ������� �������� ������
� ������� Samba. Samba ������ ���� ����, ����� �������� ������ �� ����������.
log file = /var/log/samba/log.%m
����� «log file» ���������� ����������������� � ����� ������ �����������
Samba. � ����������� «%m», � ��� ����� ����������� ����������� �����
����������� ��� ������� ������������ ��� ������, ������������� � ������
Samba ������� (��������, log.machine1).
socket options = IPTOS_LOWDELAY TCP_NODELAY
����� «socket options» ���������� ���������, ������� �� ������ �������� �
���� ������������ Samba ��� ��������� � ��������� ������� samba ��
����������� ������������������. �� ���������, �� ������� ���������
������� �� ��������� ���� � �������� ������������������ ������� Samba ���
��������� ������.
domain master = Yes
����� «domain master» ����������, ��� ���� �� ������� Samba, «nmbd», �����
���������� ��� ����� ������ ������� ��� ������ ������� ������. ��� �����
������ ��������������� � «Yes» ������ �� ����� ������� Samba � ���������
���� � ������� ������.
local master = Yes
����� «local master» ��������� «nmbd» ���������� ��������� ������ ���������
� �������. ������� ���������� ����� ��� ����� ������ ���� ����������� �
«Yes» ������ �� ����� Samba ������� � �������.
preferred master = Yes
����� «preferred master» ���������� � ������������ �������� �� «nmbd»
����������������� (preferred) ������ ��������� ������� ������. ����� ��,
��� ����� ������ ������������ � «Yes» �� ����� ������� �� ����� ����.
os level = 65
����� «os level» ���������� �������� ����� �� «nmbd» ���� ����� ���������
������ ��������� ��� ������� ������ � ��������� �����������������
�������. ����� 65 �������� �������� ����� NT ������. ���� � ����� ���� ����
NT ������ � �� ������, ����� Linux Samba ������ ���� ��������� ������
���������, �� ������ ���������� ���� �������� ������ 65. ��� ����� ������
���� ���������� ������ �� ����� Linux Samba ������� � ����, � �� ��������� ��
���� ���������.
dns proxy = No
����� «dns proxy» ���� ����������� � «Yes» ����������, ��� «nmbd» �����
��������� ��� WINS ������ � ����������, ��� Net BIOS ��� �� ����
����������������, ������ ���������������� Net BIOS ��� ����� � ����� ���
DNS ��� � ������ lookup �� DNS ������ �������� �� ����� �������,
�������������� ������ ���. ��� ��� �� �� ����������� Samba ������ ���
WINS ������, ��� �� ����� ������������� ��� ����� � «Yes». ������������ ���
����� � «Yes» �� ������� ������������������ Samba.
name resolve order = lmhosts host bcast
����� «name resolve order» ����������, � ����� ������� ������������ �������
���� ��� ���������� ����� ����� � IP �����. ���������, ������� �� �������
������� ������������ � ������ ������� ��������� «lmhosts» ����.
bind interfaces only = True
����� «bind interfaces only» ���� ����������� � «True», ��������� ���
������������ ���������� �� ������� ����� ��������� ������� «smb». ���
����������� ���������� ������������ �������. ����� «interfaces = eth0
192.168.1.1» ��������� ������ �����.
interfaces = eth0 192.168.1.1
����� «interfaces» ��������� ��� ���������� ������ ����������� ��
���������, �� ������� Samba ����� ������������ �������. �� ���������,
Samba ��������� ������ �� ���� �������� ����������� � ����� ����������
(�������� 127.0.0.1), �� ������� �������������� �����������
����������������� ��������. � ���� ������, Samba ����� ������� ������
��������� «eth0» � IP ������� 192.168.1.1. ��� ����������� ����������
������������, � ��������� ����� ����������� ����� «bind interfaces only =
True».
hosts deny = ALL
����� «hosts deny» ���������� ������ ������, ������� �������� ������ �
������� Samba, ���� ������������ ������� �� ����� ����������� �������
�������. ��� ��������, �� ��������� ������ ���� ������ �� ���������, �
��������� ������ ��������� ����������� � ����� «hosts allow =»,
����������� ����.
hosts allow = 192.168.1.4 127.0.0.1
����� «hosts allow» ����������, ����� ������ �������� ������ � Samba
�������. �� ���������, �� ������� ��������� � IP ������� ������ C
192.168.1.4 � ��� localhost 127.0.0.1. �������, ��� ������ � localhost ������
���� ������ ��������, ����� �� ������ �������� ��������� �� �������.
debug level = 1
����� «debug level» ��������� ��� ���������� ������� �����������. ���� ��
���������� ������� ������� ������ ��� 2, �� ��� �������� � �������
������������������. ��� ������� � ���, ��� ������ ���������� ���������� �
���� ����������� ����� ������ ��������, ������� ����� ���� �����
������������.
create mask = 0644
����� «create mask» ���������� � ������������� ������ ����� �������,
�������� ����� ������� ������ DOS � ������� UNIX. � ���� ������
������������� � 0644, ��� ����� ���������� ��� ����������� �� Windows
������ �� Unix ����� ����� ����� ������� 0644.
directory mask = 0755
����� «directory mask» ���������� � ������������� �����, �������
������������ ��� ��������������� DOS ������� � UNIX ������, �����
��������� UNIX �������. � ���� ������ ������������� � 0755, ��� ��������
���������� ��� ����������� �� Windows ������ �� Unix ����� ����� �����
������� 0755.
level2 oplocks = True
����� «level2 oplocks», ���� ����������� � «True», ��������
������������������ �������������� ������� � ������, ������� ������ ��
������������ (����� ��� ����� ���������� .EXE).
read raw = no
����� «read raw» ������������ ����� ��� ��� ������ ������������ «��������������» (raw)
������ SMB ��������, ����� ���������� ������ �������. �������, ���
������������� ������ �� ���������� �������� «read raw». ����� �������, ��
������ ����������, ��� ������������� ������ ����� ����������, ���� ��
��������� «read raw», ��������� �������� «read raw = no».
write cache size = 262144
����� «write cache size» ��������� Samba �������� ������������������ ������
� ������� �������� ���������� �������� ����� ������. �������� ���� �����
������������ � ������. �������� ���� ����� ������������ � ������,
������������� 262,144 ������������ 256k ��� �� ����.
[tmp]
comment = Temporary File Space
����� «comment» ��������� ��� ���������� �����������, ������� ����������,
����� ������ ���������� ������� �� ������.
path = /tmp
����� «path» ���������� �������, � ������� ������������ ����������� ������.
� ����� �������, ��� ������� «tmp».
read only = No
����� «read only» ���������� ������ �� ������������ ����� ������ «������ ��
������» ��� ���. � ����� �������, ��� ��� ��� ������������ ��� ��������
«tmp», ������������ ����� ����� ������� ������, ��� «������ �� ������».
valid users = admin
����� «valid users» ���������� ������ �������������, ������� �����
������������ � ����� �������. � ����� �������, ������ ������������ «admin»
�������� ������ � �������� «/tmp».
invalid users = root bin daemon nobody named sys tty disk mem kmem users
����� «invalid users» ���������� ������ ������������� ������� �� �����������
������������ � ����� �������. ��� ��������� «��������������» ��������,
������� �����������, ��� ������������ ��������� �� ������� ������������
�������. �������������, ����� �� �������� � ��� ������ ���� �������������,
��������� � ������� �� ���������, �� ����� ������� ����������� ������ ��
�������.
������������ ����� «/etc/lmhosts»
�������� ���� «/etc/lmhosts». �� �������� ������������ ����� Samba Net
BIOS ������� � IP ��������. �� �������, ���� ����, ������� «/etc/hosts», ��
����������� ����, ��� ���������� ����� ����� ������������� ������� ����
Net BIOS.
�������� ���� lmhosts (touch /etc/lmhosts) � ������ � ���� ����������
����������:
# ������ Samba ����� lmhosts. # 127.0.0.1 localhost 192.168.1.1 deep 192.168.1.4 win
� ����� �������, lmhots �������� ��� ������������ ����� IP � Net BIOS
�������. localhost (127.0.0.1), ������ � ������ deep (192.168.1.1) � ������ �
������ win (192.168.1.4).
������������ ����� «/etc/pam.d/samba»
�������� ���� «/etc/pam.d/samba» ��� ������������� pam ��������������.
�������� ���� samba (touch /etc/pam.d/samba) � �������� � ���� ���������
������:
Auth required /lib/security/pam_pwdb.so nullok shadow
Account required /lib/security/pam_pwdb.so
������������ ����� «/etc/logrotate.d/samba»
�������������� ���� «/etc/logrotate.d/samba» �� ��������������
������������ ������� ����� ������ �����������.
�������� ���� samba (touch /etc/logrotate.d/samba) � �������� � ���� ���������
������:
/var/log/samba/log.nmb {
notifempty
missingok
postrotate
/usr/bin/killall -HUP nmbd
endrotate
}
/var/log/samba/log.smb {
notifempty
missingok
postrotate
/usr/bin/killall -HUP smbd
endrotate
}
�������� ����� � ������������ �������� Samba
� ����� «/etc/smbpasswd» �������� ����������� ������ Samba. �� ������ ���
������������; Unix UID, ������������ ������ SMB, �������������� ����
������� ������ � ����� ���������� ��������� ������. ����� ������� ���� ����
� �������� � �������� � ���� ���� ������������� �� ����, ��� ��� �����
������������ � ������ ������� Samba. ��� ����� ����� �� ������
������������ � ����.
��� 1
��� �������� ������� ������ Samba, �� ������, ��� ������, �������
������������ Linux. �������, �������, �������� � ����� «/etc/passwd» ����
�������������, ������� ������ ������������ � ������� Samba.
�������� ������ ������������ � ���� «/etc/passwd» ��������� ���������
�������:
[root@deep /]# useradd smbclient
���������� ������ ��� ���� ��������� �������:
[root@deep /]# passwd smbclient
Changing password for user smbclient
New UNIX password:
Retype new UNIX password:
passwd: all authentication tokens updated successfully
��� 2
����� ����, ��� �� ������ ���� ������������� � ���� «/etc/passwd», �� ������
������� ���� «smbpasswd», ��������� «/etc/passwd». ��� ����� �������
��������� �������:
[root@deep /]# cat /etc/passwd | mksmbpasswd.sh > /etc/smbpasswd
��� 3
� ����������, �� ��������� ����, �� ������ ������� ������ ������������ �
����� ����� «/etc/smbpasswd».
��� �������� ������� ������ ������������ Samba ����������� �������:
[root@deep /]# smbpasswd -a smbclient (�������, ��� «smbclient» ������ ���� �������� ������������� Linux).
New SMB password:
Retype new SMB password:
Added user smbclient.
Password changed for user smbclient.
��� 4
�� �������� �������� ����� ������� � ������ ������ ����� «smbpasswd» ��
������-������ ������ ��� ������������ «root’ (0600/-rw——-). ��� �������� ��
����������� ������������.
[root@deep /]# chmod 600 /etc/smbpasswd
[root@deep /]# testparm (��� ������� �������� ���� smb.conf �� �������
������).
���������. �������� ���� ENCRYPTION.txt, ����������� � ������������
Samba � �������� /doc/texts/ ��� ������� ����������.
������������ ������� «/etc/rc.d/init.d/smb»
�������� ������ «/etc/rc.d/init.d/smb», ������� �������� �� ������ � ���������
������� Samba smbd � nmbd.
�������� ������ smb (touch /etc/rc.d/init.d/smb) � �������� � ���� ���������
������:
#!/bin/sh
#
# chkconfig: - 91 35
# ��������: ������ � ��������� ������� Samba smbd � nmbd
# ������������ ��� �������������� �������� ������� SMB.
# ���������� �������� �������.
. /etc/rc.d/init.d/functions
# �������� ������� ������������.
. /etc/sysconfig/network
# �������� ������� ����.
[ ${NETWORKING} = "no" ] && exit 0
# �������� ������� ����� smb.conf.
[ -f /etc/smb.conf ] || exit 0
RETVAL=0
# See how we were called.
case "$1" in
start)
echo -n "Starting SMB services: "
daemon smbd -D
RETVAL=$?
echo
echo -n "Starting NMB services: "
daemon nmbd -D
RETVAL2=$?
echo
[ $RETVAL -eq 0 -a $RETVAL2 -eq 0 ] && touch /var/lock/subsys/smb ||
RETVAL=1
;;
stop)
echo -n "Shutting down SMB services: "
killproc smbd
RETVAL=$?
echo
echo -n "Shutting down NMB services: "
killproc nmbd
RETVAL2=$?
[ $RETVAL -eq 0 -a $RETVAL2 -eq 0 ] && rm -f /var/lock/subsys/smb
echo ""
;;
restart)
$0 stop
$0 start
RETVAL=$?
;;
reload)
echo -n "Reloading smb.conf file: "
killproc -HUP smbd
RETVAL=$?
echo
;;
status)
status smbd
status nmbd
RETVAL=$?
;;
*)
echo "Usage: $0 {start|stop|restart|status}"
exit 1
esac
exit $RETVAL
������, �� ������ ������� ���� ������ ����������� � �������� �����
������� � ����:
[root@deep /]# chmod 700 /etc/rc.d/init.d/smb
�������� ������������� rc.d ������ ��� Samba:
[root@deep /]# chkconfig —add smb
������ Samba �� ����� ������������� ���������� ������ smbd � nmbd, �����
������� �������������. ����� �������� ���, ��������� ��������� �������:
[root@deep /]# chkconfig —level 345 smb on
��������� ������ Samba �������:
[root@deep /]# /etc/rc.d/init.d/smb start Starting SMB services: [ OK ] Starting NMB services: [ OK ]
����������� ������ Samba
����������� ������ ���������������� ������
��� «�����������» ������������ ��� �������������� ���������� �������� ���
������������� ������, ������� ����������. �� ����� �� ���� ���������
������������� ������ � ���� ������. ��� ��� ����� «smb.conf» � «lmhosts»
��� ���������, ������� ����� ����� �������������� ��:
[root@deep /]# chattr +i /etc/smb.conf
[root@deep /]# chattr +i /etc/lmhosts
����������� Samba
��������� ��������� «wide links=» � ���������������� ����� Samba
������� ������� ����� ���������� �������� «wide links» � «no» �
���������������� ����� Samba «/etc/smb.conf». ��� �����, ���� ����������� �
«no», ������� Samba �� ��������� �� ������������� ������� ���
�������������� �������. ����� ���������� ��������� �� ������ ��� �������,
Samba ������� �� ������������� ������, � ����� ��������� «directory path
lookup», ����� ����������, ��� �� �������� ������� ������������� ������
�����������. ��� �������� ��������� ����� �������������� ���������
������� �� ������ �������� lookup, � Samba ������������� ����� ������
����� ����� ���. �����, ������� ���� ������������, ��������, ��� ���������
����� ��������� ������� ������������������ Samba ������� �� 25-30
���������.
��������� ���� ������
����������� ����������, �������� �� ��������� ���� �������� �������,
����� ����������� �������� ������������������ ��������� ������� Linux.
Linux ����� �������� ������������ ������, �� ������������ ��� ������ �����,
��� ����������� �������� �������. ����������� �����, ����������
«bdflush», ����� ������������ ���������� �� ���� ���������� «�������»
������� (�����, ������� �������� ���������������� ������ ��������
������� ��� ����������).
������ ������� ������������������ — ��� ���������� � ������ ��� �����
������, ��� ��� ��������. ������ �� ���� �������� ����� ��������� ���������
��� ������ � ����� �������� ��������. ��� � � ������������ �������������
���������� ����, �� ������ �������� ��� ����� �� ����, ��� ������
����������� ������ «/proc».
��������� �� ��������� ��� «bdflush» ��� Red Hat Linux:
«40 500 64 256 500 3000 500 1884 2»
����� �������� �������� bdflush ������� ��������� ������� �� �����
���������:
��� Red Hat Linux 6.1
[root@deep /]# echo «80 500 64 64 15 6000 6000 1884 2» >/proc/sys/vm/bdflush
�� ������ �������� ��������������� ������� � ������ «/etc/rc.d/rc.local»,
����� ��� ����������� ��� ������ �������� ���������� �������������.
��� Red Hat Linux 6.2
������������ ���� «/etc/sysctl.conf» � �������� ��������� ������:
# ��������� ������������������ �������� �������
vm.bdflush = 80 500 64 64 15 6000 6000 1884 2
�� ������ ������������� ������� ���������, ����� ��������� �������� �
����:
[root@deep /]# /etc/rc.d/init.d/network restart Setting network parameters [ OK ] Bringing up interface lo [ OK ] Bringing up interface eth0 [ OK ] Bringing up interface eth1 [ OK ]
��� ������ ������� «bdflush» �� ������������ � ������ ������� ������ �� ����
���� ��� ������� �������� ������� �� ����������� �� 80 ���������. ������
�������� ���������� ������������ ���������� ������� �������, �������
����� ���� �������� �� ���� �������� (500), ��� ����� ����������� ��������
������ ������������ (60*HZ) � �.�. ������ �������� ���� ���������� ��
������ ����� � ������������, ������������ ������ � ����� 2.2, � �����
«linux/Documentation/sysctl/vm.txt», � �����, �� ������ ��������� ����� 4,
«����� ��������� �����������» ���� �����.
��������� buffermem
������ �������� ��������� ������ �������� Linux ���������: ������������
������� 60 ��������� ������ ��� ����������� �������; ��������� ������
����� ������� ������������ ������ ��� ���� ������� ���������� 10 ���������
(���� �������� ������ �� ������������); � ��������� ����� �� 60 ��������� ����
������ (���� �������� ������ �� ������������).
�� ��������� �������� ������������� ��� «buffermem» � Red Hat Linux �����:
«2 10 60»
����� �������� �������� buffermem ������� ��������� ������� �� �����
���������:
��� Red Hat Linux 6.1
[root@deep /]# echo «60 10 60» >/proc/sys/vm/buffermem
�� ������ �������� ��������������� ������� � ������ «/etc/rc.d/rc.local»,
����� ��� ����������� ��� ������ �������� ���������� �������������.
������ �������� ���� ���������� �� ������ ����� � ������������,
������������ ������ � ����� 2.2, � ����� «linux/Documentation/sysctl/vm.txt», �
�����, �� ������ ��������� ����� 4, «����� ��������� �����������» ����
�����.
��� Red Hat Linux 6.2
������������ ���� «/etc/sysctl.conf» � �������� ��������� ������:
# ��������� ������������������ ����������� ������
vm.buffermem = 60 10 60
�� ������ ������������� ������� ���������, ����� ��������� �������� �
����:
[root@deep /]# /etc/rc.d/init.d/network restart Setting network parameters [ OK ] Bringing up interface lo [ OK ] Bringing up interface eth0 [ OK ] Bringing up interface eth1 [ OK ]
����������, ��� ��������� ��� ��������� (10 � 60) ������ �� ������������,
������� �� �� ����� �� ��������.
�������������� ������������
��� ��������� ������� ���������� �� ������ ��������� ���������
�������� �����������:
$ man Samba (7) — ���� ������ Windows SMB/CIFS ��� UNIX
$ man smb.conf (5) — ���������������� ���� ��� Samba
$ man smbclient (1) — ftp-�������� ������ ��� ������� � SMB/CIFS ��������
$ man smbd (8) — ������ ��������������� SMB/CIFS ������� ��������
$ man smbmnt (8) — mount smb file system
$ man smbmount (8) — ������������ �������� ������� smb
$ man smbpasswd (5) — ���� � ������������ �������� Samba
$ man smbpasswd (8) — ��������� SMB ������ ������������
$ man smbrun (1) — ������������ ��������� ����� smbd � �������� �����������
$ man smbsh (1) — ��������� ������ � �������� ������� Windows NT, ��������� UNIX �������
$ man smbstatus (1) — ����� � ������� ����������� Samba
$ man smbtar (1) — shell ������ ��� ���������� ����������� ���������� �������� SMB �������� �� ���������� �� ��������� ����� UNIX
$ man smbumount (8) — ��������������� ��� ���������� �������������
$ man testparm (1) — �������� ����������������� ����� smb.conf �� ���������� ������
$ man testprns (1) — �������� ����� �������� �� ������������ �������� smbd
���������������� ������� Samba
������� ��������� ����, �� ����� ����� ������������, �� �� ����� ���� ��
����� ������, � �� ������ ������� �������� ����������� (man) �
������������, ����� �������� ����� ��������� ����������.
smbstatus
������� smbstatus ��� ����� ������� ���������, ������������ �������
���������� Samba:
[root@deep /]# smbstatus
Samba version 2.0.7
Service uid gid pid machine
----------------------------------------------
tmp webmaster webmaster 3995 gate (192.168.1.3) Sat Sep 25 19:40:54 1999
No locked files
Share mode memory usage (bytes):
1048464(99%) free + 56(0%) used + 56(0%) overhead = 1048576(100%) total
������� ������������ Samba
������� ��������� ����, �� ����� ����� ������������, �� �� ����� ���� ��
����� ������, � �� ������ ������� �������� ����������� (man) �
������������, ����� �������� ����� ��������� ����������.
smbclient
������� «smbclient» �������� ������� ftp ����������, �� ��� Samba. ���
��������� ��������� ��������� ��� �������� ����� � ������� �� ���������
������, ������������� ����� � ��������� ������ �� ������, ����������
���������� � ��������� � ������� � ��.
��� ���������� � Windows ������� ��� ������ ������� smbclient,
����������� �������:
[root@deep /]# smbclient //sbmserver/sharename -U smbclient
[root@deep /]# smbclient //gate/tmp -U smbclient
Password:
Domain=[OPENNA] OS=[Windows NT 4.0] Server=[NT LAN Manager 4.0]
smb: > ls
. D 0 Tue Mar 14 15:31:50 2000
.. D 0 Tue Mar 14 15:31:50 2000
PostgreSQL D 0 Tue Mar 14 15:32:22 2000
Squid D 0 Tue Mar 14 15:32:28 2000
Imap D 0 Tue Mar 14 15:32:38 2000
E_comm D 0 Tue Mar 14 15:32:42 2000
StackGuard.pdf A 61440 Tue Dec 21 20:41:34 1999
installation-without-XFree86 A 448 Tue Dec 21 20:41:28 1999
lcap-0_0_3-2_src.rpm A 13481 Thu Jan 13 01:50:12 2000
mirc561t.exe A 948224 Tue Dec 21 20:41:54 1999
65510 blocks of size 32768. 5295 blocks available
smb: >
��� «//sbmserver» ��� ��� �������, � �������� �� ������ ������������.
«/sharename» — ������� �� ���� �������, � «smbclient» — ��� ��� ������������,
��� ������� �� ������������� � �������.
���������������� �����
> /etc/rc.d/init.d/smb > /etc/rc.d/rc0.d/K35smb > /etc/rc.d/rc1.d/K35smb > /etc/rc.d/rc2.d/K35smb > /etc/rc.d/rc3.d/S91smb > /etc/rc.d/rc4.d/S91smb > /etc/rc.d/rc5.d/S91smb > /etc/rc.d/rc6.d/K35smb > /etc/pam.d/samba > /etc/logrotate.d/samba > /etc/codepages > /etc/codepages/codepage.437 > /etc/codepages/unicode_map.437 > /etc/codepages/codepage.737 > /etc/codepages/unicode_map.737 > /etc/codepages/codepage.775 > /etc/codepages/codepage.850 > /etc/codepages/unicode_map.850 > /etc/codepages/codepage.852 > /etc/codepages/unicode_map.852 > /etc/codepages/codepage.861 > /etc/codepages/unicode_map.861 > /etc/codepages/codepage.932 > /etc/gshadow- > /usr/bin/smbclient > /usr/bin/smbspool > /usr/bin/testparm > /usr/bin/testprns > /usr/bin/smbstatus > /usr/bin/rpcclient > /usr/bin/smbpasswd > /usr/bin/make_smbcodepage > /usr/bin/make_unicodemap > /usr/bin/nmblookup > /usr/bin/make_printerdef > /usr/bin/smbtar > /usr/bin/addtosmbpass > /usr/bin/convert_smbpasswd > /usr/bin/mksmbpasswd.sh > /usr/man/man1/make_smbcodepage.1 > /usr/man/man1/make_unicodemap.1 > /usr/man/man1/nmblookup.1 > /usr/man/man1/smbclient.1 > /usr/man/man1/smbrun.1 > /usr/man/man1/smbsh.1 > /usr/man/man1/smbstatus.1 > /etc/codepages/unicode_map.932 > /etc/codepages/codepage.866 > /etc/codepages/unicode_map.866 > /etc/codepages/codepage.949 > /etc/codepages/unicode_map.949 > /etc/codepages/codepage.950 > /etc/codepages/unicode_map.950 > /etc/codepages/codepage.936 > /etc/codepages/unicode_map.936 > /etc/codepages/codepage.1251 > /etc/codepages/unicode_map.ISO8859-1 > /etc/codepages/unicode_map.ISO8859-2 > /etc/codepages/unicode_map.ISO8859-5 > /etc/codepages/unicode_map.ISO8859-7 > /etc/codepages/unicode_map.KOI8-R > /etc/lmhosts > /etc/smb.conf > /etc/smbpasswd > /usr/man/man1/smbtar.1 > /usr/man/man1/testparm.1 > /usr/man/man1/testprns.1 > /usr/man/man5/lmhosts.5 > /usr/man/man5/smb.conf.5 > /usr/man/man5/smbpasswd.5 > /usr/man/man7/samba.7 > /usr/man/man8/nmbd.8 > /usr/man/man8/smbd.8 > /usr/man/man8/smbmnt.8 > /usr/man/man8/smbmount.8 > /usr/man/man8/smbpasswd.8 > /usr/man/man8/smbspool.8 > /usr/man/man8/smbumount.8 > /usr/sbin/smbd > /usr/sbin/nmbd > /var/log/samba > /var/lock/samba
Оригинал:
Getting started with samba
Автор: Paul Cobbaut
Дата публикации: 24 мая 2015 г.
Перевод: A.Панин
Дата перевода: 14 июля 2015 г.
Глава 10. Начало работы с сервером Samba
10.1. Файл конфигурации /etc/samba/smb.conf
10.1.1. Команда smbd -b
Настройка сервера Samba осуществляется с помощью файла конфигурации smb.conf. Вы можете либо редактировать данный файл вручную, либо воспользоваться веб-интерфейсом, таким, как webmin или swat. Данный файл обычно расположен в директории /etc/samba. Вы можете определить точное расположение файла, воспользовавшись командой smbd -b.
[root@RHEL4b ~]# smbd -b | grep CONFIGFILE CONFIGFILE: /etc/samba/smb.conf
10.1.2. Стандартный файл конфигурации smb.conf
В дистрибутиве RHEL/Fedora/CentOS стандартный файл конфигурации smb.conf содержит примеры использования параметров конфигурации сервера с пояснениями.
[paul@RHEL4b ~]$ ls -l /etc/samba/smb.conf -rw-r--r-- 1 root root 10836 май 30 23:08 /etc/samba/smb.conf
Аналогично, в стандартном файле конфигурации smb.conf из соответствующего пакета программного обеспечения дистрибутивов Ubuntu и Debian можно обнаружить примеры использования параметров конфигурации сервера и пояснения относительно их назначения.
paul@laika:~$ ls -l /etc/samba/smb.conf -rw-r--r-- 1 root root 10515 2007-05-24 00:21 /etc/samba/smb.conf
10.1.3. Минималистичный вариант файла конфигурации smb.conf
Ниже приведен пример минималистичного варианта файла конфигурации smb.conf. Данный файл конфигурации позволяет запускать сервер Samba, причем компьютер, на котором запущен сервер, будет видим для других компьютеров в сети (в операционных системах от компании Microsoft список доступных компьютеров находится в меню «Сетевое окружение» и «Мое сетевое окружение»).
[paul@RHEL4b ~]$ cat /etc/samba/smb.conf [global] workgroup = WORKGROUP [firstshare] path = /srv/samba/public
10.1.4. Команда net view в ОС Windows
В примере ниже приведен вывод команды net view в ОС Microsoft Windows Server 2003 sp2. При рассмотрении данного вывода можно обнаружить, что серверы Samba, работающие под управлением дистрибутивов Red Hat Enterprise Linux 5.3 и Ubuntu 9.04, с минималистичными файлами конфигурации smb.conf видны компьютерам, работающим под управлением ОС от компании Microsoft, расположенным в той же сети.
C:Documents and SettingsAdministrator>net view Server Name Remark ---------------------------------------------------------------------- \LAIKA Samba 3.3.2 \RHEL53 Samba 3.0.33-3.7.el5 \W2003 The command completed successfully.
10.1.5. Длинные строки в файле конфигурации smb.conf
Некоторые параметры в файле конфигурации smb.conf могут принимать значения, представленные в формате длинных списков других значений. Для улучшения читаемости файла конфигурации вы можете продолжать запись длинной строки в следующей строке, завершая первую строку символом обратного слэша.
valid users = Serena, Venus, Lindsay
Kim, Justine, Sabine
Amelie, Marie, Suzanne
10.1.6. Любопытная интерпретация файла конфигурации smb.conf
Любопытно, но факт: интерпретатор файла конфигурации smb.conf корректно обрабатывает такие синонимы в названиях параметров конфигурации, как create mode и create mask, а также (иногда) такие незначительные орфографические ошибки, как browsable и browseable. В некоторых случаях вы даже можете менять местами слова в названиях параметров конфигурации, к примеру, параметр конфигурации guest only идентичен параметру конфигурации only guest. А параметр конфигурации writable = yes аналогичен параметру конфигурации readonly = no.
10.1.7. Страница руководства man smb.conf
Вы можете ознакомиться с документацией, относящейся к файлу конфигурации, воспользовавшись командой man smb.conf.
[root@RHEL4b samba]# apropos samba cupsaddsmb (8) - export printers to samba for windows clients lmhosts (5) - The Samba NetBIOS hosts file net (8) - Tool for administration of Samba and remote CIFS servers pdbedit (8) - manage the SAM database (Database of Samba Users) samba (7) - A Windows SMB/CIFS fileserver for UNIX smb.conf [smb] (5) - The configuration file for the Samba suite smbpasswd (5) - The Samba encrypted password file smbstatus (1) - report on current Samba connections swat (8) - Samba Web Administration Tool tdbbackup (8) - tool for backing up and ... of samba .tdb files [root@RHEL4b samba]#
10.2. Утилита /usr/bin/testparm
10.2.1. Проверка синтаксиса файла конфигурации smb.conf
Для проверки синтаксиса файла конфигурации smb.conf вы можете воспользоваться утилитой testparm.
[paul@RHEL4b ~]$ testparm Load smb config files from /etc/samba/smb.conf Processing section "[firstshare]" Loaded services file OK. Server role: ROLE_STANDALONE Press enter to see a dump of your service definitions
10.2.2. Команда testparm -v
Любопытным параметром утилиты testparm является параметр -v, который позволяет вывести список всех глобальных параметров с их стандартными значениями.
[root@RHEL52 ~]# testparm -v | head
Load smb config files from /etc/samba/smb.conf
Processing section "[pub0]"
Processing section "[global$]"
Loaded services file OK.
Server role: ROLE_STANDALONE
Press enter to see a dump of your service definitions
[global]
dos charset = CP850
unix charset = UTF-8
display charset = LOCALE
workgroup = WORKGROUP
realm =
netbios name = TEACHER0
netbios aliases =
netbios scope =
server string = Samba 3.0.28-1.el5_2.1
...
В Samba 3.0.x в файле smb.conf могли использоваться около 350 параметров, имеющих соответствующие стандартные значения. Количество параметров возросло практически до 400 в Samba 3.5.x.
10.2.3. Команда testparm -s
Демоны Samba постоянно (раз в 60 секунд) проверяют содержимое файла конфигурации smb.conf, поэтому сокращение объема данного файла является разумной практикой. Но такой же разумной практикой является документирование вашего файла конфигурации, а также явное указание параметров конфигурации, которые имеют стандартные значения. Параметр -s утилиты testparm позволяет выполнить оба описанных выше действия. При использовании данного параметра будет сгенерирован файл конфигурации сервера Samba минимально возможного объема, в котором будут сохранены все установленные вами значения параметров конфигурации. Идея использования упомянутого параметра заключается в хранении параметров конфигурации вашего сервера Samba в отдельном файле (с таким именем, как smb.conf.full) и задействовании утилиты testparm для его разбора. В примере ниже показана последовательность выполнения описанных действий. В первую очередь в файле конфигурации с именем smb.conf.full осуществляется явная установка значения WORKGROUP параметра конфигурации workgroup.
[root@RHEL4b samba]# cat smb.conf.full [global] workgroup = WORKGROUP # Это пример документирования файла конфигурации smb.conf # Две этих строки будут удалены после использования команды testparm -s server string = Public Test Server [firstshare] path = /srv/samba/public
Далее мы используем утилиту testparm с параметром -s и перенаправим поток стандартного вывода данной утилиты в реальный файл конфигурации с именем smb.conf.
[root@RHEL4b samba]# testparm -s smb.conf.full > smb.conf Load smb config files from smb.conf.full Processing section "[firstshare]" Loaded services file OK.
А ниже представлен конечный результат. В данном файле конфигурации уже нет двух строк комментариев и директивы для установки стандартного значения параметра конфигурации.
[root@RHEL4b samba]# cat smb.conf # Global parameters [global] server string = Public Test Server [firstshare] path = /srv/samba/public [root@RHEL4b samba]#
10.3. Утилита /usr/bin/smbclient
10.3.1. Использование утилиты smbclient для исследования сервера Samba
С помощью утилиты smbclient вы можете получить информацию об используемых и разделяемых с помощью вашего сервера Samba ресурсах. Она выведет информацию обо всех ваших разделяемых ресурсах, вашей рабочей группе, а также имени системы, принимающей анонсы от компьютеров и доменов (Master Browser). Параметр -N был добавлен для того, чтобы пользователю не требовалось вводить пустой пароль. После параметра -L должно следовать имя узла для получения информации.
[root@RHEL4b init.d]# smbclient -NL rhel4b Anonymous login successful Domain=[WORKGROUP] OS=[Unix] Server=[Samba 3.0.10-1.4E.9] Sharename Type Comment --------- ---- ------- firstshare Disk IPC$ IPC IPC Service (Public Test Server) ADMIN$ IPC IPC Service (Public Test Server) Anonymous login successful Domain=[WORKGROUP] OS=[Unix] Server=[Samba 3.0.10-1.4E.9] Server Comment --------- ------- RHEL4B Public Test Server WINXP Workgroup Master --------- ------- WORKGROUP WINXP
10.3.2. Анонимное использование утилиты smbclient
В примере ниже утилита smbclient используется для вывода информации об удаленном сервере Samba (в данном случае компьютер работает под управлением дистрибутива Ubuntu 11.10).
root@ubu1110:/etc/samba# testparm smbclient -NL 127.0.0.1
Anonymous login successful
Domain=[LINUXTR] OS=[Unix] Server=[Samba 3.5.11]
Sharename Type Comment
--------- ---- -------
share1 Disk
IPC$ IPC IPC Service (Samba 3.5.11)
Anonymous login successful
Domain=[LINUXTR] OS=[Unix] Server=[Samba 3.5.11]
Server Comment
--------- -------
Workgroup Master
--------- -------
LINUXTR DEBIAN6
WORKGROUP UBU1110
10.3.3. Утилита smbclient и данные для входа в систему
В версиях ОС Windows, более новых, чем XP SP2 и 2003 SP1 не поддерживается возможность гостевого доступа к системе (при попытке осуществления гостевого доступа к системе возвращается ошибка NT_STATUS_ACCESS_DENIED). В данном примере показана методика передачи данных для входа в систему с помощью утилиты smbclient.
[paul@RHEL53 ~]$ smbclient -L w2003 -U administrator%stargate
Domain=[W2003] OS=[Windows Server 2003 3790 Service Pack 2] Server=...
Sharename Type Comment
--------- ---- -------
C$ Disk Default share
IPC$ IPC Remote IPC
ADMIN$ Disk Remote Admin
...
Если вам понравилась статья, поделитесь ею с друзьями:
Проверка конфигурационного файла
Конфигурационный файл Samba можно проверить с помощью утилиты testparm. Данная утилита обнаруживает неверные параметры, значения, а также неправильные настройки. Если testparm сообщает, что проблем нет, службы Samba успешно загрузят файл конфигурации. Обратите внимание, что данной утилитой невозможно проверить доступность или работу настроенных служб.
Внимание: Рекомендуется проверять файл /etc/samba/smb.conf с помощью testparm после каждой правки файла.
Выполнение проверки
Запустите утилиту testparm как root-пользователь:
# testparm
Если утилита выдаст сообщение наподобие:
# testparm
Load smb config files from /etc/samba/smb.conf
rlimit_max: increasing rlimit_max (1024) to minimum Windows limit (16384)
Unknown parameter encountered: "log levell"
Processing section "[example_share]"
Loaded services file OK.
ERROR: The idmap range for the domain * (tdb) overlaps with the range of DOMAIN (ad)!

Server role: ROLE_DOMAIN_MEMBER

Press enter to see a dump of your service definitions

# Global parameters
[global]
	...

[example_share]
	...
Значит, конфигурационный файл содержит ошибки. В данном примере сообщается о несуществующем параметре и неправильной конфигурации сопоставления идентификаторов.
Если testparm выдает неверные параметры, значения или другие ошибки в конфигурации, устраните проблему и снова запустите утилиту.
Если ошибок нет, вы получите такое сообщение:
# testparm
Load smb config files from /etc/samba/smb.conf
Loaded services file OK.
Server role: ROLE_DOMAIN_MEMBER

Press enter to see a dump of your service definitions
| Samba
|
|
|---|---|
| Файловое хранилище | Samba как файловый сервер • Подключение общей папки • Samba как файловый сервер в домене |
| Служба каталогов | |
| Сервер | Samba как служба каталогов (AD) • Изменение IP-адреса AD • Репликация сервера AD • Резервное копирование и восстановление • Управление пользователями • Групповые политики • Групповая политика паролей |
| Клиент | Подключение клиента AD • Устранение неполадок участников домена Samba |
| Бэкэнды идентификаторов winbind | idmap config tdb • idmap config ad • idmap config rid • idmap config autorid |
| Прочее | Samba как сервер печати • Проверка конфигурационного файла • Утилиты командной строки • LMHOSTS • Уровень логов • Каталоги Samba • Настройка DNS |
| Разное | Настройка Samba для привязки к определенным интерфейсам • Тестирование динамических обновлений DNS • Samba Перенастройка бэкенда BIND9 DLZ • Конфигурация DNS для Linux и Unix |
| Информация | SSSD vs Winbind • Установка Samba |